Forum sponsored by:

What did you do Today 2018
| martin perman | 15/03/2018 20:58:06 |
 2095 forum posts 75 photos | I used to own a 1969 Bedford CA Dormobile Camper, I took my wife to Tesco's in it and reversed into a space, my wife went off to shop and I sat waiting, after a few minutes a volvo estate backed into the space behind me and a lady go out and went shopping and after half an hour she came back with a trolley and started crashing it into mine screaming why did I have to park my heap so close to her car as she couldn't get her rear door open, I politely told her I was there before her and got back in my Bedford whilst she cursed and moved hers |
| JimmieS | 15/03/2018 20:58:19 |
| 310 forum posts 1 photos | Forget about car park problems, After 35 years of neighbourhood bliss a selfish ba****d moved in 8 months ago, who insists on leaving his car directly opposite our driveway despite being asked politely to park slightly up or down from his usual position which he could do without any problem. Every house has a driveway and he is the only one not using it. With it being a cul-de-sac, the road is quite narrow, which means that I often have to drive past, do a 3-point turn, drive back past his vehicle before reversing in. I thought he only picked on us but recently, when his wife was on the footpath using her mobile, he came out and tried to snatch it. I must admit I was waiting to dial 999 should he lay a hand on her if only for the joy of seeing him being ‘scooped’.
Jim |
| colin brannigan | 15/03/2018 22:26:19 |
| 125 forum posts 29 photos | Posted by Rik Shaw on 15/03/2018 00:14:34:
"I have done enough. Colin" Me to Colin - enjoy your retirement. Rik Many thanks Rik |
| Tractor man | 16/03/2018 06:25:41 |
| 426 forum posts 1 photos | Jimmie, didn't you know that the crowd belongs to everyone! But to some people more than others...I have had the same experience as you with neighbours and visitors to them showing such a lack of any awareness or consideration. All part of the motor vehicle culture that sees people get in their tin box and become the mr Hyde inside us all. I'm tired of cars parked on double yellow, kids on motor bikes without helmets riding on footpaths,crazy overtakes etc etc. And all because the police have no time and resources to stop and deal with the motoring public any more. |
| Tractor man | 16/03/2018 06:26:09 |
| 426 forum posts 1 photos | Road sorry |
| OuBallie | 16/03/2018 11:14:18 |
 1181 forum posts 669 photos | Propped neighbours fence away from the shed as it's ripped the gutter off They are waiting for someone to fix the lot as they have been nearly blown flat already. Will see if my Heath Robinson survives the winds next week. Geoff - If not then neighbourly 'words' will be spoken. |
| Rik Shaw | 16/03/2018 11:56:07 |
 1494 forum posts 403 photos | Popped into Sally Ann shop and picked up a years worth of ME - 1945 - in leather (?) binder. Rik |
| HOWARDT | 16/03/2018 14:39:51 |
| 1081 forum posts 39 photos | Just yesterday I was reading the Highway Code on line, it makes interesting reading. I looked at vehicle maximum speeds, road markings, pavement use and roadside parking. Judging by what I see around my way the police could be in for a nice little windfall if they were to take appropriate action on offenders, but then I suppose they would have to employ more to sit on their backsides. |
| Mick B1 | 16/03/2018 14:51:35 |
| 2444 forum posts 139 photos | Posted by Mick B1 on 05/02/2018 13:24:35:
Finished the piston rod oilers for a tank engine on a steam railway (the bit with a just-visible ring in the top pic):
Simple parts, but not so easy. The main thread is a total batsrad - M22,46 (prob 22,5) x 2,5 as near as I can measure. It would've been nice to've had one o' them 3-wire spiral gauges to measure the originals and work to that, but nothing like that was to hand, so I just started from the OD and cut the thread to just under the 1,53 nominal depth for 2,5 pitch. The only gauge I had was the loco sitting in the shed, and my lathe is in my garage. So I've ended up with a bit more of a rattling good fit than I'd like, possibly due to the crest flat I had to put on my screwcutting tool to stop the tip breaking off. I'm hoping that good old PTFE tape will resolve any problems. I'm sure they'll let me know... Edited By Mick B1 on 05/02/2018 13:29:12 Ah, well - they did let me know - on Tuesday, with the Polish tank engine due back in service tomorrow! The front 2 oiler connections really are too lose, with the stuff hissing back up through the threads. So I needed to make 2 more a bit quick. Out came the Warco manual again to look up the change gears for 10 TPI (same config as 2,5mm pitch) along with the big screwdriver and nylon hammer to dismantle the severe slide fit of the gears, bushes and spacers. Maybe if I do this often enough there'll be a distant future day when I can do it by hand alone. Any road up, the only way I could think to make 'em a better fit was to cut the thread shallower. So I took the 2 badduns and measured with the tips of a caliper the diameter where they rested on the thread flanks. OK, so it's a non-preferred measurement method, but what other options I got when I've no way to even know what the thread's supposed to be? "Effective diameter"? You can whistle for that. The female thread it screws into is a bit tapered, but you can tell the taper's too gradual to be due to anything but 67 years of wear. So on the first of the new ones I cut the thread to measure 15 thou up on the bad ones. Brought it back to the engine shed and tried it - it started in but wouldn't go all the way without seriously unreasonable effort on the end of a long monkey wrench, so I whipped it back out, took about 3 thou more and cut the second one to the same dimension - if it deserves that name. Took both back in this morning, and it seems to me they both fitted as well as practically possible - first few turns easily by hand, then needing a spanner, but coming to a sharp and clear stop at the underside of the hex. So I connected the lube pipes. Hopefully they'll work OK now; I guess I'll be back here again if they don't...
|
| Sam Longley 1 | 16/03/2018 16:04:49 |
| 965 forum posts 34 photos | Posted by Mick B1 on 16/03/2018 14:51:35:
Out came the Warco manual again to look up the change gears for 10 TPI (same config as 2,5mm pitch) along with the big screwdriver and nylon hammer to dismantle the severe slide fit of the gears, bushes and spacers. Maybe if I do this often enough there'll be a distant future day when I can do it by hand alone. ..I had the same problem with my change wheels which would never fit & ran a 14mm reamer through them but they were still too tight. So solution was to rub a piece of silver steel up the cutters of the reamer which gave a thou or two more & now they slide on & off OK. How they can justify supplying like that really beggars belief. |
| Mick B1 | 16/03/2018 17:56:40 |
| 2444 forum posts 139 photos | Not really Engineering, but: Granddaughter (5) drew the Easter Bunny yesterday on orange paper. Carol scanned it and reduced it to fit the width of 12mm wood I've got, then printed it. I drew around it over the wood and inked the scored line so I could cut to it. Used the Lidl Parkside jigsaw to cut out the shape, sanded it and filled in the details with a pyrograph thing. Took maybe an hour. See what she thinks of it on the weekend...
|
| Richard S2 | 16/03/2018 18:40:01 |
 237 forum posts 135 photos | Assorted jobs done on the refurbishment of this Vintage English Manual Bench Drill-
fully stripped down to component parts. Pressed out the worn/damaged Main Drive Shaft from the 'Pin Locked' Bevel Gear-
Prepping for making new shaft. Pressed out Main Column from Base Plate and located some replacement 5/32" Ball Bearings from replaced 'End of Life' Civil Aircraft Bearing stock I have from back in the 70s-
Also replaced the 1/2" x 20 UNF Chuck mount on the end of the Main Spindle. Enjoying this little refurb.
|
| Michael Gilligan | 16/03/2018 18:40:11 |
 23121 forum posts 1360 photos | Today, I purchased what appears to be a 'new and unused' gyroscope Manufactured in 1951, by the Mineapolis-Honeywell Regulator Co. AUTO PILOT COMPONENT CONTROL-FLIGHT, RATE GYRO TYPE Y-2 It's a discreet little box, finished in crackle black paint. ... Grateful for any information anyone may have about this system MichaelG. . Minneapolis-Honeywell Regulator Co. leveraged its scientific and engineering talent to adapt to changing times. We radically improved mass production and added an array of aeronautical equipment to our portfolio. In 1942, we invented the electronic autopilot, which proved vital to the U.S. war effort. https://www.honeywell.com/who-we-are/our-history Edited By Michael Gilligan on 16/03/2018 18:42:36 |
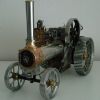
| Andrew Johnston | 16/03/2018 21:03:19 |
 7061 forum posts 719 photos | I've been experimenting with closing 3/16" steel rivets prior to riveting the spokes on my traction engine wheels. I am using a home made guide and snaps. I first tried closing by hand, with mixed results. This evening I unexpectedly had some time spare so I tried closing some rivets using my flypress. That was after I'd notched the shelving upright behind the flypress so I could swing the handle. Here are the results:
The bottom plate is 6mm, the upper is ¼". On the front row the rivet on the right was closed by hand. Success on the first trial! However the next two closed by hand (on the left) were a complete fudge up. In addition the snaps left marks on the plates. The middle, and one to the right, rivets in the front were closed with the flypress. Not perfect but not bad at all, at least to my eye. And no marks on the plate. On the slightly fuzzy back row the middle rivet was done with the flypress, the others were by hand. So three out of three for the flypress versus one out of seven by hand, ie, hitting it was a hammer. At the very least I think the flypress techique will be fine for the front wheels where the formed head will be on the inside. An afterthought - for the rivets closed by the flypress the top snap didn't quite reach the top plate. The rivet is slightly (4 thou) under the theoretical length, but I wonder if I made it shorter by another few thou the head would be better formed? I'll try and give that a go ASAP. It shouldn't take long so I should be able to fit it in over the next week or two. Andrew |
| Sam Stones | 16/03/2018 22:47:16 |
 922 forum posts 332 photos | While this may not be exactly the truth, it forms an amusing story. It appeared in a QLD (Queensland for us Pomms) newspaper some 40+ years ago. `A couple who had been married for about 12 months, drove into the local supermarket car park and found a convenient space to park. Clad in the usual summer attire of thongs, shorts and tea-shirt, they climbed from the vehicle. Instructing his young wife to carry on and do the shopping while he attempted to fix a car problem, she duly disappeared into the shopping complex. Returning some time later, she became aware of a semi-circle of titillated onlookers surrounding her car. As she approached, she noticed that protruding from beneath the car were a pair of male legs clad in shorts. Not to put too fine a point, `things’ were hanging out. Unable to contain her embarrassment, she stepped forward and dutifully scooped everything back into the shorts. It was only when she stood back and looked across the bonnet of the car, that she saw her husband standing idly by. The mechanic had to have three stitches in his forehead.’ |
| JasonB | 17/03/2018 07:30:17 |
 25215 forum posts 3105 photos 1 articles | Andrew, I think the flypress does tend to help stop the rivit going off to one side better than a hand held snap so you do get a more consistent result and there is no chance of the snap tilting and marking the surface. Are you using a single snap to close the rivit or a conical one before the rounded one? You can grind the end of the hand snaps back at a shallow angle and round the edge to help stop them marking the surface. Good thing with the press is the neighbors won't need ear defenders. I do tend to find that the theoretical length is a good starting point but you need to adjust to suit your own snaps and it will also depend on what size the holes have ended up at and how heavily they have been deburred as the rivit will expand into these spaces which leaves less metal to form the head. By the time you have a few coats of paint on them I doubt a thou will be noticable.
|
| Andrew Johnston | 17/03/2018 08:12:39 |
7061 forum posts 719 photos | Jason: Thanks for the notes. Both hand and flypress use the same jig that keeps the snaps aligned, alhough of course there's nothing to stop the work being off. I ground the ends of the snaps some while back, which significantly lessened the marking with the hand method but didn't completely eliminate it. I'm using a single hemispherical snap. I have read the book by Edward George. But I simply don't see how a conical snap would form a nice cone, whereas a concave one wouldn't form a hemisphere? The flypress forms the rivet head quite easily up to a point. Then no matter how hard I swing the handle no more forming takes place. I take that to indicate that the head is fully formed as far as the snap is concerned so there is nowhere left for the metal to flow. So if I take a tad off the end of the rivet the same thing will happen, but slightly lower. The holes are close to size, the rivets need a slight tap to fit, and are lightly deburred. I think my issue is too much metal, not too little. The lack of noise from the flypress is major plus for me. Although the houses are fairly well spaced on my road the area is very quiet. My neighbours are pretty tolerant, but there are limits! I thought my work bench was pretty solid, but really swinging the flypress has shattered that illusion. The rivets need to be perfect; you know what some people at SCMTEG are like; they don't feel satisfied unless they can point out the errors in ones work. Andrew
|
| Ian S C | 17/03/2018 10:29:58 |
 7468 forum posts 230 photos | Yes Andrew, after they have had their say I just ask them about there own work of that nature, with me it's usually something about Stirling Engines, more often than not they walk off. Ian S C |
| Andrew Johnston | 17/03/2018 15:36:35 |
7061 forum posts 719 photos | Flying has been cancelled this afternoon on the wishy-washy grounds that there are snow showers, and the rather more serious issue of the airfield being waterlogged. So I've grabbed a couple of hours to do some more riveting trials (in one sense, if not both). As an aside here is the jig I am using:
And the results of the riveting:
The results are not bad, but not perfect. There are a couple of outliers that aren't really acceptable. I experimented by shorting some rivets, ranging from a couple of strokes of the file to about 20 thou. It didn't seem to make that much difference. I suspect more experimentation is required. Andrew |
| Spurry | 17/03/2018 18:03:19 |
| 227 forum posts 72 photos | I'm enjoying this riveting experience. Pete |


This thread is closed.
Magazine Locator
Want the latest issue of Model Engineer or Model Engineers' Workshop? Use our magazine locator links to find your nearest stockist!
Sign up to our Newsletter
Sign up to our newsletter and get a free digital issue.
You can unsubscribe at anytime. View our privacy policy at www.mortons.co.uk/privacy
Latest Forum Posts
- hemingway ball turner
04/07/2025 14:40:26 - *Oct 2023: FORUM MIGRATION TIMELINE*
05/10/2023 07:57:11 - Making ER11 collet chuck
05/10/2023 07:56:24 - What did you do today? 2023
05/10/2023 07:25:01 - Orrery
05/10/2023 06:00:41 - Wera hand-tools
05/10/2023 05:47:07 - New member
05/10/2023 04:40:11 - Problems with external pot on at1 vfd
05/10/2023 00:06:32 - Drain plug
04/10/2023 23:36:17 - digi phase converter for 10 machines.....
04/10/2023 23:13:48 - More Latest Posts...
- View All Topics
Support Our Partners


Shopping Partners
Subscription Offer

Latest "For Sale" Ads
- Reeves** - Rebuilt Royal Scot by Martin Evans
by John Broughton
£300.00 - BRITANNIA 5" GAUGE James Perrier
by Jon Seabright 1
£2,500.00 - Drill Grinder - for restoration
by Nigel Graham 2
£0.00 - WARCO WM18 MILLING MACHINE
by Alex Chudley
£1,200.00 - MYFORD SUPER 7 LATHE
by Alex Chudley
£2,000.00 - More "For Sale" Ads...
Latest "Wanted" Ads
- D1-3 backplate
by Michael Horley
Price Not Specified - fixed steady for a Colchester bantam mark1 800
by George Jervis
Price Not Specified - lbsc pansy
by JACK SIDEBOTHAM
Price Not Specified - Pratt Burnerd multifit chuck key.
by Tim Riome
Price Not Specified - BANDSAW BLADE WELDER
by HUGH
Price Not Specified - More "Wanted" Ads...
Get In Touch!
Do you want to contact the Model Engineer and Model Engineers' Workshop team?
You can contact us by phone, mail or email about the magazines including becoming a contributor, submitting reader's letters or making queries about articles. You can also get in touch about this website, advertising or other general issues.
Click THIS LINK for full contact details.
For subscription issues please see THIS LINK.
Digital Back Issues


Donate

 Register
 Log-in
Model Engineer Magazine
- Percival Marshall
- M.E. History
- LittleLEC
- M.E. Clock

ME Workshop
- An Adcock
- & Shipley
- Horizontal
- Mill

Subscribe Now
- Great savings
- Delivered to your door

Pre-order your copy!
- Delivered to your doorstep!
- Free UK delivery!
All Forum Topics > The Tea Room > What did you do Today 2018