Forum sponsored by:

Tool tips
Various tips to make life easier in the workshop
| David Clark 1 | 19/10/2010 14:08:56 |
 3357 forum posts 112 photos 10 articles | Hi There
Can we calm down?
We can all use whatever method we like to set height.
Does not matter.
Razor blades at dawn are not required.
regards David |
| KWIL | 19/10/2010 14:21:09 |
| 3681 forum posts 70 photos | Please do not use Bold type to shout at us. |
| Bogstandard | 19/10/2010 14:46:55 |
| 263 forum posts | I am sorry David, but this person definitely requires a poke in the eye. HJ, As with all my posts, you will find I word them as they should be taken, this is how I do it, and it is up to the person that reads it whether they follow my advice or not. Unlike yourself, who seems to have formed an opinion of yourself where that everything you do is gospel and people have to follow your teachings. If you care to READ and inwardly digest my Madmodder post, rather than just skimming thru it, you will notice that the ruler method was classed as a rough and ready way of doing things, and by using other methods, much better accuracy could be achieved, and the reasons for showing what I was doing was completely explained, so even the layman could understand the methods I had chosen. If you notice, I made no mention about the tailstock, because that is one part of a lathe that cannot be relied upon, except for rough and ready settings. I would suggest you should bow your head in shame and apologise to all the people you have upset by your holier than thou and cavalier attitude. We are all here to learn or maybe do a bit of teaching, NOT to impose our will onto others. Bogs |
| Dusty | 19/10/2010 16:48:52 |
| 498 forum posts 9 photos | Gentlemen
What we are talking about is finish,nothing more nothing less. If your tool is a couple of thou over or under centre height it matters not one jot as long as you are achieving an acceptable finish. Yes, generally a tool on centre height will perform best, but how the tool is ground also has an effect on the finish you achieve. |
| chris stephens | 19/10/2010 19:15:17 |
| 1049 forum posts 1 photos | Mr. Williams, If you are so concerned about absolute accuracy of centre height or any other lathe settings, one must assume that you are working on such things as watch staffs (spindles to the rest of us). +- If you are in the real world of Model Engineering and working on such enormous diameters as 1/2" or more then micron or even nearest thou accuracy of tool height is relatively unimportant. I defy any one to tell the difference between a 25mmDia shaft turned with a tool even 5 thou too high or too low. Facing is a different matter, but, if there is a centre drilling, even here you would be hard pressed to tell the difference. As intimated in the first paragraph diameter makes a big difference in importance of tool height. On 2mm dia stock, a tool height 1 thou above the centre would equate to 20 thou above on a 40mm dia. Now that would cause problems! The tool in both situations is approx. 1.5 degrees above centre of rotation and that is what really counts and why diameter can make a difference. Lets keep things real shall we, the ruler between tool and work piece has stood the test of time in industry since time immemorial, granted they tend to work on larger stuff than us, but except for the very utmost of accuracy requirements, it works. When
I am feeling "Anal" I use a comparator which I have set to zero on
exactly centre height, so I can set my chriStephens PS if there were to be a contest I know who I would back, the one with the proven track record. I might not agree with him on all things all of the time, but I respect his abilities both with metal munching and great teaching skills. As opposed to, who did you say you were?
This does not mean that I would not support the under-dog over the "expert" (sorry for us of the word, Bogs), if he were correct, but.......
PPS Edited to remove unwanted emoticons
Edited By chris stephens on 19/10/2010 19:18:05 |
| Steve Garnett | 19/10/2010 21:59:20 |
| 837 forum posts 27 photos | Posted by Howard Jones on 19/10/2010 12:38:39: Bogs your ruler method will come unstuck on the first piece of irregular shaped bar that you try it on. on the stuff I seem to turn it would never work until a truing cut was made. I frequently use Bogs' ruler method, only I don't use a ruler - I keep a thin bit of smooth steel for the purpose. It's also worth noting (as one of the people commenting on his thread did) that you get a more accurate indication if you use a thin bit of rod. It is not unknown for me to put a piece of 1/4" stainless ground rod in a collet, and use that for the purpose. Oh, and keep it pretty close to the chuck, too. And when you've set your tool up, you replace the rod with what you're going to turn. Edited By Steve Garnett on 19/10/2010 22:06:40 |
| Bogstandard | 19/10/2010 22:25:43 |
| 263 forum posts | BTW, the ruler method has nothing to do with me, that came from the depths of time, I just tried to put the method into text and piccies. What method I was trying to get across was the scribed line. Mainly due to the fact of new tooling coming onto the market and becoming very popular, indexable tips. As things progress, I assume that tips will start to be used at all sorts of different angles, like on my boring bars, and as such, some of the older methods won't be able to be used with any sort of accuracy. Even my scribed line method has some pitfalls, but at least, for the time being, it seems to give me the accuracy I want. Bogs |
| Steve Garnett | 19/10/2010 22:39:39 |
| 837 forum posts 27 photos | Posted by Bogstandard on 19/10/2010 22:25:43: Even my scribed line method has some pitfalls, but at least, for the time being, it seems to give me the accuracy I want. Oh, I'm sure it's more accurate. Whilst waiting for my coffee to cool down I calculated approximately how accurate the ruler method is (this isn't absolutely precise, but that doesn't matter, as you'll see) If you assume that the tool tip will press the rule/whatever onto the surface of the bar leaving it tangential (or at least a good approximation to this), then the angle it makes to the vertical will translate reasonably accurately to the angular displacement from the horizontal. If you multiply the sine of this angle by the radius of the rod, you'll end up with the vertical error (ish). So for instance with my 1/4" rod, 5 degrees of error means that the tool is a massive 10 thou out! If you increase the rod diameter, the error increases proportionally. So with a 1" dia. rod, the same angle of displacement represents about 43 thou of error. If you use my 1/4" rod and stick a square against it, you can easily get to within a degree of vertical - but that's still a 2 thou error. The scribed line split ought to be way better than that... Edited By Steve Garnett on 19/10/2010 22:46:53 |
| Steve Garnett | 19/10/2010 23:26:15 |
| 837 forum posts 27 photos | Okay, at present this is just a thought experiment: On the same tack, I considered KWIL's razor blade between the centres for tailstock alignment. I realised after a few moments' thought that in fact the accuracy of this depends entirely on the radius at the ends of the centres - because if they truly come to as near a point as you can get, then even a few microns of error will make the blade twist, as will not parallel opposite faces to it. But if you can make an estimate of the centre end radius and it's small enough, then it's the same sum as above. The only difference will be that even the smallest degree of error will inevitably twist the blade off completely - so how do you really tell by this method? I would have thought that just bringing the points together and inspecting the error with a magnifying glass would give less equivocal results. What would appear to be the best method would be to use an accurately parallel-turned rod mounted between the centres, and clock any error along the rod from the bed of the lathe (having made absolutely sure that your lathe bed isn't twisted first). So how does it really work? Edited By Steve Garnett on 19/10/2010 23:36:26 |
| Sam Stones | 19/10/2010 23:37:21 |
 922 forum posts 332 photos |
Gentlemen, My six penn’orth would include - "What happens AFTER setting the cutter height?" In particular, how do the resultant cutting forces `take-up’ slide and bearing clearances, and in what way do they `bend’ the machine and work-piece. Stuff like the deflection relationship to `length of overhang’ of the workpiece, ie. length raised to the power three. Workpiece diameter raised to the power four. My clock pivots fit into this category. I could be a little smug about the fact that when I had the ML7, I made my four-way tool post to exactly receive 5/16" square HSS tool bits, and only occasionally bothered to introduce a top rake, except for a slight rub with an Arkansas(?) or carborundum stone.
OK! So tool bits are not that accurate, but they were for my purposes. A bit of a rub with a stone, or a couple of layers of cigarette paper would bring the tip down or lift it up, whichever was necessary.
Mind you, so many of the turning jobs I did were of a very light but precise construction and need very little in the way of cutting and machine `grunt’. As a slight digression. One `trick’ I used was to rub a tiny flat on the end of the cutter. It was in the form of the `diamond turning method’ such that the flat was `absolutely’ parallel with the travel of the lathe bed, and just a whisker wider than the feed pitch. The finish I got was superior to that of a dead sharp or rounded tool tip. Sam Edited By Sam Stones on 19/10/2010 23:39:13 Edited By Sam Stones on 19/10/2010 23:41:27 |
| blowlamp | 19/10/2010 23:51:21 |
 1885 forum posts 111 photos | And to cap it all, Boxford say that for plain external turning, the correct tool height is 5 degrees above centre height. Presumably to ensure a positive thrust against the cross slide feedscrew and thus prevent any tendency for the tool to be drawn into the workpiece.
Martin |
| Bogstandard | 20/10/2010 05:30:17 |
| 263 forum posts | I can't see where the 5º from centre height can be used. If it was a measurement, then yes, but an angle, where from and how? At one time, it was always recommended that you set your tooling slightly high, but to me that comes from our distant past, where machines and tooling were always more flexible, with carbon tooling and old fashioned lubricants. You set it high, and by the time the tooling was cutting, the flex allowed the tool to end up at the exact, or very close to the exact centre height. The general consensus nowadays, with the use of more rigid tooling (HSS & above) plus the fact that high pressure lubricants now have a constant film thickness whilst working (you do use the correct oils don't you), is to set your tooling perfectly on centre height for the larger more rigid machine, and a couple of thou higher for the more flexible benchtop machines. But even with that said, it still boils down to learning your machine and what the requirements are for getting it to cut correctly. I know mine cuts perfectly and to size when I set to exact height, yours might need to have it set slightly different. Also bear in mind, replaceable tipped tooling will have more downwards force than a sharp HSS tool. That is because the majority of carbide inserts are actually blunt to begin with, and removes metal in a different way than HSS tooling does. Given the choice, for precision work, I will use HSS before anything else. Tipped tooling comes into it's own when you start to go into production, where heavy metal removal and harder, more difficult to machine materials are called for. Experience plays a major role when machining all the different materials we use, and most of that comes from trial and error settings to your machine. Bogs. |
| John Olsen | 20/10/2010 06:36:52 |
| 1294 forum posts 108 photos 1 articles | I would presume that the 5 degrees thing would maen that the angle between a line from the tool point to the centre would be at 5 degrees above the horizontal, an awkward thing to measure other than by the razor blade/ruler method. I can't see it working on a facing cut, since the angle would then increase countinuously until you reach the centre. Anyway, the main effect of setting the tool slightly overheight like that would be to increase the top rake by 5 degrees and reduce the front clearance by the same amount.Since the front clearance is often only about 5 to 10 degrees, this does not seem like a great plan to me There was some correspondence once in ME about supposedly reducing the tendency of boring tools to dig in by setting them a little above centre height. The theory was that with the tool exactly on height, any downward cutting foce would be taking it deeper into the material. So, the theory went, if it was a bit higher, any deflection would mean it was reducing the cut. That turns out not to be the case. The tool itself knows nohing about the centre height, it is "seeing" a piece of metal go past at an angle relative to its geometry (top rake and front clearance) The direction of the forces on it will depend on the said geometry and the nature of the material, and may be such as to drag the tool into the material or to push it out. Positive top rake will tend to increase the tendency to increase the cut, while negative rake will tend to push the tool back out of the cut, but as those who have turned bronze will know, this is very material dependent. So my thinking would be to set the tool as exactly on centre height as is reasonable to acheive, and to adjust the top rake and clearance as needed for the particular material. regards John |
| Steve Garnett | 20/10/2010 09:12:27 |
| 837 forum posts 27 photos | Back to my thought experiment for a moment: After further consideration, I realised that two offset points converging on a razor blade will certainly push it sideways - but how much will depend entirely on the thickness of the blade. When it is pushed from both sides by points, ultimately it will jam when the distance between the points is equal to the blade thickness. And in principle you can work out the amount of offset from the angle of twist relative to perpendicular (in whatever direction the error is in). The sine of the angle made times the thickness of the blade will give us the offset. If we assume (not unreasonably) that the razor blade is 0.005" thick, then in principle a 5 degree offset gives us 0.0871 x 0.005 = 0.000435". That's 0.435 thou. But in reality I expect that there will be problems; if the ends of the points are even slightly rounded, then the blade will slip between them which will reduce the 'accuracy' of this measurement dramatically - and also, doing this will have the effect of taking up all of the hopefully small radial slack in both the headstock and tailstock bearings, inevitably introducing a further error. So you can't use it as a basis for a measurement, but if you can get a blade to stay pinned at all with a small angle, I'd say you'd got a pretty well set up machine, and rigid to boot. If the blade leaned over at 1 degree, that would indicate a positional error of about 0.08 thou. Can you actually set up a tailstock that accurately? |
| blowlamp | 20/10/2010 09:33:17 |
1885 forum posts 111 photos | I believe the 5 degree figure is from a 1988 copy of Know Your Lathe.
I attach a screenshot of the relevent page.
Martin.
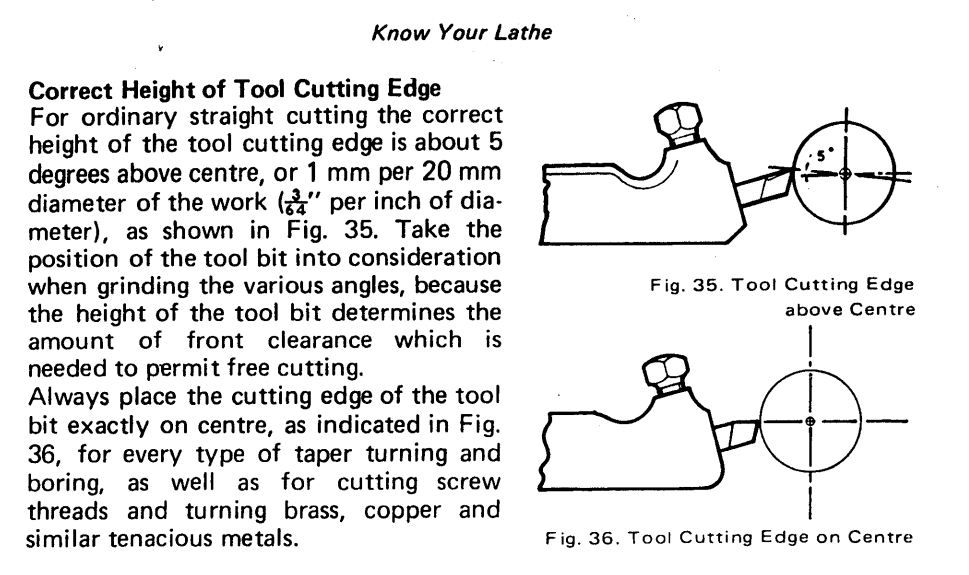 |
| Ian S C | 20/10/2010 10:49:20 |
 7468 forum posts 230 photos | I think I mentioned my method in another thread; when I first got my lathe over 20yrs ago' I put a hard center in the spindle, sat my 6" square on the saddle, I then used the center to scribe a line across the blade of the square. I still use that to set the tool hight. Some times use the rule method.Ian S C |
| john swift 1 | 20/10/2010 12:17:48 |
 318 forum posts 183 photos | surely the correct method of setting the tool height
is the one that works for YOU and your machine
If you use a form tool to produce a number of diameters for instance
how ever you set the tool height - expensive gauge or tried and trusted ruler
don't you re-adjust the tool height any way
to compensate for any deflection of the tool
for all the diameters to be correct the tool must be exactly on centre
John
Edited By john swift 1 on 20/10/2010 12:48:45 |
| Stub Mandrel | 22/10/2010 19:38:21 |
 4318 forum posts 291 photos 1 articles | I set my tools to the pip on some faced off work. I think it was Tubal Cain who tried to kill the 'dead on centre height to turn a taper' myth. He showed that quite significant errors in height made imeassureable differences to the taper. But the myth did not die. For cylindrical turning, too low reduces the top rake, with typical rake of 7-10 degrees how low do you have to be to reduce the rake to the point where quality suffers? Too high educes the front clearance. Again with a clearance angle of 7-10 degrees there is plenty of room for error. A tool placed so there is a 2-degree angle between tool-tip and horizontal should still ciut without problems.The error in tool in-feed will be to reduce it by cos 2 which is 0.9993. So that means a 10-thou cut is reduced to, hmm, 9.99 thous. So those who say tool height is NOT critical except for really small diameter workpieces have to be correct. One of the greatest skills in engineering is to avoid over-engineering. Spurious accuracy or precision just makes things more difficult. Put the effort into making the work the right size, not fretting over too height. Neil |
| Nobby | 22/01/2011 11:32:27 |
 587 forum posts 113 photos | HI
Sticky pin on end of job running true theres your center
Regards Nobby |
| jomac | 24/01/2011 11:43:29 |
| 113 forum posts | Hi . all this maths and degrees is too much for me. Nobby says use a sticky pin, Its quick. Me all I do is turn up a shallow angle point on a 4mm s/s rod, set the tool to the right hight with metal shims and then cut swarf. when Iv'e finished cutting I superglue the shims to the bottom of the tool holder. If sharpening alters the tool hight, Iv'e still got the turned tapered rod to check. This method is reasonable accurate, But if in doubt, use the centre pip method, Any thing to save time and energy is good. John Holloway. |
Please login to post a reply.
Magazine Locator
Want the latest issue of Model Engineer or Model Engineers' Workshop? Use our magazine locator links to find your nearest stockist!
Sign up to our Newsletter
Sign up to our newsletter and get a free digital issue.
You can unsubscribe at anytime. View our privacy policy at www.mortons.co.uk/privacy
Latest Forum Posts
- *Oct 2023: FORUM MIGRATION TIMELINE*
05/10/2023 07:57:11 - Making ER11 collet chuck
05/10/2023 07:56:24 - What did you do today? 2023
05/10/2023 07:25:01 - Orrery
05/10/2023 06:00:41 - Wera hand-tools
05/10/2023 05:47:07 - New member
05/10/2023 04:40:11 - Problems with external pot on at1 vfd
05/10/2023 00:06:32 - Drain plug
04/10/2023 23:36:17 - digi phase converter for 10 machines.....
04/10/2023 23:13:48 - Winter Storage Of Locomotives
04/10/2023 21:02:11 - More Latest Posts...
- View All Topics
Support Our Partners


Shopping Partners
Subscription Offer

Latest "For Sale" Ads
- Reeves** - Rebuilt Royal Scot by Martin Evans
by John Broughton
£300.00 - BRITANNIA 5" GAUGE James Perrier
by Jon Seabright 1
£2,500.00 - Drill Grinder - for restoration
by Nigel Graham 2
£0.00 - WARCO WM18 MILLING MACHINE
by Alex Chudley
£1,200.00 - MYFORD SUPER 7 LATHE
by Alex Chudley
£2,000.00 - More "For Sale" Ads...
Latest "Wanted" Ads
- D1-3 backplate
by Michael Horley
Price Not Specified - fixed steady for a Colchester bantam mark1 800
by George Jervis
Price Not Specified - lbsc pansy
by JACK SIDEBOTHAM
Price Not Specified - Pratt Burnerd multifit chuck key.
by Tim Riome
Price Not Specified - BANDSAW BLADE WELDER
by HUGH
Price Not Specified - More "Wanted" Ads...
Get In Touch!
Do you want to contact the Model Engineer and Model Engineers' Workshop team?
You can contact us by phone, mail or email about the magazines including becoming a contributor, submitting reader's letters or making queries about articles. You can also get in touch about this website, advertising or other general issues.
Click THIS LINK for full contact details.
For subscription issues please see THIS LINK.
Digital Back Issues


Donate

 Register
 Log-in
Model Engineer Magazine
- Percival Marshall
- M.E. History
- LittleLEC
- M.E. Clock

ME Workshop
- An Adcock
- & Shipley
- Horizontal
- Mill

Subscribe Now
- Great savings
- Delivered to your door

Pre-order your copy!
- Delivered to your doorstep!
- Free UK delivery!
All Forum Topics > Hints And Tips for model engineers > Tool tips