Forum sponsored by:

What did you do today? (2014)
| JasonB | 01/01/2014 07:29:03 |
 25215 forum posts 3105 photos 1 articles | I have started a new thread for the new year as the old one was getting a bit long. I know threads here tend to drift off topic but If we can try to keep it withing the main forum section of "Work in progress and completed items photos" though photos of progress are welcome and often as interesting as the finished item. It's not just limited to model engineering or making tooling, if you have knocked up something for your motorbike or RC heli for example thats more than welcome, infact anything you have done in the workshop. That can also be extended to the study, kitchen table, etc as it would also be good to see any projects that are being drawn up or the latest item to be produced on that 3D printer that Santa has just dropped off. Over to you J Edited By JasonB on 01/01/2014 07:29:36 |
| Steve Withnell | 01/01/2014 10:48:53 |
 858 forum posts 215 photos | Just cooked a stack of thick streaky bacon, on a bun with HP sauce and a mug of strong tea. Bugger the cholesterol! Happy New Year! Steve Edited By Steve Withnell on 01/01/2014 10:49:18 |
| Luke Graham | 01/01/2014 11:32:11 |
| 27 forum posts | Posted by Muzzer
Never done it myself but apparently a common technique is to use a Dremel-type device to route out the copper from the PCB surface. This avoids the need for the nasty chemicals altogether and I suspect you may have problems getting a consistent flow of ink if you are using Dalo pens (from memory - do you still use them?).
That is another option I can try if this doesn't work out. The big difference is getting a positive vs negative result, just like positive vs negatives for photography. If you go for routing/milling, you need to travel around every trace, leaving the positive copper behind. I'm using a black Staedtler Lumocolour pen, as recommended on various forums on the internet. Well, actually they say the red one works better, but this is what I could get my hands on. From drawing on the steel plate that I intend to use as a backing for the blank PCBs, the pen flows well as long as the metal is absolutely clean. This is the board I'm testing first - http://arduino.cc/en/Main/ArduinoBoardSerialSingleSided3 Luke Edited By Luke Graham on 01/01/2014 11:35:32 |
| Rufus Roughcut | 01/01/2014 12:44:34 |
| 83 forum posts 20 photos | Hi Steve Ther's only one Sauce for Bacon so no need to advertise.
MMMMMMMMMM! BACON Great Joy for the year ahead Barry |
| Rick Kirkland 1 | 01/01/2014 13:12:49 |
 175 forum posts | I stopped filing me block of steel and went in to cook some bacon. |
| blowlamp | 01/01/2014 13:17:26 |
 1885 forum posts 111 photos | Looks like the pig population's going to take a hit this year
Martin. |
| mechman48 | 01/01/2014 14:10:08 |
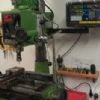
 2947 forum posts 468 photos | Finished my first project after this past year setting up my garage conversion & making stuff to make stuff with, mods to machines etc. Tried to post vid of it running but can't seem to load it , seems that album format only accepts JPEG/JPG pics... any advice of how to do it...?
Had to do a bit of tweaking as there was a tight spot that needed resolving, further pics in my album ' simple oscil' engine'. Nice pleasant start to 2014, Happy new year to all forum readers. George
Edited By mechman48 on 01/01/2014 14:15:43 Edited By mechman48 on 01/01/2014 14:31:34 |
| SverreE | 01/01/2014 15:16:21 |
| 22 forum posts 14 photos | Not today, but yesterday, I finished (after several years of "planning"....) my QCTP! It is very simple to operate - just one handle to lock it.
Here is the first toolholder I made for a DTI: I only need to add a screw for height-adjustment. By the way, I have an old Blomquist lathe, which is a South Bend clone produced in Sweden in 1960. Sverre |
| SverreE | 01/01/2014 15:19:19 |
| 22 forum posts 14 photos | And today I finished the first actual toolholder, a tangential one:
And here it is on the QCTP:
And it works beutifully - tried soft aluminium, then proceeded to steel and then stainless steel - very nice surface finish! Sverre |
| JasonB | 01/01/2014 16:52:45 |
25215 forum posts 3105 photos 1 articles | George you need to host the video somewhere else, Photobucket if you have an account or set up one on You-Tube which is better for video than PB. J |
| Svarven | 01/01/2014 17:02:13 |
 35 forum posts 8 photos |
Offensive word removed by JasonB Edited By JasonB on 01/01/2014 17:18:14 |
| Rik Shaw | 01/01/2014 17:11:45 |
 1494 forum posts 403 photos | Nothing to complicated today (or yesterday). Had a go at starting to convert some end pieces from a pair of hand exercise weights into crank webs for the twin throw crankshaft for my latest build. Before I started machining I fully expected to find cast iron but was most surprised to find they were made from what seems to me to be a very high quality nickel steel which incidentally had been plated with copper roughly .005" thick before being chromed. I call that a high standard of manufacture. Almost seems a shame to chop'em up.......almost Using my homemade indexable lathe tool ( I refuse to cough up £30-40 when I can easily make one myself) I am getting lovely finishes on this material particularly on the OD which with a finishing .020" deep cut leaves it with a mirror like finish. This pleases me no end considering the set of weights only cost me two quid from my normal Sunday morning "supplier". Three shown here in various stages of manufacture, the fourth is in the lathe chuck:
A relation works with high quality makrolon 6mm polycarbonate and he is allowed the off cuts - some "off cuts" are very large indeed! He gives me whatever I need. As you can probably see, the WARCO guard will not fit with my tool shelf over the lathe as it is, so I used a piece of this stuff to make a hinged splash guard. With it fitted I carried on machining the crank webs but found that my coolant oil was still splashing out underneath the lower edge. The solution was to hinge fit a thin sheet of ally to the bottom - problem solved.......
........and when not needed it lives up there. Also, as the next job is a cast iron flywheel I cut and fitted a piece of hardboard as shown to keep the dust away from the bed and lead screw. A simple life I know - maybe I should have been a monk. May you all have a peaceful New Year and be blessed by great wealth (I could easily get into this habit) Rik PS Pushing seventy neither of us like noise so have booked our summer hols in Bulgaria this year - I bet we'll be able to hear a pin drop over there by then. Edited By Rik Shaw on 01/01/2014 17:15:29 |
| magpie | 01/01/2014 17:15:06 |
 508 forum posts 98 photos | What have I done today ??? SOD ALL ! Happy new year to one and all. Cheers Derek. |
| chris stephens | 01/01/2014 17:24:37 |
| 1049 forum posts 1 photos | Hi Derek, I'm with you there, so miserable out there that I decided to hibernate, again. Shame I can't stay here till spring but every hour is one less till the spring warmth! chriStephens Edited By chris stephens on 01/01/2014 17:25:15 |
| mechman48 | 01/01/2014 17:31:54 |
2947 forum posts 468 photos | Jason B- Thanks for the tip Oompa Lumpa / Mike - will sort through my dwgs folder & pm you link later. George
|
| Nicholas Farr | 01/01/2014 19:05:16 |
 3988 forum posts 1799 photos | Posted by Luke Graham on 01/01/2014 11:32:11:
Posted by Muzzer
Never done it myself but apparently a common technique is to use a Dremel-type device to route out the copper from the PCB surface. This avoids the need for the nasty chemicals altogether and I suspect you may have problems getting a consistent flow of ink if you are using Dalo pens (from memory - do you still use them?).
That is another option I can try if this doesn't work out. The big difference is getting a positive vs negative result, just like positive vs negatives for photography. If you go for routing/milling, you need to travel around every trace, leaving the positive copper behind. I'm using a black Staedtler Lumocolour pen, as recommended on various forums on the internet. Well, actually they say the red one works better, but this is what I could get my hands on. From drawing on the steel plate that I intend to use as a backing for the blank PCBs, the pen flows well as long as the metal is absolutely clean. This is the board I'm testing first - **LINK** Luke Edited By Luke Graham on 01/01/2014 11:35:32 Hi Muzzer, I presume you mean the Dalo Mark 33 which came with a spare tip, which was stored in the top end of the pen. See photo below.
I do believe that I have two unused pens somrwhere. Haven't done any PCB's for some time now, but I never found these to be the easyest things to use and very difficult if you needed fine tracks beside each other. Allthough they have not been used for several years, I've tried one out on a small piece of blank PCB board and it still works but would need to use the new tip if I were to use it for real. Below is a photo Dalo Mark 33 compared to a Staedtler Lumocolor 318. I have never tried using the Lumocolor 318 for ecthing though.
As Luke says, the Lumocolor 318 seems to be recommended these days and thats what you'll find at Maplins if you search for etch resistant pen. Regards Nick. P.S. Happy New Year everyone. Edited By Nicholas Farr on 01/01/2014 19:31:26 |
| Stub Mandrel | 01/01/2014 19:13:36 |
 4318 forum posts 291 photos 1 articles | I hate Dalo poens ... but what did I do today? > kitchen table Well if that is eligible can I mention that I tiled the kitchen? At least the 18" above the worktops, with the exception of finishing round the plug sockets. £4.20 for 8 50mm socket-fixing screws - I should have made my owm actually i [probably will need to make 2 as one socket is now 3/4" further out from the wall - whoever built our kitchen extension did not work to ME standards of squareness and accuracy! Happy New Year to all! Neil
|
| Les Jones 1 | 01/01/2014 19:46:33 |
| 2292 forum posts 159 photos | Hi Neil, Les. |
| russell | 02/01/2014 00:54:29 |
| 142 forum posts | a good New Years Day in the workshop... i spent a couple of hours cleaning up and putting away last year, then... first, i repaired (brazed) a kids garden rake, the handle socket had broken away from the rake - not surprising really, with only 2 tack welds originally, about 40 degrees apart...it now has a nice purple highlight to contrast the green tines! then i brazed the mounting extension onto my parting tool holder, an impulse buy which turned out to be slightly too large for my lathe. then i started on the cylinder for Jan Ridders vacuum engine, by turning a piece of 55mm dia Al into a piece of 38mm dia.. -russ (from Oz)
|
| Muzzer | 02/01/2014 04:16:51 |
 2904 forum posts 448 photos | Posted by Svarven on 01/01/2014 17:02:13:
Hi This is the same make as the one I bought during a visit to Shenzhen, China recently. Like you, I've found it to be fine and not bad value for money at all. The instruction manual is worth the cost alone - makes Xmas cracker jokes look lame! I ended up downloading manuals from other manufacturers - they are mostly very similar in operation. There are some pictures in my albums under "DRO fitting". I now have 2 Z scales - one on the quill and one on the knee. I actually find the quill one to be more useful. Muzzer Edited By Muzzer on 02/01/2014 04:17:18 Edited By Muzzer on 02/01/2014 04:20:26 |

.jpg")


This thread is closed.
Magazine Locator
Want the latest issue of Model Engineer or Model Engineers' Workshop? Use our magazine locator links to find your nearest stockist!
Sign up to our Newsletter
Sign up to our newsletter and get a free digital issue.
You can unsubscribe at anytime. View our privacy policy at www.mortons.co.uk/privacy
Latest Forum Posts
- *Oct 2023: FORUM MIGRATION TIMELINE*
05/10/2023 07:57:11 - Making ER11 collet chuck
05/10/2023 07:56:24 - What did you do today? 2023
05/10/2023 07:25:01 - Orrery
05/10/2023 06:00:41 - Wera hand-tools
05/10/2023 05:47:07 - New member
05/10/2023 04:40:11 - Problems with external pot on at1 vfd
05/10/2023 00:06:32 - Drain plug
04/10/2023 23:36:17 - digi phase converter for 10 machines.....
04/10/2023 23:13:48 - Winter Storage Of Locomotives
04/10/2023 21:02:11 - More Latest Posts...
- View All Topics
Support Our Partners


Shopping Partners
Subscription Offer

Latest "For Sale" Ads
- Reeves** - Rebuilt Royal Scot by Martin Evans
by John Broughton
£300.00 - BRITANNIA 5" GAUGE James Perrier
by Jon Seabright 1
£2,500.00 - Drill Grinder - for restoration
by Nigel Graham 2
£0.00 - WARCO WM18 MILLING MACHINE
by Alex Chudley
£1,200.00 - MYFORD SUPER 7 LATHE
by Alex Chudley
£2,000.00 - More "For Sale" Ads...
Latest "Wanted" Ads
- D1-3 backplate
by Michael Horley
Price Not Specified - fixed steady for a Colchester bantam mark1 800
by George Jervis
Price Not Specified - lbsc pansy
by JACK SIDEBOTHAM
Price Not Specified - Pratt Burnerd multifit chuck key.
by Tim Riome
Price Not Specified - BANDSAW BLADE WELDER
by HUGH
Price Not Specified - More "Wanted" Ads...
Get In Touch!
Do you want to contact the Model Engineer and Model Engineers' Workshop team?
You can contact us by phone, mail or email about the magazines including becoming a contributor, submitting reader's letters or making queries about articles. You can also get in touch about this website, advertising or other general issues.
Click THIS LINK for full contact details.
For subscription issues please see THIS LINK.
Digital Back Issues


Donate

 Register
 Log-in
Model Engineer Magazine
- Percival Marshall
- M.E. History
- LittleLEC
- M.E. Clock

ME Workshop
- An Adcock
- & Shipley
- Horizontal
- Mill

Subscribe Now
- Great savings
- Delivered to your door

Pre-order your copy!
- Delivered to your doorstep!
- Free UK delivery!
All Forum Topics > Work In Progress and completed items > What did you do today? (2014)