Drawing Projections
| John Stevenson | 17/09/2012 09:02:19 |
5068 forum posts 3 photos | Also look on P37 And to further confuse the issue only 1st angle is a projection. In 1st angle you draw the projected side view in the direction you see it.
In 3rd angle the side view is rotated 3 times and not projected. |
| Wolfie | 17/09/2012 09:22:52 |
502 forum posts | Hmm a very interesting and clear to follow pdf. However I'm still not happy. OK I get the glass box idea where every side of the object is projected onto the surface of the box which is then unfolded. Thats clear. OK so 3rd angle appears to be the same but whats this first angle stuff. That pdf has the left hand side of an object clled the right hand side (p37) ! Whats that all about |
| Michael Gilligan | 17/09/2012 09:40:38 |
23121 forum posts 1360 photos | Wolfie, The graphic on p38 shows: First Angle ... Object inside the corner of a box with [let's say] cardboard walls Third Angle ... Object inside the corner of a box with [let's say] tracing paper walls
In photographic terms it would be the difference between using "Front-Projection" and "Back-Projection" screens. Does that help? MichaelG.
|
| jason udall | 17/09/2012 10:03:10 |
| 2032 forum posts 41 photos | First Angle ... Object inside the corner of a box with [let's say] cardboard walls Third Angle ... Object inside the corner of a box with [let's say] tracing paper walls
In photographic terms it would be the difference between using "Front-Projection" and "Back-Projection" screens. Does that help? MichaelG.
Brilliant In 35 years never seen better explanation.
|
| blowlamp | 17/09/2012 10:20:43 |
1885 forum posts 111 photos | Wolfie. To remind myself of the difference, for 1st angle projection, I think of a simple object lighlty covered in ink and laying on paper. When the paper is lifted so as to wrap the object, its shape is 'printed' to the paper. 1st angle is also kind of like a clay mould of the submerged object, that has been peeled away to make it flat and the outlines of the shape enhanced. 3rd angle projection is the actual image you see of the object features facing you. This image is then represented as being repositioned behind the object, in that particular viewing direction.
It is quite hard to try and explain Martin. |
| Gordon W | 17/09/2012 10:20:51 |
| 2011 forum posts | I feel sorry for Wolfie, the explanations seem to be getting more and more complicated, and I'm an ex draffy. I 've said before the best way is to label all views, eg. "view on arrow A", "section on X-X" , etc. . Also don't believe the truncated cone symbol always, there are lots of drawings with views in the wrong place, always check. |
| Terryd | 17/09/2012 10:23:03 |
1946 forum posts 179 photos |
Posted by Sid Herbage on 16/09/2012 18:34:02:
What do you make of this? on a drawing received (from the UK) a while ago. Hi Sid, it is an error, the symbol shows third angle.. To answer the question 'why not just use words?' The symbol is used to indicate type of projection (i.e. the placing of the various views) so that non Englsh speakers are clear which projection system is being used - the use of language allows the possibility of the sort of conflict that Sid's example demonstrates. Hi Jason U, I did say "imagine a tapered cork' which I think indicates a solid rather than a hollow object. I used that description as there are those who do not understand the geometrical term 'truncated cone'. As for there being no difference, both examples are of the same 'cork' but the layout of the views makes a great difference to the interpretation. Confusion can lead to misunderstandings of more complex shapes, as JA points out above it is important to know the type of projection used. I have seen examples in ME which actually use both types of projection on the same drawing and they had me confused until I realised that fact. Best regards Terry |
| Wolfie | 17/09/2012 11:41:28 |
502 forum posts | "First Angle ... Object inside the corner of a box with [let's say] cardboard walls Third Angle ... Object inside the corner of a box with [let's say] tracing paper walls"
OK this 3rd angle I get, same as the glass box, simple. The face or side or top or whatever of the object is drawn as if you're looking down or at it. So whats the first angle. Is it different and if so why? And I ain't got a clue what those two circles are. If its a truncated cone, which way up is it? "To remind myself of the difference, for 1st angle projection, I think of a simple object lighlty covered in ink and laying on paper. When the paper is lifted so as to wrap the object, its shape is 'printed' to the paper." Is this not the same then as what youd see if you were looking at it, ie 3rd angle?
Edited By Wolfie on 17/09/2012 11:42:50 |
| Gray62 | 17/09/2012 12:16:19 |
| 1058 forum posts 16 photos | They say a picture paint a thousand words... So how about this:
CB |
| Martin Kyte | 17/09/2012 12:31:31 |
3445 forum posts 62 photos | OK my twopence worth as remembered from school. Draw the object face on. If you want 1st angle rotate the object 90 degrees about a point BEHIND it, draw what you see. If you want 3rd angle rotate 90 degrees about a point in front of it and draw what you see. Convention shows end elevation on the left for first angle and end elevation on the right for third angle. That way you allways get the right hand side and the top view. Nothing to stop you drawing all views though. I still have to think about it.
|
| Joseph Ramon | 17/09/2012 12:37:24 |
107 forum posts | Coalburner's posting is the only one in this whole thread that says everything that needs to be said and nothing more Joey. |
| David Clark 1 | 17/09/2012 12:46:58 |
3357 forum posts 112 photos 10 articles | Hi There Having been working in the UK for an American company we had both first and third angle projection drawings. If we could not figure out what was what, we found a drawing that could not be misinterpreted and used that as a guide to the confusing one. regards David
|
| jason udall | 17/09/2012 13:14:31 |
| 2032 forum posts 41 photos | In short Wolfie you are not alone. Another "symbol" oftern appearing on drawings..."IF IN DOUBT ASK".
|
| Terryd | 17/09/2012 13:24:00 |
1946 forum posts 179 photos |
Posted by Wolfie on 17/09/2012 11:41:28:
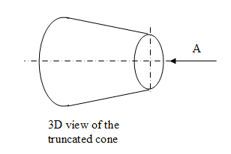
................................. So whats the first angle. Is it different and if so why? And I ain't got a clue what those two circles are. If its a truncated cone, which way up is it? ................................ Edited By Wolfie on 17/09/2012 11:42:50 Hi Wolfie , as it was my original posting that confused you let me try to clarify and hope not to cause you more confusion. The symbol for third and first angle represents a a truncated cone lying with it's main axis horizontal as in the sketch below. I put this 3D sketch in simply to try to show the solid shape. Note I have now added centre lines and an arrow.
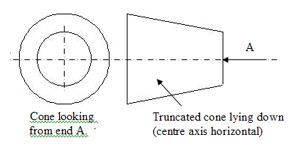
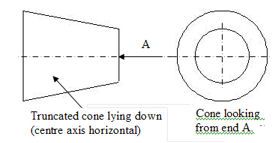
The symbol used on engineering drawings is a representation of that cone in a side and end view. The trapezoid would be the side view of the cone and the circles, the end view. Try to imagine that you are looking at a real cone from direction A. the circles are what you would see. The small circle in the end view is the small end of the cone and the large circle is the larger end (or base) of the cone. It's a bit like looking down on a volcano (with a filled crater). It is the position of those views which represent the 'angle' (first or third) of the drawing. First Angle symbol is: Third angle is:- They are of exactly the same cone and the views are the also the same. It is the positioning of those views which makes the difference and it is that layout of the views on the drawing can make a huge difference as to how you interpret them, as others have reported. I really hope that helps, use it with Coalburners example above to see if it does. Regards Terry Edited By Terryd on 17/09/2012 13:32:51 |
| blowlamp | 17/09/2012 13:37:17 |
1885 forum posts 111 photos | Wolfie.
Forget my contribution... it's a load of old crap Here's a link that I hope may make help in this topic.
Martin. |
| Gray62 | 17/09/2012 14:23:23 |
| 1058 forum posts 16 photos |
Blowlamp. that is a great example of 1st angle orthographic projection, - if you coud post the same for 3rd angle I think, with the example image I posted we could put this thread to bed cheers CB
P.S Once resolved, maybe we could make this thread a 'sticky' - Not sure if this crappy forum SW has that ability CB |
| Wolfie | 17/09/2012 14:24:26 |
502 forum posts | But in Coalburners drawing the two are the same, front face, end face, top face. Whats the difference?
Okayy so its where the cone is that makes it different. The drawings are the same?
|
| Gone Away | 17/09/2012 14:25:56 |
| 829 forum posts 1 photos |
Posted by John Stevenson on 17/09/2012 08:13:52:
Not knocking Wolfie but it's obvious from his posts that he's just starting out in this game and the original question was a valid one in his search to become one of the experienced ones. Yes of course - but I was clearly responding to Dave M 's post. |
| Wolfie | 17/09/2012 14:27:35 |
502 forum posts | I just looked at Blowlamps link. I think my problem is that I don't understand the difference between 1st and 3rd, they look the same to me |
| Keith Long | 17/09/2012 15:01:31 |
| 883 forum posts 11 photos | Hi Wolfie I think you might be better off popping along to your local library and borrowing a book on engineering drawing - they should have some that are used for the GCSE syllabus. The difference between 1st and 3rd angle projection is the relative positions of the views on the page as you see them. The other difficulty is that the examples shown have been very simple shapes and so the views in 1st and 3rd ARE the same, just arranged differently on the page. Slightly more complicated shapes may show the differences more clearly. Also the descriptions of how you arrive at the views are getting very confusing to me - and I've been reading drawings for 40 years and had draughting training! Have a look for an introductory text book and have a good read. Try some simple drawing exercises for yourself and see how you get on, and then come back with more questions. Take heart it can be confusing to start with, buit with a bit of thinking around the issues it should become clearer and then it's just a case of reading more drawings and making tools models. You've mastered your lathe and mill - just another skill to pick up o9n the way. Good luck Keith |
Please login to post a reply.
Want the latest issue of Model Engineer or Model Engineers' Workshop? Use our magazine locator links to find your nearest stockist!
Sign up to our newsletter and get a free digital issue.
You can unsubscribe at anytime. View our privacy policy at www.mortons.co.uk/privacy
- *Oct 2023: FORUM MIGRATION TIMELINE*
05/10/2023 07:57:11 - Making ER11 collet chuck
05/10/2023 07:56:24 - What did you do today? 2023
05/10/2023 07:25:01 - Orrery
05/10/2023 06:00:41 - Wera hand-tools
05/10/2023 05:47:07 - New member
05/10/2023 04:40:11 - Problems with external pot on at1 vfd
05/10/2023 00:06:32 - Drain plug
04/10/2023 23:36:17 - digi phase converter for 10 machines.....
04/10/2023 23:13:48 - Winter Storage Of Locomotives
04/10/2023 21:02:11 - More Latest Posts...
- View All Topics
- Reeves** - Rebuilt Royal Scot by Martin Evans
by John Broughton
£300.00 - BRITANNIA 5" GAUGE James Perrier
by Jon Seabright 1
£2,500.00 - Drill Grinder - for restoration
by Nigel Graham 2
£0.00 - WARCO WM18 MILLING MACHINE
by Alex Chudley
£1,200.00 - MYFORD SUPER 7 LATHE
by Alex Chudley
£2,000.00 - More "For Sale" Ads...
- D1-3 backplate
by Michael Horley
Price Not Specified - fixed steady for a Colchester bantam mark1 800
by George Jervis
Price Not Specified - lbsc pansy
by JACK SIDEBOTHAM
Price Not Specified - Pratt Burnerd multifit chuck key.
by Tim Riome
Price Not Specified - BANDSAW BLADE WELDER
by HUGH
Price Not Specified - More "Wanted" Ads...
Do you want to contact the Model Engineer and Model Engineers' Workshop team?
You can contact us by phone, mail or email about the magazines including becoming a contributor, submitting reader's letters or making queries about articles. You can also get in touch about this website, advertising or other general issues.
Click THIS LINK for full contact details.
For subscription issues please see THIS LINK.
Model Engineer Magazine
- Percival Marshall
- M.E. History
- LittleLEC
- M.E. Clock
ME Workshop
- An Adcock
- & Shipley
- Horizontal
- Mill
Subscribe Now
- Great savings
- Delivered to your door
Pre-order your copy!
- Delivered to your doorstep!
- Free UK delivery!


 Register
 Log-in


