Forum sponsored by:

Home Made Rear Toolpost Issue
| Dr_GMJN | 01/03/2021 22:29:14 |
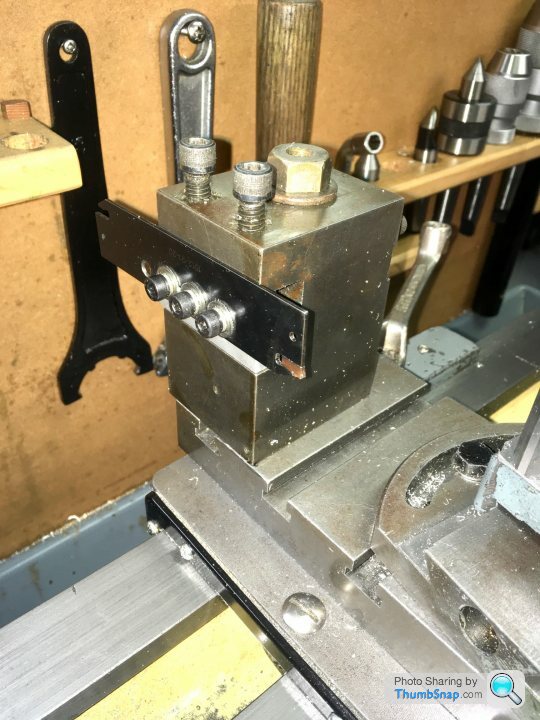
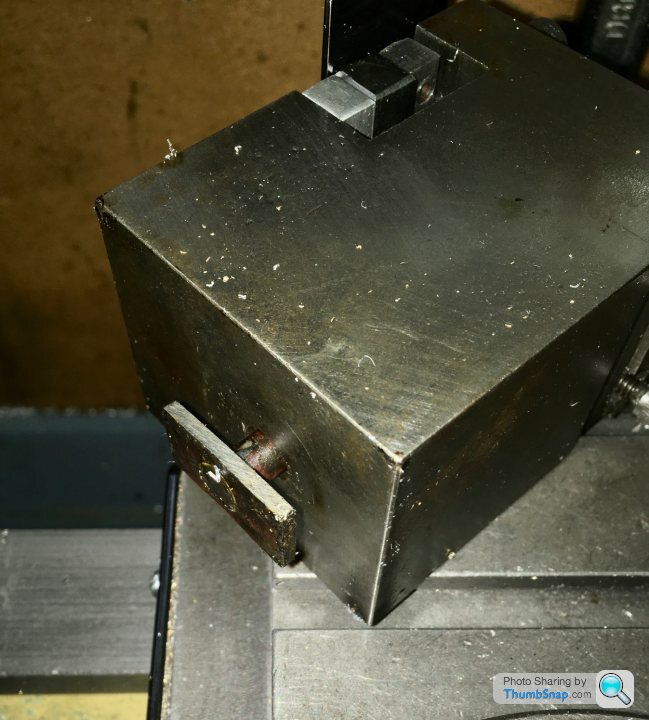
 1602 forum posts | I've been reading about the benefits of a rear toolpost for parting off. I remembered I'd got a home made rear post with some stuff I got with the lathe: Thanks. |
| Emgee | 01/03/2021 22:56:10 |
| 2610 forum posts 312 photos | You could add another 20mm thick block to the front of the existing block to convert it to an L shape when viewed from the chuck, that would allow you to use another 1 or 2 Tee nuts in the 2nd Tee slot and provide much needed security. Emgee |
| Maurice Taylor | 01/03/2021 23:39:38 |
| 275 forum posts 39 photos | Hi ,I use a single bolt rear toolpost with my Myford,it works alright .Try a proper tee bolt ,before doing anything complicated. There are plenty on Ebay. Maurice Edited By Maurice Taylor on 01/03/2021 23:40:59 |
| Peter Greene | 02/03/2021 01:41:04 |
| 865 forum posts 12 photos | Posted by Dr_GMJN on 01/03/2021 22:29:14:
.... but I don't fancy drilling through all that steel. Why? Other things being equal, I'd just go ahead and do it. 10 or 15 min later you'd have what you want. The bigger problem though is that it doesn't look like you actually have room for the second bolt. Hmmm ... just musing ... if you could raise the blade holder a bit (thick"shim" under it?) you could then cut a key on the bottom of the block to drop into the t-slot. That should give quite a benefit in rigidity (and alignment) and two bolts wouldn't be an issue.
Edited By Peter Greene on 02/03/2021 01:52:30 |
| Dr_GMJN | 02/03/2021 06:54:37 |
1602 forum posts | Thanks all. Re. Milling a key - Id have to check, but I think it could be done, or I suppose I could bolt a strip underneath which would have the same effect? I guess I could mill a gap above the T-nut (If necessary), to give a bit of clearance, ie have two blocks? That would address any rotation issue, and presumably one bolt would provide enough clamp force? Maybe worth facing the base as well, just to ensue maximum contact? Thanks. |
| Dr_GMJN | 02/03/2021 06:56:13 |
1602 forum posts | What about tip height - should it be exactly on the centre height for this tool? |
| Ron Laden | 02/03/2021 07:46:35 |
 2320 forum posts 452 photos | My rear tool post made not by me but the previous owner. He didn't go for a central vertical fixing but mounted it to a base plate which picks up on 4 Tee nuts. A tongue locates the post to the plate and is fixed from underneath. Fortunately my Tee slots run front to back which is handy as I can slide the post in and out. It works well, very rigid.
Edited By Ron Laden on 02/03/2021 07:48:27 Edited By Ron Laden on 02/03/2021 08:06:54 |
| Hopper | 02/03/2021 07:49:13 |
 7881 forum posts 397 photos | Yes dead on centre height works best and leaves no "tit" on the cut off piece. No need to drill through holes or machine keys. I have a single bolt rear tool post that I use to part off 2" steel bar. It is held down by a single bolt with a T head on the end, about the same length and thickness as a normal T slot nut commercially available. Alignment is achieved by two round studs in the base that fit into the T slot. Just drill and ream two holes and loctite a couple of pins in there, Or tap and thread etc. You can make the pins oversize and file the final fit to get exact alignment if you like. Pins go one each side of the centre bolt. Been in use for more than 50 years that I know of and works well. Or you could attach two pieces of key steel the right size with small allen head screws.
Edited By Hopper on 02/03/2021 07:50:16 |
| David George 1 | 02/03/2021 07:50:39 |
 2110 forum posts 565 photos | The center height is critical on part off tooling and should be as good as you can get it. I measured from the saddle to the top of a dowel in the chuck and deducted half the diamiter of the dowel to give center height. I made my toolholder wuth excess material and just measured from the base to tip and removed difference.
I can turn the top round and put the blade in the other side so I can put a long bar into a fixed steady and part of a piece of. By slackening the top cap screw I can slide the blade in and out to suit the job in hand. David
|
| Dr_GMJN | 02/03/2021 07:50:59 |
1602 forum posts | Thanks Ron. Slotting the post in from the end of the cross slide is no problem. I suppose I could try making a long T-nut from a strip of steel, and Loctite the existing stud into it - assuming It’s long enough to thread the end properly.
Edited By Dr_GMJN on 02/03/2021 07:51:22 |
| Dr_GMJN | 02/03/2021 07:55:29 |
1602 forum posts | Thanks Hopper and David - I think I have enough info to get it fitted and give it a go. Hopefully it will work as well as I’ve heard! It will also free up a quick-change tool holder... |
| Martin Kyte | 02/03/2021 08:02:38 |
 3445 forum posts 62 photos | If you did want an extra hold down you could mill a slot in the front of the block and use a suitable clamp. regards Martin |
| Tony Pratt 1 | 02/03/2021 08:10:24 |
| 2319 forum posts 13 photos | Definitely aim for the tool being on centre height. Tony |
| Chris Crew | 02/03/2021 08:10:30 |
 418 forum posts 15 photos | As someone has already stated the Myford OEM rear tool-post only has one tee-bolt although it is keyed into the tee-slot. You should be able make a suitable tee-bolt in about 10 minutes flat at the most, with the end properly screw-cut too if you are properly prepared beforehand. I always set a rear parting blade a fraction above centre-height, using a bit of common sense when it comes to judging how much. My reasoning being that if the tool has a tendency to dig-in it will be forced out of the cut rather than be dragged in by the rotation of the work. I always use lashings of coolant on any parting-off, say above 0.75", and I have very little trouble. Obviously not in a Myford, but I have easily parted 6" gear-blanks in a Colchester. In cases like this I let the Eclipse type blade out of a J&S type tool-holder in stages of about 0.5". One thing some people don't realise is that a properly designed lathe's cross-slide is not set at precisely 90deg. and this most certainly applies to the Myford because, when it was the true Myford at Beeston, their technical manager told me so before anybody questions my assertion. This is so shaft ends are always faced very slightly concave so that they will sit square in the bottom of a hole. This slight skewing of the cross-slide is the reason why a slight lateral flexing in a parting blade is no bad thing and helps to alleviate jamming. It is also the reason I personally much prefer the 'eclipse' type of blade and holder with its overhang providing the necessary lateral flexibility. As I said, I have very, very little difficulty in parting-off most diameters, so I must be doing something right? Edited By Chris Crew on 02/03/2021 08:12:48 |
| Hopper | 02/03/2021 08:18:55 |
7881 forum posts 397 photos | Posted by Chris Crew on 02/03/2021 08:10:30:
Eclipse type blade out of a J&S type tool-holder in stages of about 0.5". One thing some people don't realise is that a properly designed lathe's cross-slide is not set at precisely 90deg. and this most certainly applies to the Myford because, when it was the true Myford at Beeston, their technical manager told me so before anybody questions my assertion. Certainly. They were set to something like zero to half a thou concave facing over a 4-inch radius.Standard Schlessinger limits. When they were new. First time the lathe is used and that puny Myford saddle guide starts to bed in and then wear, all bets are off. 50 years later, hahahahahaha! If I'm doing something critical, I set the parting blade square to the bed using a dial indicator but usually just line it up by eye with the edge of the cross slide, which according to tests done by GH Thomas back in the day can give results within two thou if done carefully. Not sure my eyeballs are that accurately calibrated though! |
| Journeyman | 02/03/2021 08:30:28 |
 1257 forum posts 264 photos | You could make or purchase a proper T-nut to fit the Myford cross-slide slot then replace the stud with a a bolt and washer. Make sure that the bolt is the right length and does not protrude through the T-nut. Also worthwhile making sure that the bottom of the rear tool-post is flat amd mating with the cross-slide top properly. Definitely tool tip dead on centre height. John |
| John Baron | 02/03/2021 08:49:08 |
 520 forum posts 194 photos | Hi Guys, This is a picture of my rear parting tool post on my Myford. It is set dead square to the chuck jaws and dead on centre height. It uses a single through bolt into a 4 mm thick flat plate located in the "T" slot. Notice that it is also set a little inboard to avoid the twisting effect that you get when the cutting tool is over the edge of the slide.
That blade is 2 mm thick by 12 mm wide and 200 mm long ! £2 from Bangood.
|
| Ady1 | 02/03/2021 08:49:17 |
 6137 forum posts 893 photos | Centre height is fine It lifts if it starts jamming up |
| Dr_GMJN | 02/03/2021 08:50:53 |
1602 forum posts | Thanks all. I did some checks when I filed the wear off the main slides last year, and in fact mine faces a bit convex unfortunately. IIRC it was something like 0.0005" over the radius of the large faceplate. I never even considered it before someone mentioned it. Ignorance truly is bliss with old machine tools. |
| larry phelan 1 | 02/03/2021 09:20:16 |
| 1346 forum posts 15 photos | I have a homemade toolpost using those blades, held in place with one long bolt from the cross slide and it works OK. Hopper, to pick your brains once again. The fingers on my steady have left hand threads, which I find confusing. Is there any good reason for this arrangement ? |


Please login to post a reply.
Magazine Locator
Want the latest issue of Model Engineer or Model Engineers' Workshop? Use our magazine locator links to find your nearest stockist!
Sign up to our Newsletter
Sign up to our newsletter and get a free digital issue.
You can unsubscribe at anytime. View our privacy policy at www.mortons.co.uk/privacy
Latest Forum Posts
- hemingway ball turner
04/07/2025 14:40:26 - *Oct 2023: FORUM MIGRATION TIMELINE*
05/10/2023 07:57:11 - Making ER11 collet chuck
05/10/2023 07:56:24 - What did you do today? 2023
05/10/2023 07:25:01 - Orrery
05/10/2023 06:00:41 - Wera hand-tools
05/10/2023 05:47:07 - New member
05/10/2023 04:40:11 - Problems with external pot on at1 vfd
05/10/2023 00:06:32 - Drain plug
04/10/2023 23:36:17 - digi phase converter for 10 machines.....
04/10/2023 23:13:48 - More Latest Posts...
- View All Topics
Support Our Partners


Shopping Partners
Subscription Offer

Latest "For Sale" Ads
- Reeves** - Rebuilt Royal Scot by Martin Evans
by John Broughton
£300.00 - BRITANNIA 5" GAUGE James Perrier
by Jon Seabright 1
£2,500.00 - Drill Grinder - for restoration
by Nigel Graham 2
£0.00 - WARCO WM18 MILLING MACHINE
by Alex Chudley
£1,200.00 - MYFORD SUPER 7 LATHE
by Alex Chudley
£2,000.00 - More "For Sale" Ads...
Latest "Wanted" Ads
- D1-3 backplate
by Michael Horley
Price Not Specified - fixed steady for a Colchester bantam mark1 800
by George Jervis
Price Not Specified - lbsc pansy
by JACK SIDEBOTHAM
Price Not Specified - Pratt Burnerd multifit chuck key.
by Tim Riome
Price Not Specified - BANDSAW BLADE WELDER
by HUGH
Price Not Specified - More "Wanted" Ads...
Get In Touch!
Do you want to contact the Model Engineer and Model Engineers' Workshop team?
You can contact us by phone, mail or email about the magazines including becoming a contributor, submitting reader's letters or making queries about articles. You can also get in touch about this website, advertising or other general issues.
Click THIS LINK for full contact details.
For subscription issues please see THIS LINK.
Digital Back Issues


Donate

 Register
 Log-in
Model Engineer Magazine
- Percival Marshall
- M.E. History
- LittleLEC
- M.E. Clock

ME Workshop
- An Adcock
- & Shipley
- Horizontal
- Mill

Subscribe Now
- Great savings
- Delivered to your door

Pre-order your copy!
- Delivered to your doorstep!
- Free UK delivery!
All Forum Topics > Workshop Tools and Tooling > Home Made Rear Toolpost Issue