Forum sponsored by:

Treppaning a flywheel
Tool Profile?
| Iain Downs | 03/07/2019 08:12:28 |
| 976 forum posts 805 photos | Hi, All. I'm in the process of building a flywheel for my vertical engine (covered in more detail elsewhere). I have a 25mm piece of 150mm cast iron bar. I've mounted it on the faceplate by drilling some counterbored holes and bolting it to the face plate with some washers as stand-offs (about 5/6mm depth). I've faced off and skimmed the outside. Now I want to dig out the bits in the middle. I've made a trepanning tool. The outside edge is covered to go inside the other radius (at about 55mm radius of the bar). The inside edge is more or less vertical. The end relief is probably about 10 degrees and the top rake the same. End width is about 4-5 mm (sorry don't have the tool in the house to measure at the moment). I'm trying to cut at about 55mm radius, which is just outside the counterbored holes. I would have liked the outer rim to be thicker, but I figured that treppaning with an interrupted cut was just asking for trouble. lathe is a REal Bulk CJ18A (500W 7x14 ish) What am I seeing? 1. the best 'cut' is producing a fine dust, not chips. 2. I have to feed VERY carefully or the tool jams. 3. When performing the cut, it makes quite a noise. 4. If I pull out and widen the slot, I actually get chips from the 2mm cut so the tool is reasonably sharp (I keep sharpening it with a stone as well as attempting to tune it on the grinder). 5. There is often a resonance that roughly matches the rotation of the lathe. I've seen this on a lot of cuts. I can take very fine cuts until the resonance flattens out but it comes back. 6. I've tried speeds from about 100 rpm up to about 300. Lower than 100rpm and the lathe doesn't have the power to do anything. Above 200 I don't seem to get more cutting, but if I get a jam it worries me more. 7. I've put some side relief on the tool and as far as I can tell it's not binding, however, it starts to complain at about 0.5mm depth. 8. It's not helping that the saddle lock ( on to the leadscrew) seems to release from time to time meaning that the saddle creeps back rather than the tool forward. 9. I have the feeling that if the lathe had more grunt and more rigidity then this would go MUCH more smoothly! 10. After about one and a half hours of tender tool pushing, I've excavated a channel 4 mm wide and 4mm deep. I need to take 15mm deep out, excavate from 16mm to 55mm then turn it over and take out 5mm on the other side. 11. I've tried using some cutting oil, but that just clogs the dust together and makes a jam more likely. I don't know if I should try getting rid of the top rake to stop it digging in, or increase it to make the cut better. I've wondered about making the tool thinner so there is less cutting area, but that will also make it more fragile. Trepanning is not much mentioned in the books I've got - and not much on the web either (except for some toolmaker videos where it's terribly easy if you have the right (expensive) tools and a big lathe).. I'm thinking that putting it on a rotary table and milling it out might make more sense, but mounting it would be an interesting challenge. Any help (links I've missed, pointers, tool profile, commiseration) would be appreciated.
Iain |
| JasonB | 03/07/2019 08:20:51 |
 25215 forum posts 3105 photos 1 articles | Make the tool about half the width you have now, you would not try to take a 5mm deep cut with a normal tool at that diameter so why do it with this one. Move it sideways every so often to make sure the tool has good clearance. The other question is why trepan out the middle? can you not just make it thinner and leave a hub then cut spoke shapes into the thinner area? |
| Hopper | 03/07/2019 09:12:07 |
 7881 forum posts 397 photos | Pics sure would help. Having trouble visualizing what what you are trying to do, and like Jason, why. |
| Ian S C | 03/07/2019 10:58:28 |
 7468 forum posts 230 photos | I agree with Jason and Hopper. I usually dig out as much as I can with an ordinary general purpose tool, then clean up with a boring bar, and using the same tool I do the hub by going past centre, and run the lathe in reverse (very carefully, I have a screw on chuck). Ian S C |
| Mick B1 | 03/07/2019 11:17:36 |
| 2444 forum posts 139 photos | My first thought would be to reduce the top rake - I've generally used 0 degrees for CI and brass if the tool was made for that material. You can get away with a general-purpose tool with top rake on less demanding cuts, but trepanning's a bit different. Secondly I'd agree with Jason about reducing the width, though I dunno if I'd halve it. Is there a curve on the front cutting edge? I'm not sure if it's actually necessary, but I've always used one and trepanning *normally* works OK for me... |
| Iain Downs | 03/07/2019 18:14:35 |
| 976 forum posts 805 photos | Thanks to all... I wonder if I'm using the wrong terminology. This is the thing I'm trying to make.
A model of it anyway. There's also a recess on the back side, but 5 mm deep not 15 (though this is a manufacturing requirement rather than a design requirement. I think). This is where I am.
I'm digging into the face with the trepanning tool and then was going to go sideways probably with a right hand knife tool. MOst of the progress you see there was actually with a knife tool with at an angle digging in a bit and then to the right, followed by a knife tool the other way to the left.
Iain |
| JasonB | 03/07/2019 18:18:45 |
25215 forum posts 3105 photos 1 articles | For something like that round the tool and work back and forth across the face while slowly putting on the cut.
|
| martin perman | 03/07/2019 18:45:16 |
 2095 forum posts 75 photos | I recently made four rollers, also similar to yours in size, I used a round insert tool set up similarly to yours I also had 45 deg set on the top slide because the outer edge needed a 45 deg on it, To give me a guide I blued up the face to see where the two edges were then plunged in up to 1mm with the traverse then used the crossslide to move to the boss in the centre and treversed out. This was done until I had gone in up tp 5mm deep, it took a while but worked well. Martin P
Edited By martin perman on 03/07/2019 18:46:26 |
| Michael Gilligan | 03/07/2019 18:52:36 |
 23121 forum posts 1360 photos | Posted by Iain Downs on 03/07/2019 18:14:35:
This is the thing I'm trying to make.
. A toolpost-mounted milling spindle would do that nicely ... but it's another project, or another purchase [story of my life] . MichaelG. Edited By Michael Gilligan on 03/07/2019 18:53:42 |
| ANDY CAWLEY | 03/07/2019 19:09:22 |
| 190 forum posts 50 photos | Trepanning is a operation that I carry out occasionally. I do this to a 3/4" pitch plate wheel which is then bolted to a carrier, the finished article is shown above. I carry out the operation on a fairly heavy duty CVA lathe using the tool shown below.
(This picture is upside down.) I cant remember how wide the cutting edge is but 4 mm would be about right, every time I do the job I consider reducing the width but never quite get round to it. I wouldn't dream of putting the tool to the job without a full flood of coolant.
Somehow or other this picture has got upside down! I cut at fairly slow speed to start with speeding up as I get more confident. I hone the cutting edge and maintain it sharp. The whole operation is conducted with tightly clenched cheeks and I'm glad when its finished. The material from which the platewheels are made is, I believe, En8. Edited By ANDY CAWLEY on 03/07/2019 19:10:57 |
| Stuart Bridger | 03/07/2019 19:39:23 |
| 566 forum posts 31 photos | +1 on a round insert tool. Had to grind a bit of extra relief so the bottom of the holder didn't foul. |
| Andrew Johnston | 03/07/2019 20:01:40 |
 7061 forum posts 719 photos | I'd agree that it would have been better to trepan first and drill holes later. For the trepanning I'd use a multi tool approach. First I'd grind a short "parting" tool from square HSS with the necessary clearance on the outside, say a 6mm deep blade and 3mm wide. Then I'd plunge in 5mm near the outer diameter, move across 3mm and plange again and so on until the inner diameter is reached. Then repeat twice to get near the 15mm depth. Of course you won't be able to get right into the inner diameter on the second and third cuts. Finally I'd clean up the inner and outer diameters and the bottom of the groove using L& R knife tools, or L&R boring bars in my case as I don't have matching knife tools. For cast iron I'd add a little top rake to the tool, a few degrees. Andrew |
| JasonB | 03/07/2019 20:13:20 |
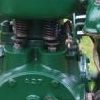
25215 forum posts 3105 photos 1 articles | If you can run your lathe in reverse you don't even need to bother with left and right hand tools. Just do most of the recess and outer edge with the lathe running forwards and then finish the hub with the tool behind it and running in reverse., did this 4" CI one that way with the tool set at a slight angle so it easily reached into both the corners which saves having to grind excess clearance
|
| SillyOldDuffer | 03/07/2019 20:21:38 |
| 10668 forum posts 2415 photos | Posted by Stuart Bridger on 03/07/2019 19:39:23:
...Had to grind a bit of extra relief so the bottom of the holder didn't foul. Relief is important when trepanning because there's a good chance the tool will foul the work and it gets worse the deeper you go. An ordinary parting-off tool collides rather quickly:
For this kind of job I would hack out the centre with a point-first square insert leaving a 45° chamfer on both sides. Then square the chamfers off with right and left hand knives. Dave |
| Iain Downs | 03/07/2019 20:22:42 |
| 976 forum posts 805 photos | So, I will thin the tool and reduce the top rake and see how that goes. Whilst my lathe runs in reverse, the cross slide doesn't go past the centre, though that would be a nice thought. The holes were only drilled because I could think of no other way of holding the piece. Neither of my chucks come close. Ah, damn. It's just occurred to me that i could have glued it to a base of some kind. That would have made much more sense. Great advice as usual, but a bit too late to action tonight...
Iain |
| martin perman | 03/07/2019 20:58:50 |
2095 forum posts 75 photos | Posted by Stuart Bridger on 03/07/2019 19:39:23:
+1 on a round insert tool. Had to grind a bit of extra relief so the bottom of the holder didn't foul.
Silly me, I forgot to mention about the tool relief underneath. Martin P |
| Stuart Bridger | 03/07/2019 21:57:19 |
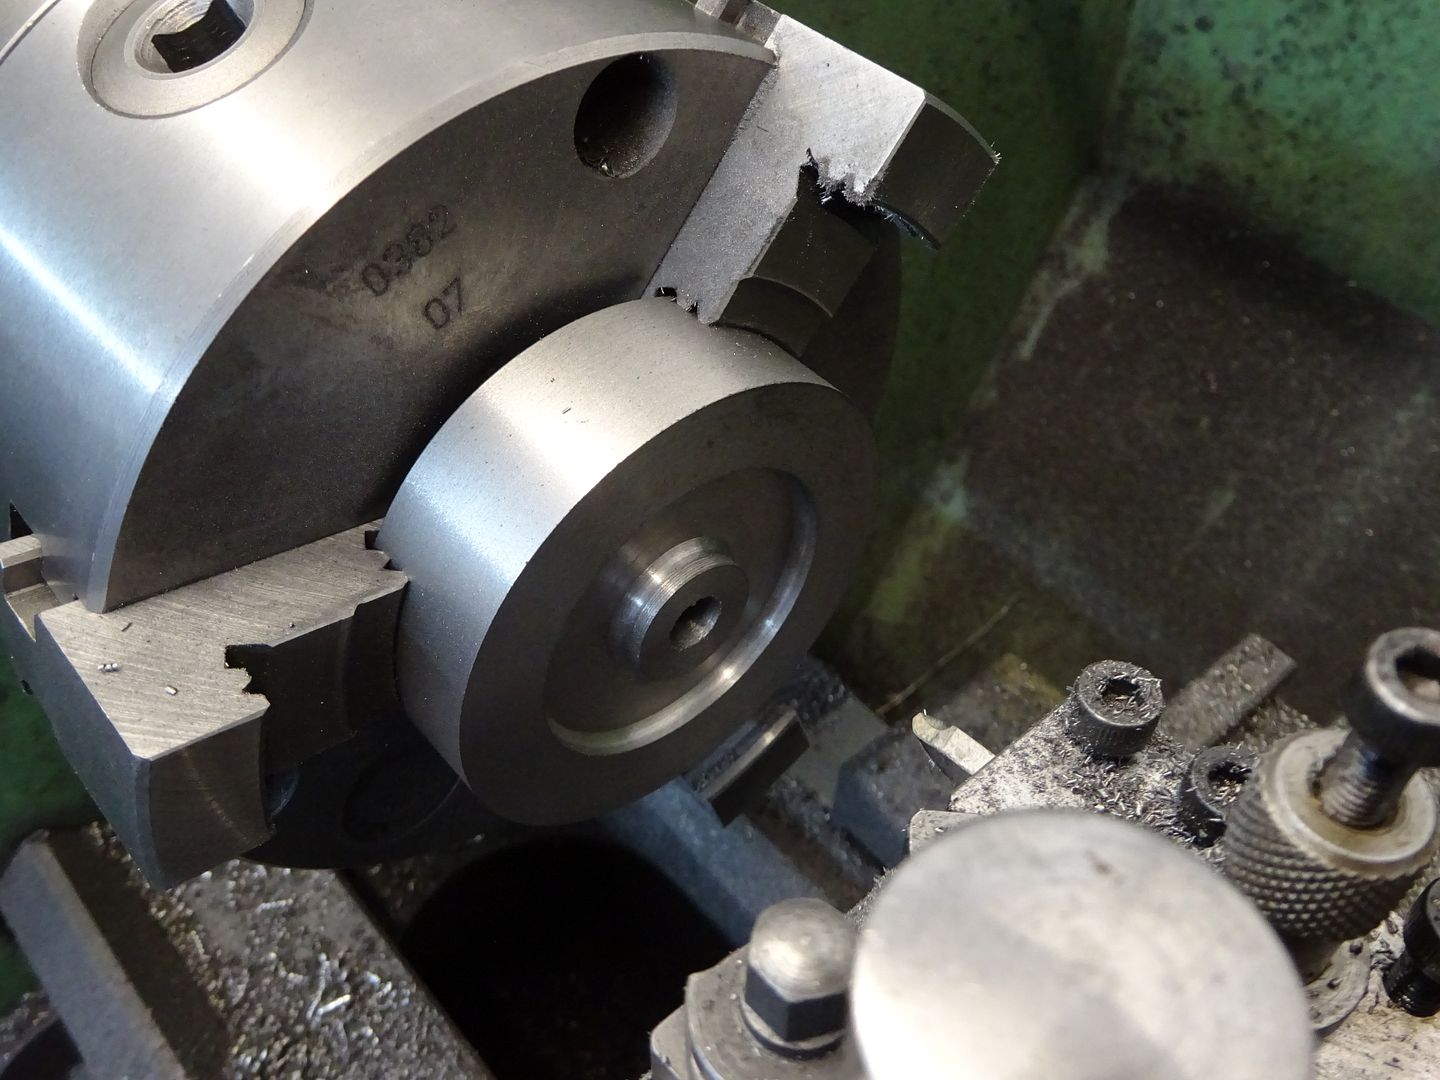
| 566 forum posts 31 photos | Glanze Circular insert toolholder with extra relief (roughly) ground. Shown with unfinished flywheel for barstock Elmers Mill Engine. Big advantage of the round insert is that you can turn both the inside of the rim and the internal boss with the same tool.
Edited By Stuart Bridger on 03/07/2019 22:10:27 |
| Neil Wyatt | 03/07/2019 22:22:34 |
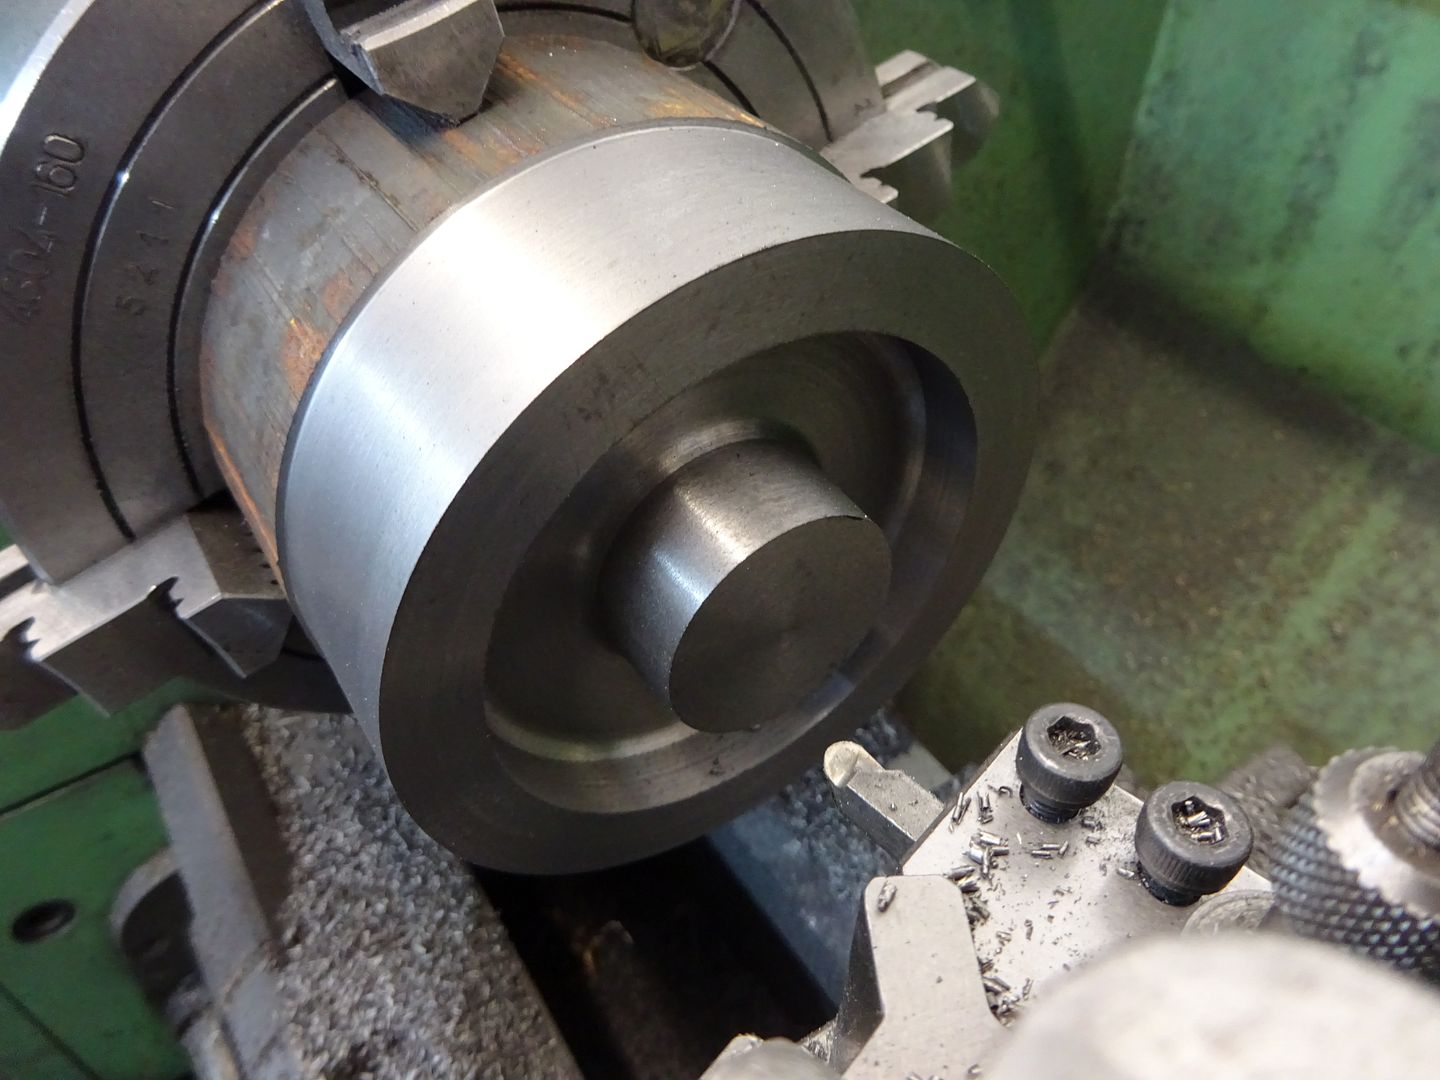
 19226 forum posts 749 photos 86 articles | I have done this job as Jason suggests - working a round tipped tool side to side. Works even better if the end of the tool is notched slightly. If necessary leave the outer radius tapering (that is don't go to the full radius, with each cut do a slightly smaller diameter). Tidy up with a boring bar at the end. Sort of how I did this from a laser cut blank, but used a large radius tool to do the internal corners.
|
| Iain Downs | 06/07/2019 11:11:17 |
| 976 forum posts 805 photos | As usual great advice. The key was to take off the top rake. It's now 0 degrees - well, it might be one degree as per Andrew's suggestion, my hand grinding's not that precise. But it's no longer 10. I reckon the rake was making the tool dig in and catch which was the heart of the problems. Still requires a good deal of delicacy.
I could only get in about 1mm without it starting to jam, even though I'm convinced the relief was adaquate (and I kept tuning it), but in this case I didn't need a narrow slot so just plunged in next to it. I also had a bit of a go at the point technique once the trough was done to start taking the bulk of the metal off.
As you can see it's starting to come together!
Iain |
| ANDY CAWLEY | 07/07/2019 10:59:14 |
| 190 forum posts 50 photos | Were you absolute fastidious about making sure the tool was plunging into the work piece at bang on 90 degrees. If you got it only very slightly out it starts to bind and that’s that‼️ Don’t ask me how I know🙄. Edited By ANDY CAWLEY on 07/07/2019 11:00:01 |


Please login to post a reply.
Magazine Locator
Want the latest issue of Model Engineer or Model Engineers' Workshop? Use our magazine locator links to find your nearest stockist!
Sign up to our Newsletter
Sign up to our newsletter and get a free digital issue.
You can unsubscribe at anytime. View our privacy policy at www.mortons.co.uk/privacy
Latest Forum Posts
- *Oct 2023: FORUM MIGRATION TIMELINE*
05/10/2023 07:57:11 - Making ER11 collet chuck
05/10/2023 07:56:24 - What did you do today? 2023
05/10/2023 07:25:01 - Orrery
05/10/2023 06:00:41 - Wera hand-tools
05/10/2023 05:47:07 - New member
05/10/2023 04:40:11 - Problems with external pot on at1 vfd
05/10/2023 00:06:32 - Drain plug
04/10/2023 23:36:17 - digi phase converter for 10 machines.....
04/10/2023 23:13:48 - Winter Storage Of Locomotives
04/10/2023 21:02:11 - More Latest Posts...
- View All Topics
Support Our Partners


Shopping Partners
Subscription Offer

Latest "For Sale" Ads
- Reeves** - Rebuilt Royal Scot by Martin Evans
by John Broughton
£300.00 - BRITANNIA 5" GAUGE James Perrier
by Jon Seabright 1
£2,500.00 - Drill Grinder - for restoration
by Nigel Graham 2
£0.00 - WARCO WM18 MILLING MACHINE
by Alex Chudley
£1,200.00 - MYFORD SUPER 7 LATHE
by Alex Chudley
£2,000.00 - More "For Sale" Ads...
Latest "Wanted" Ads
- D1-3 backplate
by Michael Horley
Price Not Specified - fixed steady for a Colchester bantam mark1 800
by George Jervis
Price Not Specified - lbsc pansy
by JACK SIDEBOTHAM
Price Not Specified - Pratt Burnerd multifit chuck key.
by Tim Riome
Price Not Specified - BANDSAW BLADE WELDER
by HUGH
Price Not Specified - More "Wanted" Ads...
Get In Touch!
Do you want to contact the Model Engineer and Model Engineers' Workshop team?
You can contact us by phone, mail or email about the magazines including becoming a contributor, submitting reader's letters or making queries about articles. You can also get in touch about this website, advertising or other general issues.
Click THIS LINK for full contact details.
For subscription issues please see THIS LINK.
Digital Back Issues


Donate

 Register
 Log-in
Model Engineer Magazine
- Percival Marshall
- M.E. History
- LittleLEC
- M.E. Clock

ME Workshop
- An Adcock
- & Shipley
- Horizontal
- Mill

Subscribe Now
- Great savings
- Delivered to your door

Pre-order your copy!
- Delivered to your doorstep!
- Free UK delivery!
All Forum Topics > Beginners questions > Treppaning a flywheel