Forum sponsored by:

The Workshop Progress Thread (2017)
Report your modeling and workshop progress here
| Neil Wyatt | 24/02/2017 18:35:22 |
 19226 forum posts 749 photos 86 articles |
I'm going to have to keep a pile of sick bags handy if people keep posting wobbly workshop videos... Or give away tripods as the prize for tip of the month! Neil |
| Ian S C | 25/02/2017 07:52:30 |
 7468 forum posts 230 photos | Or put up plans so video makers have somewhere stable to put their camera. Ian S C |
| Benny Avelin | 26/02/2017 12:14:06 |
| 80 forum posts 86 photos | Thought this would be useful. Not sure
|
| JA | 26/02/2017 13:11:21 |
 1605 forum posts 83 photos | Posted by Benny Avelin on 26/02/2017 12:14:06:
Thought this would be useful. Not sure
I made a smaller version, with a Jacobs type chuck, about a month ago to replace a rather decrepit pin chuck. JA Edited By JA on 26/02/2017 13:12:41 |
| Michael Gilligan | 26/02/2017 14:22:29 |
 23121 forum posts 1360 photos | Posted by Benny Avelin on 26/02/2017 12:14:06:
Thought this would be useful. Not sure . Nice knurling, Benny, but [assuming it's meant to be hand-held] ... mine is on a small file handle, which I find very convenient. MichaelG. . Of course, yours may have a centre-drilling in the end, and be useful for other than hand-work ... I accept that the knurled shank may be optimum for the way you intend to use it.
|
| Iain Downs | 26/02/2017 16:28:57 |
| 976 forum posts 805 photos | The scrapyard press! At long last I've finished my press. It's designed to press down (not the thrust bearing at the bottom)
And pull up.
My new spindle is shown in this example. Hopefully, I will now be able to disassemble and reassemble the headstock without recourse to a hammer and I will instantly become a brilliant lather... It's not pretty, but it should be able to squish stuff nicely!
Iain |
| daveb | 26/02/2017 16:59:53 |
| 631 forum posts 14 photos | Benny, it will be. I made a similar device using the spindle and chuck from a defunct Makita battery drill fitted to a wooden handle. Only took half an hour or so, very useful for holding small screws and pins for grinding or filing. Dave |
| Benny Avelin | 27/02/2017 08:05:13 |
| 80 forum posts 86 photos | JA, I actually made it to hold a countersink so that I could hand-deburr stuff, but as a pin chuck it would be great... why didnt I think of that? Michael, I didnt have a file handle I felt I could spare so this was the easiest step, took maybe 15 min or so. But I am lost as to why a centerdrilled hole would be of use, what am I missing, a small chuck for turning between centers? Dave, great! |
| Michael Gilligan | 27/02/2017 08:24:23 |
23121 forum posts 1360 photos | Posted by Benny Avelin on 27/02/2017 08:05:13:
Michael, I didnt have a file handle I felt I could spare so this was the easiest step, took maybe 15 min or so. But I am lost as to why a centerdrilled hole would be of use, what am I missing, a small chuck for turning between centers? . Benny, I was actually wondering if I had missed-a-trick regarding your design [although it appears not]: If the tail end of the handle was centre-drilled; the device could be used, with tailstock support, for 'sensitive' drilling & tapping. MichaelG. |
| IanT | 27/02/2017 09:56:19 |
| 2147 forum posts 222 photos | And I misunderstood your post Michael - I thought you were suggesting drilling all the way through the handle (and chuck) - to make a form of hollow hand vice... They are not expensive to buy though... https://www.cousinsuk.com/product/10mm-jaw-width-indian Regards, IanT |
| Michael Gilligan | 27/02/2017 10:21:11 |
23121 forum posts 1360 photos | Posted by IanT on 27/02/2017 09:56:19:
And I misunderstood your post Michael . Sorry ... I should perhaps have mentioned Slocombe MichaelG.
|
| richardandtracy | 28/02/2017 10:12:00 |
 943 forum posts 10 photos | I do not think mentioning either Mrs Slocombe or her cat would help. Regards, Richard.
Edited By richardandtracy on 28/02/2017 10:16:54 |
| Michael Gilligan | 28/02/2017 10:38:21 |
23121 forum posts 1360 photos | Touché, Richard ... the e was superfluous I should have written Slocomb MichaelG. |
| Neil Wyatt | 28/02/2017 12:33:22 |
19226 forum posts 749 photos 86 articles | Posted by Michael Gilligan on 28/02/2017 10:38:21:
Touché, Richard ... the e was superfluous I should have written Slocomb MichaelG. Or superficial as Mrs Solcombe may have put it.
Neil |
| Benny Avelin | 02/03/2017 20:11:55 |
| 80 forum posts 86 photos | I decided to perform one of Steve's improvements as found on this website **LINK**. This amounted to turning a new pulley for the motor, this one is approximately 1" (25mm).
My particular version of the mini-lathe had a different setup for adjusting the belt tension, essentially there was no bracket at the end where the adjustment screw was, instead it was built into the plate, so I had to begin by milling away that material, making a flat on the top and two holes for mounting.
This is how the bracket turned out
Everything mounted and adjusted, now the max rpm for the low ratio is 600 and the max for the high ratio is 1200. Previously it was 1200 and 2400.
Looking forward to trying it out. |
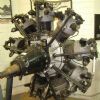
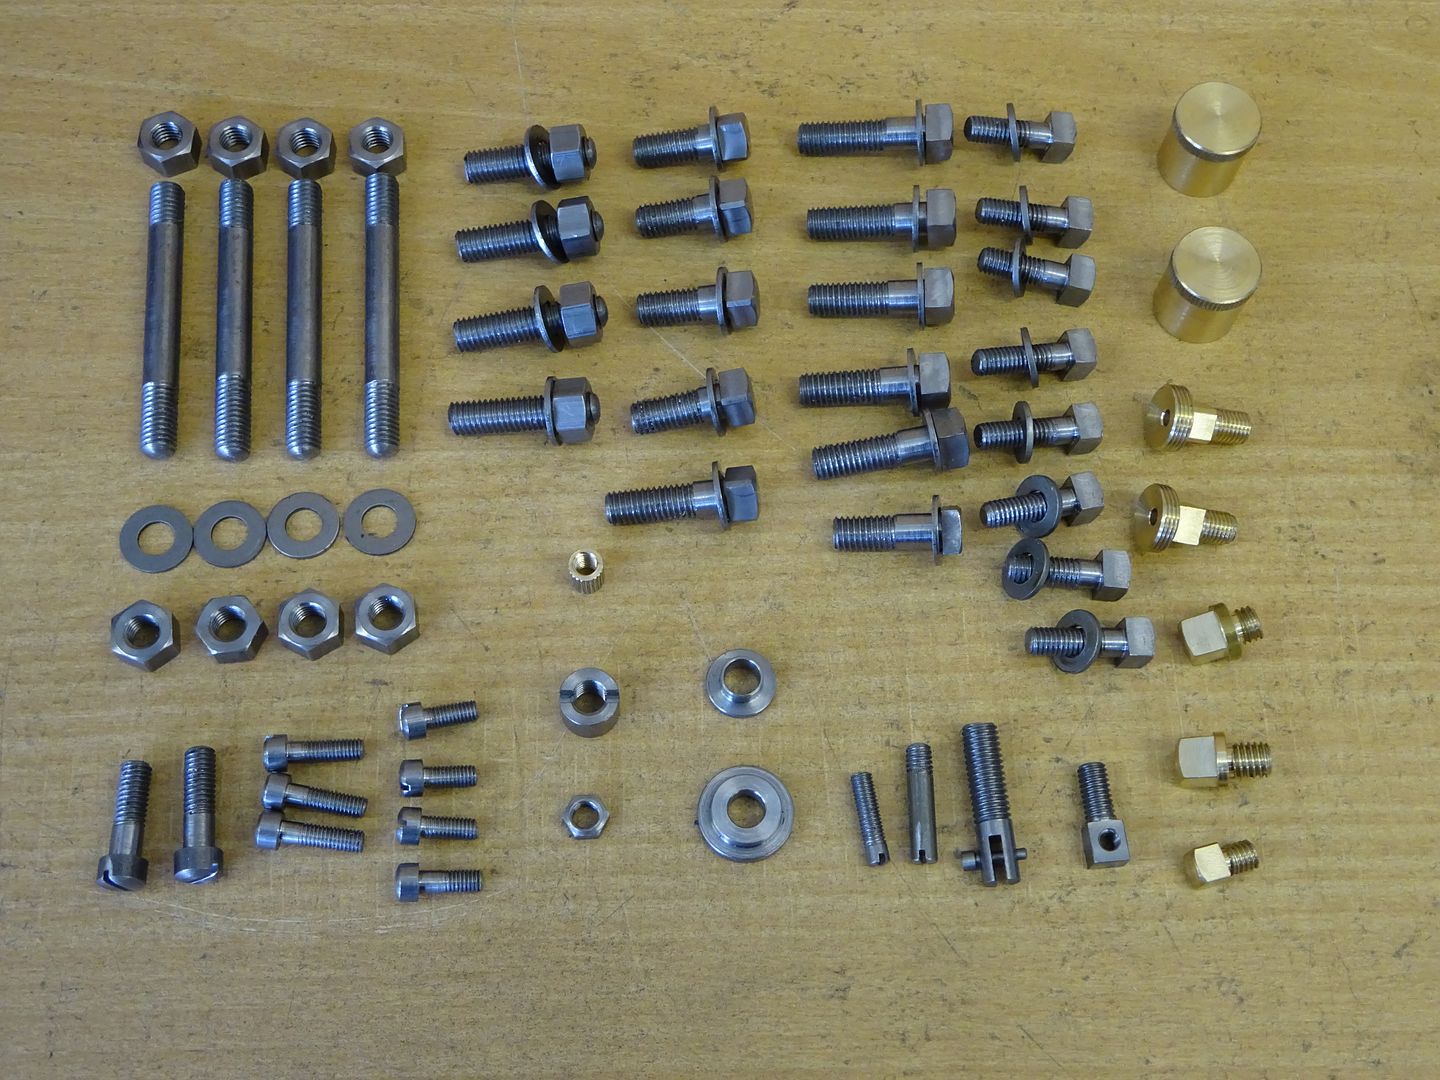
| JasonB | 05/03/2017 18:00:35 |
 25215 forum posts 3105 photos 1 articles | I made a start on the part completed Root & Van Dervoort vertical, generally assesing what still had to be done and making up some of the assorted fixings and small parts. The crank shaft was going tight a TDC so I put one end in a collet upto the web and clocked the other end, 0.018" TIR
There are quite a few square headed fixings, non standard nuts and some filaster headed screws so the 5C spin indexer got a fair bit of use.
J
|
| Neil Wyatt | 05/03/2017 19:42:41 |
19226 forum posts 749 photos 86 articles | Posted by JasonB on 05/03/2017 18:00:35:
Interesting optical illusion, to me it looks like the stilson is climbing up the cabinet! Neil |
| duncan webster | 05/03/2017 19:51:59 |
| 5307 forum posts 83 photos |
|
| Martin Cottrell | 05/03/2017 20:07:05 |
| 297 forum posts 18 photos | Posted by JasonB on 05/03/2017 18:00:35:
I made a start on the part completed Root & Van Dervoort vertical, generally assesing what still had to be done and making up some of the assorted fixings and small parts. The crank shaft was going tight a TDC so I put one end in a collet upto the web and clocked the other end, 0.018" TIR
Good to see that even the experts need to resort to some "agricultural adjustments" when chasing that last few thou' of precision!! Martin. |
| John Stevenson | 05/03/2017 22:56:28 |
 5068 forum posts 3 photos | Started off having a clear up but got side tracked into a job that's wanted doing for over 2 years.
When I bought my big mill , a WM40 from Warco it came with a two axis DRO fitted but I swapped the 3 axis read head off my old mill onto this which was OK as I use a vernier type bar on the quill but I had a spare scale kicking about to fit so in the clean up, found and and started to fit it,
The only place to mount this was on the electrical cabinet at the side but as I guess although it looks square it's not plumb in both plane because of the column tapering so a lot of winding up and down and shimming before I was happy.
This mill has a three phase motor driving the knee directly which is one of the main reasons I bought it as it's the next size up to a standard Bridgeport but they had been very conservative in fitting the stops for the knee motor and I was loosing out at least 3" top and bottom under power although I still had this movement if I wound it by hand.
So a re measure and a bit of drilling and it stops just short of the physical stops. So 433mm on knee movement under power and can just scrape 450mm if I hand crank to the physical stops.
So all in all a productive day and we won't mention dropping a very large box of Coventry Dies and having to re-sort them all out off the floor.
I said we won't mention that bit. Edited By John Stevenson on 05/03/2017 22:56:59 |


.jpg")
.jpg")
This thread is closed.
Magazine Locator
Want the latest issue of Model Engineer or Model Engineers' Workshop? Use our magazine locator links to find your nearest stockist!
Sign up to our Newsletter
Sign up to our newsletter and get a free digital issue.
You can unsubscribe at anytime. View our privacy policy at www.mortons.co.uk/privacy
Latest Forum Posts
- hemingway ball turner
04/07/2025 14:40:26 - *Oct 2023: FORUM MIGRATION TIMELINE*
05/10/2023 07:57:11 - Making ER11 collet chuck
05/10/2023 07:56:24 - What did you do today? 2023
05/10/2023 07:25:01 - Orrery
05/10/2023 06:00:41 - Wera hand-tools
05/10/2023 05:47:07 - New member
05/10/2023 04:40:11 - Problems with external pot on at1 vfd
05/10/2023 00:06:32 - Drain plug
04/10/2023 23:36:17 - digi phase converter for 10 machines.....
04/10/2023 23:13:48 - More Latest Posts...
- View All Topics
Support Our Partners


Shopping Partners
Subscription Offer

Latest "For Sale" Ads
- Reeves** - Rebuilt Royal Scot by Martin Evans
by John Broughton
£300.00 - BRITANNIA 5" GAUGE James Perrier
by Jon Seabright 1
£2,500.00 - Drill Grinder - for restoration
by Nigel Graham 2
£0.00 - WARCO WM18 MILLING MACHINE
by Alex Chudley
£1,200.00 - MYFORD SUPER 7 LATHE
by Alex Chudley
£2,000.00 - More "For Sale" Ads...
Latest "Wanted" Ads
- D1-3 backplate
by Michael Horley
Price Not Specified - fixed steady for a Colchester bantam mark1 800
by George Jervis
Price Not Specified - lbsc pansy
by JACK SIDEBOTHAM
Price Not Specified - Pratt Burnerd multifit chuck key.
by Tim Riome
Price Not Specified - BANDSAW BLADE WELDER
by HUGH
Price Not Specified - More "Wanted" Ads...
Get In Touch!
Do you want to contact the Model Engineer and Model Engineers' Workshop team?
You can contact us by phone, mail or email about the magazines including becoming a contributor, submitting reader's letters or making queries about articles. You can also get in touch about this website, advertising or other general issues.
Click THIS LINK for full contact details.
For subscription issues please see THIS LINK.
Digital Back Issues


Donate

 Register
 Log-in
Model Engineer Magazine
- Percival Marshall
- M.E. History
- LittleLEC
- M.E. Clock

ME Workshop
- An Adcock
- & Shipley
- Horizontal
- Mill

Subscribe Now
- Great savings
- Delivered to your door

Pre-order your copy!
- Delivered to your doorstep!
- Free UK delivery!
All Forum Topics > Work In Progress and completed items > The Workshop Progress Thread (2017)