Forum sponsored by:

Making a Carriage stop for a lathe
This is mainly for a Myford but could be adapted to any lathe.
| Anthony Knights | 02/03/2022 11:31:44 |
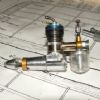
| 681 forum posts 260 photos | Not a Myford, but my mini lathe.
|
| Richard Millington | 02/03/2022 12:58:21 |
| 101 forum posts 9 photos | I have two carriage stops for my lathe, one is std and makes a clutch slip in the apron. The other one I put on the carriage stop which operates a micro switch to add a braked stop from the vfd for when screw cutting. |
| Sam Longley 1 | 02/03/2022 16:06:21 |
| 965 forum posts 34 photos | I apreciate that one should not put items for sale in the threads but as the subject on hand is stops I thought that I would cheat ( If I can get away with it!!) & say that I have one of these for sale for £ 80-00 plus P & P It is quite heavy
|
| Terry Kirkup | 02/03/2022 20:21:51 |
 108 forum posts 82 photos | Here's mine. I thought I'd avoid any flack by not showing the 45 second video I didn't make of me drilling and tapping one 8mm hole.
|
| Journeyman | 03/03/2022 09:38:58 |
 1257 forum posts 264 photos | This is my version for WM250
Details of build *** HERE *** but no video! John |
| Danny M2Z | 03/03/2022 10:35:31 |
 963 forum posts 2 photos | For a mini-lathe it is not too difficult to wire a micro-switch into the chuck guard stop circuit as an over-run switch.
|
| Nigel Graham 2 | 03/03/2022 11:23:13 |
| 3293 forum posts 112 photos | Stops that switch the motor off.... Fine in theory but I would be wary of using it with a VFD as it would seem to emulate the Emergency Stop action, not recommended for the sake of the electronics. At least I would suggest seeking the manufacturer's advice before making any such system. The switches on machine-guards are to prevent you starting the machine with the guard open, not for stopping it. |
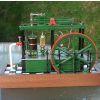
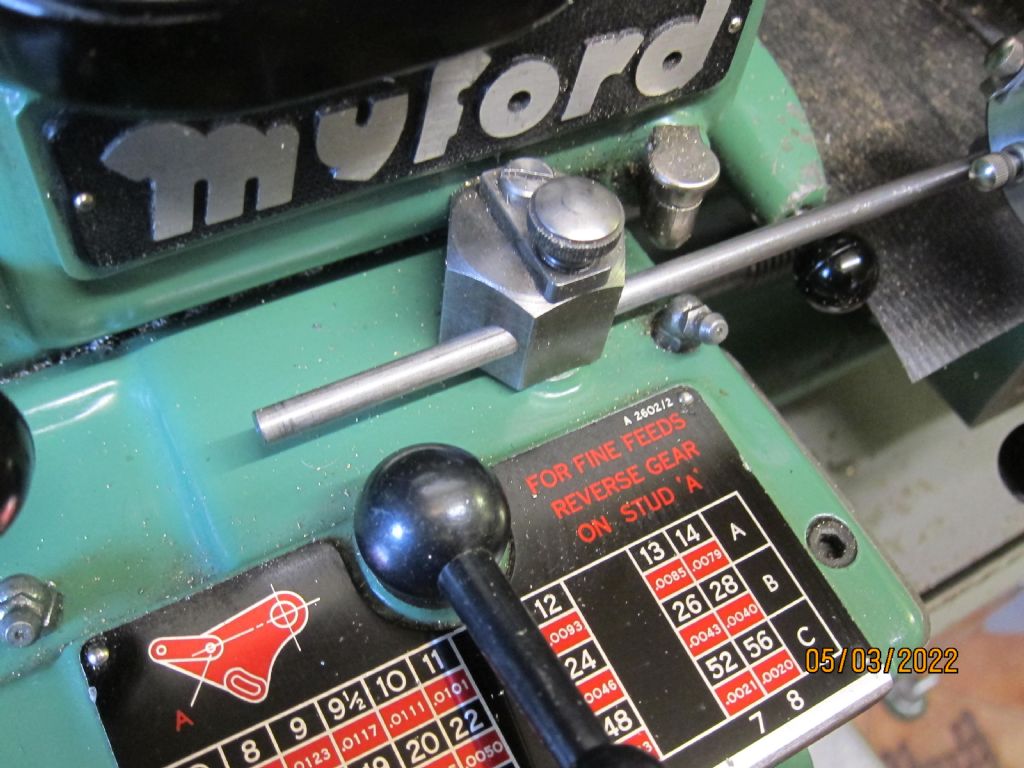
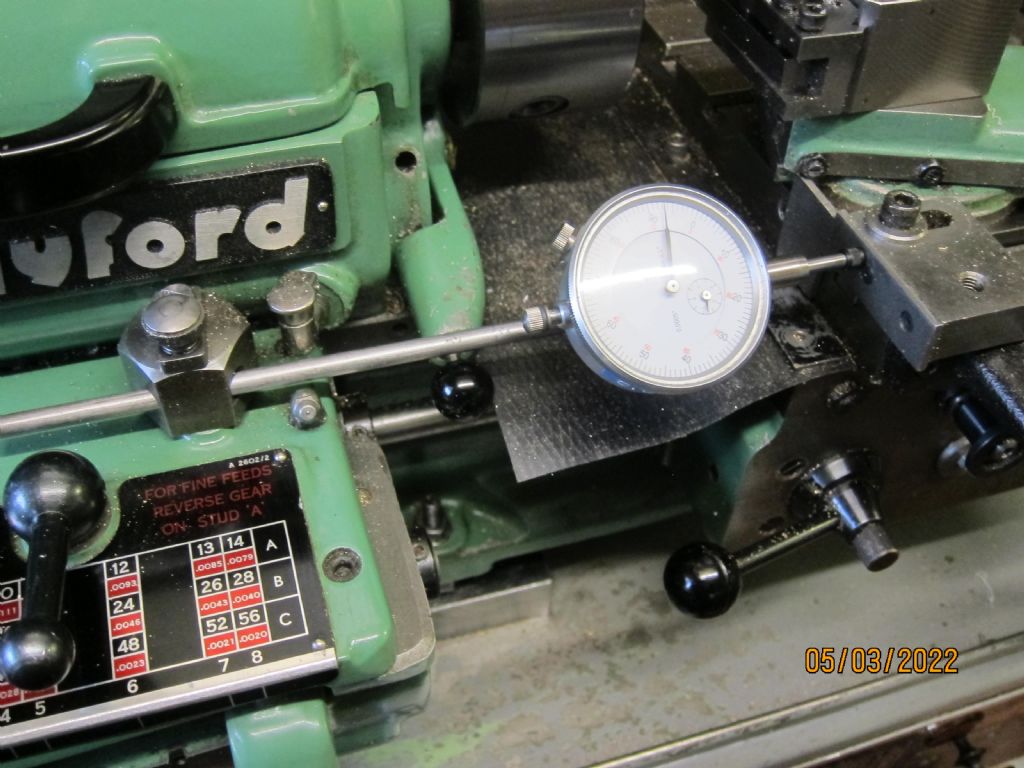
| Greensands | 05/03/2022 15:26:47 |
| 449 forum posts 72 photos | This is my answer to a gearbox fitted Myford S7 making use of the tapped hole provided for the oiler. It has provided satsfactory service over many tears.
|
| Steviegtr | 05/03/2022 15:41:21 |
 2668 forum posts 352 photos | Hey Greensands. That looks great. Not seen one like that before. Steve. |
| Dalboy | 05/03/2022 15:47:19 |
 1009 forum posts 305 photos | Posted by Terry Kirkup on 02/03/2022 20:21:51:
Here's mine. I thought I'd avoid any flack by not showing the 45 second video I didn't make of me drilling and tapping one 8mm hole.
I have the very same one did need to strip it and clean it up for the adjuster to operate smoother than supplied |
| ega | 05/03/2022 17:36:07 |
| 2805 forum posts 219 photos | Greensands: That's a very nice looking machine and ingenious solution. On mine, the corresponding hole is for the detent grub screw ie FWIW not an oiler. |
| Nigel Taylor 2 | 05/03/2022 18:44:18 |
| 27 forum posts 10 photos |
I modified the stop on my Warco 290V to make it quick to set and release.
|
| Dalboy | 05/03/2022 19:41:21 |
1009 forum posts 305 photos | Very nice Nigel may have to do that with mine looks easier than having to fiddle with the two bolts underneath the stop assembly |
| Nigel Taylor 2 | 05/03/2022 20:50:15 |
| 27 forum posts 10 photos | In case it's not clear from the photos, I used the quick release mechanism from a bike front wheel to make the clamping mechanism. Much easier than two hidden bolts! |
| Steviegtr | 05/03/2022 21:48:51 |
2668 forum posts 352 photos | Posted by Greensands on 05/03/2022 15:26:47:
This is my answer to a gearbox fitted Myford S7 making use of the tapped hole provided for the oiler. It has provided satsfactory service over many tears.
Hi again Greensands. I have been working on my Myford tonight. If i had the stop where yours is fitted , then i could not engage backgear. Steve. |
| Nick Wheeler | 05/03/2022 22:08:49 |
| 1227 forum posts 101 photos | Posted by Derek Lane on 05/03/2022 19:41:21:
Very nice Nigel may have to do that with mine looks easier than having to fiddle with the two bolts underneath the stop assembly One of my requirements for this sort of thing is that tools are not needed for use. I've posted my current stop, but having made it from aluminium it's spread and becoming less effective. And I've never used the adjustable stop because it's not accurate. So the new one will look like this:
and
|
| Steviegtr | 06/03/2022 00:05:20 |
2668 forum posts 352 photos | Posted by Nicholas Wheeler 1 on 05/03/2022 22:08:49:
Posted by Derek Lane on 05/03/2022 19:41:21:
Very nice Nigel may have to do that with mine looks easier than having to fiddle with the two bolts underneath the stop assembly One of my requirements for this sort of thing is that tools are not needed for use. I've posted my current stop, but having made it from aluminium it's spread and becoming less effective. And I've never used the adjustable stop because it's not accurate. So the new one will look like this:
and
Mm interesting. Will like to see the finished product. Steve. |
| Dominic Bramley | 06/03/2022 08:20:28 |
| 60 forum posts 1 photos | Posted by Nicholas Wheeler 1 on 05/03/2022 22:08:49:
Posted by Derek Lane on 05/03/2022 19:41:21:
Very nice Nigel may have to do that with mine looks easier than having to fiddle with the two bolts underneath the stop assembly One of my requirements for this sort of thing is that tools are not needed for use. I've posted my current stop, but having made it from aluminium it's spread and becoming less effective. And I've never used the adjustable stop because it's not accurate. So the new one will look like this:
and
I like the look of this design. Grab a couple of pics if/when you make it and it could be a good little article for MEW.... Dom |
| Bob Unitt 1 | 06/03/2022 11:43:40 |
 323 forum posts 35 photos | Here's the Carraige Stop I made for my Myford 254. No automatic lathe-stopping or anything, it's mainly to prevent me running into the chuck when roughing-out by hand. No changes made to the lathe itself, it just clamps around the top and bottom of the ways. It consists of a holder with a clamp on the lathe centre-line, with 4 different length rods (adjustable) to set the actual stop position (which acts on the centre of the saddle). First picture shows the holder with clamp, and the four stop-rods. Second picture is a close-up of the holder. Third picture is the carraige-stop in use, with the saddle stopped by it.
|
| john halfpenny | 06/03/2022 13:19:34 |
| 314 forum posts 28 photos | A simple adjustable stop on my Clarke lathe. The excess length disappears into the drive housing on the left. Next job is to add a fine thread button/lock nut at the contact end.
|


Please login to post a reply.
Magazine Locator
Want the latest issue of Model Engineer or Model Engineers' Workshop? Use our magazine locator links to find your nearest stockist!
Sign up to our Newsletter
Sign up to our newsletter and get a free digital issue.
You can unsubscribe at anytime. View our privacy policy at www.mortons.co.uk/privacy
Latest Forum Posts
- hemingway ball turner
04/07/2025 14:40:26 - *Oct 2023: FORUM MIGRATION TIMELINE*
05/10/2023 07:57:11 - Making ER11 collet chuck
05/10/2023 07:56:24 - What did you do today? 2023
05/10/2023 07:25:01 - Orrery
05/10/2023 06:00:41 - Wera hand-tools
05/10/2023 05:47:07 - New member
05/10/2023 04:40:11 - Problems with external pot on at1 vfd
05/10/2023 00:06:32 - Drain plug
04/10/2023 23:36:17 - digi phase converter for 10 machines.....
04/10/2023 23:13:48 - More Latest Posts...
- View All Topics
Support Our Partners


Shopping Partners
Subscription Offer

Latest "For Sale" Ads
- Reeves** - Rebuilt Royal Scot by Martin Evans
by John Broughton
£300.00 - BRITANNIA 5" GAUGE James Perrier
by Jon Seabright 1
£2,500.00 - Drill Grinder - for restoration
by Nigel Graham 2
£0.00 - WARCO WM18 MILLING MACHINE
by Alex Chudley
£1,200.00 - MYFORD SUPER 7 LATHE
by Alex Chudley
£2,000.00 - More "For Sale" Ads...
Latest "Wanted" Ads
- D1-3 backplate
by Michael Horley
Price Not Specified - fixed steady for a Colchester bantam mark1 800
by George Jervis
Price Not Specified - lbsc pansy
by JACK SIDEBOTHAM
Price Not Specified - Pratt Burnerd multifit chuck key.
by Tim Riome
Price Not Specified - BANDSAW BLADE WELDER
by HUGH
Price Not Specified - More "Wanted" Ads...
Get In Touch!
Do you want to contact the Model Engineer and Model Engineers' Workshop team?
You can contact us by phone, mail or email about the magazines including becoming a contributor, submitting reader's letters or making queries about articles. You can also get in touch about this website, advertising or other general issues.
Click THIS LINK for full contact details.
For subscription issues please see THIS LINK.
Digital Back Issues


Donate

 Register
 Log-in
Model Engineer Magazine
- Percival Marshall
- M.E. History
- LittleLEC
- M.E. Clock

ME Workshop
- An Adcock
- & Shipley
- Horizontal
- Mill

Subscribe Now
- Great savings
- Delivered to your door

Pre-order your copy!
- Delivered to your doorstep!
- Free UK delivery!
All Forum Topics > The Tea Room > Making a Carriage stop for a lathe