Forum sponsored by:

Todays update from Bodgers Lodge
| john swift 1 | 23/06/2015 21:44:02 |
 318 forum posts 183 photos | continuing with the early computer theme , how about - Build Your Own NASA Apollo Landing Computer john
|
| John Stevenson | 23/06/2015 23:37:18 |
 5068 forum posts 3 photos | Posted by mark costello 1 on 23/06/2015 15:29:34:
Oh John, Oh John Where forth art thou? Leave the little filly alone and post something, We are wondering what's going on. Too many good deals to stop and let Us know? .
I can't leave the little filly alone, she's too lovely.
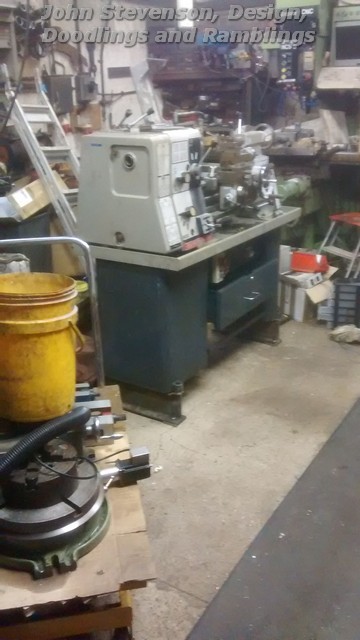
Mind you I have been playing with her new lathe, the little Phantom Bantam. I did remark when I brought it into the workshop how small it was, it was too low for me and she's 5' 14" tall so needed to get it jacked up.
Lathe into position for now until a move round after some building work is done, need to add about 820 extra square foot.
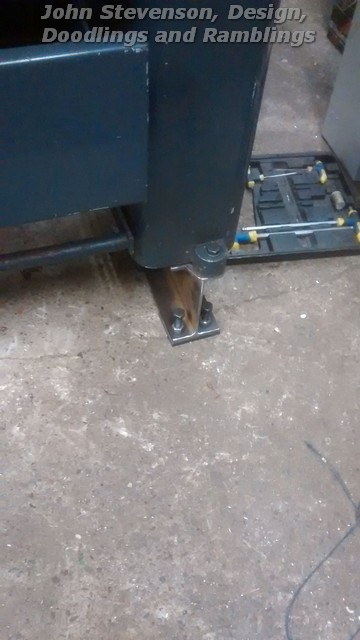
And a close up of the feet before the H&S Nazi's can say anything.
Levelling feet all round.
Sooner than put in in this thread I have started a new thread about a belt drive conversion I'm doing on this. It's called "Lathe Design not Keeping Up. " |
| mark costello 1 | 24/06/2015 14:07:43 |
 800 forum posts 16 photos | What's wrong with the feet that draws unwanted stares from H+S? |
| Ian S C | 24/06/2015 14:29:45 |
 7468 forum posts 230 photos | 5' 14" ?, that makes 6' 2", maybe 5' 1.4". Just being a picky git. I do like that little lathe. Ian S C |
| John Stevenson | 24/06/2015 16:09:03 |
5068 forum posts 3 photos | Mark, Until I rounded the corners off it was an invitation to stab you ankles on the corners.
Ian, 6' 2" which is about the hight this one flew over your head |
| Flying Fifer | 24/06/2015 16:21:47 |
| 180 forum posts | John, 6` 2`` , Eyes of blue ? Reminds me of an old old song. Ian probably hasn`t come in contact with Notts humour !!! Ducks back into workshop to make more swarf. |
| John Stevenson | 24/06/2015 16:25:27 |
5068 forum posts 3 photos | Posted by Flying Fifer on 24/06/2015 16:21:47:
John, 6` 2`` , Eyes of blue ? Reminds me of an old old song. Ian probably hasn`t come in contact with Notts humour !!! Ducks back into workshop to make more swarf. .
"You might think that, I couldn't possibly comment" |
| Ian S C | 25/06/2015 13:33:58 |
7468 forum posts 230 photos | Nuff sed. Ian S C |
| daveb | 25/06/2015 14:18:27 |
| 631 forum posts 14 photos | Posted by Neil Wyatt on 23/06/2015 20:00:07:
> if you flew fast enough you could go right through the mountain and land safely on the other side
A lot of pilots have tried this but I never heard of one landing safely. The wreckage that regularly appears at the bottom of glaciers seems to indicate that quantum physics does not operate in the real world. Dave |
| jason udall | 25/06/2015 18:24:54 |
| 2032 forum posts 41 photos | ..fly at mountain...qm tunnel..and arrive safely at far side.... Mmmmm Probability wave function would indeed be non zero at far side but for any mass that large and slow ..the non zero value is .....to use a mathematical term..chuffing small... |
| John Stevenson | 30/06/2015 01:32:28 |
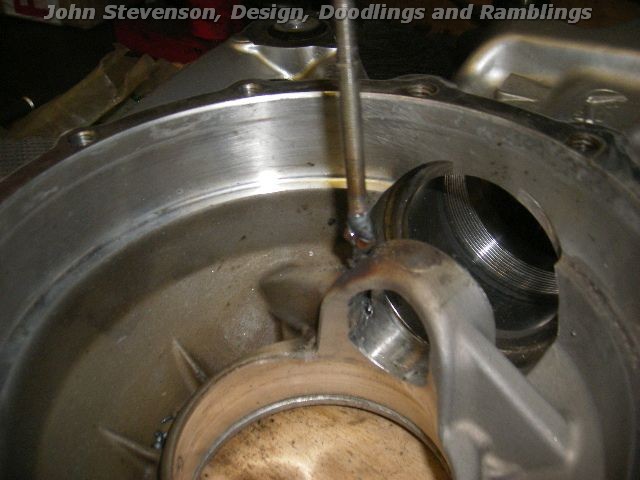
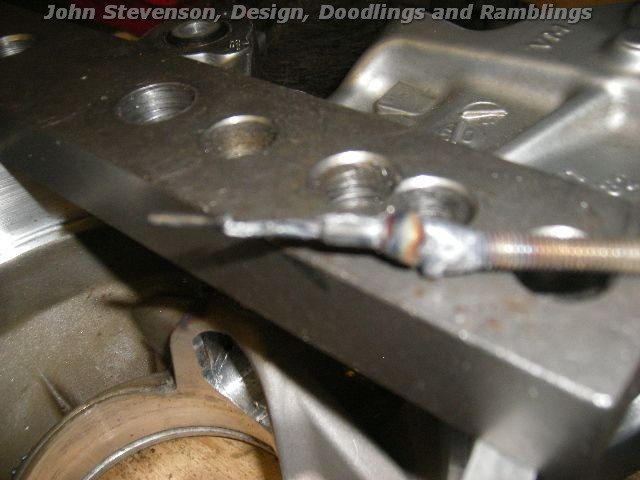
5068 forum posts 3 photos | Interesting and relevant job today.
BMW motorcycle final drive housing. The last bearing is grooved and pressed into place and a roll pin located it from shuffling by going into the groove. One problem, it's fitted into a blind hole, can't drill from the other side as that's the "pretty" side.
BMW in all fairness recognise it's a problem and fit a longer than standard pin that you can grip with a pair of mole grips fitted to a slide hammer. Problem is rolls pins squash up and are brittle so the bit sticking out just snaps off and you have the rag end of a roll pin just below the surface of a curved casting - lovely.
You can get the bearing out by just pulling it and wrecking the roll pin but it's still stuck in and now damaged.
Now it actually looks worse than it is as they spend a good hour piggling away at it and getting nowhere and loose heart. So 3mm roll pin - hardened - buried in an expensive alloy casting.
But you can weld steel with a Mig with steel wire but you can't weld alloy. So dob a quick spot on the end of the pin, count three to let it cool, another dob etc. The idea is not to get it stinking hot so the alloy melts, sound easy and it is.
Once you have got a nice volcano sticking up weld a bit of studding onto this.
Fit a stretcher bar across, couple of washers etc.
Swift pull and jobs a good un.
Sorry it's a bit out of focus but you get the gist on how bad a state the pin is in after whacking the bearing out.
Job done and paint unmarked, another pie and a pint. Edited By John Stevenson on 30/06/2015 01:34:10 |
| Bob Rodgerson | 30/06/2015 09:04:53 |
| 612 forum posts 174 photos | Nice one John, now if you can tell me how I remove the inner cover from a 1933 Sunbeam model 8 engine. I've roomed the four screws and am presented with a plain flat face looking at me. There are no other fasteners holding it in place and I don't want to resort to doing any welding to provide a means of grip. |
| Bob Rodgerson | 30/06/2015 09:05:40 |
| 612 forum posts 174 photos | I should have said the inner cover from an oil pump on a 1933 model 8 Sunbeam. |
| John Stevenson | 30/06/2015 10:24:40 |
5068 forum posts 3 photos | Bob, Just guessing with no picture but could you tap the securing holes to just the depth of the cover ?
Don't try to extract on these as all you will do is squash the underlying threads but bolt a steel 'cover' over the existing one with a length of studding welded to it and use this plate and studding as a slide hammer ? |
| Brian Oldford | 30/06/2015 21:41:48 |
 686 forum posts 18 photos | Posted by John Stevenson on 30/06/2015 01:32:28:. . . . . . .
Sorry it's a bit out of focus but you get the gist on how bad a state the pin is in after whacking the bearing out.
Job done and paint unmarked, another pie and a pint. Edited By John Stevenson on 30/06/2015 01:34:10 Significantly quicker than try to spark it out. |
| John Stevenson | 25/08/2015 21:07:14 |
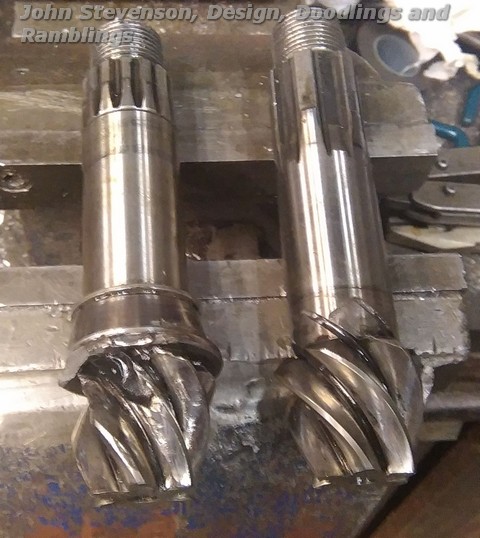
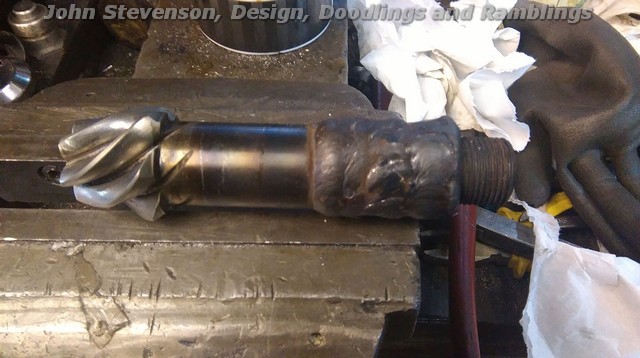
5068 forum posts 3 photos | Started to put this one in the "What did you do today" thread but looked so pretty when it was done it deserves it's own shelf in the Lodge.
Started out with this.
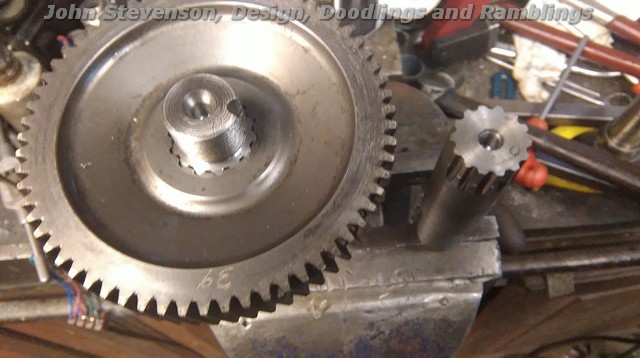
The shaft on the right needs the same splines as the one on the left. It's off something to do with a fork truck transmission and no spares. Ideally it would pay to change the shaft and gear but the 6 spined gear is larger, narrower, and the offset of the dished gear is wrong.
So first thing and this shaft is hardened is to remove some of the shaft and the 6 splines to get under the surface. So in the lathe and using resharpened carbide tips as they won't last long, rip big lumps off. No picture as it's straight forward.
Then build up with weld. The idea is to get the splined end hot so it becomes soft but not allow the pinion to become hot. So weld a bit and let it cool with the pinion under water.
This achieves two things, it keeps the pinion hard and also warms up last nights coffee.
Proof of which is in the photo below, no HAZ on the pinion, and the coffee was lovely.
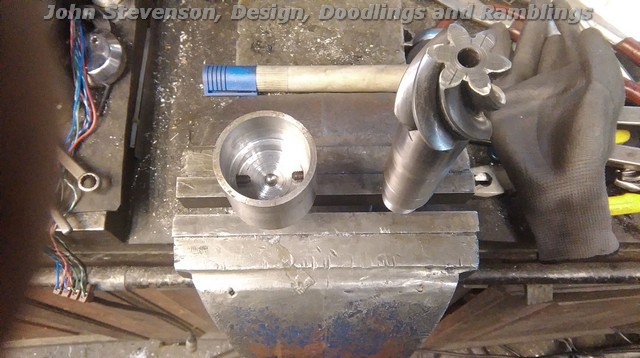
Throw it back in the lathe and simple turning and we get a blank shaft.
Next bit is hobbing the splines on the old converted Victoria U2 mill. As I only have one bit of the cherry or redo everything again I cut a dummy shaft and checked for fit. I fed the hob in the the text book depth and it came out a nice tap fit onto the gear.
However the hobber has an ER32 inbuilt collet chuck and no way will this pinion fit in so I made a tempory pot chuck with a 20mm spigot to fit the ER32, a ball bearing for a centre and two M5 grub screws as driver dogs to turn the pinion when in the machine.
So cut the spline, only a short one 18mm long and check for fit on the gear, dummy shaft to the right.
All done and dusted, just requires going over the road to the heat treat plant to have the splines induction hardened. Could do it with a torch and dunk the end but these guys have all the gear and know what they are doing, plus I can get on with something else.
Pie and a pint time................................... |
| Bob Brown 1 | 25/08/2015 21:17:25 |
 1022 forum posts 127 photos | What weld wire did you use as filler? Bob |
| John Stevenson | 25/08/2015 21:29:31 |
5068 forum posts 3 photos | Not sure of the ANSI ? number but it's very close to EN8 and allows the weld to be thru hardened. On a big hardened shaft you can use ordinary MiG wire as there is enough carbon in the original shaft to leech thru and still get a hard surface, smaller shafts not so as many are not thru hardened anyway and you loose most of the case hardening turning undersize. I have three MiG's set up and ready to run with Y gas connectors and multiple 3 phase sockets on the wall. One is on 1mm plain MiG wire, one is on 1mm high tensile, the EN8 one, and the last one is on 1mm stainless wire. Also have two TiG sets, again all plumbed in so never have to change anything unless something runs out. |
| Bob Rodgerson | 25/08/2015 21:45:32 |
| 612 forum posts 174 photos | Today I have been scratching my head as to how, every time I log into this site and open up a forum I get a pop up telling me I have a virus called "snaketap" and offering to have it removed. Of course when you log in to the "Free" anti virus site you are offered a choice of a whole range of APPS all at a price- no signs of any free ones. I have also cleaned and prepared the crank cases of a 1933 Sunbeam Model 8 for installation of the crank shaft. I have to fit a new big end bearing to the crankshaft and align the flywheels, hopefully it shouldn't take too much alignment because the crank pin has parallel pin ends and there is only about 3/8" of engagement of pin in the flywheels so a good clout with a four pound lead hammer should persuade it to move without much effort. |
| Bob Rodgerson | 25/08/2015 21:47:01 |
| 612 forum posts 174 photos | I should add that I am using an apple Mac book air. |


Please login to post a reply.
Magazine Locator
Want the latest issue of Model Engineer or Model Engineers' Workshop? Use our magazine locator links to find your nearest stockist!
Sign up to our Newsletter
Sign up to our newsletter and get a free digital issue.
You can unsubscribe at anytime. View our privacy policy at www.mortons.co.uk/privacy
Latest Forum Posts
- *Oct 2023: FORUM MIGRATION TIMELINE*
05/10/2023 07:57:11 - Making ER11 collet chuck
05/10/2023 07:56:24 - What did you do today? 2023
05/10/2023 07:25:01 - Orrery
05/10/2023 06:00:41 - Wera hand-tools
05/10/2023 05:47:07 - New member
05/10/2023 04:40:11 - Problems with external pot on at1 vfd
05/10/2023 00:06:32 - Drain plug
04/10/2023 23:36:17 - digi phase converter for 10 machines.....
04/10/2023 23:13:48 - Winter Storage Of Locomotives
04/10/2023 21:02:11 - More Latest Posts...
- View All Topics
Support Our Partners


Shopping Partners
Subscription Offer

Latest "For Sale" Ads
- Reeves** - Rebuilt Royal Scot by Martin Evans
by John Broughton
£300.00 - BRITANNIA 5" GAUGE James Perrier
by Jon Seabright 1
£2,500.00 - Drill Grinder - for restoration
by Nigel Graham 2
£0.00 - WARCO WM18 MILLING MACHINE
by Alex Chudley
£1,200.00 - MYFORD SUPER 7 LATHE
by Alex Chudley
£2,000.00 - More "For Sale" Ads...
Latest "Wanted" Ads
- D1-3 backplate
by Michael Horley
Price Not Specified - fixed steady for a Colchester bantam mark1 800
by George Jervis
Price Not Specified - lbsc pansy
by JACK SIDEBOTHAM
Price Not Specified - Pratt Burnerd multifit chuck key.
by Tim Riome
Price Not Specified - BANDSAW BLADE WELDER
by HUGH
Price Not Specified - More "Wanted" Ads...
Get In Touch!
Do you want to contact the Model Engineer and Model Engineers' Workshop team?
You can contact us by phone, mail or email about the magazines including becoming a contributor, submitting reader's letters or making queries about articles. You can also get in touch about this website, advertising or other general issues.
Click THIS LINK for full contact details.
For subscription issues please see THIS LINK.
Digital Back Issues


Donate

 Register
 Log-in
Model Engineer Magazine
- Percival Marshall
- M.E. History
- LittleLEC
- M.E. Clock

ME Workshop
- An Adcock
- & Shipley
- Horizontal
- Mill

Subscribe Now
- Great savings
- Delivered to your door

Pre-order your copy!
- Delivered to your doorstep!
- Free UK delivery!
All Forum Topics > Workshop Techniques > Todays update from Bodgers Lodge