Forum sponsored by:

Engine Turning or "Jewelling
My method of adding that touch of bling to your work
| Chris Heapy | 28/04/2013 22:00:31 |
| 209 forum posts 144 photos | Plenty of info on the web about this but no threads on here that I can see. If you're a beginner you may not have heard of it but old hands surely will. There are many ways and tools that can be used to achieve this traditional attractive finish to smooth steel but I thought I would just describe the tools and method I use. A jewelled finish looks like this:
Essentially a series of overlapping circles in a regular pattern. A photograph fails to capture the dynamics of the beautiful finish which moves and shimmers as it is turned in the light. The pattern is ground into the surface of the metal using some sort of flexible head (rubber, synthetic, nylon, metallic brush..) as a rotating tool and some carborundum (valve) grinding paste. It is the grinding paste that does the work, whilst the head dimensions govern the size of the pattern. Naturally you will need some method of indexing the workpiece so it is moved in precise steps in X-Y axis (for flat surfaces) or x-rotation (for cylindrical surfaces). The rotating tool I've found which works best is a small (5mm diameter) wire brush contained within a home-made holder which constrains the brush filaments and stops them splaying outward.
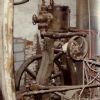
Only about 1/16" length of the filaments are allowed to extend beyond the end of the holder - and you will need to keep checking as work progresses because they will wear away fairly quickly. This was my setup on my mill for the job shown above, with the workpiece held in a 3-jaw chuck attached to my HV6 rotating table. The mill bed takes care of the X-axis steps by way of the handwheel markings, whilst the rotational steps are achieved with the HV6 handwheel. It is an extraordinarily boring job to be sure, and one that could readily be done on some CNC machinery. However, need must... and the results are worth the effort.
In the picture above you can see the workpiece is coated in a generous amount of grinding paste (180-grit in this example), and the end of the brush is brought into gentle contact with it. Don't press hard! - it is not necessary and will achieve nothing other than premature wear of the brush head. Only a light contact is required, and In this particular job I counted for 15 seconds then released. (Did I mention this was boring...?). If you press too hard you can also end up with deeper scoring than expected and possibly a raised blob in the middle of the circle, either of which will ruin the finish. Aim for an overlap of about 50% of the circle diameter in both axes, there is no hard and fast rule about this but that is a good starting point. Don't forget to keep checking on wear of the head, I had to re-set the depth once part way through this job. Oh, and make sure you cover all machine beds with rags or paper towels to keep the grinding paste off them - slideways and grinding paste don't mix well.
I suppose the difficulty of attempting this using a CNC setup is the loss of 'feel' which will normally compensates for any gradual wear in the brush head. A fixed depth setting simply won't work. I guess you would have to use a tool modified so it is weighted and able to slide freely (vertically) on a shaft - the CNC spindle will take care of the indexing just fine, the weighted head producing a nice even pressure (with exaggerated Z-movements when moving to the next step). Wish I had some CNC kit to experiment with
|
| Chris Heapy | 29/04/2013 00:18:06 |
| 209 forum posts 144 photos |
Thanks John, I had to Google 'Cratex bobs' Another consideration is the material that is being worked on - soft aluminium will respond to nylon blocks quite well, steel brush and abrasive being a bit harsh for this. Hard steel really does need the carborundum paste though (in my experience). I must say your workpiece looks beautiful, so clearly your method is working well. Edited By Chris Heapy on 29/04/2013 00:19:03 Edited By Chris Heapy on 29/04/2013 00:31:09 |
| Thor 🇳🇴 | 29/04/2013 05:54:06 |
 1766 forum posts 46 photos | Hi Chris and John that looks very nice indeed. I have seen something similar to the photo you are showing John, not seen it on round objects before. Thor |
| Rik Shaw | 29/04/2013 10:41:00 |
 1494 forum posts 403 photos | My two 'pennorth - when ever I've done this I always use a piece a of wood doweling with a squared of end dipped in valve grinding past. Held in the drill chuck it is a simple process that makes a nice piece of tooling look a bit more special I think I have heard of this process being called "engine turning". Am I right or wrong? ---- Rik |
| Chris Heapy | 29/04/2013 12:26:14 |
| 209 forum posts 144 photos |
Posted by Rik Shaw on 29/04/2013 10:41:00:
...I think I have heard of this process being called "engine turning". Am I right or wrong? ---- Rik
Absolutely right Rik - like the thread title says! In fact there are many other names too but I'm not sure if any particular one is 'right' |
| Joseph Ramon | 29/04/2013 14:35:58 |
 107 forum posts | I've seen this on vintage car dashboards. personally i think it's a bit OTT as it highlights the background, rather than the detail. Rather like the 'Duplex' boring bar holder that was scraped all over! Joey the spoilsport |
| Bazyle | 29/04/2013 16:54:55 |
 6956 forum posts 229 photos |
I think it better to avoid using the term "engine turning" as that is a subset of ornamental turning and using that term will debase proper ET. It is typical modern marketing to try and adopt terms from a top line product like that. |
| Chris Heapy | 29/04/2013 18:59:35 |
| 209 forum posts 144 photos | Bazyle: The finish described above is just that - a decorative finish applied to an existing metal surface, and has been called Engine Turning for donkey's years. Ornamental turning generally employs a cutter to produce a new surface, often in 3D, using complex geometric chucks or machinery offering similar funtionality. I don't know where you get 'Modern Marketing' from given its history, and it isn't a poor substitute for anything - it is what it is. Used appropriately and executed well it can enhance appearance (dependent on the eyes of the beholder of course). As mentioned above, it also has a practical application in improving lubrication of sliding surfaces. |
| JasonB | 29/04/2013 19:13:08 |
 25215 forum posts 3105 photos 1 articles | Chris, the "complex geometric chucks or machinery" on an ornamental lathe are known as an "engine" this is where the term Engine Turning originates from.
J |
| Chris Heapy | 29/04/2013 19:18:50 |
| 209 forum posts 144 photos |
Posted by JasonB on 29/04/2013 19:13:08:
Chris, the "complex geometric chucks or machinery" on an ornamental lathe are known as an "engine" this is where the term Engine Turning originates from.
J I know, but the key word is 'finish' - the appearance of an engine-turned finish, which is quite different from using a cutter to form complex surface geometry which has actually been 'engine turned'. However, we are splitting hairs and the name is not mine in any case. |
| Andrew Evans | 29/04/2013 23:06:48 |
| 366 forum posts 8 photos | Chris, John - What sort of rotational speed do you run the tool at and doesn't it fling grinding paste everywhere ? Thanks |
| Chris Heapy | 29/04/2013 23:19:14 |
| 209 forum posts 144 photos | Andrew: I keep speed down for that reason, although the grinding paste I use is quite viscous and doesn't tend to get thrown around much anway. Can't tell you the RPM as I adjust it on the fly (3-phase/speed controler) but I would guess 800-1000 -ish. |
| frank brown | 30/04/2013 07:45:35 |
| 436 forum posts 5 photos |
I used a far cruder system , a piece of dowel with a vertical split it its end with a piece of emery paper, stuck axially in the split, so it goes over the end of the dowel. The dowel went in a drill press and it was used for tarting up (hiding the scratches Frank |
| russell | 01/05/2013 01:56:26 |
| 142 forum posts | there is another technique also known as 'engine turning'. Possibly this polishing technique was an attempt to reproduce without the expensive machinery...
**LINK** is a reference i could find quickly. -russell |
| joegib | 01/05/2013 06:58:14 |
| 154 forum posts 18 photos | When listing the terms John has quoted above Eamonn Keogh (who's a professor of computing) does qualify them with the phrase "with various degrees of appropriateness". While the term 'damascening' may have been loosely applied to 'engine turning' that doesn't make it right. 'Damascening' (traditionally supposed to have originated in Damascus) probably arrived in Europe via Spain which for a period was under Moorish domination. The technique involves engraving designs in a base metal (commonly steel) and infilling the incised lines with precious metals — gold/silver — for decorative effect. Acid etching might also be used to add colour effects. It was commonly employed on swords (e,g, Toledo steel) and suits of armour. It was also revived and used for presentation swords given to notable naval/military figures in the Napoleonic period. 'Engine turning' is the generation of decorative regular or geometric patterns on metalwork using machine techniques. The 'machine' involved might only be a hand drill and abrasive bobs at its simplest but it's nonetheless a machine technique that's quite different from the hand engraving/infilling technique employed in damascening. Using the same term for what are quite different techniques only leads to confusion. Joe |
| JasonB | 01/05/2013 07:47:48 |
25215 forum posts 3105 photos 1 articles | This page gives some interesting history of how the various terms have come to be used and what their original meanings were. J |
| JAMES WALLING | 28/01/2015 20:12:06 |
| 2 forum posts | Hi Chris (Heapy) or Bogstandard2, I've just come across this topic/site and joined up in the hope that you can help me out.I have just retired and sunk the savings into a Morgan (!!). The dashboard has a beautiful engine turned alloy finish and the armrest /centre tunnel has a matching finish. Sadly,the car is several years old and the finish on the centre tunnel is scratched and worn in several places.Morgan can no longer supply a replacement and whilst I have read up on the 'jewelling' technique ,I don't feel confident enough to try it myself.Would either of you be prepared to re-engine turn the piece in question for me (obviously for suitable recompense )?! I recognise this is a bit cheeky and I don't want to break any forum rules but I truly am desperate to get the item re-finished and have so far drawn a blank.... Any help would be greatly appreciated;many thanks,James
|
| Jon | 01/02/2015 19:12:23 |
| 1001 forum posts 49 photos | We used to call it Jewelling and the pads Chris used were sold as Jewelling by Edgar Bros same as Brownells in US. Loads of stuff done with it usually bolts for rim and centrefires. Personally not worth the effort for what people will pay. Which leads me on to Edgars brushes last hell of a lot longer than anything else, though used to buy in 10's personally for aluminium work up to about 2003. At work used on steel for lock plates and went through three brushes in 7 years, looked tacky like inferior Spanish stuff but saved time polishing.
The Morgans are spotted, whatever is done to the console would have to match the original unless dash done as well. Can anodise if a decent grade. Johns your man he has a long enough mill for centre console, I couldn't sniff for at least 4 months. What looks naff is when the symmetrical look is not put on square to the edges or just 'one' out of place jewel standing out like a sore thumb. Used to cause grief on round objects where first and last meet.
Thought had replied two years ago, Chris front row of bearings too far back so not seen. Tx can go a front later called Venom Ultraglide in 94. Idea was the late Mick Dawes then Venom nicked early 80's. |
| mechman48 | 04/02/2015 17:17:10 |
 2947 forum posts 468 photos | Have had a go myself; I call it 'Jewelling' I used some 'Garryflex abrasive blocks' ... fine grade from Chronos (usual disclaimer ) I cut to suit some holders I made. It works well but doesn't last long so only very light pressure is needed... 1 fingertip pressure is quite sufficient. I have use other methods described on older stuff & they all work to a certain degree... My attempt...
George.
|
| alan-lloyd | 04/02/2015 19:38:42 |
 183 forum posts | Hi James, have you asked the same question on the T V R, Ginetta and Marcos forums? I'm sure they had models with these dashboards. Regards Alan |


 on ali front panels of electronic kit.
.jpg")
Please login to post a reply.
Magazine Locator
Want the latest issue of Model Engineer or Model Engineers' Workshop? Use our magazine locator links to find your nearest stockist!
Sign up to our Newsletter
Sign up to our newsletter and get a free digital issue.
You can unsubscribe at anytime. View our privacy policy at www.mortons.co.uk/privacy
Latest Forum Posts
- *Oct 2023: FORUM MIGRATION TIMELINE*
05/10/2023 07:57:11 - Making ER11 collet chuck
05/10/2023 07:56:24 - What did you do today? 2023
05/10/2023 07:25:01 - Orrery
05/10/2023 06:00:41 - Wera hand-tools
05/10/2023 05:47:07 - New member
05/10/2023 04:40:11 - Problems with external pot on at1 vfd
05/10/2023 00:06:32 - Drain plug
04/10/2023 23:36:17 - digi phase converter for 10 machines.....
04/10/2023 23:13:48 - Winter Storage Of Locomotives
04/10/2023 21:02:11 - More Latest Posts...
- View All Topics
Support Our Partners


Shopping Partners
Subscription Offer

Latest "For Sale" Ads
- Reeves** - Rebuilt Royal Scot by Martin Evans
by John Broughton
£300.00 - BRITANNIA 5" GAUGE James Perrier
by Jon Seabright 1
£2,500.00 - Drill Grinder - for restoration
by Nigel Graham 2
£0.00 - WARCO WM18 MILLING MACHINE
by Alex Chudley
£1,200.00 - MYFORD SUPER 7 LATHE
by Alex Chudley
£2,000.00 - More "For Sale" Ads...
Latest "Wanted" Ads
- D1-3 backplate
by Michael Horley
Price Not Specified - fixed steady for a Colchester bantam mark1 800
by George Jervis
Price Not Specified - lbsc pansy
by JACK SIDEBOTHAM
Price Not Specified - Pratt Burnerd multifit chuck key.
by Tim Riome
Price Not Specified - BANDSAW BLADE WELDER
by HUGH
Price Not Specified - More "Wanted" Ads...
Get In Touch!
Do you want to contact the Model Engineer and Model Engineers' Workshop team?
You can contact us by phone, mail or email about the magazines including becoming a contributor, submitting reader's letters or making queries about articles. You can also get in touch about this website, advertising or other general issues.
Click THIS LINK for full contact details.
For subscription issues please see THIS LINK.
Digital Back Issues


Donate

 Register
 Log-in
Model Engineer Magazine
- Percival Marshall
- M.E. History
- LittleLEC
- M.E. Clock

ME Workshop
- An Adcock
- & Shipley
- Horizontal
- Mill

Subscribe Now
- Great savings
- Delivered to your door

Pre-order your copy!
- Delivered to your doorstep!
- Free UK delivery!
All Forum Topics > Workshop Techniques > Engine Turning or "Jewelling