Forum sponsored by:

Milling a curved end
| Wolfie | 18/01/2012 09:01:28 |
 502 forum posts | OK I have made the con rod for my engine but aesthetically it need the ends curving. I've done one end with a file but it looks like a donkey's hind leg  How do I do this in the milling machine (I don't have a circular table thing) Edited By Wolfie on 18/01/2012 09:02:55 |
| methusala | 18/01/2012 10:06:27 |
| 32 forum posts | Hi Wolfie, Have a look at the" model engine news" web site, then go to the "alpha index " located on the side panel and scroll down to item no. 416. there you will find all the information that you require, plus a whole lot more besides . The site is a mine of information albeit about model aero engines but still applicable to most model engineering projects . hope this helps. Colin. |
| Dave C | 18/01/2012 10:07:33 |
| 102 forum posts 37 photos | Hi Wolfie
I am in the same position as you regards the rotary table.
I overcame the problem by making some filing buttons. I just made mine from mild steel but hardened silver steel would have been a better option. However the lack of gas bottle at the time and the fact that only two ends needed doing dictated the cheep option.
Get some rod the same size diameter as the hole in the con rod. then turn two pieces of bar off about 6mm thick and to the outer diameter of your con rod end with a central drilled hole to match the rod.
You can then use them as a guide to filing if assembled with one on each side of the rod end. File near enough to the guides and the finish by draw filing, whilst draw filing the guides should roll. surprisingly good results can be achieved for very little effort.
LBSC describes ways of doing the ends in the lathe with a milling cutter but I didn't fancy the idea much.
Long winded answer but I hope its of some use to you. |
| Tel | 18/01/2012 10:08:55 |
 157 forum posts 28 photos | Knock up one of these. In use the bottom block is gripped in the mill vice and an end mill lowered into the slot - the workpiece is located on the pin and rotated by hand against the mill, with light cuts. DO ensure you are not climb milling tho! I should be using mine tomorrow - I see if I can remember some action shots. 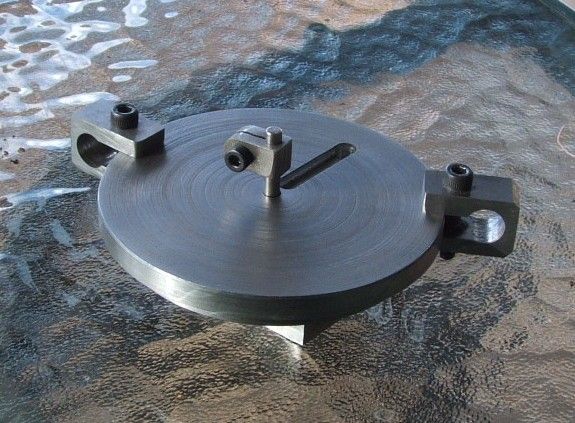 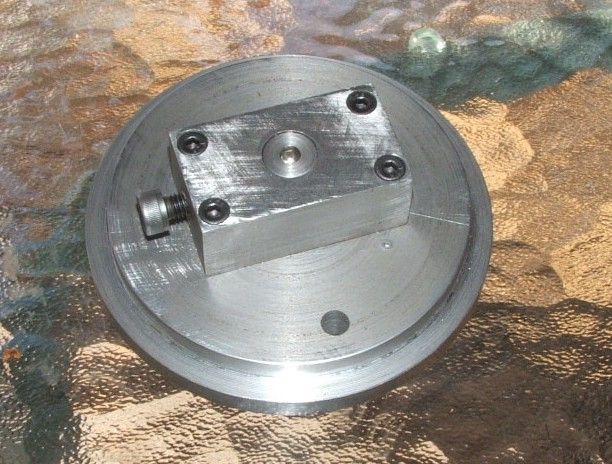 |
| Terryd | 18/01/2012 10:49:16 |
 1946 forum posts 179 photos | Hi Wolfie, You don't need to use a milling machine, it's very satisfying to do it by hand methods, and quicker than setting up the machine accurately for just a couple of ends. Here is a guy using filing buttons to guide him rounding a bearing block and here to round the end of some linkage rods. Scroll down the first page at least to see other examples of them being used. Best regards, Terry Edited By Terryd on 18/01/2012 10:53:48 |
| Wolfie | 18/01/2012 10:57:26 |
502 forum posts | Hi thats a great site, but I can't find an item 416? Also interesting stuff there Terry, learned something there Edited By Wolfie on 18/01/2012 11:06:42 |
| Bazyle | 18/01/2012 11:00:27 |
 6956 forum posts 229 photos | With appologies for being too basic but I wonder if everyone knows the way to file a curve. Rather than try to make the file follow round the curve you must do the opposite.
So with the hole in your connecting rod going left to right and the curve uppermost like a hill in front of you start with the file horizontal and gradually through the stroke drop the handle so the file ends almost vertical. Instead of being like a car going over a bridge it is like a plane taking off.
It is well worth getting old MEs from the '60s onwards when someone is having a clearout and thumbing through them while watching tv as all this stuff is in there. |
| DMB | 18/01/2012 11:34:32 |
| 1585 forum posts 1 photos | Thats it, Bayzle. Just flick thro` each vol., use old envelope for a bookmark on useful articles. Later, copy these items on your printer or simply scan them into `puter. Easy way to create your own encyclopaedic `how to do it` manual. Why mess about with donkeys years worth of indexes to trawl thro` umpteen times every time that you want to know something. Thats what I have done, right from 1930`s. Sounds a lot but apart from LBSC theres not a lot else, since some good ideas from way back have been superceded by more recnt better ideas. I would say that 1950 onwards with each decade revealing better ways of `how to do it`. One example; instead of punching a piece of flexible steel tape with loads of holes and stringing it around a wooden disk to create a new set of dividing holes, its now only necessary to print out required number of divs. on a circular bit of paper + stick it to any old disc and use a pointer.Job done! John |
| Terryd | 18/01/2012 12:51:52 |
1946 forum posts 179 photos | Y Posted by Bazyle on 18/01/2012 11:00:27: With appologies for being too basic but I wonder if everyone knows the way to file a curve. Rather than try to make the file follow round the curve you must do the opposite. So with the hole in your connecting rod going left to right and the curve uppermost like a hill in front of you start with the file horizontal and gradually through the stroke drop the handle so the file ends almost vertical. Instead of being like a car going over a bridge it is like a plane taking off. It is well worth getting old MEs from the '60s onwards when someone is having a clearout and thumbing through them while watching tv as all this stuff is in there. Hi Bazyle, You are absolutely spot on. When I was teaching that is exactly the way I taught youngsters to file a curve and they quickly achieved good results, which chuffed them no end and as you know nothing breeds success like success. There are a great number of techniques and skills such as the one you describe developed over a very long time which really are 'best practice'. It is this sort of success, achievement, self confidence and esteem gained by students following good practice that kept me teaching for so long. These are skills that cannot be learned easily from a book, or are easily missed when reading text, Many beginners working on their own wouldn't even realise that they need to learn basic techniques, they just do as best they can without realising that there are better ways. Further there really is no real substitute for learning from demonstration followed by practice. Videos are ok but as with any skill, tool use as with a golf swing or tennis serve etc, really needs someone competent at hand to show you the little adjustments to stance, action, grip etc in order to progress. That's why sportsmen need coaches. A sad day when 'apprenticeship' means a 6 weeks competency course in shelf stacking.  Best regards Terry |
| Bazyle | 18/01/2012 15:11:23 |
6956 forum posts 229 photos | My only tutor was ME
 By thumb through I meant read thoroughly. The pre 1950 may be a bit thin but I enjoyed reading all of the content as often there is some wisdom burried in the build articles. I am hanging on to my copies so when my memory cells die off I can enjoy reading them afresh. |
| methusala | 18/01/2012 16:26:39 |
| 32 forum posts | Hi wolfie, Sorry I forgot to say click the "site map" first then that will bring up the "alpha index" then scroll down to item 416. Colin. |
| 60019 | 18/01/2012 19:30:42 |
| 24 forum posts 4 photos | How do I do this in the milling machine (I don't have a circular table thing) Neither do I yet, nor have I yet acquired the filing skills to do this with confidence on parts I would hate to scrap. So I experimented with the Radius function on my DRO when I needed to create the cutout in the Metro Inner Frames to clear the leading axle. I managed to do this as four part quadrants using a 0.2mm step size + confidence in my mathematics + a lot of hand wheel twiddling. I like to think of it as a poor man's CNC. Wolfie, I cannot remember if you've mentioned you have a DRO on your mill; when I get to the connecting rod ends, and if my artisan skills have not improved by then, this is the way that I will be doing them. Mike  |
| Tel | 18/01/2012 19:39:22 |
157 forum posts 28 photos | Posted by Terryd on 18/01/2012 10:49:16: Hi Wolfie, You don't need to use a milling machine, it's very satisfying to do it by hand methods, and quicker than setting up the machine accurately for just a couple of ends. Here is a guy using filing buttons to guide him rounding a bearing block Terry Edited By Terryd on 18/01/2012 10:53:48
|
| Clive Hartland | 18/01/2012 19:52:14 |
 2929 forum posts 41 photos | Filing buttons, it just came to me that enclosed ball bearings would make good filing buttons as they would easily rotate and the periphery is hard.
Might be worth saving all the old bearings.
Clive |
| Terryd | 18/01/2012 21:20:59 |
1946 forum posts 179 photos | Posted by Tel on 18/01/2012 19:39:22: Posted by Terryd on 18/01/2012 10:49:16: Hi Wolfie, You don't need to use a milling machine, it's very satisfying to do it by hand methods, and quicker than setting up the machine accurately for just a couple of ends. Here is a guy using filing buttons to guide him rounding a bearing block Terry Edited By Terryd on 18/01/2012 10:53:48
Exactly.  Terry |
| Jon | 19/01/2012 00:37:38 |
| 1001 forum posts 49 photos | Posted by Bazyle on 18/01/2012 11:00:27: So with the hole in your connecting rod going left to right and the curve uppermost like a hill in front of you start with the file horizontal and gradually through the stroke drop the handle so the file ends almost vertical. Afraid gonna have to disagree with that as one of a few in this day an age that filed quality items for a living by traditional means. Looking at the cylindrical hole keep file horizontal push and look where metals removed subconsciously. The key is to look what you are doing, no need to stop and stare you have to start again then. Generally as pushing file forward on left side the hardest, you want to keep altering the angle paying attention to where the metal needs to come off. When competant you can do this arcing and sweeping up and down at 45 degrees flicking the wrist. Top centre down to 3 o clock is easier if right handed. Nice fluent strokes putting your back in to it. Apprentices when seen doing as mentioned above would have been told and shown straight away, if persisted twice, shown the door, it has happened. The only time that would be used is to draw file prior to polishing. A good tutorial that no book can attempt to teach is to use hardened pegs a few thou up on diameter required. Certainly quicker if doing more than three. All you have to do is keep the file horizontal far quicker than milling. |
| Stub Mandrel | 19/01/2012 20:21:33 |
 4318 forum posts 291 photos 1 articles | I vote for filing buttons - they work like magic. Neil |
| Terryd | 19/01/2012 21:18:56 |
1946 forum posts 179 photos | Posted by Stub Mandrel on 19/01/2012 20:21:33: I vote for filing buttons - they work like magic. Neil Hi Neil, I agree, sounds a bit like the 'hardened pegs' Jon was banging on about. T |
| Jon | 20/01/2012 00:01:57 |
| 1001 forum posts 49 photos | Yes the same Terry. Got no piccies but essentially we used to do a lot of springs with eyes going on products costing as much as a cheap house. These eyes were screw fixing points along with a raised groove filed in elsewhere. These eyes could be 10 to 15 thou thick on a around a 3/16" dia screw head. Close you get the worse it looks if out. For these pegs to work best keep where it goes in to the hole short soit doesnt protrude through. Other large end doesnt matter. Hold peg and part in vice and remove metal, then rotate as necessary. Work clean its easier in the end. Now because the pegs were slightly oversize youcan then polish a few though off where filed. You would have to do that if milled any way. It gets trial and error when having to file the part round to fit snugly in to the opposite arrangement with no gaps or play, just takes time. Smoke it up or engineer blue it otherwise an ink marker does just as well. |
| Terryd | 20/01/2012 07:29:04 |
1946 forum posts 179 photos | Hi Wolfie, reading other threads it seems as though us 'Luddites' have got it all wrong and have wasted your time, leading you astray down wicked paths - sorry . What you really need to do is forget archaic technology such as hand tools and get yourself set up with an array of cnc machinery and get program (buy or free) spend time learning how to produce cad models and upload them to your new machine.If you are really clever like all those 'Hi Tech' guys you can get instructions from other sites on building robotic arms to do the machine loading and even assembly (like they do in real factories not playshops like ours) and you will then be able to enjoy your model without having to lift a finger. Just be creative and design the parts, spend advanced skill time sourcing materials and enjoy the results that your robots bring to you in your favourite armchair. Result - perfectly radiused con rods Best regards Terry Edited By Terryd on 20/01/2012 07:31:13 |
 I notice some of my filing button adventures on that page!
Please login to post a reply.
Magazine Locator
Want the latest issue of Model Engineer or Model Engineers' Workshop? Use our magazine locator links to find your nearest stockist!
Sign up to our Newsletter
Sign up to our newsletter and get a free digital issue.
You can unsubscribe at anytime. View our privacy policy at www.mortons.co.uk/privacy
Latest Forum Posts
- hemingway ball turner
04/07/2025 14:40:26 - *Oct 2023: FORUM MIGRATION TIMELINE*
05/10/2023 07:57:11 - Making ER11 collet chuck
05/10/2023 07:56:24 - What did you do today? 2023
05/10/2023 07:25:01 - Orrery
05/10/2023 06:00:41 - Wera hand-tools
05/10/2023 05:47:07 - New member
05/10/2023 04:40:11 - Problems with external pot on at1 vfd
05/10/2023 00:06:32 - Drain plug
04/10/2023 23:36:17 - digi phase converter for 10 machines.....
04/10/2023 23:13:48 - More Latest Posts...
- View All Topics
Support Our Partners


Shopping Partners
Subscription Offer

Latest "For Sale" Ads
- Reeves** - Rebuilt Royal Scot by Martin Evans
by John Broughton
£300.00 - BRITANNIA 5" GAUGE James Perrier
by Jon Seabright 1
£2,500.00 - Drill Grinder - for restoration
by Nigel Graham 2
£0.00 - WARCO WM18 MILLING MACHINE
by Alex Chudley
£1,200.00 - MYFORD SUPER 7 LATHE
by Alex Chudley
£2,000.00 - More "For Sale" Ads...
Latest "Wanted" Ads
- D1-3 backplate
by Michael Horley
Price Not Specified - fixed steady for a Colchester bantam mark1 800
by George Jervis
Price Not Specified - lbsc pansy
by JACK SIDEBOTHAM
Price Not Specified - Pratt Burnerd multifit chuck key.
by Tim Riome
Price Not Specified - BANDSAW BLADE WELDER
by HUGH
Price Not Specified - More "Wanted" Ads...
Get In Touch!
Do you want to contact the Model Engineer and Model Engineers' Workshop team?
You can contact us by phone, mail or email about the magazines including becoming a contributor, submitting reader's letters or making queries about articles. You can also get in touch about this website, advertising or other general issues.
Click THIS LINK for full contact details.
For subscription issues please see THIS LINK.
Digital Back Issues


Donate

 Register
 Log-in
Model Engineer Magazine
- Percival Marshall
- M.E. History
- LittleLEC
- M.E. Clock

ME Workshop
- An Adcock
- & Shipley
- Horizontal
- Mill

Subscribe Now
- Great savings
- Delivered to your door

Pre-order your copy!
- Delivered to your doorstep!
- Free UK delivery!
All Forum Topics > Beginners questions > Milling a curved end