Forum sponsored by:

Workshop floor
| Peter Simpson 2 | 01/12/2010 16:11:51 |
| 28 forum posts 1 photos | I'm in the process of having a new timber workshop constructed after moving house. I intend to have a 12' x 18' workshop installed onto a concrete pad. The workshop will have a tounge and groove floor build onto wooden bearers. I intend to cover the T&G boards with 12mm plywood sheeting.
Will this floor be rigid enough to support my Myford S7, Tom Senior light vertical and other workshop equipment ? |
| James fortin | 01/12/2010 16:25:30 |
 46 forum posts 12 photos | when i built my workshop we put extra bearers under where the machines went and screwed them in
hope this gives an idea
many thanks
james Edited By James fortin on 01/12/2010 16:25:49 |
| Richard Parsons | 01/12/2010 17:42:41 |
 645 forum posts 33 photos |
Peter, I cut holes in the floor where my heavier machines were to go. I boxed them in and poured in concrete pillars (duly levelled) complete with lengths of 10-12 mm studding ready to take the bolting plates etc. It is a good idea to underlay the wood floor with sheets of polythene and building insulation boards. This stops rising damp and keeps the floor warm Regards Dick Parsons
|
| Peter Simpson 2 | 01/12/2010 18:06:53 |
| 28 forum posts 1 photos | Dick and James,
Many thanks for the replies. Dick I have seen the concrete pillar option used before. The point regarding the builders insulation board. Do you build the workshop on sheets of say Kingspan between the concrete base and the workshop base ?
Regards
Peter |
| Peter Tucker | 01/12/2010 18:53:45 |
| 185 forum posts | Hi Peter,
Why not use the concrete pad as the floor?
Peter. |
| David Clark 1 | 01/12/2010 20:46:12 |
 3357 forum posts 112 photos 10 articles | Hi Peter
Myford should be fine.
I think a Tom Senior light vertical is too heavy.
Two strong men can't lift the column. I know, we tried.
Managed to get it onto the base by lifting one end while other end was resting on the cabinet
It is just too heavy.
regards david
|
| NJH | 01/12/2010 21:17:51 |
 2314 forum posts 139 photos | Hi Peter
My workshop has a concrete base first covered with a polythene moisture barrier then 2"x2" battens at 18" centres on which is laid flooring grade chipboard. The space between the battens is filled with glass fibre insulation. I have a Super 7, Warco mill/drill, drill press and several heavy benches and accessories on it and it's fine. I suspect though, as David says, that the Tom Senior would be too heavy. If it was mine I would go for Richards solution for the Tom Senior. Whatever course you decide upon I do recommend that you take trouble to insulate the whole as well as you can. Not only will you feel more inclined to go in there if you can achieve a comfortable temperature but you will also crack the condensation demon!
Regards
Norman
|
| Robbo | 01/12/2010 22:07:15 |
| 1504 forum posts 142 photos | Hi Peter,
My workshop has a concrete floor with a damp-proof membrane built in to it. On top of the concrete is a layer of underlay (as used for laminate flooring, but not the plastic kind, the rough panel sort), on top of this is flooring grade chipboard (8' x2' sheets, not attic flooring) with an expansion gap round the walls. This takes the weight of an Elliott 10M shaper without getting dents in it, and the Super 7 is a breeze.
Cheers,
Robbo Edited By Robbo on 01/12/2010 22:08:13 |
| Stub Mandrel | 03/12/2010 21:31:01 |
 4318 forum posts 291 photos 1 articles | My workshop is an 8 x16 prefab concrete garage on a concrete pad. I had to build walls at each end, shiplap on a wooden frame. I made a 1-brick high retaining wall each end and used a PVC damp membrane to line this. Floor is ODB (I would now use chipboard) on 3x2 bearers resting on DPC over the membrane (under would be ideal). Walls are platerboard over 1 1/2" polystyrene between wooden battens. Roof is uninsulated, just hardboard with damp membrane above. The whole is actually better insulated than most of our 1930's semi! Very easy to heat, no condensation, but gets hot in summer because of uninsulated roof. Neil |
| Ian S C | 04/12/2010 00:21:13 |
 7468 forum posts 230 photos | As far as the floor goes, when I built my workshop I mapped out where my lathe would go, and that area of the floor was made double the thickness of concrete, and a bit of extra reinforcing was put in. In the roof I put in some fibreglass sections on the north side (southern for you lot up north), to give max lighting, Its about 25yr old now, the birds annoy me pecking at the fibre glass, I suppose in a few yrs it will need replacing as it degrades with the sun light. Ian S C |
| Pat | 04/12/2010 01:13:21 |
| 94 forum posts 1 photos | Hi Peter - The concrete pads under any machines is a good one. Also suggest simple expedient of bracing all the joists at 750mm intervals. This technique is used in the building trade to stiffen woden floor joists prior to laying the flood boarding. This uses 25mm x 35mm material sawn at an angle so that it is jammed into place giving a herringbone brace between each joist. Obviously each brace transffers its force to the adjacent set so the herringbone braces form a line from one side to the other. Each brace is lightly nailed at it's lower end so that over time and with vibration the floor is self tightening. Metal struts are available for the purpose but rough sawn 25x35 and a few minutes with a saw will yeild better esults.
Also the use of water proof plywood (WPB one good face) screwed with screw tight screws at 250mm intervals will also strengthen the floor. Use 22mm plywood rather than flooring chip board (Green grade is reasonably damp proof but inferior to WPB. The screw tight screws are available from screwfix and builders merchants and have a shank that is clear of thread for 20 mm and of reduced diameter so that the board is puled down tight. A good test is to place a cereal dish on several shhets of news paper - fill the dish to the point of over flowing with water - then jump up and down on the floor. Given adequate herringbone bracing - screwed down ply skin - adequate joist sizing / spacing the water should ripple a little but not leap out of the dish! This test is the recommended one for tiling suspended wooden floors with large ceramic tiles on topnotch builds.
I would use two layers of 22mm ply and mark the joist positions as you can all ways cut out the holes for concrete pads at a later stage/ The concrete pads in my experince are cold spots that get damp unless you can heat the workshop or use a dehumidified even when the pads have their own damp proof coarse.
Under floor ventilation is necessary with a wooden floor so why not prefabricate as a double skinned unit with insulation between the skins?
Woulds like you are on track for the perfect work space. I have a single skin brick one and it is way to expensive to heat and the dehumidifier will not work whenthe temperature is near freezing.
Good luck - regards - Pat |
| Sam Stones | 04/12/2010 02:33:17 |
 922 forum posts 332 photos | When I was a Leak HiFi buff back in the 60's, attempting to achieve a reasonable setup, I set the force on the stylus to about 1gram. Unfortunately, there was significant pick-up bounce due to a springy wooden floor, thus turning the sounds from any disc into versions of the 1812.
Like Richard Parson's idea, but without SWAMBO's approval, I planned to drill holes through the floor, and then cast concrete pillars beneath each of the four legs of the HiFi unit. It needed some thinking about because the wooden floor was at least two feet above ground level. You outdoor railway chaps will be familiar with the problem.
However, I never got that far before migrating to Australia, where most modern houses are built on concrete slabs. Sadly, my HiFi cabinet now resides down the local tip, while the amps etc. were sold off.
Of mice and men.
Regards,
Sam Edited By Sam Stones on 04/12/2010 02:35:30 |
| Richard Parsons | 08/12/2010 11:07:05 |
645 forum posts 33 photos | The easiest way of making the pillars is to get your hooks on some bits of very wide bore plastic drain pipe or some cheap plastic barrels from which you have remover the tops and bottoms. Mine I scrounged from a local restaurant. They used to contain pickled cucumbers and were roughly square. These must be well large enough to take the feet of the machines you going to set up. These bits of plastic form the moulds for the pillars. |
| Richard Parsons | 09/12/2010 06:36:39 |
645 forum posts 33 photos |
Peter - I am sorry I should have added this to my last post.
Being very ‘parsimonious’ I used any insulating materials I could get my hands on and placed it between the joists. At the lowest layer I put in used cat litter (with the lumpy bits raked out). It niffed a bit, but this stopped when I spread the upper layers of crumbled expanded polystyrene and broken outdoor insulation over it. It seems to keep the local wild mice out, which is what I wanted. You can massacre them over here but there seem to be millions of the little devils, which come indoors after the harvest. I do not like 'mouse dirts' on my Myford! Edited By Richard Parsons on 09/12/2010 06:37:39 |
| The Merry Miller | 09/12/2010 09:57:32 |
 484 forum posts 97 photos | Where's "overhere" Richard? Len P. |
| Richard Parsons | 09/12/2010 16:03:41 |
645 forum posts 33 photos | Len –I am in the boondocks on the Great Planes of Hungary. There is no 'Chippy', no 'Pie and Eel' shops, no cinema. You can order a pizza but it will take several hours to arrive and will be stone cold. If you order it too late (after about 8pm.) you might get it for breakfast next day. The nearest Koscma/Pub a good three and a half klicks away. It is actually a 'Bothe/Shabeen' (a sort of unlicensed drinking den) where your arrival has to be announced, the correct passwords and special handshakes given and you will be told where it is tonight (if it is open, as its owner has rather a taste for his own wares and when he is open often has to be taken home in a wheel barrow by his misses. Sometimes the customers had to take them both home in that way. If you want a licensed boozer that is about 16 Klicks away over ‘rendorsheg’ (bluebottles) infested and very pot holey roads
The use of old cat litter was recomended by a local (or thats what I think he said) . |
| Stub Mandrel | 09/12/2010 20:37:07 |
4318 forum posts 291 photos 1 articles | Bloody 'ell Richard - used cat litter!!! By the powers vested in me I award you the Nobel Recycling Prize! Neil |
| The Merry Miller | 09/12/2010 20:41:24 |
484 forum posts 97 photos | 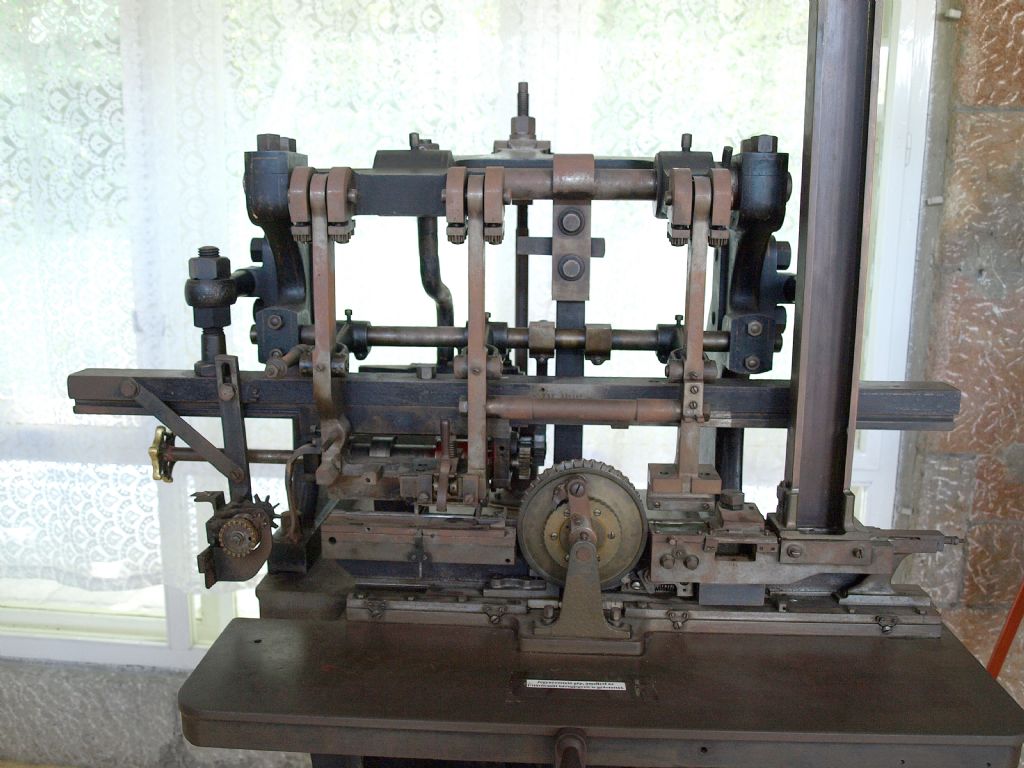  Richard, When I was out on your plains in 2008 I took some interesting pics but have no info on the details. The Loco picture you may be able to identify, if not I have some more images. If you look carefully you can just see the missus peeping out of the first carriage window. The second is a poser for your or anybody else that takes a look. It's a machine found in a station waiting room, not operational, that's obvious. It may have been on the kiddies railway but I can't guarantee that. It just look a tremendous piece on engineering, god knows how old it is and what it is. It will be interesting to see what ME browsers come up with. P.S.There's no prize for getting it right but then I wouldn't know if it was right!! Len P. |
| Richard Parsons | 10/12/2010 07:38:43 |
645 forum posts 33 photos |
Hi there Len. I think you were on a special excursion train on the MÁV operated narrow gauge line (760mm) from Kecskemet to Kiskörös. Normally these are hauled by a Raba 48 diesel. The Spark arrester is of a new type. I cannot see its wheel arrangements. If she is a 0-6-0 then I saw her in Kecskemét yards and believe she is a ‘Budapest class’. According to Paul Engelbert the Raba 48 is a derivation of the MÁV Raba 24 standard gauge shunter. It has what they called a ‘Hydraulic Drive’. What this means is it has a ‘fluid flywheel’ in place of the normal clutch. The Raba 48 would make a good 5” model. If you look here you can relive the journey (choose the Narrow gauge Kiskörös item). Towards the end of this you will see a ‘rail car’ (literally a car with railway wheels on it) and somewhere else in the yards there is the remains of a drasine’ which had an air cooled motorcycle engine. There was a forest railway somewhere in the North which held ‘Open Days’ in January where you could bring and drive your own drasine, but I cannot now find the web site. January in Hungary is not a good month for outdoor activity! There is a very good book by Paul Engelbert called ‘Forestry Railways In Hungary’ if you are interested. Most of the surviving tracks are used for ‘Tourists’. The best is that from Miskolc up to Lillafüred and beyond. There is still the Children’s Railway in Budapest. I think they now have some beautiful rail cars which were used to take passengers from Miskolc to the Palota Hotel at Lillafüred. A very up-market joint which has lost its way. By the way I think the curious machine is a ticket printer. I have seen something similar in the Museum of Transport in Budapest.
To our site moderator these last postings might make the start of a new thread |
| Steve Garnett | 10/12/2010 08:58:25 |
| 837 forum posts 27 photos | Posted by Richard Parsons on 10/12/2010 07:38:43: By the way I think the curious machine is a ticket printer. I have seen something similar in the Museum of Transport in Budapest. I think it is too. I did a bit of checking, and it's just possible that this is a very old Goebl machine, of which there are supposed to be very few examples. Just in case anybody was wondering, I think you put the blank tickets in the stacker on the right, and they pass through to the left. I presume that there's some sort of power source underneath - can't see how it can be driven otherwise. Bet you needed quite a solid floor to mount it on! (just to keep this OT) Edited By Steve Garnett on 10/12/2010 08:59:31 |
Please login to post a reply.
Magazine Locator
Want the latest issue of Model Engineer or Model Engineers' Workshop? Use our magazine locator links to find your nearest stockist!
Sign up to our Newsletter
Sign up to our newsletter and get a free digital issue.
You can unsubscribe at anytime. View our privacy policy at www.mortons.co.uk/privacy
Latest Forum Posts
- *Oct 2023: FORUM MIGRATION TIMELINE*
05/10/2023 07:57:11 - Making ER11 collet chuck
05/10/2023 07:56:24 - What did you do today? 2023
05/10/2023 07:25:01 - Orrery
05/10/2023 06:00:41 - Wera hand-tools
05/10/2023 05:47:07 - New member
05/10/2023 04:40:11 - Problems with external pot on at1 vfd
05/10/2023 00:06:32 - Drain plug
04/10/2023 23:36:17 - digi phase converter for 10 machines.....
04/10/2023 23:13:48 - Winter Storage Of Locomotives
04/10/2023 21:02:11 - More Latest Posts...
- View All Topics
Support Our Partners


Shopping Partners
Subscription Offer

Latest "For Sale" Ads
- Reeves** - Rebuilt Royal Scot by Martin Evans
by John Broughton
£300.00 - BRITANNIA 5" GAUGE James Perrier
by Jon Seabright 1
£2,500.00 - Drill Grinder - for restoration
by Nigel Graham 2
£0.00 - WARCO WM18 MILLING MACHINE
by Alex Chudley
£1,200.00 - MYFORD SUPER 7 LATHE
by Alex Chudley
£2,000.00 - More "For Sale" Ads...
Latest "Wanted" Ads
- D1-3 backplate
by Michael Horley
Price Not Specified - fixed steady for a Colchester bantam mark1 800
by George Jervis
Price Not Specified - lbsc pansy
by JACK SIDEBOTHAM
Price Not Specified - Pratt Burnerd multifit chuck key.
by Tim Riome
Price Not Specified - BANDSAW BLADE WELDER
by HUGH
Price Not Specified - More "Wanted" Ads...
Get In Touch!
Do you want to contact the Model Engineer and Model Engineers' Workshop team?
You can contact us by phone, mail or email about the magazines including becoming a contributor, submitting reader's letters or making queries about articles. You can also get in touch about this website, advertising or other general issues.
Click THIS LINK for full contact details.
For subscription issues please see THIS LINK.
Digital Back Issues


Donate

 Register
 Log-in
Model Engineer Magazine
- Percival Marshall
- M.E. History
- LittleLEC
- M.E. Clock

ME Workshop
- An Adcock
- & Shipley
- Horizontal
- Mill

Subscribe Now
- Great savings
- Delivered to your door

Pre-order your copy!
- Delivered to your doorstep!
- Free UK delivery!
All Forum Topics > Beginners questions > Workshop floor