Forum sponsored by:

Tangential lathe tool holder
............not another one!
| john kennedy 1 | 14/08/2014 14:08:39 |
 214 forum posts 24 photos | Vic, Are you known as "Firebird" on another forum? I'm sure I've seen this tool before .. John |
| Neil Wyatt | 14/08/2014 14:20:43 |
 19226 forum posts 749 photos 86 articles | I use a very 'low profile' toolbit clamp. Neil
|
| Vic | 14/08/2014 16:11:49 |
| 3453 forum posts 23 photos | Posted by john kennedy 1 on 14/08/2014 14:08:39:
Vic, Are you known as "Firebird" on another forum? I'm sure I've seen this tool before .. John
No John, must be someone else.
nice work on the Knurling tool Paul, bit better thought out than mine!
|
| Michael Horner | 14/08/2014 19:50:37 |
| 229 forum posts 63 photos | Posted by Vic on 14/08/2014 12:59:22:
Thanks Norman! Couple more pics, how it started out:
Clamp setup.
Nice work Vic. I don't have that kind of artisic talent My version is a Mike Cox variant. For the clamp I have counter bored a hole similar to what you have done but pull a tapered wedge into the hole, a bit like a cotter pin on a push bike crank. I have only just made it so I don't if it clamps better than a traditional clamp, only time wll tell. Cheers Michael. |
| Howard Lewis | 15/08/2014 21:41:57 |
| 7227 forum posts 21 photos | The tool shown in the Autumn 2009 M.E.W. article taking 1/8" toolbits gave such impressive results that, recently, I made up a beefed up version taking 5/16" toolbits. Sharpening, The original Sharpening Fixture called for a 20 degree angle, (corner to corner), but the drawing seemed to suggest that the angle of the bit would be 30 degrees. Maybe that meant along the side? Any comments? The 30 degree angle recently mentioned will results in a thinner and weaker cutting edge. My original sharpening jig was made to 20 degrees, and the 5/16 bit was ground to that on a Worden. Both tools work well for me, (and for at least three others used on various lathes), having been sharpened at 20 degrees). Using a 1/4 BSF clamp screw and nut, no sign of slippage has been evident, when taking a 0.100" cut. It appears to be capable of taking a 0.0005" cut just as well! I do like the idea of using a tapered wedge to clamp the bit; must try that. Currently, it has made the usual CCMT060204 tipped tool redundant. Wonder how long the honeymoon will last? Seems to stand my brutality better, and so looks to be cheaper to run! Am now starting a holder to take 1/8" round toolbits, for use as a finishing tool, to see if an even better surface finish can be produced, than the "standard" tool used at low speed with neat cutting oil. Howard |
| Vic | 15/08/2014 22:06:30 |
| 3453 forum posts 23 photos | I've used round HSS in my bought holder to good effect. I've struggled even on a green grit wheel to sharpen some old broken carbide milling cutters but when I do I'm sure I'll be able to cut some really hard stuff should the need arise. |
| Vic | 21/08/2014 22:28:37 |
| 3453 forum posts 23 photos | Couple more pics to clarify the tool angle of 12 degrees forward and 12 degrees toward the chuck.
Edited By Vic on 21/08/2014 22:32:44 |
| Anthony Knights | 29/08/2014 00:50:24 |
| 681 forum posts 260 photos | Finally got around to making a right hand tangential toolholder to complement the L.H. one I made following the MEW article by Michael Cox. The step on the top is machined to the centre height of my lathe which makes setting the tool height a doddle. I will be doing the same on the original one when I get a round tuit.
|
| Clive Hartland | 29/08/2014 10:15:59 |
 2929 forum posts 41 photos | Vic, have you a drawing of the tangential tool holder you have made? What grade steel did you use also? Clive |
| Vic | 29/08/2014 12:45:04 |
| 3453 forum posts 23 photos | Hi Clive, I don't have a drawing as I milled it as I went along! As for the steel, I have no idea. It was made from bench (gym) machine weights that were going for scrap. Definitely steel though of some description. Sorry I can't be of more help. |
| Clive Hartland | 29/08/2014 13:53:48 |
2929 forum posts 41 photos | Thanks Vic, I will see what I can find under the bench. Clive |
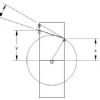
| Thor 🇳🇴 | 29/08/2014 17:19:49 |
 1766 forum posts 46 photos | Hi Clive, don't know which size HSS toolbit you intend to use, here is a drawing of one using 1/8" square bits, may be you'll find it helpful.
Thor |
| Clive Hartland | 29/08/2014 20:00:29 |
2929 forum posts 41 photos | Thank you Thor, that will give me something to start from, I do have memory of using this type tool many years ago on a machining course in the army. Clive |
| ChrisH | 29/08/2014 20:11:12 |
| 1023 forum posts 30 photos | Vic, very nice tool, looks the business! Just one query, was there a reason you made the bit where the HS tool bit is held thicker than the rest, or did it just come out like that? Chris |
| Vic | 29/08/2014 21:35:51 |
| 3453 forum posts 23 photos | Only because it ends up thinner at the end where it's milled at 12°. It can be the same thickness all the way through though if you like. I started with quite a large lump of scrap steel so I needed to thin it a bit for the toolpost. The reason for the deep step was to keep the toolbit clear of swarf, it also help to see what's happening at the cutting edge. Really though it's just a matter of making it to fit your Lathe. Within reason though bigger is better if it improves rigidity. If I get a minute I'll take some more pictures at different angles if it helps. It's not quite as clean now though as it's had a lot of use, it's my most used tool! Edited By Vic on 29/08/2014 21:36:22 |
| ChrisH | 29/08/2014 21:52:14 |
| 1023 forum posts 30 photos | Good enough reason Vic, hadn't thought of that angle but it makes sense. Yes please, more pictures if you can please, a picture is worth a thousand words and all that! Chris |
| john kennedy 1 | 30/08/2014 08:55:35 |
214 forum posts 24 photos | I knew I'd seen that tool before http://www.homemodelenginemachinist.com/showthread.php?t=22458&highlight=tangential Very nicely made. |
| Steve Withnell | 30/08/2014 09:25:55 |
 858 forum posts 215 photos | Can someone post a pic of this thing "at work" - public declaration of ignorance - I don't know how it works! Steve |
| NJH | 30/08/2014 10:17:57 |
 2314 forum posts 139 photos | Hi Steve HERE is a good example. They are very effective and, with the exception of special form tools , will cope with most turning tasks. In addition sharpening and adjustment is very simple. Norman |
| Gary Wooding | 30/08/2014 10:40:28 |
| 1074 forum posts 290 photos | I've made several holders for 1/4" tool bits based on Michael Cox's MEW article, for me and some friends. I designed a slightly different sharpening jig to those shown so far; it works just fine and needs a smaller chunk of metal. Here are a few pictures, plus the design of the jig.
|


Please login to post a reply.
Magazine Locator
Want the latest issue of Model Engineer or Model Engineers' Workshop? Use our magazine locator links to find your nearest stockist!
Sign up to our Newsletter
Sign up to our newsletter and get a free digital issue.
You can unsubscribe at anytime. View our privacy policy at www.mortons.co.uk/privacy
Latest Forum Posts
- hemingway ball turner
04/07/2025 14:40:26 - *Oct 2023: FORUM MIGRATION TIMELINE*
05/10/2023 07:57:11 - Making ER11 collet chuck
05/10/2023 07:56:24 - What did you do today? 2023
05/10/2023 07:25:01 - Orrery
05/10/2023 06:00:41 - Wera hand-tools
05/10/2023 05:47:07 - New member
05/10/2023 04:40:11 - Problems with external pot on at1 vfd
05/10/2023 00:06:32 - Drain plug
04/10/2023 23:36:17 - digi phase converter for 10 machines.....
04/10/2023 23:13:48 - More Latest Posts...
- View All Topics
Support Our Partners


Shopping Partners
Subscription Offer

Latest "For Sale" Ads
- Reeves** - Rebuilt Royal Scot by Martin Evans
by John Broughton
£300.00 - BRITANNIA 5" GAUGE James Perrier
by Jon Seabright 1
£2,500.00 - Drill Grinder - for restoration
by Nigel Graham 2
£0.00 - WARCO WM18 MILLING MACHINE
by Alex Chudley
£1,200.00 - MYFORD SUPER 7 LATHE
by Alex Chudley
£2,000.00 - More "For Sale" Ads...
Latest "Wanted" Ads
- D1-3 backplate
by Michael Horley
Price Not Specified - fixed steady for a Colchester bantam mark1 800
by George Jervis
Price Not Specified - lbsc pansy
by JACK SIDEBOTHAM
Price Not Specified - Pratt Burnerd multifit chuck key.
by Tim Riome
Price Not Specified - BANDSAW BLADE WELDER
by HUGH
Price Not Specified - More "Wanted" Ads...
Get In Touch!
Do you want to contact the Model Engineer and Model Engineers' Workshop team?
You can contact us by phone, mail or email about the magazines including becoming a contributor, submitting reader's letters or making queries about articles. You can also get in touch about this website, advertising or other general issues.
Click THIS LINK for full contact details.
For subscription issues please see THIS LINK.
Digital Back Issues


Donate

 Register
 Log-in
Model Engineer Magazine
- Percival Marshall
- M.E. History
- LittleLEC
- M.E. Clock

ME Workshop
- An Adcock
- & Shipley
- Horizontal
- Mill

Subscribe Now
- Great savings
- Delivered to your door

Pre-order your copy!
- Delivered to your doorstep!
- Free UK delivery!
All Forum Topics > Workshop Tools and Tooling > Tangential lathe tool holder