Forum sponsored by:

What did you do today? (2014)
| Nicholas Farr | 04/03/2014 00:03:26 |
 3988 forum posts 1799 photos | Hi, well you could always make the arrangement like the one that is on a piller drill head that I have stripped down at the moment. See bolow.
The nut only nips the two halves together and not on the frame of the drill head and will therefore nip the piller into a central position in the driil head.
Below is a view inside the drill head where the piller is nipped by the two halves. These types usually grip very well.
Regards Nick.
|
| Another JohnS | 04/03/2014 00:26:08 |
| 842 forum posts 56 photos | Pretty much finished up my Thomas/Hemingway Rolls kit. Lots of fun. Waiting for Loctite, a broach, and some more Arc adjustable handles - all should be in this week. More on CNCing part of the construction on my blog: Now, back to the Ivatt...
|
| Muzzer | 04/03/2014 06:58:18 |
 2904 forum posts 448 photos | Tonight's challenge - add some 10mm ventillation obrounds to the lid of a steel battery cassette for a fork lift. 21 of them of various lengths from 60 to 160mm on 3 different faces. The lid measures about 60 x 50 x 20cm. In production, these would takes seconds on a CNC punch but I don't have one of these and it's already been folded anyway. So the Blidgeport went in for a bit of serious yoga. Couple of angle plates, cassette hanging of the back of one side of the table then the other, table and ram fully extended, turret swiveled right then left. Being sheet metal (1/8" Stretch to the right....
...and stretch to the left....
Done now, including deburring. Managed not to ding the carbide slot drill and it's still cutting nicely.
Not the most fun I've had in an evening but a reasonable result given the circumstances. Merry Can't get rid of that smiley that thinks it's a right parenthesis.... Edited By Muzzer on 04/03/2014 07:04:19 |
| Michael Horner | 04/03/2014 18:22:44 |
| 229 forum posts 63 photos | Posted by JasonB on 03/03/2014 07:43:25:
Michael if you look at the first picture you can see the clamp barrel inside the hole which has a scallop out of it to match the hole. As the orange handle is tightened it pulls the brass barrel to one side and locks the spindle. J Hi thanks for the explanation Jason. If I am lucky I will be to use the original barrel lock which resembles the one depicted by Nicolas Farr. The casting has a restriction at the hand wheel end which will need boring out and I will need to move the retaining screw holes to accomodate the larger diameter hole. Cheers Michael |
| fizzy | 04/03/2014 20:50:06 |
 1860 forum posts 121 photos | Me and the family have the norovirus - nuff said!
|
| julian atkins | 05/03/2014 09:06:20 |
 1285 forum posts 353 photos |
yesterday i took my partly made scratch built LBSCR 5"g wagon up to the club track for a first spin. it has been built out of odds and ends and is intended to go behind my 5"g STEPNEY terrier loco for extra coal and water, plus somewhere to put a mug of tea! cheers, julian |
| Bob Rodgerson | 05/03/2014 10:34:17 |
| 612 forum posts 174 photos | Last night I fitted a Newton Tesla pre wired inverter drive to my Warco BH600 lathe. The instructions were clear and concise and I had no difficulty at all with the installation. The results are impressive. Originally, especially when using the Back Gear and auto feeds, the lathe was very noisy. Now with the lathe running without the auto feeds it is very quiet and even with the auto feed on there is only a mild gear whine which means that I might just be able to listen to the workshop radio while I work. (Once I get the workshop back together and the lathe back in it's usual spot that is). The previous couple of nights were spent making a backplate for a small chuck to fit the drive head on my Myford MG-12 Grinder. The chuck had been in it's box since buying it nearly two years ago waiting for this job to be done. While doing this job I also modified the draw tube for the Grinder, the wrong type was supplied by the company I bought the grinder from, it being threaded externally. When I got the grinder it came with about 50 collets of various shapes and sizes and only one was threaded to suit the draw tube as supplied. I made up a makeshift draw tube which sufficed but I decided that the original draw tube looked much better so I decided to modify it to suit all of the c-5 collets. I normally take my camera into the workshop but for whatever reason I forgot, I will take some pictures and post them soon. |
| ChrisH | 05/03/2014 11:09:42 |
| 1023 forum posts 30 photos | It's dry for the second day on the trot - and sunny. No rain - a modern marvel. The lawn badly needs cutting, as opposed to not cutting badly, so the lawn mower beckons. Perhaps after that a bit of workshop clear-out duties.....? Chris |
| ChrisH | 05/03/2014 17:36:29 |
| 1023 forum posts 30 photos | 17:30. Grass cut, brownie points earned, car load of junk for the tip tomorrow out the workshop today, another half hours daylight in the shed now - a good day! Chris |
| chris stephens | 05/03/2014 18:11:08 |
| 1049 forum posts 1 photos | Hi ChrisH, You've still got grass after our water, sorry, winter? chriStephens |
| IanT | 05/03/2014 18:27:03 |
| 2147 forum posts 222 photos |
This was the first day of Spring, as evidenced by my good Lady appearing in the garden for the first time this year. After completing my allotted tasks, I snuck off to the Shed and did a few small jobs. However, one thing is currently defeating me. I have a just acquired a McMaster Power Hacksaw that is going to need a bit of work before it's useful and I want to fully dismantle it (and strip it right back & degrease) it before I start re-assembly and make any necessary repairs. There is a casting that connects the motor to the gearbox and to get this off the base, I have to remove the gearbox. Only problem is that the splined connector will not shift off the gearbox shaft. None of my normal pullers will fit but I did manage to lash-up two bolts (with washers) onto one of my puller units that did get a reasonable grip on the driver. I've tightened this as far as is sensible over the past week or so (oiled it, left it, tried to tighten up a bit more etc) but it hasn't moved at all. Today, I heated the driver using a heat gun until everything smoked and was too hot to handle. Still no go. There is a similar (exactly the same I assume) splined driver on the motor, and this one just has a single grub screw and a small drive key. Naturally, this one came off easily. I guess I'm going to have to make a custom puller to get it off. By the way, the splined drive is thicker than it looks (about 20mm) and it's not a gear (there's a plastic part that connects the two splines together. So generally had a nice day but I'm stuck on this job at the moment. Regards, IanT
|
| David Clark 1 | 05/03/2014 18:54:31 |
 3357 forum posts 112 photos 10 articles | I did absolutely nothing for the first time in about 7 years. Actually I did do a few things, all of which had nothing to do with model Engineering. Oh, I did read some of Model Engineer. I enjoyed Anthony Mount's new series and the photo etching article. regards David Edited By David Clark 1 on 05/03/2014 18:58:23 |
| Rik Shaw | 05/03/2014 19:35:02 |
 1494 forum posts 403 photos | As Frankie sung - "Relax, don't do it ! " Rik PS I just love retirement. |
| NJH | 05/03/2014 20:02:39 |
 2314 forum posts 139 photos | If you guys think that retirement is a "sit around relaxing, drinking tea and doing what I want" existence then you have got another think coming! The major difference between employment and retirement is that you don't get paid for the work that you will soon find that you need to do. What's more the boss is always at hand and knows all your little tricks and so can keep you in line. There is no chance of a "sickie" unless you are at death's door and it is very unwise to argue - as there is no union rep to appeal to either. What's more your neighbours, the parish hall committee, the vicar, the school, old Uncle Tom Cobley and all will find you little projects to keep you amused and all will expect that you not only do it for free but also supply the materials. (However before you go out and drink yourselves to death or maybe join the French Foreign Legion let me say that I have retired twice and I really DO recommend it. Welcome to the club!) Cheers Norman |
| ChrisH | 05/03/2014 20:19:43 |
| 1023 forum posts 30 photos | Hi ChriStephens, yes, we still have grass, although in Somerset we are 270something feet above sea level so the water drains off but the grass still grows "cos it's mild, so much for the coldest winter for 60 years forecast for this winter. And Norman, I am retired and glad to be so because now I would never have the time to go to work, there is so much to do when you are retired, and what you say about the boss, sickies, etc is spot on! Chris |
| Four stroke Fred | 05/03/2014 21:39:15 |
 322 forum posts 305 photos | Retirement is great - should have done it when I was 21! It's great to have continuity of work in the shed. I have to make an appearance In the garden to mow the lawn every now and again but it's been so dry out here that it's only the weeds that grow. Mind you the older you get the quicker the years go by. |
| Neil Wyatt | 06/03/2014 17:12:44 |
 19226 forum posts 749 photos 86 articles | I went to visit Sir John and pick up a fabricated gear hobber in need of some TLC. I saw the prototype mini-lathe tailstock lever modification and the armature of a very strange squirrel cage motor that had suffered some very strange damage! I can also testify that the legendary temperature gauge is not exaggerating. It does depend where you are relative to the burner, but near to it I reckon its well over 40 degrees and I had to take my jacket off stood at the far end of the shop! Neil |
| John Stevenson | 06/03/2014 21:30:50 |
 5068 forum posts 3 photos | Wimp/ |
| Bob Rodgerson | 06/03/2014 21:53:35 |
| 612 forum posts 174 photos |
I finally got a 1910 Humber 200 cc Side valve engine running, probably for the first time since the 1920's. An original barn find with a completely worn out engine that I was asked to restore. Here it is just about ready for a test on the bench.
And another shot from different angle.
A lot of work was required to get it back into running order, this included making a new Con Rod, new cam followers, new push rods, & push rod guides, a complete set of fasteners and new bearings throughout. I had no luck trying to remove the valve covers so I had no choice but to machine them out. Accurate set yup on the milling machine enabled me to machine away the body of the cover and leave just a very thin piece of it left which I was able to prize off from the top of the cylinder and then pull it out rather like they way you open a can of corned beef ,
This photo shows one of the covers after it had been machined out.
This photo shows how I was able to pull the remaining metal out just like opening a can of corned Beef.
A rather blurred shot of the second valve cover being machined out.
Preparing a fixture for holding the replacement valve covers.
A valve cover blank about to be machined.
Two valve covers almost finished.
The two replacement covers almost finished. Only the hex heads to be milled then Nickel plated to finish.
The replacement Con Rod.
A pile of bits and pieces including the Cam Followers and shaft (lower right).
The Engine nearly finished. This engine being old has some unusual features that a lot of people probably haven't seen before. For instance the valves are not like conventional modern valves with a 45 degree sealing face, these valves have a flat sealing face that seats on a flat valve seat. (Imagine a mushroom, the seal being around the bottom of the mushroom cap). The piston is cast iron, which was common in the early days of motoring, the piston ring was straight out of steam engine technology I believe it is of the Clupet type. No provision is made for adjusting valve clearances, the engine has to be assembled and the valves dropped in from the top and the valve stems ground until the desired clearance is obtained. Apparently some car engines were similar in the thirties. Rather than leave the owner with no adjustment I built up the engine with three cylinder base gaskets of .005" thickness so that if the valve clearance gets too much he can lift the cylinder, take out a gasket and not have to grind away the valve stems.
|
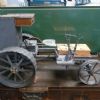
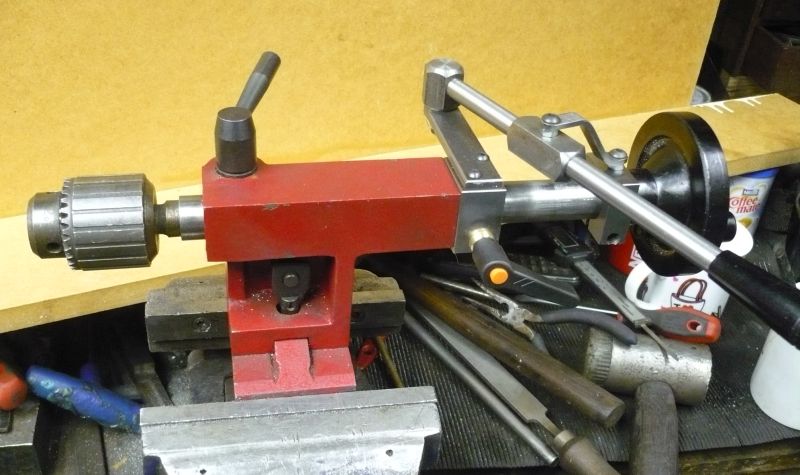
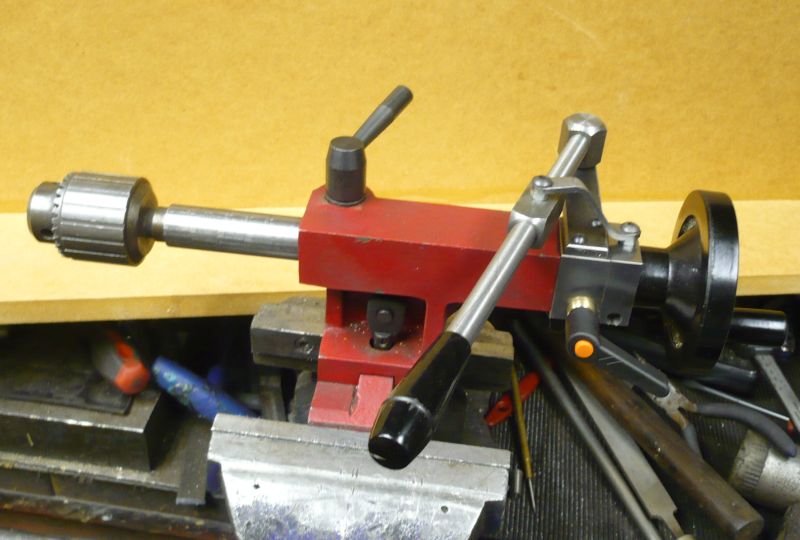
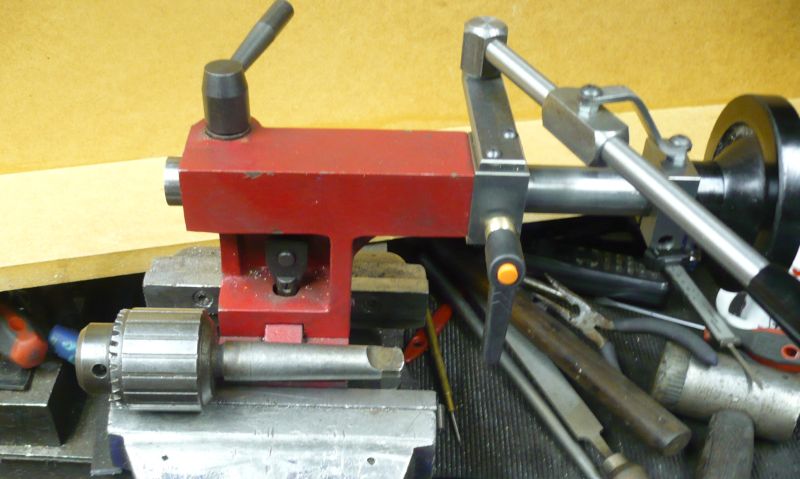
| John Stevenson | 06/03/2014 22:17:52 |
5068 forum posts 3 photos | Well after being disturbed this afternoon got back onto the lever feed for the C3.
Finished job.
This is it parked up with a tanged drill chuck fitted and in the zero position on the scale.
Fully extended and it has 60mm of travel from zero but if you park it up right back you have 70mm max.
Just to prove, that's the chuck that has just come out and it extracts at the zero position. Only mod made to the machine is two extra M4 holes has to be drilled in the rear of the tailstock to secure the clamp block on. I can't see this being a problem to Mini-lathe owners as they are not usually as anally retentive about modifying machine like Myford owners are.
There is one inherent fault with this tailstock design in that the casting isn't long enough and if you use tanged tooling then the screw is so far back to start and you only have 30mm of usable screw thread but having said that it's 30mm of travel anywhere in the 70mm of max range. I could easily cure this to give 60mm of screw travel but it means altering the original tailstock barrel from standard. I may do this and offer it as an alternative design for anyone wanting to be this but it will entail making a new nut which means sourcing either the nut or a M10 x 1.5 LH tap.
|


 , it was never going to be possible to clamp it rigidly, even without the various overhangs. Pretty noisy business, lasting just over 2 hours, a lot of it setting up. And thank god for power feed.


This thread is closed.
Magazine Locator
Want the latest issue of Model Engineer or Model Engineers' Workshop? Use our magazine locator links to find your nearest stockist!
Sign up to our Newsletter
Sign up to our newsletter and get a free digital issue.
You can unsubscribe at anytime. View our privacy policy at www.mortons.co.uk/privacy
Latest Forum Posts
- hemingway ball turner
04/07/2025 14:40:26 - *Oct 2023: FORUM MIGRATION TIMELINE*
05/10/2023 07:57:11 - Making ER11 collet chuck
05/10/2023 07:56:24 - What did you do today? 2023
05/10/2023 07:25:01 - Orrery
05/10/2023 06:00:41 - Wera hand-tools
05/10/2023 05:47:07 - New member
05/10/2023 04:40:11 - Problems with external pot on at1 vfd
05/10/2023 00:06:32 - Drain plug
04/10/2023 23:36:17 - digi phase converter for 10 machines.....
04/10/2023 23:13:48 - More Latest Posts...
- View All Topics
Support Our Partners


Shopping Partners
Subscription Offer

Latest "For Sale" Ads
- Reeves** - Rebuilt Royal Scot by Martin Evans
by John Broughton
£300.00 - BRITANNIA 5" GAUGE James Perrier
by Jon Seabright 1
£2,500.00 - Drill Grinder - for restoration
by Nigel Graham 2
£0.00 - WARCO WM18 MILLING MACHINE
by Alex Chudley
£1,200.00 - MYFORD SUPER 7 LATHE
by Alex Chudley
£2,000.00 - More "For Sale" Ads...
Latest "Wanted" Ads
- D1-3 backplate
by Michael Horley
Price Not Specified - fixed steady for a Colchester bantam mark1 800
by George Jervis
Price Not Specified - lbsc pansy
by JACK SIDEBOTHAM
Price Not Specified - Pratt Burnerd multifit chuck key.
by Tim Riome
Price Not Specified - BANDSAW BLADE WELDER
by HUGH
Price Not Specified - More "Wanted" Ads...
Get In Touch!
Do you want to contact the Model Engineer and Model Engineers' Workshop team?
You can contact us by phone, mail or email about the magazines including becoming a contributor, submitting reader's letters or making queries about articles. You can also get in touch about this website, advertising or other general issues.
Click THIS LINK for full contact details.
For subscription issues please see THIS LINK.
Digital Back Issues


Donate

 Register
 Log-in
Model Engineer Magazine
- Percival Marshall
- M.E. History
- LittleLEC
- M.E. Clock

ME Workshop
- An Adcock
- & Shipley
- Horizontal
- Mill

Subscribe Now
- Great savings
- Delivered to your door

Pre-order your copy!
- Delivered to your doorstep!
- Free UK delivery!
All Forum Topics > Work In Progress and completed items > What did you do today? (2014)