Forum sponsored by:

Stuart 10V First Build - Opinions on Running Please
| Dr_GMJN | 17/10/2020 15:47:13 |
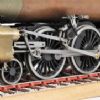
 1602 forum posts | All, I've been building my first model engineering project - a Stuart 10V - over the past five months. There's a build thread elsewhere on the forum. I ran it for the first time last night. It worked first time on a rough valve setting, which I got from this forum and my build thread, and reading the "Building the Stuart 10V" book. It had a tight spot at the bottom of the crank throw, but nothing serious. I put the gland packing in (plaited PTFE tape), but just nipped up. The rods slide freely up and down. The valve timing hasn't been touched from the initial best effort, but the tight spot has now eased considerably. You may notice the screw in place of the upper drain cock. It snapped off on tightening, I probably shouldn't have used PTFE tape. Anyway, minor detail. You have NO IDEA how amazing it was for me (and the family!) to see this engine running for the first time. I know its about as simple as it gets, and it's no big deal for the old hands on here, but I can tell you I'm hooked. I'm already looking forward to my next build. I quickly realised that despite me thinking it sounded brilliant, I have no real idea what a 10V should sound like, or what noises it should make under various loads and conditions. With this in mind - and also to show the results of a lot of great help and advice from this forum over the months, I've made some video clips. I would really appreciate any comments on how you think it's running, and any adjustments I might need to make. In many ways it's irrelevant: I've built it, it runs, and I love it, but still I need to know. I hope these links work. They are posted on my son's drawing channel, so if you stray on to any of his videos by mistake, please trun the music volume down, as it may be bad for the hearing/wellbeing. Slow/Medium speed, 10 psi (air)
Fast/Medium speed, 30 psi (air)
Turning by hand, 30 psi (air)
Under light load, 30 psi (air)
Muffled exhaust (ie mainly mechanical noise), 30 psi (air)
|
| derek hall 1 | 17/10/2020 16:18:18 |
| 322 forum posts | Great job! Like the videos.....you have got "the" bug now ! Next job to make a boiler and run it on steam... Well done I have been following the build log and the care that you took in making the engine has paid off. Kind regards Derek |
| JasonB | 17/10/2020 16:19:42 |
 25215 forum posts 3105 photos 1 articles | I think most people would be more than happy with it as is. You may want to try a bit more lead as it looks like the grub screw in the eccentric is almost a 90 deg to the crankshaft web but not that easy to see for certain. If you move it another 10-20deg in the direction of rotation it may run a bit smoother at the ends of the stroke. |
| Dr_GMJN | 17/10/2020 16:33:54 |
1602 forum posts | Thanks both. So it sounds like nothing major to do, which is brilliant. One thing thatS apparent at very very low speed is that the ‘beats’ are slightly irregular. Is this the ‘lead’ issue with the eccentric, or have I got the symmetry of the slide valve out? Thanks. |
| John Olsen | 18/10/2020 07:13:11 |
| 1294 forum posts 108 photos 1 articles | I was quite impressed at how slowly it will run. That means that there is not too much wrong with it. You have to expect a little bit of irregularity at slow speed, can be just slight variations in friction as it goes around. John |
| Dr_GMJN | 18/10/2020 11:09:03 |
1602 forum posts | Posted by John Olsen on 18/10/2020 07:13:11:
I was quite impressed at how slowly it will run. That means that there is not too much wrong with it. You have to expect a little bit of irregularity at slow speed, can be just slight variations in friction as it goes around. John Thanks John. I did wonder if looser than ideal tolerances would make slow running easier to achieve - at the expense of torque? No matter, I’m happy with it. I will try advancing the eccentric though. It will be a nice experiment for me to see how it affects running. |
| SillyOldDuffer | 18/10/2020 11:13:12 |
| 10668 forum posts 2415 photos | Posted by Dr_GMJN on 17/10/2020 15:47:13: ... You have NO IDEA how amazing it was for me (and the family!) to see this engine running for the first time. ...
You're wrong there! Bunch of engine junkies here. Mary Shelley's 'Frankenstein' is all about people like us. “You’re fulfilling your destiny, Dr_GMJN. Become my apprentice. Learn to use the Dark Side of the Force.” Bringing inanimate objects to life is dangerously addictive. The irregular beats may be a feature of the engine's design. All engines of this type suffer from a geometric imperfection due to the 'angularity (or obliquity) of the connecting rod'. It's a consequence of converting reciprocating sideways into rotary motion. When the piston is centred in the cylinder, the connecting rod, being at an angle, isn't quite long enough to put the crank at a true right angle to the piston rod. This causes valve event timing errors. The error is proportional to the ratio between piston stroke length and con-rod length, and for it to be at an acceptable level the con-rod should be at least 4 times longer than the stroke. An inconvenient cure is to build engines with very long connecting rods. The other is to compensate errors with an adjustable valve gear and then spend an age fine tuning it. The Stuart's valve gear is a straightforward and effective compromise, with minor shortcomings, plenty good enough for a working model. However, if chasing perfection brings joy, then there are lots of more advanced engines to model... Seriously good build though - you either have talent or a skip full of rejects, perhaps both! Congratulations. Dave |
| Dr_GMJN | 18/10/2020 13:25:15 |
1602 forum posts | Posted by SillyOldDuffer on 18/10/2020 11:13:12:
Posted by Dr_GMJN on 17/10/2020 15:47:13: ... You have NO IDEA how amazing it was for me (and the family!) to see this engine running for the first time. ...
You're wrong there! Bunch of engine junkies here. Mary Shelley's 'Frankenstein' is all about people like us. “You’re fulfilling your destiny, Dr_GMJN. Become my apprentice. Learn to use the Dark Side of the Force.” Bringing inanimate objects to life is dangerously addictive. The irregular beats may be a feature of the engine's design. All engines of this type suffer from a geometric imperfection due to the 'angularity (or obliquity) of the connecting rod'. It's a consequence of converting reciprocating sideways into rotary motion. When the piston is centred in the cylinder, the connecting rod, being at an angle, isn't quite long enough to put the crank at a true right angle to the piston rod. This causes valve event timing errors. The error is proportional to the ratio between piston stroke length and con-rod length, and for it to be at an acceptable level the con-rod should be at least 4 times longer than the stroke. An inconvenient cure is to build engines with very long connecting rods. The other is to compensate errors with an adjustable valve gear and then spend an age fine tuning it. The Stuart's valve gear is a straightforward and effective compromise, with minor shortcomings, plenty good enough for a working model. However, if chasing perfection brings joy, then there are lots of more advanced engines to model... Seriously good build though - you either have talent or a skip full of rejects, perhaps both! Congratulations. Dave
Thanks Dave. I've re-built a couple of old cars in the past, and it was a similar feeling driving them for the first time. Of course, re-building something is different from actually making the parts yourself and fitting them together into something that runs (even if it's probably been done thousands of times by others in the past). I don't have any previously scrapped projects - this was my first one. Among the 'firsts' for me during this project were: * Using a 4-jaw chuck (making the setting rod and setting up the parts to be central) * Using a face plate * Intermittent cuts of the lathe * Using a fly cutter * Making tools e.g. spot facing tool * Making jigs & fixtures * Co-ordinate drilling * Lapping There were probably more, but with advice from this forum, and practice on off-cuts, most of it went without much probelm. Of course, I made mistakes during this build, and had to scrap some bits and pieces, but not a skip full; they are all in my build thread or here on the beginner's forum. From memory they were the crank webs being drilled off-centre, the valve rod being turned incorrectly, and the valve chest being drilled over-sized and needing sleeving. I also very nearly had to scrap the cylinder casting due to the milling cutter grabbing. The cylinder end faces also aren't parallel. I do however have a lot of experience of scale models in plastic and paper, so if something is wrong, I know right away, and I have to correct it. I am a design engineer, and have been around engienering projects all my working life, and before that with my Dad, who was also a very good intuitive engineer (and my best constructive critic!). I wish he was still around to see this engine. I will have to re-read your notes on crank geometry a few times to get my head around it. Cheers! |
| Paul Kemp | 18/10/2020 13:40:43 |
| 798 forum posts 27 photos | Nice job, measure of success is not how fast it will run but how slow and that runs as slow as you could reasonably expect with a flywheel of that size. Well done indeed. Paul. |
| Steviegtr | 18/10/2020 13:41:54 |
 2668 forum posts 352 photos | Nice job you have done. Looks immaculate. Steve. |
| Mick B1 | 18/10/2020 13:49:46 |
| 2444 forum posts 139 photos | Posted by Paul Kemp on 18/10/2020 13:40:43:
Nice job, measure of success is not how fast it will run but how slow and that runs as slow as you could reasonably expect with a flywheel of that size. Well done indeed. Paul. Indeed. Yours runs fine as far as I can see, and a slow run is the most attractive because you can still see the detail of the moving parts, and it most resembles what you see in a full-sized engine of similar design. Plus I don't think the vanilla design of the 10V crankshaft is properly balanced - mine vibrates at high speed. Because I don't have a quiet compressed air supply - I use a hand-held compressor from Lidl since the battery gave out in my car jump-starter/tyre inflator - I can scarcely hear the beat of my 10V. I very much like your inlet control, and will shamelessly copy something like it... Edited By Mick B1 on 18/10/2020 13:54:22 |
| SillyOldDuffer | 18/10/2020 14:34:51 |
| 10668 forum posts 2415 photos | Posted by Dr_GMJN on 18/10/2020 13:25:15:
Posted by SillyOldDuffer on 18/10/2020 11:13:12:
Posted by Dr_GMJN on 17/10/2020 15:47:13: ..... I will have to re-read your notes on crank geometry a few times to get my head around it. ... A diagram should help:
Piston travel 10 units, piston rod 12, and the con-rod is 33 units long. The con-rod is exactly in line with the piston rod when the piston is at either end in the cylinder, and the crank is correctly positioned at 0° or 180°. In a perfect world, the crank would be at 90° or 270° when the piston was mid-cylinder, but in this example the crank is 4.34° out. As the eccentric driving the valve has the same type of angular error, all the steam events will be off target. Doesn't matter in a model, but a steamship engineer who cost his owners an extra 5% on coal between Southampton and Bombay would be dropped with the anchor! Designing a valve gear to get the very best out of a reciprocating steam engine is challenging, as is adjusting them. Dave |
| Neil Wyatt | 18/10/2020 14:43:25 |
 19226 forum posts 749 photos 86 articles | Something else to be aware of is that air and steam behave very differently, so steam runs better with more advance. Also steam finds leaks that air can't (or at least makes them obvious!) It is fun to fit a displacement lubricator and run a 10V on steam though, I found a coffee machine's milk frother supplied plenty of steam via a silicone tube for running unloaded. Neil |
| Dr_GMJN | 18/10/2020 15:16:07 |
1602 forum posts | Posted by SillyOldDuffer on 18/10/2020 14:34:51:
Posted by Dr_GMJN on 18/10/2020 13:25:15:
Posted by SillyOldDuffer on 18/10/2020 11:13:12:
Posted by Dr_GMJN on 17/10/2020 15:47:13: ..... I will have to re-read your notes on crank geometry a few times to get my head around it. ... A diagram should help:
Piston travel 10 units, piston rod 12, and the con-rod is 33 units long. The con-rod is exactly in line with the piston rod when the piston is at either end in the cylinder, and the crank is correctly positioned at 0° or 180°. In a perfect world, the crank would be at 90° or 270° when the piston was mid-cylinder, but in this example the crank is 4.34° out. As the eccentric driving the valve has the same type of angular error, all the steam events will be off target. Doesn't matter in a model, but a steamship engineer who cost his owners an extra 5% on coal between Southampton and Bombay would be dropped with the anchor! Designing a valve gear to get the very best out of a reciprocating steam engine is challenging, as is adjusting them. Dave
Dave, Prompted by your earlier post, I found a paper that references the work of H. Nollau on steam engine balancing, and I just drew exactly the same diagram on Autocad (albeit vertical not horizontal)! I admit that I should be able to decipher it better, but I found it more intuitive to draw the two positions of the piston in the bore when the crank webs and connecting rod form a 90 degree angle. My - possibly incorrect - assumption is that with constant inlet pressure, this is when peak torque is applied to the shaft. So on my diagram, with a counterclockwise rotation, the peak torque on the downstroke is significantly earlier in the piston's travel downwards than in its travel upwards on the upstroke...so it gives peaks of torque at significantly unequal crankshaft rotation intervals. Clearly a longer connecting rod reduces the angle difference. Is this a valid way of visualising it? Must admit, I find all this very non-intuitive, and therefore very interesting. Cheers. |
| Jon Lawes | 18/10/2020 15:43:40 |
 1078 forum posts | Great work. To create something like this is not only addictive but fantastic for the soul. Well done, You seem to have taken to it like a duck to water. Now to plan the next one! |
| Dr_GMJN | 18/10/2020 15:54:01 |
1602 forum posts | Posted by Mick B1 on 18/10/2020 13:49:46:
Posted by Paul Kemp on 18/10/2020 13:40:43:
Nice job, measure of success is not how fast it will run but how slow and that runs as slow as you could reasonably expect with a flywheel of that size. Well done indeed. Paul. Indeed. Yours runs fine as far as I can see, and a slow run is the most attractive because you can still see the detail of the moving parts, and it most resembles what you see in a full-sized engine of similar design. Plus I don't think the vanilla design of the 10V crankshaft is properly balanced - mine vibrates at high speed. Because I don't have a quiet compressed air supply - I use a hand-held compressor from Lidl since the battery gave out in my car jump-starter/tyre inflator - I can scarcely hear the beat of my 10V. I very much like your inlet control, and will shamelessly copy something like it... Edited By Mick B1 on 18/10/2020 13:54:22 Thanks Mick. the valve is just a standard Wilesco item with a home made brass wheel replacing the plastic one. It's a bit flaky, but better than nothing, and a bit smaller than the others I've seen from ME suppliers. It was good to muffle the exhaust with a cloth, then you can hear the mechanical noises. I was wondering if the put-put-put was all exhaust noise, or a mechanical knock. It seems it was just the exhaust. |
| Dr_GMJN | 18/10/2020 16:02:58 |
1602 forum posts | Posted by Jon Lawes on 18/10/2020 15:43:40:
Great work. To create something like this is not only addictive but fantastic for the soul. Well done, You seem to have taken to it like a duck to water. Now to plan the next one! Cheers Jon - indeed it's a relaxing process. In many ways it's more relaxing than building plastic kits becasue that's pretty much a one-way build, and any mistake towards the end can ruin the entire model. With model engineering I guess a single mistake is less likely to scrap the whole thing. Not saying that I'd want to re-machine the cylinder casting though, and I know a lot of the more complex individual parts on bigger models take a hell of a lot of work. The next steps are already decided: Stuart Twin Victoria next year, and the 1" "Minnie" traction engine as a long-termer. After that I can say the lathe and mill were justified purchases, and I'll be able to go to the Doncaster Model Engineering show without feeling like I'm not really worthy! |
| Dr_GMJN | 18/10/2020 16:06:03 |
1602 forum posts | Posted by Neil Wyatt on 18/10/2020 14:43:25:
Something else to be aware of is that air and steam behave very differently, so steam runs better with more advance. Also steam finds leaks that air can't (or at least makes them obvious!) It is fun to fit a displacement lubricator and run a 10V on steam though, I found a coffee machine's milk frother supplied plenty of steam via a silicone tube for running unloaded. Neil Thanks Neil. I wonder if I could adapt my Wilesco D32 boiler to feed the 10V? Working pressure is about 20 psi, but perhaps it can't generate enough volume of steam to keep it running? I suppose if it was do-able, everyone would just use a cheap boiler like that. I would like to run it on steam at some point. |
| SillyOldDuffer | 18/10/2020 16:54:03 |
| 10668 forum posts 2415 photos | Posted by Dr_GMJN on 18/10/2020 15:16:07:
Posted by SillyOldDuffer on 18/10/2020 14:34:51:
Posted by Dr_GMJN on 18/10/2020 13:25:15:
Posted by SillyOldDuffer on 18/10/2020 11:13:12:
Posted by Dr_GMJN on 17/10/2020 15:47:13: ..... I will have to re-read your notes on crank geometry a few times to get my head around it. ... A diagram should help: ...
Dave, Prompted by your earlier post, I found a paper that references the work of H. Nollau on steam engine balancing, and I just drew exactly the same diagram on Autocad (albeit vertical not horizontal)! ... I found it more intuitive to draw the two positions of the piston in the bore when the crank webs and connecting rod form a 90 degree angle. My - possibly incorrect - assumption is that with constant inlet pressure, this is when peak torque is applied to the shaft. So on my diagram, with a counterclockwise rotation, the peak torque on the downstroke is significantly earlier in the piston's travel downwards than in its travel upwards on the upstroke...so it gives peaks of torque at significantly unequal crankshaft rotation intervals. Clearly a longer connecting rod reduces the angle difference. Is this a valid way of visualising it? Must admit, I find all this very non-intuitive, and therefore very interesting. Cheers. I find it interesting too. There's a mass of interest in a steam engine. Building them is great fun, and making them look good isn't easy either! Then there's understanding how they work, and how they might be improved. The more I look at the whole the more I appreciate the technical achievements of our forefathers. Your diagram is every bit as good as mine I'm sure - I just drew it as it felt right to me. I'm not sure about torque, but you may be right. Certainly the piston is travelling fastest at mid-point, because it has to slow down and reverse before hitting the end of the cylinder. Pressure inside the cylinder isn't constant throughout the stroke though. One of James Watt's major contributions was the Indicator Diagram, a graph of pressure inside the cylinder, example pinched from Wikipedia:
That it's all about heat is more obvious with hot steam than cold compressed air, but the piston isn't simply pushed to and fro by pressure. Rather, work is done as the input gas cools by expansion. So the valves aren't just opened and closed at each end with a bang, they gently open and close to maximise the expansion phase. I find steam engines difficult to visualise because everything changes throughout the cycle; temperature, pressure, torque, power-output, piston speed, and rpm. My mathematical abilities run out of puff with rates of change. Wish I understood calculus but I struggle with the basics. Measuring what an engine is capable of is another game. Next challenge: find the power output of your Stuart in Watts. I think average power is easier to measure than torque,but could be wrong... Dave
|
| duncan webster | 18/10/2020 17:35:04 |
| 5307 forum posts 83 photos | I wish my 10V ran as well as this, I used commercial piston rings, (ex chain saw) and so the friction is too high. It's on the list for sorting. Just one possible improvement, as shown the inlet is on what would normally be the output. This doesn't actually matter, but with it the other way round, when the valve is shut the valve stem packing isn't subject to steam pressure. Many moons ago I actually repacked valves on a steam loco whilst there was pressure in the boiler. I wouldn't do it again, it was **** hot to start with, and if it had gone awry I'd have been right in the firing line |


Please login to post a reply.
Magazine Locator
Want the latest issue of Model Engineer or Model Engineers' Workshop? Use our magazine locator links to find your nearest stockist!
Sign up to our Newsletter
Sign up to our newsletter and get a free digital issue.
You can unsubscribe at anytime. View our privacy policy at www.mortons.co.uk/privacy
Latest Forum Posts
- *Oct 2023: FORUM MIGRATION TIMELINE*
05/10/2023 07:57:11 - Making ER11 collet chuck
05/10/2023 07:56:24 - What did you do today? 2023
05/10/2023 07:25:01 - Orrery
05/10/2023 06:00:41 - Wera hand-tools
05/10/2023 05:47:07 - New member
05/10/2023 04:40:11 - Problems with external pot on at1 vfd
05/10/2023 00:06:32 - Drain plug
04/10/2023 23:36:17 - digi phase converter for 10 machines.....
04/10/2023 23:13:48 - Winter Storage Of Locomotives
04/10/2023 21:02:11 - More Latest Posts...
- View All Topics
Support Our Partners


Shopping Partners
Subscription Offer

Latest "For Sale" Ads
- Reeves** - Rebuilt Royal Scot by Martin Evans
by John Broughton
£300.00 - BRITANNIA 5" GAUGE James Perrier
by Jon Seabright 1
£2,500.00 - Drill Grinder - for restoration
by Nigel Graham 2
£0.00 - WARCO WM18 MILLING MACHINE
by Alex Chudley
£1,200.00 - MYFORD SUPER 7 LATHE
by Alex Chudley
£2,000.00 - More "For Sale" Ads...
Latest "Wanted" Ads
- D1-3 backplate
by Michael Horley
Price Not Specified - fixed steady for a Colchester bantam mark1 800
by George Jervis
Price Not Specified - lbsc pansy
by JACK SIDEBOTHAM
Price Not Specified - Pratt Burnerd multifit chuck key.
by Tim Riome
Price Not Specified - BANDSAW BLADE WELDER
by HUGH
Price Not Specified - More "Wanted" Ads...
Get In Touch!
Do you want to contact the Model Engineer and Model Engineers' Workshop team?
You can contact us by phone, mail or email about the magazines including becoming a contributor, submitting reader's letters or making queries about articles. You can also get in touch about this website, advertising or other general issues.
Click THIS LINK for full contact details.
For subscription issues please see THIS LINK.
Digital Back Issues


Donate

 Register
 Log-in
Model Engineer Magazine
- Percival Marshall
- M.E. History
- LittleLEC
- M.E. Clock

ME Workshop
- An Adcock
- & Shipley
- Horizontal
- Mill

Subscribe Now
- Great savings
- Delivered to your door

Pre-order your copy!
- Delivered to your doorstep!
- Free UK delivery!
All Forum Topics > Beginners questions > Stuart 10V First Build - Opinions on Running Please