Forum sponsored by:

Postman Cometh Part 2
Build progress of Stuart No.4
| JasonB | 12/12/2015 08:45:32 |
 25215 forum posts 3105 photos 1 articles | Obviously not a Boy Scout Assuming you have a M3.5 tap for rethreading electrical boxes you could single point the valve spindle M3.5 as its a very similar dia to 4BA and tap the valve nut to suit |
| Nick_G | 12/12/2015 10:02:07 |
 1808 forum posts 744 photos | Posted by JasonB on 12/12/2015 08:45:32:
Obviously not a Boy Scout
. Nope. I was a cub scout though. ................ But managed to get expelled so did not get to the lofty position of boy scout. I seem to remember the final straw was something to do with a note book and drawings of Arkala. I do however still clearly remember the thick-ear from my father when he found out I had 'disgraced' the family. I have ordered the required trinkets from Macc Models as they always seem to dispatch promptly. - I will press on with other areas of the construction. Nick |
| mechman48 | 12/12/2015 10:17:31 |
 2947 forum posts 468 photos | ... Hi George, Many thanks.
Nick
Stuart S50... 10V ... & the 'Progress' ... Birthday prezzie last year but never got round to starting one, always had other stuff to attend to, family etc, then making stuff to make stuff to make stuff with if you get my drift , so plan on starting in the new year, I use the term 'plan on' very loosely as something has always cropped up lately so.. George. |
| Nick_G | 15/12/2015 23:10:03 |
1808 forum posts 744 photos | . Made the piston. After 'consultation' with the wise one decided to make it out of Aluminium. A slug was tuned down to 4 thou under the bore size.
The bottom side had a recess let into it then drilled and tapped to 2 BA
Grooves for the piston rings were cut.
It was then parted off a tad over size, reversed in the chuck and faced off to the required size. A recess was then let into it with a boring bar.
The finished up and down thingy.
I could then get the final measurement for the length of the piston rod as I had deliberately made it a lttle on the long side until I had ref points from the top and bottom of the piston.
Nick Edited By Nick_G on 15/12/2015 23:11:34 |
| Nick_G | 20/12/2015 19:53:57 |
1808 forum posts 744 photos | . Did some work on the eccentric. I decided to make a filing guide. Two stepped buttons were turned.
One had a 6mm clear hole in it. The other had a 6mm thread tapped into it.
And went together thus.
Filing commenced.
Then a bit of dressing. I will give it a final finish and polish at assembly time.
And how it's all starting to look like an engine.
Nick |
| JasonB | 21/12/2015 07:23:48 |
25215 forum posts 3105 photos 1 articles | Looking good, will it be finished by Xmas? |
| Nick_G | 21/12/2015 12:00:57 |
1808 forum posts 744 photos | Posted by JasonB on 21/12/2015 07:23:48:
will it be finished by Xmas? .
Which year.? But I must admit to starting to think about paint types and colours. Nick |
| Nick_G | 21/12/2015 19:12:12 |
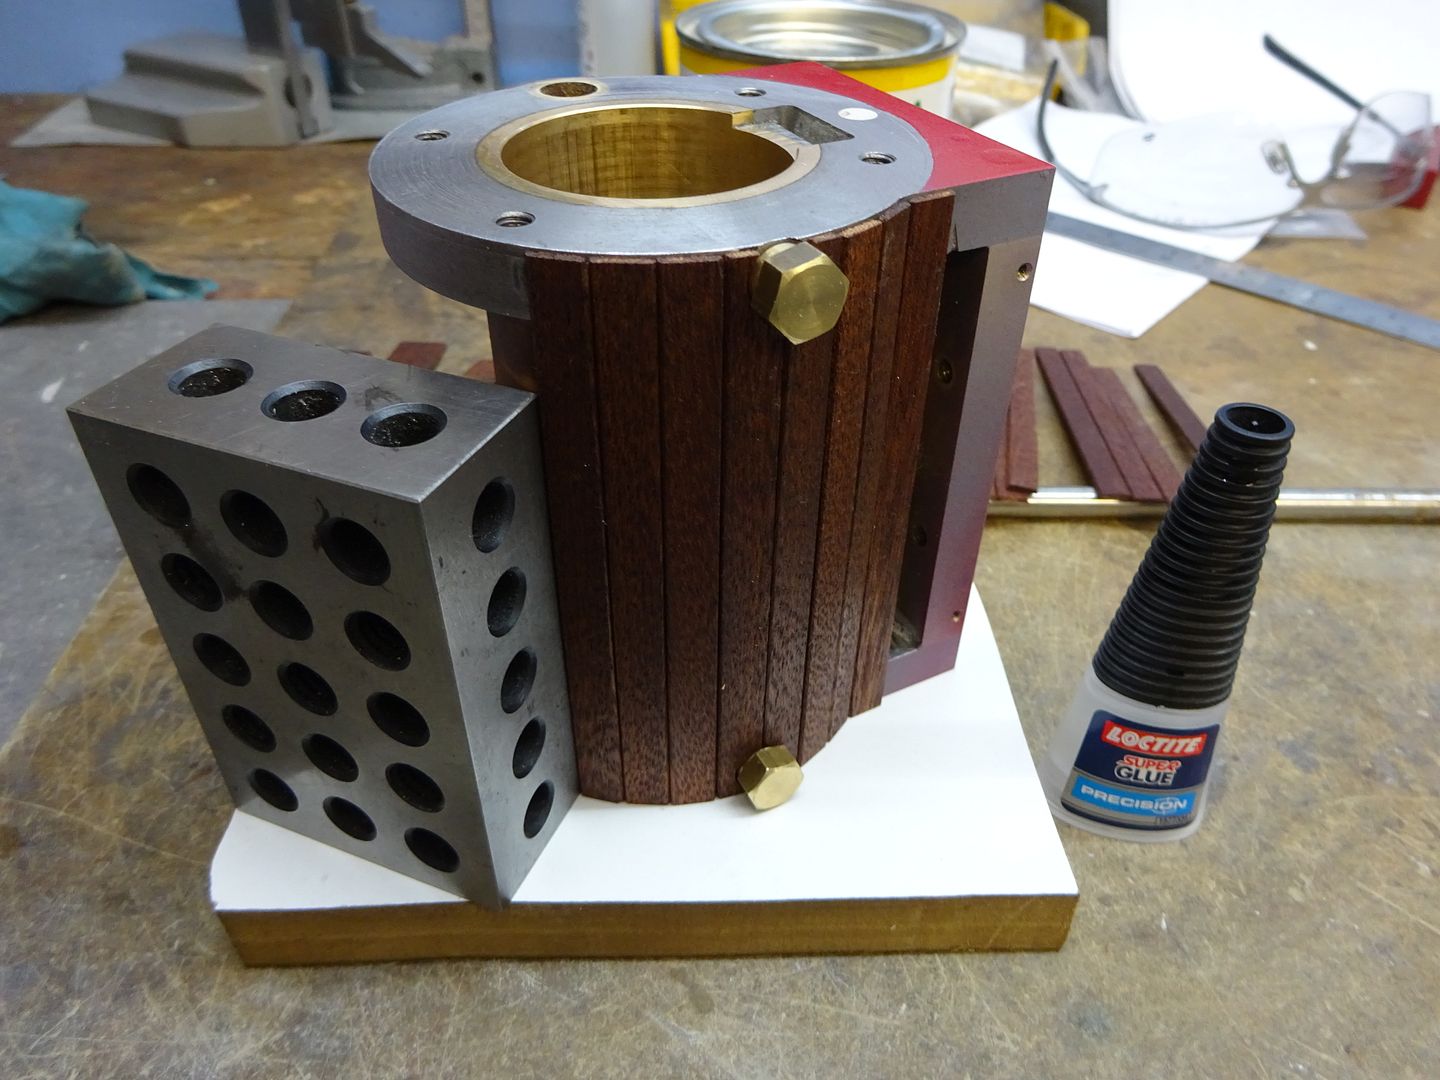
1808 forum posts 744 photos | . Hi Guy's. Need a bit of advice please. I have to produce this :-
From this :-
I feel confident on the general machining but the top has a cosmetic dome to it. It is I realise not a precise size, it just has to 'look right'.! I have never had to do such. What is the best way please.? A form tool.? If such what is the best way of making such.? Or is there another way.? Cheers, Nick
|
| JasonB | 21/12/2015 19:28:27 |
25215 forum posts 3105 photos 1 articles | Too big an area to do with a form tool which will result in a lot of chatter. I would use a HSS tool with a bull nose end to do the concave outer part and then freehand the convex central part. You can refine the basic shape by hand turning much like woodturning with a hand held tool and finally use a bit of emerycloth. I would leave the machined top surface a little over thickness and then take a final skim once the shaping has been completed just incase you mark it.
Edited By JasonB on 21/12/2015 19:31:05 |
| Ian S C | 22/12/2015 11:08:54 |
 7468 forum posts 230 photos | For brass or aluminium I actually use a wood turning scraper to cut curves. I sometimes file a bit of sheet metal as a template, a bit of cardboard will do ok for a one off job. Ian S C |
| KWIL | 22/12/2015 12:11:53 |
| 3681 forum posts 70 photos | Nick, If you can afford the Multisize chuck set you can afford a posh boring bar, if that one is not solid carbide, you should try one, wish I had more |
| JasonB | 22/12/2015 13:09:30 |
25215 forum posts 3105 photos 1 articles | Kwil, his bars are solid carbide came from the same auction site as the chuck (s) all for very reasonable amounts |
| Nick_G | 15/01/2016 13:24:35 |
1808 forum posts 744 photos | . I have been busy.
Nick |
| JasonB | 15/01/2016 16:17:51 |
25215 forum posts 3105 photos 1 articles | I see the postman had some paint left over from doing his boxes. Looking good. |
| Michael Gilligan | 15/01/2016 16:18:27 |
 23121 forum posts 1360 photos | Posted by Nick_G on 15/01/2016 13:24:35:
I have been busy. Nick . Busy and effective !! MichaelG. |
| mechman48 | 15/01/2016 16:42:14 |
2947 forum posts 468 photos | Looks an excellent job... must get started on my '2016 projects'... hopefully this year George. |
| Nick_G | 15/01/2016 18:06:13 |
1808 forum posts 744 photos | Posted by JasonB on 15/01/2016 16:17:51:
I see the postman had some paint left over from doing his boxes. Looking good. .
I admit it is a bit on the red side. I picked it from a swatch at a local place near me that will mix the satin paint into an aerosol. - I was sure it looked darker / crimson on the swatch. I also took your advice and have given a couple of coats of satin lacquer of the type used on motorbike petrol tanks. Rounding off and reducing the size of the cylinder flanges and getting the size the same as the valve chest was a bit nerve wracking but went smoothly once I had grown a pair to actually do it.! - Again I took your advice and made them smaller than the end covers so that the wooden planked cylinder will flow into them. On the subject of the wooden cladding. I was thinking of attaching them with super glue then staining / sealing them with linseed oil. Is this a good idea or bad.? Then to trim them up with brass banding. Nick |
| JasonB | 15/01/2016 18:20:45 |
25215 forum posts 3105 photos 1 articles | Thats what I did on the Tidman. The other option is to stick them all onto a piece of linen (old hanky) making sure not to get glue on the edges. Once dry this can be wrapped around the cylinder and then the banding will hold it in place.
Edited By JasonB on 15/01/2016 18:21:10 |
| Neil Wyatt | 15/01/2016 18:34:52 |
 19226 forum posts 749 photos 86 articles |
|
| Grant Nicholas | 15/01/2016 20:35:37 |
 51 forum posts | I do tip my hat to you gentleman that knock out these engines and loco's! Not really my thing, but man, the craftsmanship and techniques used is inspiring!
Edited By Grant Nicholas on 15/01/2016 20:36:20 |


Please login to post a reply.
Magazine Locator
Want the latest issue of Model Engineer or Model Engineers' Workshop? Use our magazine locator links to find your nearest stockist!
Sign up to our Newsletter
Sign up to our newsletter and get a free digital issue.
You can unsubscribe at anytime. View our privacy policy at www.mortons.co.uk/privacy
Latest Forum Posts
- *Oct 2023: FORUM MIGRATION TIMELINE*
05/10/2023 07:57:11 - Making ER11 collet chuck
05/10/2023 07:56:24 - What did you do today? 2023
05/10/2023 07:25:01 - Orrery
05/10/2023 06:00:41 - Wera hand-tools
05/10/2023 05:47:07 - New member
05/10/2023 04:40:11 - Problems with external pot on at1 vfd
05/10/2023 00:06:32 - Drain plug
04/10/2023 23:36:17 - digi phase converter for 10 machines.....
04/10/2023 23:13:48 - Winter Storage Of Locomotives
04/10/2023 21:02:11 - More Latest Posts...
- View All Topics
Support Our Partners


Shopping Partners
Subscription Offer

Latest "For Sale" Ads
- Reeves** - Rebuilt Royal Scot by Martin Evans
by John Broughton
£300.00 - BRITANNIA 5" GAUGE James Perrier
by Jon Seabright 1
£2,500.00 - Drill Grinder - for restoration
by Nigel Graham 2
£0.00 - WARCO WM18 MILLING MACHINE
by Alex Chudley
£1,200.00 - MYFORD SUPER 7 LATHE
by Alex Chudley
£2,000.00 - More "For Sale" Ads...
Latest "Wanted" Ads
- D1-3 backplate
by Michael Horley
Price Not Specified - fixed steady for a Colchester bantam mark1 800
by George Jervis
Price Not Specified - lbsc pansy
by JACK SIDEBOTHAM
Price Not Specified - Pratt Burnerd multifit chuck key.
by Tim Riome
Price Not Specified - BANDSAW BLADE WELDER
by HUGH
Price Not Specified - More "Wanted" Ads...
Get In Touch!
Do you want to contact the Model Engineer and Model Engineers' Workshop team?
You can contact us by phone, mail or email about the magazines including becoming a contributor, submitting reader's letters or making queries about articles. You can also get in touch about this website, advertising or other general issues.
Click THIS LINK for full contact details.
For subscription issues please see THIS LINK.
Digital Back Issues


Donate

 Register
 Log-in
Model Engineer Magazine
- Percival Marshall
- M.E. History
- LittleLEC
- M.E. Clock

ME Workshop
- An Adcock
- & Shipley
- Horizontal
- Mill

Subscribe Now
- Great savings
- Delivered to your door

Pre-order your copy!
- Delivered to your doorstep!
- Free UK delivery!
All Forum Topics > Work In Progress and completed items > Postman Cometh Part 2