Forum sponsored by:

Stuart 'No.1' : a beginners tale..
| JasonB | 29/04/2014 16:14:54 |
 25215 forum posts 3105 photos 1 articles | Poke someting sharp like a scriber into one of the indentations, it could well be a blow hole and the slightly dull tool has pushed the soft GM into the ole rather than cutting it off. As Andrew says it looks like its all within the area to be bored out. Similar thing here but the sharper tool cut the skin off
And then when it was milled a bit deeper
Next time you are buying carbide inserts try one of the CCGT or DCGT ones which work a treat on GM, Bronze, Brass and Aluminium Edited By JasonB on 29/04/2014 16:15:43 |
| GarryC | 29/04/2014 17:16:08 |
 740 forum posts 1043 photos | Hi Jason Thats interesting to see, I hadn't even thought to look more closely at the different types of carbide inserts, just checked and I'm using CCMT. Definitely makes sense to increase options and get some different types when I order next time.. Hardly a day goes by when I don't learn something new, thanks.... Can't get enough of it! Cheers. Allan.
|
| Nick_G | 29/04/2014 18:26:55 |
 1808 forum posts 744 photos | Posted by Allan. on 29/04/2014 17:16:08:
Hi Jason Hardly a day goes by when I don't have to get my card out and spend lot's more money .... Cheers. Allan.
You got that wrong.! Don't worry I corrected it for you.
Nick |
| GarryC | 30/04/2014 08:22:35 |
740 forum posts 1043 photos | I know nick was just joking but its given rise to a rather horrible thought this morning - because I've tried to include everything that I'm doing my posts may read to some just starting out that you have to be spending money all the time, putting them off. The very very last thing I would want. I just want to say that for me I have found that compared to what I know others spend on some other common interests e.g.. Supporting Football, Golf, Motorcycling etc the costs to 'get going' are far less. A lot depends on your skill level and what you want to do - I need all the help I can get from bits and pieces but there are some on here who could have put together my projects with little more than a pen knife and a piece of string as it were... and I've not looked at the second hand market.. As its all still fresh in my mind - If anyone setting out is interested I could put together a list of all the bits and pieces that I considered were essential to have had so far, it really need not be that bad / expensive - just let me know here or pm... All the 'tooling up' for me is an investment for all the future projects to come.. Nick - hope your own workshop is coming along well.. Cheers. Allan.
|
| roy entwistle | 30/04/2014 09:46:06 |
| 1716 forum posts | Alan During the past 50 years at least I have built several of Stuarts engines including Victoria I have also made 3 long case clocks and 5 other clocks with only a lathe a bench drill and hand tools I find filing and the use of a piercing saw very therapeutic Roy Edited By roy entwistle on 30/04/2014 09:58:08 |
| GarryC | 30/04/2014 11:40:15 |
740 forum posts 1043 photos | Hi Roy It's been brilliant to see some of the 'old skills' still alive and well on here. You confirm what I was trying to say above. I would suggest that given the way the world is moving on this very place not only now but will in the future become more and more important in keeping the 'hand down' of such knowledge and skills ongoing... Someday the country may well be very grateful..! Cheers. Allan. |
| GarryC | 01/05/2014 08:16:29 |
740 forum posts 1043 photos | Great fun before breakfast this morning - soldering the top bearing half's together. Thought I would quickly put up the sequence of soldering steps in case anyone like me who's not tried it before may be interested.. Hopefully if I've messed up someone will explain.. My little soldering hearth...
The solder paint applied when cold - i don't know if this was maybe too much. Applied with a matchstick I'm afraid..
Initial heating.
After heating and wiping off the excess solder.
Solder paint reapplied to one surface after cooling.
The two half's placed together.
Reheating.
I think I heated too much as they slid apart slightly.
Back in line and cooling.
Cooling before machining..
On to the lathe now - after breakfast.. Hope some found it interesting. Regards. Allan.
Edited By Allan. on 01/05/2014 08:17:16 Edited By Allan. on 01/05/2014 08:30:48 |
| roy entwistle | 01/05/2014 08:29:30 |
| 1716 forum posts | Alan What happened ? |
| GarryC | 01/05/2014 08:33:11 |
740 forum posts 1043 photos | Sorry Roy - should be ok to see now.. Cheers. Allan. |
| roy entwistle | 01/05/2014 13:33:56 |
| 1716 forum posts | Alan Just a thought but I think I would have drilled two small holes where the bolt holes will be and pinned them together so that they couldn't move Pin with something like copper wire so that it is softer than the caps so it could be drilled out after I'm not trying to teach you to suck eggs Roy |
| Ian S C | 01/05/2014 14:27:51 |
 7468 forum posts 230 photos | Allan, you would be best if you don't apply the heat / flame directly to the solder surface, but to the metal from beneath, if the solder gets too hot it will boil off, and the lead in the air is not supposed to be good for you. I'v never tried the solder paint, I either use a stick of plumbers solder, or cored electricians solder, just heat up, touch the solder to the metal, use a bit of COTTON cloth to wipe off any surplus solder. Ian S C |
| GarryC | 01/05/2014 15:14:31 |
740 forum posts 1043 photos | Hi Roy Just came back in and seen your post - so too late for me to try really as I've already started turning in the Lathe, but it does sound a very good and a useful idea, something else I will remember thanks.. Hi Ian Thanks very much, I'll know to do that now in future, and it's great to know I could have used the cored electricians or plumbers solder - I thought the solder paint was a bit pricey, I've just checked and 'electricians' is about 75% cheaper!! I owe you one there Ian... and Jason if you read this - many thanks again to you for the steps to follow through in doing this for the first time... I've made a little more progress on the lathe since the soldering and will post up again later.. Cheers. Allan. |
| JasonB | 01/05/2014 16:27:18 |
25215 forum posts 3105 photos 1 articles | One thing I would say is don't use that nice little vice, flux will make things rust and the flux in the solder paint is quite a corrosive one. I keep a couple of old toolmakers clamps just for soldering, as you can see they are not in pristine condition. Probably a bit too much solder which will make the parts squirm about a bit. If using stick solder or electricians cored solder on large areas you will also want to flux them first.
J |
| GarryC | 01/05/2014 18:28:42 |
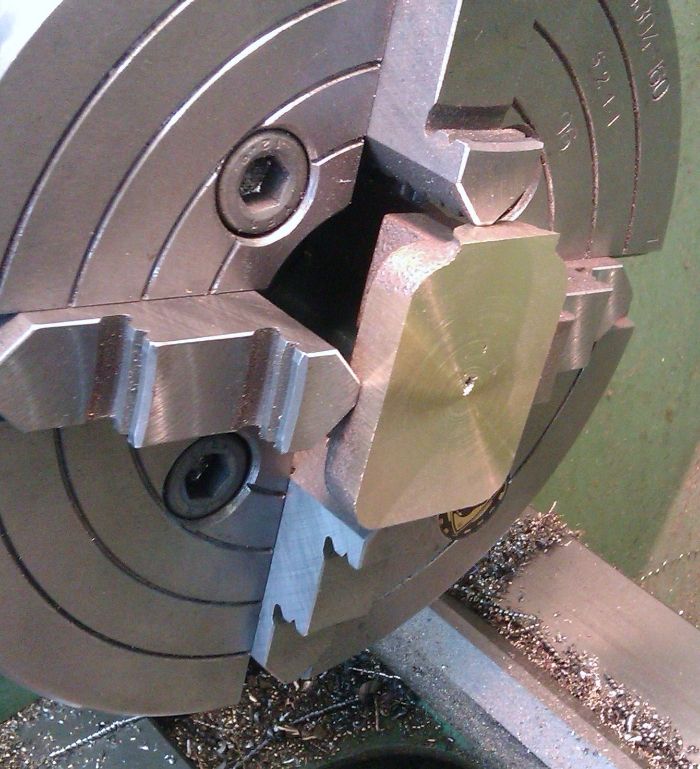
740 forum posts 1043 photos | Hi Jason Yes, that makes sense and will do - I was quite surprised it wasn't more 'messy' than it was when doing it, I'd imagined it running lots more.. A little more progress in the Lathe - it will be worth in the future trying some of the CCGT carbide inserts for Gunmetal I think.. The bearing 'tops' in the lathe ready for the initial facing.
Facing in order to be able to mark the centre..
After marking the centre, setting the bearing 'tops' to run true..
The bearing 'tops' so far 1.
The bearings tops so far 2.
Regards Allan. |
| Martin Cottrell | 01/05/2014 22:48:46 |
| 297 forum posts 18 photos | Hi Allan, Nice job so far! I've sent you a PM regarding your brazing hearth setup. Regards, Martin. |
| John Olsen | 02/05/2014 08:05:07 |
| 1294 forum posts 108 photos 1 articles | I thought that the hay in the background might not be the greatest idea. Speaking of corrosive flux, I have a bottle of commercial flux, which is based as far as I can tell on killed spirits, eg zinc chloride. I keep this out of the workshop, since if the fumes of it get anywhere near steel, they will cause it to rust. The bottle doesn't need to be open for this to happen. I've done two Stuart Number 1's, along with a 10V and a double 10. I don't know how more recent ones would be, but in the past something to watch for was that cast parts as supplied were sometimes already below the nominal size. This meant making adjustments to the sizes of other parts. Usually no great problem but something to be aware of. Although since all of mine would have been from the eighties or earlier, this may not apply to current production. I've always done my spot facing with home made cutters. You drill a hole the size of the pilot you want in the end of a piece of silver steel bar the diameter of the desired spot. You then file with a little triangular file to make cutting teeth. No dividing needed, you can do it all by eye. Just try to make sure that the back of each tooth meets the front of the next without leaving a little flat or taking off too much. It is actually a good thing if all the teeth vary in pitch slightly since it reduces any tendency to chatter. Eight or so teeth is plenty. The cutter is then hardened and tempered. Heat the cutting end up to the colour of a boiled carrot, hold it there for a bit, then plunge into cold water. At this point it will be dead hard and very brittle so don't drop it. Now polish the outside surface with wet and dry paper to bring it back to shiny metal...don't worry about the teeth, just the shank. Heat it up back from the tip and watch the colours as they move up from the flame. When the light yellow tinge reaches the edge, plunge it into water again. That should give you an edge that is hard enough to cut, but not too brittle. Make a pilot pin the right diameter and push it into the hole in the end with a drop of loctite. The advantage of a piloted cutter is that the spot will always be concentric with the screw hole, and you don't have to carefully line the job up on the mill. You can off course buy piloted spot face cutters but they are quite expensive. John |
| Neil Wyatt | 02/05/2014 09:37:38 |
 19226 forum posts 749 photos 86 articles | Using solder paste, I wouldn't have pre-melted it. It should work fine (if not better, as fresh flux) just by smearing it on and heating the assembly. Billions of little (and large) electronic components are fixed this way every day. Another thought, for soft soldering, you can use a jig made of wood, just a groove hacked out with a saw or rasp would do what that vice is doing. For silver soldering, make some toolmaker's clamps. Don't make a showroom job of them If they are thrown together, you won't have any worries about heating them until they blister! Neil Edited By Neil Wyatt on 02/05/2014 10:04:33 |
| julian atkins | 02/05/2014 09:42:42 |
 1285 forum posts 353 photos | very nice work allan! dont wear trousers with turn ups when machining gunmetal in the lathe! cheers, julian |
| NJH | 02/05/2014 10:18:19 |
 2314 forum posts 139 photos | Good advice Julian - but is it possible to get trousers with turn ups these days? Alan I agree - please don't subject that nice little vice to the fury of the blowtorch. Cheers Norman
|
| Jo | 02/05/2014 10:27:08 |
| 198 forum posts | I agree with Neil, solder paste should be applied sparingly only where it is needed, once applied the two parts are put together and heated, until the solder runs = goes shiny and runs out at the edges. Once you have heated the solder paste, or any soft solder, you loose the flux and like you observed the oxidisation on the surface of the solder will make it difficult to get a good joint. This can be remedied by applying flux (plumbers variety) or by introducing new flux cored soft solder. Any heat sinks (that vice) will make the time to heat up the work longer and increase the likely hood of the flux boiling off before the solder mounts and may cause a brittle joint that will fail (normally a the most inopportune time like whilst you are machining). So a couple of small off cuts which have minimum surface area with the work is more than adequate. And, as a friend introduced me to the other day, a "lazy bird" (a three legged tripod with weight on one leg) that rest on the item to be soldered in more than adequate to prevent things going astray when the solder melts. I am not sure why you did not do the boring of the bearing whilst you had them set up... Jo
Edited By Jo on 02/05/2014 10:29:16 |


This thread is closed.
Magazine Locator
Want the latest issue of Model Engineer or Model Engineers' Workshop? Use our magazine locator links to find your nearest stockist!
Sign up to our Newsletter
Sign up to our newsletter and get a free digital issue.
You can unsubscribe at anytime. View our privacy policy at www.mortons.co.uk/privacy
Latest Forum Posts
- *Oct 2023: FORUM MIGRATION TIMELINE*
05/10/2023 07:57:11 - Making ER11 collet chuck
05/10/2023 07:56:24 - What did you do today? 2023
05/10/2023 07:25:01 - Orrery
05/10/2023 06:00:41 - Wera hand-tools
05/10/2023 05:47:07 - New member
05/10/2023 04:40:11 - Problems with external pot on at1 vfd
05/10/2023 00:06:32 - Drain plug
04/10/2023 23:36:17 - digi phase converter for 10 machines.....
04/10/2023 23:13:48 - Winter Storage Of Locomotives
04/10/2023 21:02:11 - More Latest Posts...
- View All Topics
Support Our Partners


Shopping Partners
Subscription Offer

Latest "For Sale" Ads
- Reeves** - Rebuilt Royal Scot by Martin Evans
by John Broughton
£300.00 - BRITANNIA 5" GAUGE James Perrier
by Jon Seabright 1
£2,500.00 - Drill Grinder - for restoration
by Nigel Graham 2
£0.00 - WARCO WM18 MILLING MACHINE
by Alex Chudley
£1,200.00 - MYFORD SUPER 7 LATHE
by Alex Chudley
£2,000.00 - More "For Sale" Ads...
Latest "Wanted" Ads
- D1-3 backplate
by Michael Horley
Price Not Specified - fixed steady for a Colchester bantam mark1 800
by George Jervis
Price Not Specified - lbsc pansy
by JACK SIDEBOTHAM
Price Not Specified - Pratt Burnerd multifit chuck key.
by Tim Riome
Price Not Specified - BANDSAW BLADE WELDER
by HUGH
Price Not Specified - More "Wanted" Ads...
Get In Touch!
Do you want to contact the Model Engineer and Model Engineers' Workshop team?
You can contact us by phone, mail or email about the magazines including becoming a contributor, submitting reader's letters or making queries about articles. You can also get in touch about this website, advertising or other general issues.
Click THIS LINK for full contact details.
For subscription issues please see THIS LINK.
Digital Back Issues


Donate

 Register
 Log-in
Model Engineer Magazine
- Percival Marshall
- M.E. History
- LittleLEC
- M.E. Clock

ME Workshop
- An Adcock
- & Shipley
- Horizontal
- Mill

Subscribe Now
- Great savings
- Delivered to your door

Pre-order your copy!
- Delivered to your doorstep!
- Free UK delivery!
All Forum Topics > Work In Progress and completed items > Stuart 'No.1' : a beginners tale..