Forum sponsored by:

What Did you do Today 2022
| Mark Rand | 21/10/2022 17:12:55 |
| 1505 forum posts 56 photos | Been tidying up the Record No25 vice I'd picked up at an auction that I mentioned on the 12th of September. I don't really need a 25, since I've had a good condition 23 for many years, but I've always wanted the bigger one... The vice was in a rather sorry condition when I got it and I've ground the base ways of the moving part flat, taking out 5 thou of wear, Welding up ghastly hammer marks in the top (Why do idiot's think that vices are anvils?) and milling the top parallel to the base. I've added shims to the supports on the fixed part after grinding them to give a few thou of clearance to the assembled parts. I will be replacing the handle, because it's been hammered and is bent (again why...). The castings were shot blasted and have two coted of primer and the first topcoat. Paragon Paint's roundel blue, which is apparently the right colour. It's a bit ruddy bright
Not sure why I'm bothering, but it's better than doing the gardening.
Edited By Mark Rand on 21/10/2022 17:14:43 |
| bernard towers | 21/10/2022 17:19:46 |
| 1221 forum posts 161 photos | You're doing it because you can and looks a good job too and definitely better than doing the gardening. Me I'm getting stuff ready for Lowmex hope the weather stays ok. |
| Robin | 23/10/2022 18:52:19 |
 678 forum posts | Fixing my mill spindle clatter with a zero-backlash sprung second spline thingumabob. Brass seemed like the best bet. Can't finish it until longer springs and a new threading tool arrive from China
|
| Mark Rand | 23/10/2022 19:30:48 |
| 1505 forum posts 56 photos | Aha! Probably a far simpler solution than my one of making a completely new driving sleeve, with its internal splines, external keyways and multiple concentric diameters for my 1960's Beaver milling machine. It is nice to have a mill that doesn't sound like a Vickers gun when taking interrupted cuts though! Edited By Mark Rand on 23/10/2022 19:32:42 |
| Robin | 23/10/2022 20:47:18 |
678 forum posts | Posted by Mark Rand on 23/10/2022 19:30:48:
Aha! Probably a far simpler solution than my one of making a completely new driving sleeve, with its internal splines, external keyways and multiple concentric diameters for my 1960's Beaver milling machine. It is nice to have a mill that doesn't sound like a Vickers gun when taking interrupted cuts though! Edited By Mark Rand on 23/10/2022 19:32:42 A glutton for punishment Robin
|
| Robin | 27/10/2022 16:18:21 |
678 forum posts | Springs not here yet so I go for a trial fit. Heeds another 10.8mm of spline Muggins here forgot that you don't get to use the whole spline length if cut on a horizontal mill. The mighty Rong-Fu mill drill leaps to my rescue. I will admit to wilting slightly when I hit this latest set-back, but the deed is now done, all water under the bridge. Next the wiring
|
| Jelly | 28/10/2022 02:40:11 |
 474 forum posts 103 photos | I bought a bunch of Bisley Cabinets from a company who turned out to have had a re-organisation of their factory and bought new storage solutions... They're kinda tatty, but the ones I've already collected have allowed me to condense a lot of my storage whilst also increasing accessibility of stuff.
This re-organisation has of course, temporarily created a fantastic mess into the bargain, I'm due to pick up the last of the cabinets tomorrow and will hopefully get stuff squared away over the weekend. ¶ Whilst I was at it I also took a bunch of broken motors to the scrappy, my local EMR yard was offering well above market price (£570 a tonne, over a market rate of £450) on motors, so the timing was right. weighing in 250kg of motors and transformers paid for all the cabinets, whilst clearing a bunch of useless, heavy and bulky stuff out; Win-Win! ¶ I finally procrastinated from finishing my re-organisation by fitting the X-Axis Scale for my Lathe DRO.
It's rather crude in the bracketry department again, but I was able to use the mounting holes for the X-axis adjustable stop assembly and avoid modifying the lathe at all. I do have a better approach in mind to mount it more permanently using the casting on the saddle which carries the taper attachment and a welded bracket assembly to bolt on, and will probably do that using 1μm scale to replace that 5μm one in the fullness of time... But for now, that's a significant improvement on no DRO, and whilst the X-Axis stop is very handy and it would be good to get it back, it's somewhat less useful once you have a DRO fitted. |
| Nigel Graham 2 | 29/10/2022 23:24:29 |
| 3293 forum posts 112 photos | A day at the W&DMES track.... Weymouth Model Railway Association is holding a weekend exhibition in Budmouth College, its first in the school whose grounds are inhabited by our (W&DMES) track and small club-house. Saturday and Tuesday evenings are only normal club times anyway, but we are operating as an adjunct to the WMRA show. We did not know how busy we'd be - and we were, keeping 3 steam and 1 battery-electric diesel-outline locos, all 7:1/4" g. NG outline in action. We gave rides but without charging for them. Plenty of services on the raised garden scale circuit, too, and road steam representation. With my apologies for the low picture quality (my hands have always been wobbly and the snaps were rather on the fly), 4 of the better ones: .
|
| Nigel Bennett | 01/11/2022 10:12:54 |
 500 forum posts 31 photos | I'm back on my 5"G Invicta now, and the tender axle is next. It's going to be as near as I can make it to the current exhibit in Whitstable Museum but with the hope that it might just pull me. It owes nothing whatsoever to LBSC's Canterbury Lamb. My small version will have a multi-tubular marine boiler instead of the single flue big brother has now. Here's how I hope it will look in due course (if my CAD system is to be believed):
There is still a lot of tweaking to do to the valve gear and pipework on the CAD yet. The two-wheeled tender (!!!) is based on the contemporary illustration of the opening of the line in 1830. Despite four-wheeler pontifications by authoritative historians, I have taken the naïve view that despite certain other inaccuracies in the old picture, the artist could count... besides, it's quicker to make as it has fewer parts! Progress to date, with Ed Parrott providing the laser-cut sloping cylinder frames:
The wheels were an interesting exercise, being fabricated. Here the tender wheels have been brazed up; the loco wheels are yet to be done.
It's amazing how spindly it is. The loco main frames are lengths of 3/8" x 1/8" mild steel. They should by rights be only 2mm thick... |
| DrDave | 06/11/2022 12:09:33 |
| 264 forum posts 52 photos | I am building David Haythornthwait’s version of the pillar drill. Having made the bits for the arms, and glued them together, I spent this morning trying to bore the holes down the centre of the first arm. It did not go well! Following David’s instructions, I drilled 12 mm holes through the steel blocks to aid alignment at the next stage. All but one hole were true; the last deviated by a mm or so over the height of some 55 mm. I bored this “bent” hole first. It must have had some slag in it, even though it was from a respected supplier rather than scrapbinium. There are several hard areas that the carbide insert is struggling with. I was aiming at a bore of 17 mm to suit some bronze bushes. The bush is a rattle fit at the start of the hole, but only goes ⅔ of the way in before becoming a press fit. When the second hole is done (the boring bar is behaving at the mo), I will have to press the bearings in with a drop of Araldite & ream straight & to size, if needed. Why is nothing simple? |
| duncan webster | 08/11/2022 19:48:50 |
| 5307 forum posts 83 photos | After weeks of procrastination I finally made the last few connectors to couple my loco chassis to the compressor. Worked straight away. Now to couple up the reversing lever and get on with the boiler. |
| bernard towers | 09/11/2022 15:36:47 |
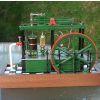
| 1221 forum posts 161 photos | blast from the past . Had a pair of these turn up today for overhaul. Haven’t done any for quite a while. Good thing is it’s from a hot rod so should get a test drive,
|
| Mick B1 | 11/11/2022 17:25:11 |
| 2444 forum posts 139 photos | Finished and delivered to the railway 2 sets of Water Gauge Nuts for S160 locos. I do this stuff for fun, as a volunteer
They fit the empty thread on the bulkhead fitting - 1 7/16" x 12 TPI, probably Whit form though I guess it might theoretically be US 60° - but Whit form thread depth seemed to work. I started from a length of 2" LG2 gunmetal, which I had to hex to 1.67" A/F on the Bridgy's divvy head, then bandsaw into blanks as it wouldn't fit through the spindle in either my WM20V or the railway's Colchester student. Somebody - not me - bu99ered the 13T end of the 2nd headstock shaft gear in the Colchy, so only the top 4 speeds are available, but that was ok for getting the meat off so I could take 'em home to finish on the Warco. Trying to source a replacement gear only showed up new-made at correspondingly eyewatering prices, while most of the other gears were available cheap S/H, so my guess is it's a common disaster, probably from trying to change speeds on the run. The bore in the sleeved nuts is 3/4" reamed. Screwcutting to a deep shoulder like this needs good nerve and sharp reactions. I was doing it at 150 RPM in the Warco 'cause I couldn't be bothered (never have been) to change the belt to low speed. But the recess at the far end of the thread is *just* wide enough to stop the lathe when you hear the cut finish singing. I still got a couple of light bottomings but refacing a thou or two off the bottom of the bore was enough to delete the evidence.
Taking a break from this stuff now, maybe to make some Chrissy presents for the grandkids... Edited By Mick B1 on 11/11/2022 17:25:53 |
| Chris Mate | 12/11/2022 03:33:02 |
| 325 forum posts 52 photos | A few years back I visited a 2nd hand shop on nearby town which I do frequently, however that time I looked into a cabinet full of cutlery(Never looked here) and to my surprise saw 2 small vices, one good for my small drillpress(but not a drillpress vice I would say), and other one looks like a machinest vice very solid but small and can do angle. So this week I mounted it to an old X/Y vice I used for many years and scrapped since I got the mill, mounted it to the base of this vice to get it higher for small milling jobs. It does not have an achme thread, but one of those where the one side is striaght and the other side at an angle, not a normal thread either. I tested it, it holds up in milling, it was cheap and I repainted both. |
| Bazyle | 12/11/2022 10:23:58 |
 6956 forum posts 229 photos | Interesting talk at Exeter DMES last night about the railway through the Khyber pass. Don't conflate it with the Darjeeling one. Our speaker, an irrigation engineer, had been there repeatedly over 30 years and even sat on a chair strapped to the front buffer beam of the 1927 loco that was still running, just, in 1998. Now without cheating on that search engine, what gauge is it? I wonder if anyone models it? |
| Bob Unitt 1 | 12/11/2022 12:36:08 |
 323 forum posts 35 photos | Posted by Chris Mate on 12/11/2022 03:33:02:
It does not have an achme thread, but one of those where the one side is striaght and the other side at an angle, not a normal thread either. AKA a Buttress Thread. |
| Dave Wootton | 12/11/2022 14:24:54 |
| 505 forum posts 99 photos | Been meaning to get around to this for ages finally got my round tuit. One of the things that I've found with my 254 is that the large faceplate is a bit awkward for small stuff, the slots for mounting start a long way out from the centre to clear the D1-3 backplate. I was given a backplate that had been modified at some point by machining down the o/d to just bigger than the mounting flange, and also a lathe backplate casting that the threading of the centre hole had gone horribly wrong. I managed to combine the two to make a small faceplate for smaller work, using M6 tapped holes instead of slots. Shame about the large centre hole, I'll see how it goes and may loctite in a plug of cast iron and reface it. Much better than the scruffy bit of old alloy plate I've been using bolted to the large faceplate.However I'll probably keep that as you don't feel guilty about making a few tapped holes in it for holding odd shaped things. |
| Jelly | 13/11/2022 16:18:47 |
474 forum posts 103 photos | Finally got round to installing my dessicant dehumidifier after it sitting in the workshop a month of not having time.
I need to buy some 75mm PVC PN10 pipe and fittings to replace the Jerry rigged connections with 100mm ducting; then sort out programming a PLC up to integrate it with the trace heating to maximize efficiency. Currently I have just this wired to a cheap smart switch which will act as a humidistat, whilst the trace heating runs off a similar smart switch which acts as a thermostat. My hope is that this will be a far more energy efficient rust prevention tool than trace heating alone, as it can remove a vast amount of humidity from the air very quickly, and will work equally efficiently regardless of air temperature (unlike refrigerant dehumidifiers)...
Oh and rather irritatingly the closest I could get it to the ceiling results in the bottom of the brackets being at 6'2" in the air... Just above my eye-line, but still at prime forehead gouging height! I think some pipe lagging is probably in order to pad that out. Edited By Jelly on 13/11/2022 16:24:19 |
| Greensands | 13/11/2022 20:37:40 |
| 449 forum posts 72 photos | Finally got around to replacing a previously fitted TDI used for measuring saddle movements on the Myford with a digital linear scale. Slotted holes in the fixing brackets makes it quick and easy to fit and remove and hopefully located in a position offering free access to all the usual controls.
|
| Jelly | 14/11/2022 13:36:14 |
474 forum posts 103 photos | Posted by Jelly on 13/11/2022 16:18:47:
My hope is that this will be a far more energy efficient rust prevention tool than trace heating alone, as it can remove a vast amount of humidity from the air very quickly, and will work equally efficiently regardless of air temperature (unlike refrigerant dehumidifiers)... Some brief test data on this from last night compared to data collected on similar nights (in terms of temperature and humidity profiles) with different approaches suggests it's going to work out far superior to trace heating or heating alone.
The next piece of data I need to gather is what the "recovery rate" of humidity is for direct dehumidification, (which is linked to Air Changes per Hour and external humidity, but must effectively be empirically determined) as compared to heating (where the thermal effects predominate, and I have a decent thermal model from when I did the insulation). I also need to:
As otherwise I'm actively fighting things which could just be mitigated.
Edit: There's also a third parameter needed, the surface temperature of various machines/other major heat sinks as that will define the temperature which condensation would occur at, allowing me to produce an expression fo the "never exceed" value for RH humidity. I'm not sure how much this will swing or be influenced by heating, especially as the biggest machines are largely thermally isolated from the floor; otherwise I could assume it to be the average sub-soil temperature for my area, as that would be the predominating route of heat loss; but that would over emphasise the amount of dehumidification needed. Edited By Jelly on 14/11/2022 14:23:22 |


.jpg)

This thread is closed.
Magazine Locator
Want the latest issue of Model Engineer or Model Engineers' Workshop? Use our magazine locator links to find your nearest stockist!
Sign up to our Newsletter
Sign up to our newsletter and get a free digital issue.
You can unsubscribe at anytime. View our privacy policy at www.mortons.co.uk/privacy
Latest Forum Posts
- hemingway ball turner
04/07/2025 14:40:26 - *Oct 2023: FORUM MIGRATION TIMELINE*
05/10/2023 07:57:11 - Making ER11 collet chuck
05/10/2023 07:56:24 - What did you do today? 2023
05/10/2023 07:25:01 - Orrery
05/10/2023 06:00:41 - Wera hand-tools
05/10/2023 05:47:07 - New member
05/10/2023 04:40:11 - Problems with external pot on at1 vfd
05/10/2023 00:06:32 - Drain plug
04/10/2023 23:36:17 - digi phase converter for 10 machines.....
04/10/2023 23:13:48 - More Latest Posts...
- View All Topics
Support Our Partners


Shopping Partners
Subscription Offer

Latest "For Sale" Ads
- Reeves** - Rebuilt Royal Scot by Martin Evans
by John Broughton
£300.00 - BRITANNIA 5" GAUGE James Perrier
by Jon Seabright 1
£2,500.00 - Drill Grinder - for restoration
by Nigel Graham 2
£0.00 - WARCO WM18 MILLING MACHINE
by Alex Chudley
£1,200.00 - MYFORD SUPER 7 LATHE
by Alex Chudley
£2,000.00 - More "For Sale" Ads...
Latest "Wanted" Ads
- D1-3 backplate
by Michael Horley
Price Not Specified - fixed steady for a Colchester bantam mark1 800
by George Jervis
Price Not Specified - lbsc pansy
by JACK SIDEBOTHAM
Price Not Specified - Pratt Burnerd multifit chuck key.
by Tim Riome
Price Not Specified - BANDSAW BLADE WELDER
by HUGH
Price Not Specified - More "Wanted" Ads...
Get In Touch!
Do you want to contact the Model Engineer and Model Engineers' Workshop team?
You can contact us by phone, mail or email about the magazines including becoming a contributor, submitting reader's letters or making queries about articles. You can also get in touch about this website, advertising or other general issues.
Click THIS LINK for full contact details.
For subscription issues please see THIS LINK.
Digital Back Issues


Donate

 Register
 Log-in
Model Engineer Magazine
- Percival Marshall
- M.E. History
- LittleLEC
- M.E. Clock

ME Workshop
- An Adcock
- & Shipley
- Horizontal
- Mill

Subscribe Now
- Great savings
- Delivered to your door

Pre-order your copy!
- Delivered to your doorstep!
- Free UK delivery!
All Forum Topics > The Tea Room > What Did you do Today 2022