Forum sponsored by:

The Workshop Progress thread 2018
| Limpet | 25/08/2018 19:02:05 |
| 136 forum posts 5 photos | I'm reckoning that the amount of projects that Jason has expertly completed he must have a display industrial unit to give them all justice. You can't help but admire the quality and quantity of his work. |
| JasonB | 25/08/2018 19:56:52 |
 25215 forum posts 3105 photos 1 articles | As few of the hit & miss engines have gone to other homes, infact it was nice to see one again at the recent Bristol show. Others are on shelves, in cabinets of filling up the wide window cills around the house and the 2" traction engine lives in the conservatory. |
| JasonB | 27/08/2018 17:13:52 |
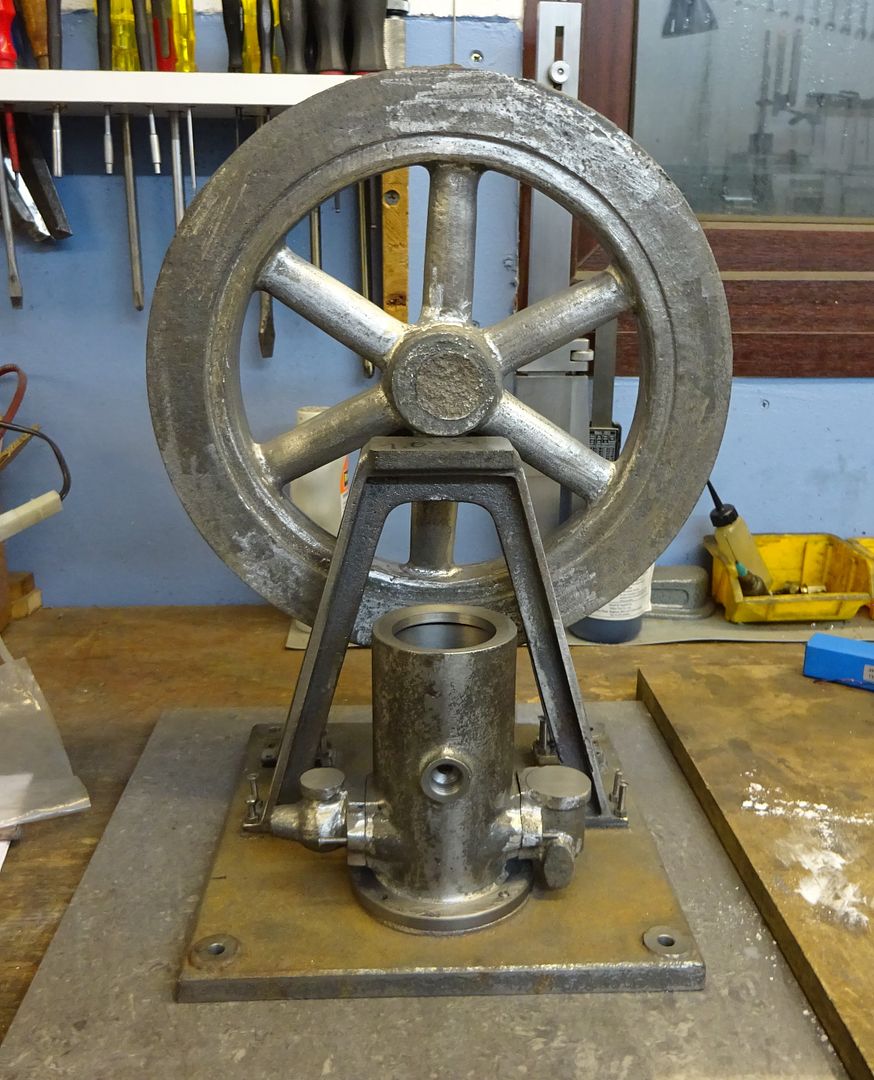
25215 forum posts 3105 photos 1 articles | I cut another notch into the workshop door frame today First test run of my 24mm bore Robinson Hot Air Engine all from scratch except the Stuart 10series flywheel. Still needs some tweaks but it's a runner. Sorry video is a bit jumpy but I was holding a blowtorch under it with my right hand and trying to hold the camera with my left. Blue tube and most of the noise is an airline to cool the engine rather than filling with water at this stage. Edited By JasonB on 27/08/2018 17:15:10 |
| mechman48 | 27/08/2018 18:58:06 |
 2947 forum posts 468 photos | Nice smooth action there Jason. |
| mechman48 | 27/08/2018 23:38:04 |
2947 forum posts 468 photos | Did a little bit more work on my boxer twin oscillator, cylinders & pistons, support brackets, the right hand cylinder proves the cliché... measure twice, cut once, had to make a top hat to bring it to length & Loctited in, probably make another one when I've made all the other pieces...
|
| Boiler Bri | 28/08/2018 09:32:05 |
 856 forum posts 212 photos | Hi George,
I am also building an oscillator engine, ultimately to go in a small steam launch. I have started to draw it up in 3d to make sure it all fits. I don't trust drawings from the MAP series of books.
|
| mechman48 | 28/08/2018 10:11:53 |
2947 forum posts 468 photos | Hello Boiler Bri, looking good. Have never got round to getting into 3D or AutoCAD ( Fusion 360 these days ? ) myself, am into 70's now & still of the old school where Tech drawing was the norm. I did try AutoCAD some years ago when it fist appeared but was getting confused with constructing layers 1,2, etc, maybe my grey matter was not receptive enough at the time |
| Boiler Bri | 28/08/2018 11:58:23 |
856 forum posts 212 photos | I started the engine because i keep looking at the stuff that Jason produces in such short time. I have been on with some of my big stuff for years and never see the end, so thought i would have a bash at a smaller project. If only to have it running on my desk running on air, i could at least say i have finished something!
Bri |
| JasonB | 28/08/2018 12:17:43 |
25215 forum posts 3105 photos 1 articles | Both looking good Gents. That's what I like about some of these smaller engines, they make a change from the usual and you end up with something that runs in a short space of time rather than just a couple more bits to add to a long build project. |
| mechman48 | 31/08/2018 10:51:23 |
2947 forum posts 468 photos | Did a bit of clean up prior to final polish on support brackets & crank eccentrics... |
| Iain Downs | 01/09/2018 17:34:21 |
| 976 forum posts 805 photos | I'm pleased to post in Workshop progress today because, after 9 months of no progress, I've had a bit. It's been a work year so far with far too much time away from the shed (oh, and the family). But at last I've done something! Not much, but something. We've been 'de-cluttering' and I decided to make a stand for one of my guitars. here it is
And more attractively with guitar
What is (slightly) clever is the use of my 3D printer to make the connectors.
What's not terribly clear from the photo is that the the connectors for the A-Frame are angled in at 20 degrees each and back at 15. For those who poo-poo 3d Printers, I challenge you to make these brackets out of metal! Iain Post Scriptum. Please do not confuse possession of musical instruments with musical skill. I have some of the first and very little of the latter. Perhaps when I retire I will have the time to adjust the balance! |
| Mark Rand | 01/09/2018 23:31:02 |
| 1505 forum posts 56 photos | Milled the top and bottom faces of the milling machine raising block flat and parallel today. I did it on a rotary table to avoid any embarrassing steps caused by having to move the 14" diameter raising block to machine it in several passes on the 10" milling machine table. Probably an idiot thing to do, but it was quite relaxing turning the (extended) handle for several hours. Of course, because I was using the RT, even with the brake on, there was too much play to use a shell mill, so it was nibbled away with a 12mm endmill!
First I flattened a bit of precious ally plate, you can (sort of) make out the extended RT handle here:-
Then I clamped the raising block onto the ally plate:-
Finally, I whittled it flat:-
On the first side, there was a part of the circle that rang a little bit, due to the not-flat surface not being tight against the ally plate at that point. When I flipped it over and did the other side, it sat without any rocking and milled nice and evenly.
Next operation is to clamp it to the table, then face and bore the round bits at the end of the 'ears' so I can fit brackets to them. All in all a happy day's work. |
| David Taylor | 03/09/2018 08:30:55 |
 144 forum posts 39 photos | Put the rivets in the plate in front of the smokebox and spotted, drilled, and tapped holes in the smokebox sides (below the footplates) so the smokebox is now attached properly. It's about 2mm too far back because the exhaust manifold turned out that way. I'll live with it!
|
| Jim Nic | 12/09/2018 14:07:12 |
 406 forum posts 235 photos | My current project of Stew Hart’s Overcrank engine is proving to be a little more of a challenge than I thought. However, if everything was easy life would be awfully boring so on we go. Having opened out the cylinder bores, I got confused over the steam passages and made a bit of an upcock which required a couple more blanking plugs. I also decided on the spur of the moment to alter the design for the exhaust outlet to allow me to fit a pipe in place of the open port in the block. Here is the block with the blanks Loctited in place ready to be smoothed off.
The enlarged exhaust port is also clear but what is not apparent is that it lies in the way of one of the valve chest fixing studs so my “improvement” has caused much wailing and gnashing of teeth. To give me time to recover and work out a solution I made the cylinder end caps.
Now for the steam chest and valves. Jim
|
| geoff walker 1 | 12/09/2018 15:06:37 |
| 521 forum posts 217 photos | Nice work Jim, looking good. Are those just very short studs in the cylinder end or are they extended into the cylinder wall thickness? Keep the pics coming and can you put 6" rule in the pics so I get an idea of the scale. ATB Geoff |
| Neil Wyatt | 12/09/2018 15:08:38 |
 19226 forum posts 749 photos 86 articles | Wow! Much workshop business! Good to see so much great work in progress. Neil |
| Jim Nic | 12/09/2018 19:05:07 |
406 forum posts 235 photos | Thanks Geoff The 7BA studs are 10.5mm long and the holes, which are 5mm deep, would probably just break through the outside cylinder wall if they went much deeper.
Jim
|
| Neil Wyatt | 12/09/2018 19:38:14 |
19226 forum posts 749 photos 86 articles | I want to try out my new scope this evening, but so I can set the focus witha a camera and leave it I had to make a short 5mm diameter length of nylon rod for the focus clamp. Before starting I thought "should I seal up the anodising bath?" I thought, "no, I'll just be careful, I will probably use it later." All I could find was an M6 nylon screw, which after some faff was just right, I offered it up to the parts of the focuser and went all butterfingers. The focuser pressure block with the rod in it span towards the bench, hit it, bounced off at an angle and landed in my anodising bath... Thought for a spilt second, grabbed it with bare hand and straight into the adjacent container full of washing soda solution for a quick fizz. Straight off to the utility room sink and, yes you've guessed it. As soon as the stream of the tap hit the block, the rod fell out and went straight down the plughole. It took me considerably longer to find another nylon M6 screw than to turn up a new rod. The lid is on the anodising bath now. Neil |
| Windy | 12/09/2018 20:21:17 |
 910 forum posts 197 photos | Filled the garden refuse bin to the top thought better clean up the garden. For speed nuts it's Elvington FIM and ACU record attempts this weekend.
|
| JasonB | 12/09/2018 20:26:42 |
25215 forum posts 3105 photos 1 articles | Spent a couple of hours filing and die grinding the 10" Allman flywheel to a point where it is ready to be machined, looks a lot more promising now than when I got it.
|
.jpg")
.jpg")


This thread is closed.
Magazine Locator
Want the latest issue of Model Engineer or Model Engineers' Workshop? Use our magazine locator links to find your nearest stockist!
Sign up to our Newsletter
Sign up to our newsletter and get a free digital issue.
You can unsubscribe at anytime. View our privacy policy at www.mortons.co.uk/privacy
Latest Forum Posts
- hemingway ball turner
04/07/2025 14:40:26 - *Oct 2023: FORUM MIGRATION TIMELINE*
05/10/2023 07:57:11 - Making ER11 collet chuck
05/10/2023 07:56:24 - What did you do today? 2023
05/10/2023 07:25:01 - Orrery
05/10/2023 06:00:41 - Wera hand-tools
05/10/2023 05:47:07 - New member
05/10/2023 04:40:11 - Problems with external pot on at1 vfd
05/10/2023 00:06:32 - Drain plug
04/10/2023 23:36:17 - digi phase converter for 10 machines.....
04/10/2023 23:13:48 - More Latest Posts...
- View All Topics
Support Our Partners


Shopping Partners
Subscription Offer

Latest "For Sale" Ads
- Reeves** - Rebuilt Royal Scot by Martin Evans
by John Broughton
£300.00 - BRITANNIA 5" GAUGE James Perrier
by Jon Seabright 1
£2,500.00 - Drill Grinder - for restoration
by Nigel Graham 2
£0.00 - WARCO WM18 MILLING MACHINE
by Alex Chudley
£1,200.00 - MYFORD SUPER 7 LATHE
by Alex Chudley
£2,000.00 - More "For Sale" Ads...
Latest "Wanted" Ads
- D1-3 backplate
by Michael Horley
Price Not Specified - fixed steady for a Colchester bantam mark1 800
by George Jervis
Price Not Specified - lbsc pansy
by JACK SIDEBOTHAM
Price Not Specified - Pratt Burnerd multifit chuck key.
by Tim Riome
Price Not Specified - BANDSAW BLADE WELDER
by HUGH
Price Not Specified - More "Wanted" Ads...
Get In Touch!
Do you want to contact the Model Engineer and Model Engineers' Workshop team?
You can contact us by phone, mail or email about the magazines including becoming a contributor, submitting reader's letters or making queries about articles. You can also get in touch about this website, advertising or other general issues.
Click THIS LINK for full contact details.
For subscription issues please see THIS LINK.
Digital Back Issues


Donate

 Register
 Log-in
Model Engineer Magazine
- Percival Marshall
- M.E. History
- LittleLEC
- M.E. Clock

ME Workshop
- An Adcock
- & Shipley
- Horizontal
- Mill

Subscribe Now
- Great savings
- Delivered to your door

Pre-order your copy!
- Delivered to your doorstep!
- Free UK delivery!
All Forum Topics > Work In Progress and completed items > The Workshop Progress thread 2018