Forum sponsored by:

Been playing with me laser.
| John Stevenson | 25/11/2012 23:00:40 |
 5068 forum posts 3 photos |
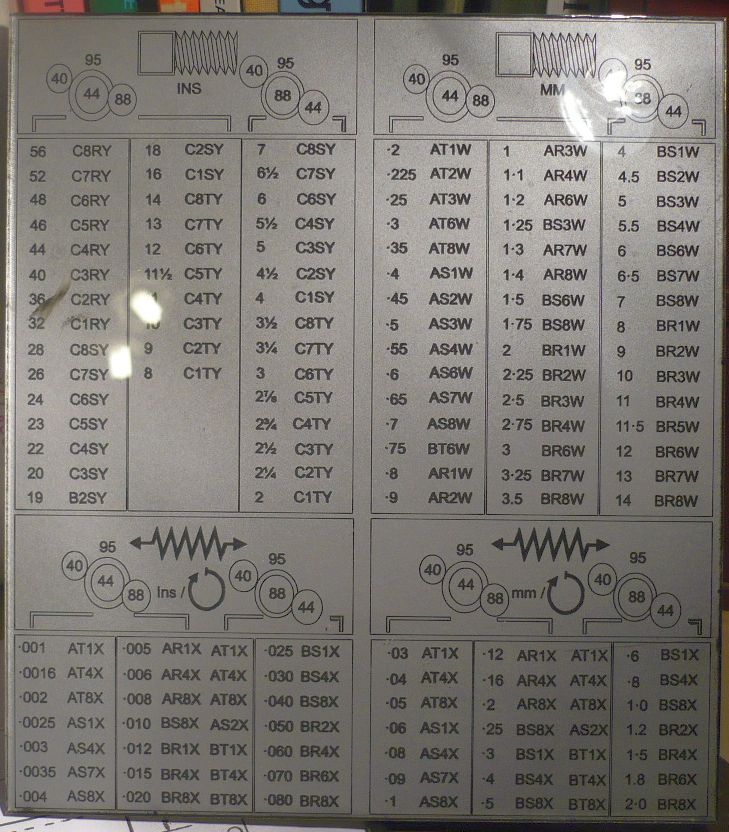
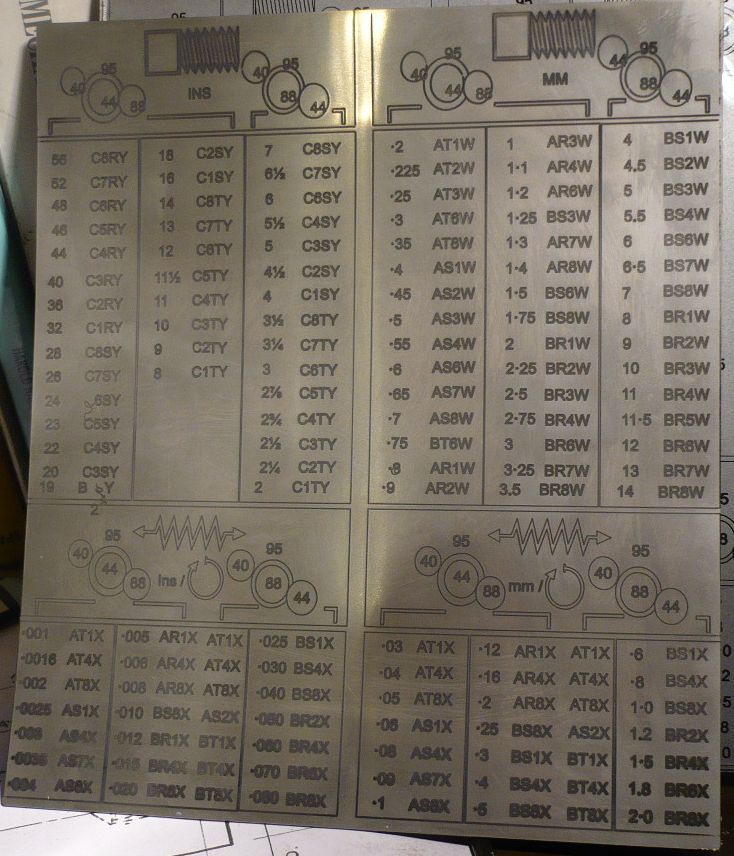
OK been working on doing some harrison M300 screw cutting plates.
John S. |
| DMB | 25/11/2012 23:27:23 |
| 1585 forum posts 1 photos | Hullo John, Dont know how you illuminated subject but my thinking is along lines of something to diffuse the light source or even lighting aimed opposite direction and reflected back to subject, possibly with a mirror. Rgds, John |
| John Stevenson | 25/11/2012 23:45:39 |
5068 forum posts 3 photos | Gert has a light box for doing photo's but to be honest point and click is good enough for me. My interest is in machining, everything else is peripheral. |
| mark mc | 26/11/2012 08:22:33 |
| 92 forum posts 16 photos | That is very nice, very tidy. I would love to be able to do things like that. |
| Michael Gilligan | 26/11/2012 08:43:56 |
 23121 forum posts 1360 photos | Nice work John Thanks for letting us learn at your expense ! MichaelG. |
| NJH | 26/11/2012 10:01:37 |
 2314 forum posts 139 photos | Hi John Nice plates - bad 'photos - point and click just 'aint good enough! Yes the answer is to diffuse the light source. ( Photos could be a bit sharper too) Speak nicely to Gert and enrol her services in the light tent. As you well know the best work can be spoilt by lack of attention to detail. ( I still think the plates are good though and I guess it's better than good pictures of bad plates). Cheers Norman
Edited By NJH on 26/11/2012 10:04:31 |
| V8Eng | 26/11/2012 13:06:05 |
| 1826 forum posts 1 photos | If the stuff is easily moveable take it outside on a cloudy day and take the pictures, that usually works for me. But do not let the camera's built in flash operate! Edited By V8Eng on 26/11/2012 13:12:31 |
| _Paul_ | 26/11/2012 13:43:22 |
 543 forum posts 31 photos | The perspex one looks really good _Paul_ |
| Billy Mills | 27/11/2012 09:35:39 |
| 377 forum posts | Hi Sir John, Have used celulose as a resist coat, laser off the paint then etch. Fill the etch with paint then wipe off the surface. Also useable for PCB's. Would agree with the comments about the "industry standard aerosol". We do a lot of perspex signs, as you say the backside paint then engrave and contrast coat works great. For illuminated signs you can paint a ground colour ( say red) then overcoat white then engrave through the lot. The white reflects back the light into the box giving more even and brighter lighting. Your warping stainless might be down to too much power and too slow movement, it is always good to start low and work up rather than using cutting power but I have not used the molly route myself. I am always very careful about just what gets exposed, few months back witnessed the effects of cutting PVC in a CO2 machine, everything was corroded and the control board was a write off. It is a good idea to check the lens after blasting at something unusual, debris will significantly reduce power in some machines where the air assist is not so good. Billy. |
| Robin teslar | 27/11/2012 18:13:37 |
 127 forum posts 8 photos | Photo tip FWIW You need and old white bedsheet, then perhaps a dining chair that you can push the squab out or something to make a box frame. Drape the sheet over to form a white box. Direct some strong lights on the sides, cut a hole in the centre of the top sheet to point the camera down and shoot, do have a plain matt background (green is good) It the way to take those tasty plates of food pix for example
Robin |
| Clive Hartland | 27/11/2012 20:45:53 |
 2929 forum posts 41 photos | A good light box can be made with crumpled up kitchen foil attached to all the inside surfaces of a large cardboard box. If the object has a lot of shiny surfaces then place it in a cold fridge for a while and it will be less shiny when you take it out because of condensation ( Good for silver or plated objects) not precision machinery of course. Outside, a muslin covered frame will filter the light and remove extreme dazzle points. Clive Edited By Clive Hartland on 27/11/2012 20:46:22 |
| varonica leon | 22/03/2013 11:50:27 |
| 1 forum posts | Informative post thanks for sharing with us. It's very useful for me. |

Please login to post a reply.
Magazine Locator
Want the latest issue of Model Engineer or Model Engineers' Workshop? Use our magazine locator links to find your nearest stockist!
Sign up to our Newsletter
Sign up to our newsletter and get a free digital issue.
You can unsubscribe at anytime. View our privacy policy at www.mortons.co.uk/privacy
Latest Forum Posts
- *Oct 2023: FORUM MIGRATION TIMELINE*
05/10/2023 07:57:11 - Making ER11 collet chuck
05/10/2023 07:56:24 - What did you do today? 2023
05/10/2023 07:25:01 - Orrery
05/10/2023 06:00:41 - Wera hand-tools
05/10/2023 05:47:07 - New member
05/10/2023 04:40:11 - Problems with external pot on at1 vfd
05/10/2023 00:06:32 - Drain plug
04/10/2023 23:36:17 - digi phase converter for 10 machines.....
04/10/2023 23:13:48 - Winter Storage Of Locomotives
04/10/2023 21:02:11 - More Latest Posts...
- View All Topics
Support Our Partners


Shopping Partners
Subscription Offer

Latest "For Sale" Ads
- Reeves** - Rebuilt Royal Scot by Martin Evans
by John Broughton
£300.00 - BRITANNIA 5" GAUGE James Perrier
by Jon Seabright 1
£2,500.00 - Drill Grinder - for restoration
by Nigel Graham 2
£0.00 - WARCO WM18 MILLING MACHINE
by Alex Chudley
£1,200.00 - MYFORD SUPER 7 LATHE
by Alex Chudley
£2,000.00 - More "For Sale" Ads...
Latest "Wanted" Ads
- D1-3 backplate
by Michael Horley
Price Not Specified - fixed steady for a Colchester bantam mark1 800
by George Jervis
Price Not Specified - lbsc pansy
by JACK SIDEBOTHAM
Price Not Specified - Pratt Burnerd multifit chuck key.
by Tim Riome
Price Not Specified - BANDSAW BLADE WELDER
by HUGH
Price Not Specified - More "Wanted" Ads...
Get In Touch!
Do you want to contact the Model Engineer and Model Engineers' Workshop team?
You can contact us by phone, mail or email about the magazines including becoming a contributor, submitting reader's letters or making queries about articles. You can also get in touch about this website, advertising or other general issues.
Click THIS LINK for full contact details.
For subscription issues please see THIS LINK.
Digital Back Issues


Donate

 Register
 Log-in
Model Engineer Magazine
- Percival Marshall
- M.E. History
- LittleLEC
- M.E. Clock

ME Workshop
- An Adcock
- & Shipley
- Horizontal
- Mill

Subscribe Now
- Great savings
- Delivered to your door

Pre-order your copy!
- Delivered to your doorstep!
- Free UK delivery!
All Forum Topics > CNC machines, Home builds, Conversions, ELS, automation, software, etc tools > Been playing with me laser.