Forum sponsored by:

Silver Soldering
| Wolfie | 06/01/2012 18:03:37 |
 502 forum posts | OK another thing to learn sigh  Right as I understand it its similar to electronic soldering except you use a blowlamp and heat it up to a higher temperature. Can anyone recommend a silver steel and flux combination? Edited By Wolfie on 06/01/2012 18:03:49 |
| Ramon Wilson | 06/01/2012 18:36:09 |
 1655 forum posts 617 photos | Hi Wolfie, Solder - Easy flo Flux - Easy Flo Three parameters in strict order CLEANLINESS - no oil or greasy marks Flux - mix the flux with some clean water to a thin paste and coat both parts. Heat - heat the part until the flux appears to flow like water - do not apply the solder near the job before the flux gets to this stage otherwise you will melt the solder all over the work - result, lots of cleaning up to do. You can apply more flux to the job by just heating the rod and dipping it in the flux powder (not the pre mixed paste) but be careful not to melt the rod. When the flux flows like water gently touch the rod to the join and, if the heat is uniform, the solder will flow all round the join Make sure the parts are not tightly fitted as the solder needs to run through the join by capillary action. Quench the parts when they have cooled sufficiently - too quick the solder may still be fluid, to long and the flux residue will tend to harden. It's simple enough but veryeasy to get it wrong when you first start. Do some practice parts first Remember - Clean it - Flux it - Heat it - Then put the solder on . Last week I spoke to the guy who taught me this when I was fifteen - 52 years ago  Hope this helps Ramon Edited By Ramon Wilson on 06/01/2012 18:38:56 |
| JasonB | 06/01/2012 18:50:12 |
 25215 forum posts 3105 photos 1 articles | Ramon only problem for Wolfi is that now its 2012 its illegal to sell CAD bearing Silver Solder (in the EU)
So you will need silverflow55 or the CuP alloys No 455 both of which contain more silver which helps combat the lack of cadmium. I'd also suggest the higher temp Tenacity 5 or HT 5 flux particularly if you start doing larger fabrications as it lasts longer if you are heating for a while.
Wolfi have a read about silver soldering on Cup's site
J
Edited By JasonB on 06/01/2012 18:51:32 Edited By JasonB on 06/01/2012 18:53:42 |
| Ramon Wilson | 06/01/2012 19:57:31 |
1655 forum posts 617 photos | Hi Jason, thanks for pointing that out and sorry for misleading you Wolfie. The technique hasn't changed I hope  I guess it's still okay to actually possess the stuff or heaven forbid have I been breaking the law today  I hope not - theres an awful lot of it been squirreled away over the years I hope not - theres an awful lot of it been squirreled away over the yearsRegards - Ramon |
| Wolfie | 06/01/2012 20:04:45 |
502 forum posts | No worries. I've been reading that cupalloys stuff and it pretty much concurs with what I read in a book this morning. So I'll get one of their starter sets that will do me for this part for my engine anyway. |
| JasonB | 06/01/2012 20:13:31 |
25215 forum posts 3105 photos 1 articles | The Cup Brazing Tips also apply to silver solder so worth reading as well.
Please see my comment about that video on the plans thread, better off just not looking at it as its too contradictory to our type of soldering and darn right dangerous.
J Edited By JasonB on 06/01/2012 20:13:58 |
| Stub Mandrel | 06/01/2012 21:32:57 |
 4318 forum posts 291 photos 1 articles | Johnson Matthey website is quite good too. Neil |
| Clive Hartland | 06/01/2012 22:10:56 |
 2929 forum posts 41 photos | One thing Wolfie is that make sure that you have enough heat output from your heat source.
For the small eyelet you have mentioned one of those small gas canister lamps will do but if you need to braze/silver solder a large piece of metal then you will need a much larger gas torch.
Clive
|
| Terryd | 07/01/2012 02:59:17 |
 1946 forum posts 179 photos | Hi Ramon, Just shows how advice can contradict. When I was training to be a teacher, I elected for a jewellery/silversmithing course as one of my units (2 years, one day a week) as I already had much engineering experience. The very experienced lecturer taught us to make joints by fluxing and adding small snippets of solder called 'pallets' I think. As the flux boiled and heated just before the glassy stage obviously these pallets moved but were coaxed back into place in the now molten flux with a long thin stainless or soft iron probe Solder won't stick to soft iron as it oxidises.. Trying to add the solder from a long stick, it is tempting to try to apply it through the flame and of course it melts before reaching the joint. With small joints it is possible to move the flame away and use the residual heat to melt the solder but that involves higher heats as heat loss can be quite pronounced. It is also the reason most folk use a larger torch than is strictly necessary. Of course the largest structures we would solder were tankards or coffee pots but the same methods for (admittedly small) boilers works for me. As for flux we used pure borax (inexpensive) from a jewellers cone and dish , grinding it to a paste in the wet dish using the cone like a mortar (dish used as pestle) and applying with a brush. We used this with quite large copper items for practice as well as with precious metals. To prevent excessive solder spread (essential with precious metals) we used a loam/water or jewellers rouge mix as a resist. Now I use Tippex or soft pencil. This was especially important when soldering lengths of chenier tube to make hinges on boxes to ensure that the temporary locating wire within was not soldered or the lengths of tube soldered together. It was interesting stuff for a mechanical engineer. I tried to embed a YouTube video but it seems not to have worked. It won't even link to the page using a hyperlink. Has anyone had succeeded in this on this forum? The link is here: http://www.youtube.com/watch?v=9gzYgu3McMI Best regards Terry Edited By Terryd on 07/01/2012 03:27:43 |
| Terryd | 07/01/2012 03:14:01 |
1946 forum posts 179 photos | Test for video Success I think  By the way Wolfie, I just re-read your initial post. You surely mean silver solder, not "silver steel"! Terry Edited By Terryd on 07/01/2012 03:33:18 |
| Terryd | 07/01/2012 04:17:00 |
1946 forum posts 179 photos | Hi Wolfie (and any interested members), I accidentally came across this link to a modelling site in Australia which gives a good background into silver soldering (aka in the US as silver brazing), there is some good advice. One point is important, which is shown on the site and that is to use proper refractory bricks to contain and concentrate the heat from your torch. You will often be advised to use ordinary firebricks or even cement building blocks - don't - it is false economy. As it says you will waste a huge amount of heat just heating up the blocks. Proper refractory bricks absorb little heat and are white to give a 'reverberatory' effect i.e. they actually reflect heat back into the work, that is why kilns and furnaces are lined with white refractory materials. Hope it is of some help or interest, Terry Edited By Terryd on 07/01/2012 10:12:34 |
| mgj | 07/01/2012 09:31:55 |
| 1017 forum posts 14 photos | Tubal Cain is very good on it in his book. He advises, similar to the jewellers, the use of prepositioned bits of SS where ever possible, and I find that a very succesful technique - its actually the best way if possible or circumstances permit, because the SS won't melt until the metal is hot enough. A few centre pops are a pretty good way of ensuring a small gap between two bits of metal. |
| Ramon Wilson | 07/01/2012 10:24:48 |
1655 forum posts 617 photos | Hi Terry, Yes, I agree, there are always more ways to skin a cat but I was trying to keep it basic as Wolfie, now beginning another new experience, probably only needs sufficient information to solder up his inlet and exhaust pipes The techique you describe is indeed another way - I think the small pieces are referred to as 'pellions' - as is winding up small rings of solder to apply to pipe flanges, rivets etc. before heating. By using this method on small parts it can create the potential that you can end up with too much or too little on the join as the solder melts but it's horses for course really. However as for poking it with something - I'm not particulaly enarmoured with that thought if the parts are not pinned together in some way as they could easily be moved out of register. I've just soldered up the flanges to the pipes for the Waller engine. The flanges had pre drilled bolt holes and the pipe was loose enough to allow the solder to flow - carefully aligned before soldering shows a situation where movement was definitely not required The solder stick (from wire section upwards) should not melt as soon as it's brought into the flame. If the job has been brought to the correct temperature first, the flame can be moved just slightly to allow the solder to touch the join. Of course if the flame is big enough to build a boiler and the job is 1/8 pipe then you do have a point Many having a go at silver soldering for the first time do not get the workpiece to temperature first, bringing the solder in too quick in the process. This does lead to melting of the solder and great blobs of it all over the place hence the advice to Wolfie. Something else that may be of interest to some is that to remelt a soldered joint requires a greater temperature than the initial soldering. This characteristic can be used to great help if several small parts have to be soldered together as they can be done separately in stages. Using differing melting point solders will enhance that process even more. Just a couple of further points that may help someone - trying to silver solder something that has previously been soft soldered will prove fruitless as the silver solder simply will not take. All traces of the soft solder have to be removed to be successful On that note if you dont want silver solder to take to a specific area then before fluxing the join 'coat' the area with a soft lead pencil -one of those flat carpemters pencils are ideal. As previously said - it's a simple process but one which can so easily look a mess so practice first Regards - Ramon Edited By Ramon Wilson on 07/01/2012 10:30:14 |
| Gordon W | 07/01/2012 10:30:01 |
| 2011 forum posts | Wolfy, all the above are good. I only learnt silver soldering a couple of years ago, although used to welding and brazing. It is much easier than electrical soldering ! Only thing I would add is to direct the heat onto the bigger part, or the part with the hole, the solder will flow to the hotter part, just as in plumbing. |
| Wolfie | 07/01/2012 10:41:29 |
502 forum posts | Thanks all plenty of info there. I have ordered a starter set from Cupalloy and I'll use it to try and solder my eccentric ring on. I'll practice on that. I only have a blowlamp so I was planning to stand it up in the vise and attack it with that. And yes Terry I did mean silver solder lol Edited By Wolfie on 07/01/2012 10:42:02 |
| maurice bennie | 07/01/2012 10:46:34 |
| 164 forum posts 1 photos | Hi Wolfie If you can go to local library .There are many books on jewellery making .
Showing how to prepare metal for hard soldering ,also to work the metal and hold small pieces with clips and pins to stop them moving. When you have mastered this many brownie points can be earned repairing family jewellery , or even making it. After I retired I spent one day a week for some years at classes I found it time well spent .
Best wishes Maurice.
P.S. "jewellery making" by Hamish Bowie ISBN07153 70448 for a start.
|
| maurice bennie | 07/01/2012 10:55:02 |
| 164 forum posts 1 photos | P.S. Wolfie .Take great care of the area past the end of the flame ,and also above it .the heat will go a lot further than you think BEWARE please dont ask me how I know .
Maurice.
|
| AndyP | 07/01/2012 11:09:15 |
| 189 forum posts 30 photos | Wolfie, If you grip pieces in the vice to solder them the vice will act as a heatsink and draw heat away from the job. Far better to prop or pin (dressmaking pins work) the job to a lump of refractory brick to stop them moving around if there isn't a good mechanical joint.
I have always known the little pieces of solder as pallions and if you place them wet and heat the job slowly so the flux dries rather than boils they won't all jump off.
A practice piece is a very good idea just to get a feel for how much heat is required and what the flux looks like when the job is hot enough.
Maurice has a good point, plastic bottles of flux do not respond well to an oxy/propane flame in my experience
 Cheers
Andy |
| Swarf, Mostly! | 07/01/2012 11:21:16 |
| 753 forum posts 80 photos | Hi there, all, Regarding refractory bricks to localise the heat: When our landlords condemned and stripped-out our gas fire, I hung on to the refractory 'radiants' with just this use in mind. However, I haven't had the opportunity to use them yet. Best regards, Swarf, mostly. |
| Ramon Wilson | 07/01/2012 22:28:00 |
1655 forum posts 617 photos | Hi Wolfie, I have spent today finishing off an inlet valve, parts of which needed silver soldering so these may help a little. The advice about anything acting as a heat sink is a sound one all the heat should go into the job especially if the heat source is a bit marginal for the job in hand.  My hearth is quite small - just the width of a standard fire brick. These do absorb the heat so the part is closed in with 'Skamoflex' a refractory material that doesn't (This is a previous pic not from today)  My version of the borax cone and ceramic dish 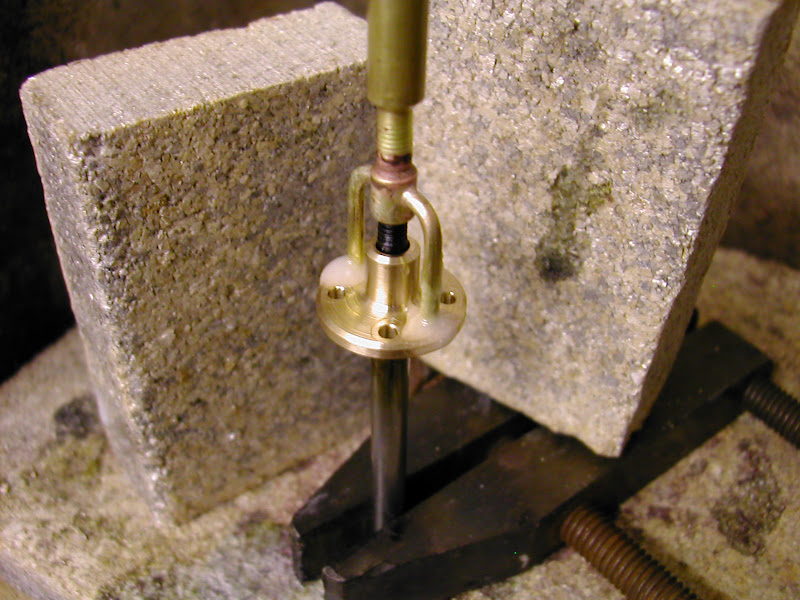 The valve top fluxed up ready to heat. The solder was applied by hand - 1/16 rod Easy-flo. (Jason, if you are reading this has 'Easy' flo been replaced by 'Silver' flo ?)  The parts as finished ready to clean up. The major diameter is 14.4 mm, the 'bars' are 1/16 brazing wire These parts are for the Waller engine stop valve - there are a lot more pics on HMEM if you or anyone are interested. Good luck with your first attempts. Regards - Ramon |
Please login to post a reply.
Magazine Locator
Want the latest issue of Model Engineer or Model Engineers' Workshop? Use our magazine locator links to find your nearest stockist!
Sign up to our Newsletter
Sign up to our newsletter and get a free digital issue.
You can unsubscribe at anytime. View our privacy policy at www.mortons.co.uk/privacy
Latest Forum Posts
- hemingway ball turner
04/07/2025 14:40:26 - *Oct 2023: FORUM MIGRATION TIMELINE*
05/10/2023 07:57:11 - Making ER11 collet chuck
05/10/2023 07:56:24 - What did you do today? 2023
05/10/2023 07:25:01 - Orrery
05/10/2023 06:00:41 - Wera hand-tools
05/10/2023 05:47:07 - New member
05/10/2023 04:40:11 - Problems with external pot on at1 vfd
05/10/2023 00:06:32 - Drain plug
04/10/2023 23:36:17 - digi phase converter for 10 machines.....
04/10/2023 23:13:48 - More Latest Posts...
- View All Topics
Support Our Partners


Shopping Partners
Subscription Offer

Latest "For Sale" Ads
- Reeves** - Rebuilt Royal Scot by Martin Evans
by John Broughton
£300.00 - BRITANNIA 5" GAUGE James Perrier
by Jon Seabright 1
£2,500.00 - Drill Grinder - for restoration
by Nigel Graham 2
£0.00 - WARCO WM18 MILLING MACHINE
by Alex Chudley
£1,200.00 - MYFORD SUPER 7 LATHE
by Alex Chudley
£2,000.00 - More "For Sale" Ads...
Latest "Wanted" Ads
- D1-3 backplate
by Michael Horley
Price Not Specified - fixed steady for a Colchester bantam mark1 800
by George Jervis
Price Not Specified - lbsc pansy
by JACK SIDEBOTHAM
Price Not Specified - Pratt Burnerd multifit chuck key.
by Tim Riome
Price Not Specified - BANDSAW BLADE WELDER
by HUGH
Price Not Specified - More "Wanted" Ads...
Get In Touch!
Do you want to contact the Model Engineer and Model Engineers' Workshop team?
You can contact us by phone, mail or email about the magazines including becoming a contributor, submitting reader's letters or making queries about articles. You can also get in touch about this website, advertising or other general issues.
Click THIS LINK for full contact details.
For subscription issues please see THIS LINK.
Digital Back Issues


Donate

 Register
 Log-in
Model Engineer Magazine
- Percival Marshall
- M.E. History
- LittleLEC
- M.E. Clock

ME Workshop
- An Adcock
- & Shipley
- Horizontal
- Mill

Subscribe Now
- Great savings
- Delivered to your door

Pre-order your copy!
- Delivered to your doorstep!
- Free UK delivery!
All Forum Topics > Beginners questions > Silver Soldering