Forum sponsored by:

Spiralux Drill Grinding Attachment
| Sandy Morton | 11/12/2010 11:04:00 |
| 104 forum posts | Does anyone have the instructions for this tool which they could scan for me or know of an online source? Google hasn't been my friend this time. |
| TomK | 11/12/2010 13:06:32 |
| 83 forum posts 23 photos | Sandy
PDF of instruction can be downloaded from this site
|
| TomK | 11/12/2010 13:40:37 |
| 83 forum posts 23 photos | Sandy
Another PDF for a similar grinding attacment Grind Edited By TomK on 11/12/2010 13:42:23 |
| Sandy Morton | 11/12/2010 13:50:07 |
| 104 forum posts | Thanks Tom - exactly what I was looking for. |
| Peter G. Shaw | 11/12/2010 14:04:09 |
 1531 forum posts 44 photos | Hi, I have a Spiralux device dating back many years - 15 to 20 or so. Now, TomK's first reference does indeed give more info on the drill angles than does my instructions, however, his second reference is at odds with both my instructions and my experience. This reference gives approximate distances by which the drill point should protrude past the lip guide. My instructions state approximately 1/16" for all drills. Also, the writer says it doesn't grind when rotating clockwise. I'm afraid that mine does, and other than a bit of overhanging metal (sorry, can't think of the correct term) on the cutting edges, it doesn't seem to do any harm. This overhanging metal is easily removed - by fingernail I seem to think - it's quite a while since I used it. Also, the writer is correct in that small drills , say 3 to 4mm, can be very difficult to sharpen - the device doesn't seem particularly keen on them. Perhaps it's easier to simply replace anything up to 3 or 4mm. Finally. I too have had the problem with the flute guide fixing screws - I used larger screws in the end. And, I had to mount the 5" d/e grinder on blocks to get the height right, and also remove the wheel guard. But, overall, it's a darn useful tool. Regards, Peter G. Shaw |
| John Shepherd | 11/12/2010 19:44:18 |
| 222 forum posts 7 photos |
Sandy I have an original Picador jig that is similar to the one shown in the two links and I am guessing that the Spiralux and the Picador are similar given that they are from the same era? One noticeable difference (besides the quality) between the Picador and the modern versions is the angle of the base. In the ones shown, the pivot is angled and on the Picador it is vertical. If yours is vertical this is what works for me: 1. Place the drill in the V block so that the edge of the lip (not the point) is level with the end of the V and tighten the drill clamping screw. 2. Bring the end stop up to the drill and lock it in place. 3. Loosen the drill clamp and put a drill or piece of rod the same diameter as the drill to be sharpened between the end stop and the end of the drill shank (advancing the drill one diameter from the edge of the lip). 4. Rotate the drill anticlockwise (viewed from the front) the drill so that the edge of the lip is about 10 -15 deg from vertical, tighten the clamp and set the rotational stop. (This angle contributes to the clearance angle and may need modifying. Once you have found a setting that works stick to it.) 5. Move the end stop up to the new position. 6. Sharpen by advancing and securing the base so it removes the minimum amount of metal - do not use the fine adjustment on the end stop. Rotate the drill without touching anything but the drill clamp and sharpen the second edge. It takes longer to explain than to do. Two useful additions to the jig are an adjustable attachment for the base that was described in MEW (Sorry can't find a reference just now) and an alternative rotational stop described by Harold Hall in 'Tool and Cutter Sharpening' - Workshop Practice No 38. The above does not relate to the modern clones of the jig. I have tried one and could not get it to work well at all – the angles were all wrong and the results were not consistent.
Peter - I would be interested to know what your instructions say about the location of the cutting edge i.e vertical or at an angle?
Hope that helps.
John Shepherd.
|
| Clive Foster | 11/12/2010 20:39:39 |
| 3630 forum posts 128 photos | These things are a nightmare! Especially when you get clones of clones and mixed up angles. Bottom line is that the ones with a tilted pivot post (General, Spiralux & clones) need the drill edge vertical and the ones with the pivot post vertical (Picador and clones) need the edge at an angle, sort of 5 to 5 ish, to work. The projection depends on the offset distance between Vee carrier and rotation axis. The shape of the little sheet metal stop also gets involved.
There are also subtle differences between those intended to sweep across the side of the wheel and those which run from the front. I notice the General instructions linked to show use of the front of the wheel whilst Picador and Spiralux instructions refer to using the side. I'd have thought that wheel diameter and drill point height relative to wheel centre would have been important is using the front. The Picador device is certainly much more civilised when using a narrow cup wheel, mine is 10 mm face, than when using the side of a normal wheel as advised in the instructions.
I believe it is possible to work out and demonstrate graphically what is going on so that things can be set "perfectly" from measurement for any size of drill. That said I've not been able to figure out anything that could be considered understandable by the general reader. (I'm none too sure I understand what I've figured out myself!) Hand waving, "its sort of like this" and step by step "works for me" instructions aren't too hard to get to but pinning things down properly is like nailing jelly to the wall. I can't help feeling that even the original designers didn't really have a complete handle on the geometry and settled for producing something which can be made to work by a determined user. A trained, albeit non practising, toolmaker friend says its a darn sight easier to learn to sharpen by hand than to learn these "easy" jigs. He may have a point! The original PlasPlugs design in the 4 in 1 sharpener set is actually pretty easy and works well. Dunno about the current version.
Clive
|
| Peter G. Shaw | 11/12/2010 21:35:16 |
1531 forum posts 44 photos | John & Sandy, Herewith cover & page 1 of my Spiralux instructions. Apologies for the poor quality, the original is 4" x 6.5", scanned by a 1200dpi scanner at 150dpi into Paint Shop Pro, contrast increased and sharpened with the Unsharp mask, finally increased in size to 8" x 12" and then uploaded. I don't know how to make it larger in the forum. Perhaps if you want a better copy, then we will have to do it by private email - [email protected], but not until Sunday pm at the earliest (going to collect my caravan tomorrow!) 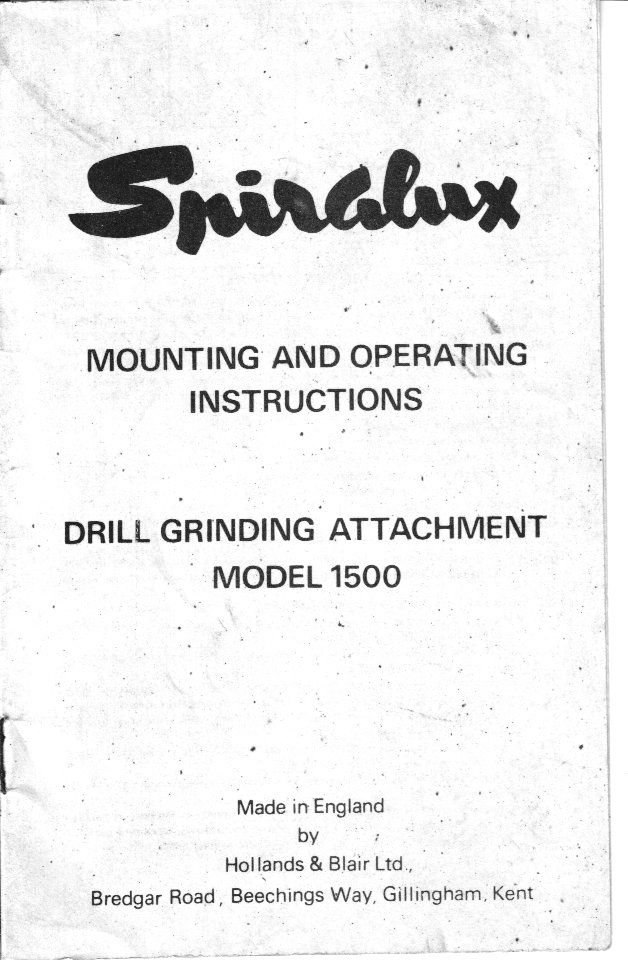 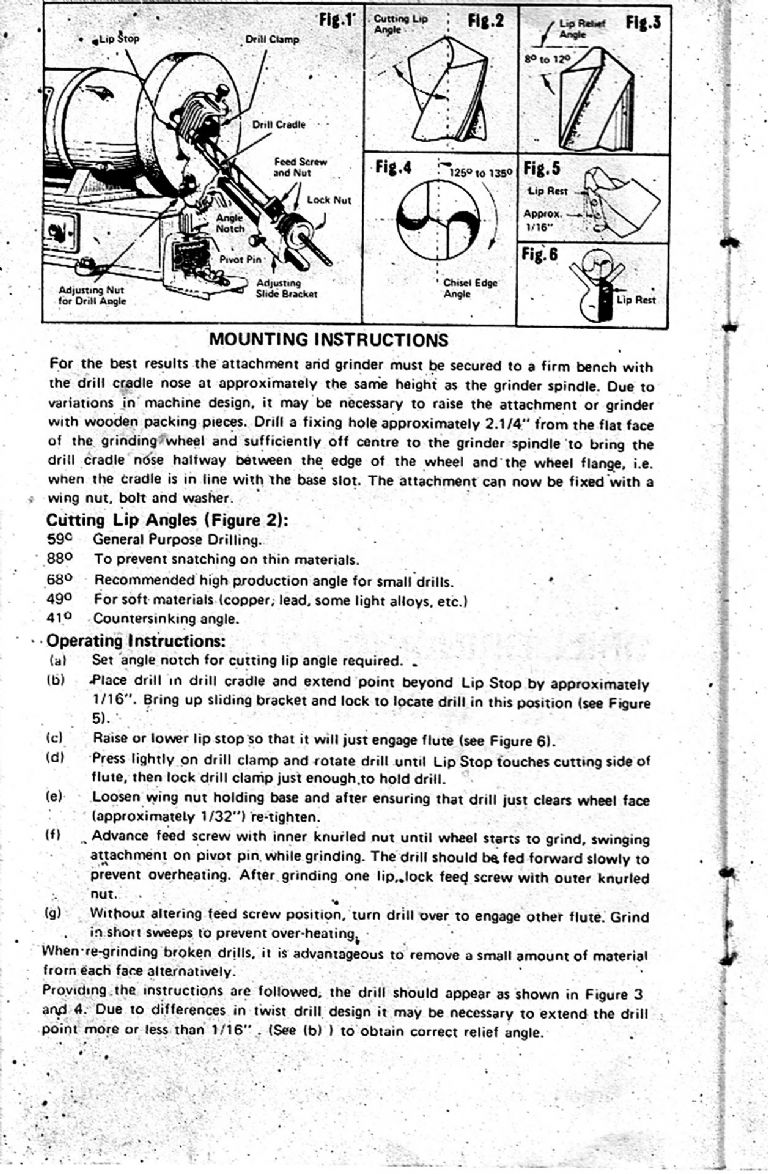 Regards, Peter G. Shaw |
| John Shepherd | 11/12/2010 21:37:35 |
| 222 forum posts 7 photos | The 'General' instructions Clive refers to appear to show the jig mounted on the front of the wheel but the instructions refer to using a wheel designed for grinding on the side.
I must admit I cant see it working on the front as this introduces even more variables and more complex geometry. (Which I don't understand either!)
It just reinforces what Clive says about the confusion about these jigs and manufacturers not realy knowing how they work.
I should have added that my set up also uses a narrow cup wheel and that may have some influence on the results.
John Shepherd |
| John Shepherd | 11/12/2010 21:42:53 |
| 222 forum posts 7 photos | Peter
Thank for the instructions - perfectly readable. |
| _Paul_ | 12/12/2010 10:34:37 |
 543 forum posts 31 photos | Here is another variation on the instructions: 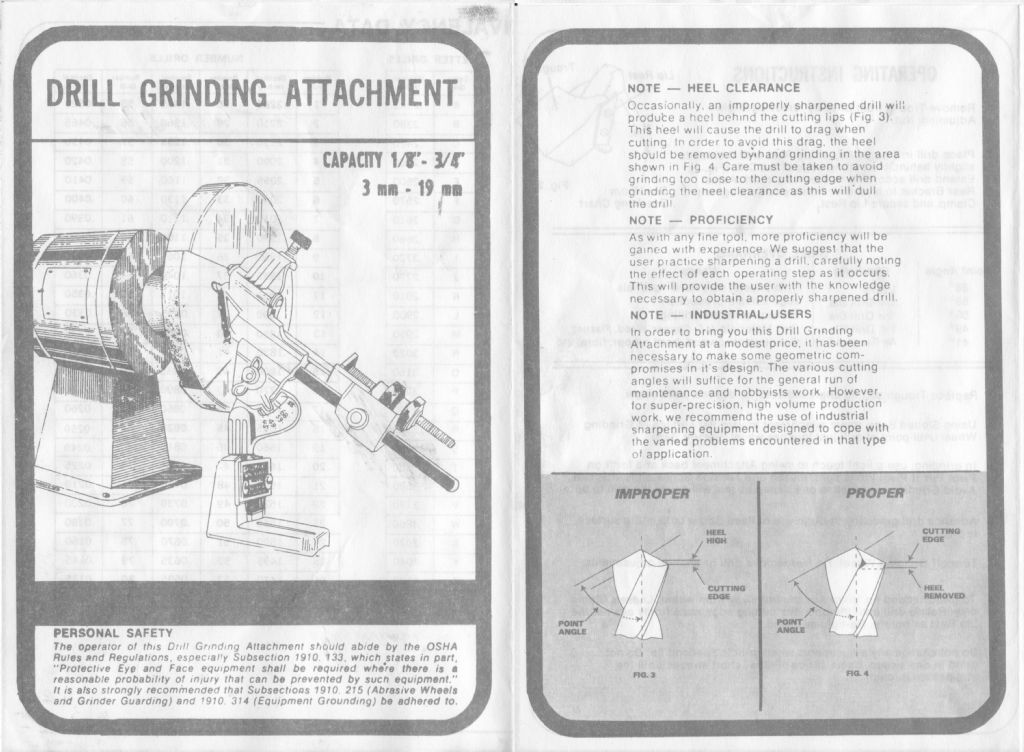 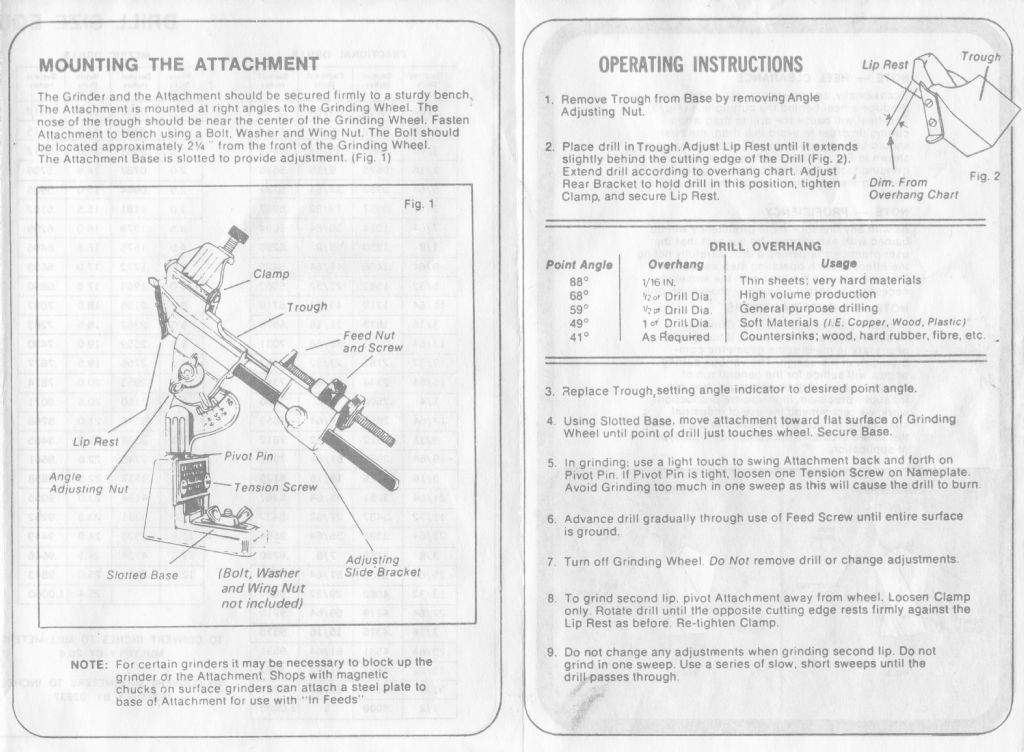 This particular one bought about a year ago from a well known UK vendor. Regards Paul Floyd |
| Stub Mandrel | 12/12/2010 13:48:27 |
 4318 forum posts 291 photos 1 articles | My attachment is the same as Paul's. I have had more luck with my Plasplugs 4 in 1 or even hand grinding. With drills above 1/4" I get the best result by hand grinding a 4-facet point. With very small drills a diamond slip seems to be the best way. Neil |
| NJH | 12/12/2010 14:23:52 |
 2314 forum posts 139 photos | Hi All
I have one of these and , in truth, I don't really get on well with it. Maybe I should try again. Now then to the question of WHERE to grind. I agree with John that using the periphery of the wheel introduces more problems but everything I read says that using the side of the wheel is a dangerous practice. ( OK I know that it might be possible to get away with light cuts - but how light is light and would wear compromise the strength and integrity of the wheel over time? ) I guess substituting a cup wheel would be a good idea but these are not cheap and even if this was done is the attachment then capable of achieving a good result? What IS the best way to sharpen drills?
Thanks (Hopefully)
Norman
|
| _Paul_ | 12/12/2010 18:01:49 |
543 forum posts 31 photos | This thread has rekindled my interest in this jig. Having previously tried the jig with very limited success  I am now determined to get some use out of it...after all I did pay good money for it and being a Yorkshireman it pains me not to get good value for money at all times I am now determined to get some use out of it...after all I did pay good money for it and being a Yorkshireman it pains me not to get good value for money at all times  A scull around t'internet came up with this from the Instructables site : Regards Paul Floyd Edited By _Paul_ on 12/12/2010 18:04:07 |
| Peter G. Shaw | 12/12/2010 19:36:28 |
1531 forum posts 44 photos | Can I just say to all those people having trouble using these jigs, that I have never had any problem at all using mine. Ok, I know that sounds bigheaded: it isn't meant to be, and I apologise for coming across like that. What I do, is to set the tool on the 59° mark, drop in the drill to be ground, set it up against the Lip Stop, which, by the way, I don't seem to need to adjust all that much, and grind away. Rotate the drill once, or maybe thrice as necessary or if necessary, and Robert is my fathers brother! (Actually my son, but that's another story.) The point is that a nicely sharpened drill, even if it's not perfect, is a lot easier to use than a blunt one, and, it's possible to rescue broken ones provided they are not too broken. It's true to say that a) I ruin more drills by chuck slip than by breakages/blunt; and b) I haven't bought any large replacement drill bits for a long, long time. What I have done though, is to have one good set of imperial plus the remains of an imperial set, and a working set of metric and a good set of metric (which is what I mainly use). What this means is that I can sharpen at my leisure, or replace if too small to sharpen. It also means that I have good drills for use where better accuracy is required. I use the side of a standard wheel. Ok, I know one didn't ought to, but I do, and if you have a look at page 32 of Tubal Cain's book, Drills, Taps And Dies (WSP12, you will find that Tubal Cain himself says it's ok as the forces are, or should be, very light. Indeed, he finishes the sentence "and I can assure you that no harm will come". He also says that the ideal is a cup wheel, but then points out that most grinders won't accommodate one. So, as far as I am concerned, if Tubal Cain says it's ok, then it's ok by me. Regards, Peter G. Shaw |
| John Olsen | 13/12/2010 00:19:17 |
| 1294 forum posts 108 photos 1 articles | I agree with Peter about the side being OK for these light cuts, and would suggest that if there is a lot to remove, as may be with a broken drill, then you should grind it as close as possible by eye on the front of the wheel, and just use the jig for the final correction. The jig I am using may or may not be an ideal design, but what I do know is that it can sharpen drills better than I can by eye. regards John |
| Nicholas Farr | 13/12/2010 01:29:49 |
 3988 forum posts 1799 photos | Hi, it is acceptable to use the side of a grinding wheel, providing that it is only reasonbly light in comparison to what you use on the front of the wheel. The amout of force required to sharpen a drill should only need to be light, otherwise you will overheat the drill and introduce very fine fractures which will just chip out when drilling. I would suggest however to use the outer edge of the side so as not to make grooves that cannot be dressed out in the normal course of wheel maintenace. (You do dress your wheels! don't you?) You should not let your drills overheat, or quench a hot one. FWIW if you put so much pressure on the front of the wheel so that it significantly slows it down, not only do you reduce the cutting efficency and produce a lot of heat, but you will also tear away your wheel and shorten its life. This can also increase the risk of the wheel bursting. The risk of wheel bursting is greater during starting and running up to speed. It is good practice not to stand in front of your wheels during start up for this very reason. Fortunately if wheels are used and maintained correctly, bursting rarely occurs. Regards Nick. |
| Sandy Morton | 15/12/2010 21:46:13 |
| 104 forum posts | Many thanks to all who replied - it now works and some drills seem to be sharper than when they were new. Because of the positive replies which I have had I will very probably post more requests for help but to go a wee bit OT if anyone needs advice on maintaining cycles feel free to ask - [email protected] since it's not really Model Engineering. |
| Cornish Jack | 05/01/2011 12:14:32 |
| 1228 forum posts 172 photos | Slightly OT, I have a Miller Falls device which I assume was intended for drill (and mill cutter??) sharpening. I have no instructions for it and have not yet tried to use it. It is rather more complex and 'engineered' than the Spiralux et al. Does any body have any experience of this model or suggestions for operation, please? ... Have tried the Miller Falls site, but nothing mentioned there Rgds |
| Marcus Bowman | 10/05/2018 20:52:40 |
| 196 forum posts 2 photos | One of the problems in using the side of the wheel is that frequent dressing thins the wheel. It is also a touch awkward to do the dressing on the side. Opinions differ, but I think it is important to dress wheels to keep them cutting freely. I have a little home-made accessory (effectively a small rest) which sits in the drill sharpening jig in place of a drill, and it allows me to quickly dress the face of my cup wheel. I agree that it should not be necessary to press hard when grinding a drill. The heat is unlikely to damage a HSS drill, but if the grade of wheel is correct, it should grind without generating a lot of heat. If the wheel is too hard a grade, it will not wear, but will clog (sparkly bits of metal embedded in the wheel), and then it will not cut terribly well, but will generate heat as it rubs instead of cutting. Marcus
|
Please login to post a reply.
Magazine Locator
Want the latest issue of Model Engineer or Model Engineers' Workshop? Use our magazine locator links to find your nearest stockist!
Sign up to our Newsletter
Sign up to our newsletter and get a free digital issue.
You can unsubscribe at anytime. View our privacy policy at www.mortons.co.uk/privacy
Latest Forum Posts
- *Oct 2023: FORUM MIGRATION TIMELINE*
05/10/2023 07:57:11 - Making ER11 collet chuck
05/10/2023 07:56:24 - What did you do today? 2023
05/10/2023 07:25:01 - Orrery
05/10/2023 06:00:41 - Wera hand-tools
05/10/2023 05:47:07 - New member
05/10/2023 04:40:11 - Problems with external pot on at1 vfd
05/10/2023 00:06:32 - Drain plug
04/10/2023 23:36:17 - digi phase converter for 10 machines.....
04/10/2023 23:13:48 - Winter Storage Of Locomotives
04/10/2023 21:02:11 - More Latest Posts...
- View All Topics
Support Our Partners


Shopping Partners
Subscription Offer

Latest "For Sale" Ads
- Reeves** - Rebuilt Royal Scot by Martin Evans
by John Broughton
£300.00 - BRITANNIA 5" GAUGE James Perrier
by Jon Seabright 1
£2,500.00 - Drill Grinder - for restoration
by Nigel Graham 2
£0.00 - WARCO WM18 MILLING MACHINE
by Alex Chudley
£1,200.00 - MYFORD SUPER 7 LATHE
by Alex Chudley
£2,000.00 - More "For Sale" Ads...
Latest "Wanted" Ads
- D1-3 backplate
by Michael Horley
Price Not Specified - fixed steady for a Colchester bantam mark1 800
by George Jervis
Price Not Specified - lbsc pansy
by JACK SIDEBOTHAM
Price Not Specified - Pratt Burnerd multifit chuck key.
by Tim Riome
Price Not Specified - BANDSAW BLADE WELDER
by HUGH
Price Not Specified - More "Wanted" Ads...
Get In Touch!
Do you want to contact the Model Engineer and Model Engineers' Workshop team?
You can contact us by phone, mail or email about the magazines including becoming a contributor, submitting reader's letters or making queries about articles. You can also get in touch about this website, advertising or other general issues.
Click THIS LINK for full contact details.
For subscription issues please see THIS LINK.
Digital Back Issues


Donate

 Register
 Log-in
Model Engineer Magazine
- Percival Marshall
- M.E. History
- LittleLEC
- M.E. Clock

ME Workshop
- An Adcock
- & Shipley
- Horizontal
- Mill

Subscribe Now
- Great savings
- Delivered to your door

Pre-order your copy!
- Delivered to your doorstep!
- Free UK delivery!
All Forum Topics > Hints And Tips for model engineers > Spiralux Drill Grinding Attachment