Forum sponsored by:

Think you have trouble losing your chuck key?
Just a little project, to see if it was possible!
| William S | 31/03/2021 19:03:21 |
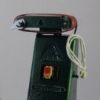 80 forum posts 335 photos | Hello all Think you have trouble misplacing you full size chuck key? How would you contend with this size(I have misplaced it several times myself whilst making it!!)
Thanks for reading William |
| Dave Halford | 31/03/2021 19:17:38 |
| 2536 forum posts 24 photos | What chuck key? |
| David George 1 | 31/03/2021 19:27:18 |
 2110 forum posts 565 photos | Here's my 4 jaw chuck not quite as hard as a self centering 3 jaw.
David
|
| Hopper | 01/04/2021 12:43:55 |
 7881 forum posts 397 photos | Goodness. That's rather wonderful. Are you making the lathe to go with the chuck? And yes please, how did you make the scroll? Lathe with extremely coarse cross feed? Or mill with table and dividing head geared together? Or CNC magick? |
| Brian Wood | 01/04/2021 12:59:53 |
| 2742 forum posts 39 photos | Hello William, What a cracking piece of work. Please add me to the list of those who would like to know how you went about the tricky bits involved. It's a little sweetie. Brian |
| Bo'sun | 01/04/2021 13:52:53 |
| 754 forum posts 2 photos | Amazing detail (and patience). Another vote for "how it was done". On a similar theme, have you seen Joe Pieczynski's mini lathe project on You Tube? Yes, the American drawl can be a bit tiring, but interesting none-the-less. |
| Craig Brown | 01/04/2021 14:24:50 |
| 110 forum posts 57 photos | Very nice indeed, would also be interested in the finer details. I like how the jaws are to scale also because that is my problem with the ones made for the kits like David's, they are always too big (no disrespect David, your model looks great) but the makers (Stuart and others) must deem it too fiddly to do the jaws to scale? |
| Mike Poole | 01/04/2021 15:31:30 |
 3676 forum posts 82 photos | That chuck looks a bit heavy for a Myford ike |
| Nigel Bennett | 01/04/2021 16:21:49 |
 500 forum posts 31 photos | I take it you're going to make it a working Griptru one as well... It looks really good, William - and if you've got to do the pinions somehow! Keep us posted on how you did them... |
| Tom Sheppard | 01/04/2021 17:54:45 |
| 47 forum posts | Isn't that a full size 26 2/3mm chuck? |
| William S | 01/04/2021 23:25:49 |
80 forum posts 335 photos | Hello all Thank you for the kind words, its just going to stay a standard chuck, as I am not an owner of an 80mm Griptru! I have done one pinion, Its not right as I forgot about the involute detail when grinding the D bit!: As can be sen here the middle D bit just has straight sides, I am yet to experiment with making a involute form D bit so watch this space. I am using a D bit as I don't think any other cutter would work. A fly cutter style tool or a commercial cutter as it has to clear the pin sticking out the front of the pinion.
That's the pinion before I cut the teeth, Okay you asked for an explanation on the finer details so here goes: The scroll and jaws have so far turned 2 of these 0.5mm slot drills
To;
The scroll and jaws are machined on my Alexander 2c pantograph engraver using the full size original, and the pantograph ratio set to 3:1. I first roughed out the ends of the jaws using a 1mm endmill and a 3mm stylus, (the pantograph ratio x cutter dia = stylus dia) Then I moved on to the 0.5mm slot drill and a 1.5mm stylus to finish machine the profiles. Getting set up here is the most difficult part one has to really be creative with an indicator!, I needed to get the "fence"(1,2,3 block) on the copy table in relation to the fixed jaw on the vice on the machine table. This was done by calculating the centre of the original jaws plus the radius of the stylus, turned out to be 4mm exactly. A slip gauge was used. Then holding the stylus against said "fence" and slip and sweeping an indicator either side of the 1/3rd scale jaw on the machine table to centralise it.
The 0.5mm slot drill is running at full lick of 20,000rpm, 0.1mm depth of cut set with the knee on the machine, about 30mins per jaw The scroll was largely the same process, only I used the 0.5mm cutter to fully machine it, no roughing cuts. I removed the copy table and held the original scroll on a mount. Sorry no pictures of this stage! so you will just have to put up with my explanations. The scroll took about an hour and a half to machine. The jaws were made out of a strip of gauge plate which I surface ground in my lunch break at work to fit the slot in the chuck body, the slots either side were cut using a little T slot cutter, in this set up, enables both sides to be at exactly the same depth etc.
The T slots in the chuck body were cut in this little fixture on the BCA ,slot first then using a miniature carbide "key seat" cutter (off ebay, Klot carbide, no links just an impressed customer). the fixture allowed easy lineing up with the pre drilled pinion holes that were drilled when it was still attached to the parent stock from turning the i.d. and o.d etc
The gears were cut on the Pantograph using the aforementioned D bit in this set up:
I hope that explains a bit! William
Edited By William S on 01/04/2021 23:28:09 |
| Craig Brown | 02/04/2021 04:41:52 |
| 110 forum posts 57 photos | Impressive work. Inventive use of the pantograph too, I like it! |
| Dave Wootton | 02/04/2021 06:33:27 |
| 505 forum posts 99 photos | Inspirational and beautiful work William, I am in awe. Thank you for posting this and please keep them coming, this is just the sort of thing I love to see on the forum.
Dave |
| DiogenesII | 02/04/2021 08:44:58 |
| 859 forum posts 268 photos | Posted by Dave Wootton on 02/04/2021 06:33:27:
Inspirational and beautiful work William, I am in awe. Thank you for posting this and please keep them coming, this is just the sort of thing I love to see on the forum. Dave ..Exactly my sentiments.. Thanks for posting Williiam |
| Michael Gilligan | 02/04/2021 09:06:10 |
 23121 forum posts 1360 photos | In another recent thread, I wrote: ... why is it so often presumed that one’s horizons will inevitably expand in terms of physical size ? Doing smaller stuff better is another option. . I think you have validated that beautifully, William ! MichaelG. |


Please login to post a reply.
Magazine Locator
Want the latest issue of Model Engineer or Model Engineers' Workshop? Use our magazine locator links to find your nearest stockist!
Sign up to our Newsletter
Sign up to our newsletter and get a free digital issue.
You can unsubscribe at anytime. View our privacy policy at www.mortons.co.uk/privacy
Latest Forum Posts
- *Oct 2023: FORUM MIGRATION TIMELINE*
05/10/2023 07:57:11 - Making ER11 collet chuck
05/10/2023 07:56:24 - What did you do today? 2023
05/10/2023 07:25:01 - Orrery
05/10/2023 06:00:41 - Wera hand-tools
05/10/2023 05:47:07 - New member
05/10/2023 04:40:11 - Problems with external pot on at1 vfd
05/10/2023 00:06:32 - Drain plug
04/10/2023 23:36:17 - digi phase converter for 10 machines.....
04/10/2023 23:13:48 - Winter Storage Of Locomotives
04/10/2023 21:02:11 - More Latest Posts...
- View All Topics
Support Our Partners


Shopping Partners
Subscription Offer

Latest "For Sale" Ads
- Reeves** - Rebuilt Royal Scot by Martin Evans
by John Broughton
£300.00 - BRITANNIA 5" GAUGE James Perrier
by Jon Seabright 1
£2,500.00 - Drill Grinder - for restoration
by Nigel Graham 2
£0.00 - WARCO WM18 MILLING MACHINE
by Alex Chudley
£1,200.00 - MYFORD SUPER 7 LATHE
by Alex Chudley
£2,000.00 - More "For Sale" Ads...
Latest "Wanted" Ads
- D1-3 backplate
by Michael Horley
Price Not Specified - fixed steady for a Colchester bantam mark1 800
by George Jervis
Price Not Specified - lbsc pansy
by JACK SIDEBOTHAM
Price Not Specified - Pratt Burnerd multifit chuck key.
by Tim Riome
Price Not Specified - BANDSAW BLADE WELDER
by HUGH
Price Not Specified - More "Wanted" Ads...
Get In Touch!
Do you want to contact the Model Engineer and Model Engineers' Workshop team?
You can contact us by phone, mail or email about the magazines including becoming a contributor, submitting reader's letters or making queries about articles. You can also get in touch about this website, advertising or other general issues.
Click THIS LINK for full contact details.
For subscription issues please see THIS LINK.
Digital Back Issues


Donate

 Register
 Log-in
Model Engineer Magazine
- Percival Marshall
- M.E. History
- LittleLEC
- M.E. Clock

ME Workshop
- An Adcock
- & Shipley
- Horizontal
- Mill

Subscribe Now
- Great savings
- Delivered to your door

Pre-order your copy!
- Delivered to your doorstep!
- Free UK delivery!
All Forum Topics > Workshop Tools and Tooling > Think you have trouble losing your chuck key?