Forum sponsored by:

Desperate times and desperate measures...
What am I letting myself in for??
| UncouthJ | 19/11/2020 11:53:04 |
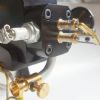
| 143 forum posts 39 photos | Hi Folks. I’m currently unable to work on medical grounds. I did my apprenticeship in machining, but strayed into maintenance engineering, to my eternal shame. Anyway, I really miss machining so I’m desperate to set myself up a mini lathe, to have something to do whenever I am able. Unfortunately, times have tolled and the budget is obscenely tight, mainly selling prized possessions to finance it, and even that isn’t half what I’d be looking to spend under any other circumstances. So, that’s the desperate times... Now, an Amadeal CJ18A has come up that I can afford. Some obvious concerns, but I’m prepared for it to need a bit of work. The chap has upgraded to the metal gears, but says a cover has broken somewhere along the way. He’s covered the area with tape to prevent ingress, and says it doesn’t impede functionality. I guess my whole post here is to see if anyone in the know might see anything fatally wrong, or perhaps can provide insight into the journey that may lay ahead in the repair? I don’t mind desperate measures, but I’d rather avoid pointless ones... Cheers Here’s a pic of the taped up area, and uncovered pic below.
|
| JasonB | 19/11/2020 13:26:25 |
 25215 forum posts 3105 photos 1 articles | Looks like the shield has come off the 91p bearing so not too expensive to replace, I'll leave it to others to explain how to replace as unfortunately that bit is not shown on ARC's strip & rebuild guide. Though if no dirt has got in and it's running OK, I'd get a bit more tape. |
| HOWARDT | 19/11/2020 13:42:35 |
| 1081 forum posts 39 photos | I is just a swarf shield for the front bearing, but the spinel has to come out to replace it. It is just a plastic shield, easily broken of a little hamfisted when refitting. Better to leave it in place unless you want/need to change the bearings. If you want to proceed you have a cholce on the bearing types, normal balll bearing, angular contact, or taper roller. I stick with normal ball bearings as that is what is fitted as standard and the machine, not this one, does what I want it to do. Plenty of discussion and preferences on here as to bearing type chosen. |
| UncouthJ | 19/11/2020 13:46:13 |
| 143 forum posts 39 photos | Posted by JasonB on 19/11/2020 13:26:25:
Looks like the shield has come off the 91p bearing so not too expensive to replace, I'll leave it to others to explain how to replace as unfortunately that bit is not shown on ARC's strip & rebuild guide. Though if no dirt has got in and it's running OK, I'd get a bit more tape. Brilliant, that was my thought also. Thanks for that Jason. My job this afternoon is downloading every drawing, manual, part number and measurement, I can possibly find on the thing... |
| Andy_G | 19/11/2020 13:53:20 |
 260 forum posts | Posted by Jay Nugent 1 on 19/11/2020 13:46:13:
My job this afternoon is downloading every drawing, manual, part number and measurement, I can possibly find on the thing... The Arc Euro Trade strip-down guide is very good. https://www.arceurotrade.co.uk/machineguides/C3-Mini-Lathe-Dismantling-and-Reassembly-Guide.pdf Your lathe may not be identical, but it is likely to be very, very similar. |
| Bazyle | 19/11/2020 13:57:50 |
 6956 forum posts 229 photos | You can have some fun designing and making a metal replacement. Then attachi it with double sided tape until one day when you do decide to strip all and drill holes ot screw it in position through the lugs you so sensibly incormorated into your design. Worst case is the bearing gets contaminated and damaged eventually but as it is just the layshaft it is not too serious and can just be replaced by a cheap bearing. |
| Howard Lewis | 19/11/2020 14:01:52 |
| 7227 forum posts 21 photos | Bazlyle beat to me the suggestion to make up a metal cover, large enough to cover the damage. With e chuck removed there may be access to drill and tap some holes for the retaining fasteners. That would make it look a proper Engineers job! Howard. |
| Ady1 | 19/11/2020 14:19:08 |
 6137 forum posts 893 photos | a metal plate glued on with a smear of pinkgrip will be fine in 4-6 hours Lever it off with a screwdriver in 5 years or whenever you need access for maintenance GL |
| old mart | 19/11/2020 15:05:02 |
| 4655 forum posts 304 photos | Welcome, Jay, I wouldn't worry too much about it, just make sure the tape is doing its job and get machining. |
| mechman48 | 19/11/2020 15:18:07 |
 2947 forum posts 468 photos | Try a thin piece of Teflon sheeting, cut a hole close to the diameter of the spindle & the OD of the bearing + plus an extra 10 mm, as near as, split the 'washer' down from the top & fit over the spindle glued in place with hot glue gun or even some silicon sealant, niceley sealed up , job done. George. |
| larry phelan 1 | 19/11/2020 17:02:48 |
| 1346 forum posts 15 photos | Give the dog a bone and let him sleep ! Stick a piece of plastic over it and forget you ever saw it. |
| UncouthJ | 19/11/2020 17:20:00 |
| 143 forum posts 39 photos | Thanks for the feedback guys. I can’t wait to get turning! |
| Ian B. | 19/11/2020 22:37:37 |
| 171 forum posts 5 photos | Interesting. I have owned personnally 2 mini lathes and worked on a couple of othersb. Still have one in use after loads of work. The first one a Clarke CL300M dated back to 1996. The second is a Chester Conquest dating to early 2017. Both bought new and in sealed crates. NEITHER machine had covers fitted in this area from the factory build. The bearing on the layshaft is exposed. The larger plastic covers for the mandrel bearings are deliberately moulded with the half moon cut out to clear the layshaft bearings at both ends being a common part. The bearings are specified as shielded bearings anyway ZZ suffix. In this time and the Clarke did work commercially for me did not suffer any harm at all by being exposed over those years. I have replaced the Conquest bearings during the major strip down for other reasons with steel sealed and shielded units. Naachi branded units for a couple of quid each. Regards Ian Edited By Ian B. on 19/11/2020 22:38:42 |
| Ian B. | 19/11/2020 22:51:30 |
| 171 forum posts 5 photos | I would also beg to suggest after examining the photos closely that those bearings have been replaced at some stage with basic open frame bearings which are not the specification for these machines. A quick fan through my notes, books and mini lathe info shows 100% sealed and shielded bearings on the layshaft (correctly the input shaft). Just check carefully the size. The basic size will be etched on the side of the outer race. E.g 6201. They do vary manufacturer to manufacturer and may not always be the number listed in the parts list. The Clarke did in my case, the Conquest was one size down on OD and thickness (ID same) to the listed item in the parts list. Regards Ian |
| Stuart Smith 5 | 19/11/2020 23:31:26 |
| 349 forum posts 61 photos | I have the same CJ18A lathe and replaced the main bearings and plastic gears on mine earlier this year after I stripped one of the plastic gears. There is a plastic cover over the main spindle bearing held on by screws. This has a cut out at the bottom to clear the bearing for the input shaft. This cover looks ok on your photo. The tape has been put on to cover the end of the input shaft which on yours has either an open bearing or a sealed bearing with the built in shield missing. Mine has a shielded bearing with no other cover. Either way, fit either a plastic or metal cover over this as has been suggested. Stuart |
| UncouthJ | 20/11/2020 08:34:29 |
| 143 forum posts 39 photos | Looking at the assy guide, it looks a much simpler teardown than I expected, so that'll be the first job. Make sure eveythigs as it should be. I'm sure I read or watched an artice on turning new bearing shields recently, as it happens. I may just grab a complete set of bearings etc jic. Here's to hoping that the biggest headache I'm in for is the 400mile round trip to collect it. ...cue canned laughter... 😉 J Edited By Jay Nugent 1 on 20/11/2020 08:50:07 |
| Andy_G | 20/11/2020 09:01:03 |
260 forum posts | I’d respectfully suggest using it as it is for a week or two to get the feel of it (making minor adjustments such as slideway gibs, etc.) before launching into a full strip-down.
Sometimes taking things to bits introduces new problems! |
| SillyOldDuffer | 20/11/2020 10:25:57 |
| 10668 forum posts 2415 photos | Posted by Andy Gray 3 on 20/11/2020 09:01:03:
I’d respectfully suggest using it as it is for a week or two to get the feel of it (making minor adjustments such as slideway gibs, etc.) before launching into a full strip-down.
Sometimes taking things to bits introduces new problems! +1 Or longer! The urge to strip down new toys is almost irresistible, but don't do it as a first step! Although mini-lathes aren't delicate there are many opportunities for beginner blunders. One example, gibs go back in one way. Not unusual for enthusiastic innocents to put them in upside down, or the wrong way round, or fail to notice the adjusting screws are meant to engage with dimples (usually). And a certain amount of skill is needed to adjust correctly assembled gibs for best smooth running tightness, end to end. When the new owner asks for help on the forum, it's hard for this end of the internet to tell the difference between worn-out, needs normal adjustment, and incorrectly assembled faults if someone has been 'at it'. Worst of all when several assembly mistakes are made. Another booby trap, beginners often try and machine random scrap or DIY store metal, unaware that much of it is nasty stuff. All too easy to assume the machine is wrong and start fixing it, when the real problem is an inexperienced operator struggling with difficult material. Take it step by step. Strip down after using the lathe reveals something needs attention. Cutting metal reveals faults better than any other approach. Reassembly is much safer when the machine and it's quirks are understood. It doesn't take long! Dave
|
| Howard Lewis | 20/11/2020 12:10:40 |
| 7227 forum posts 21 photos | On the subject of material, AVOID rebar. It is horrible material,. Don't know what is in it, but getting a reasonable, let alone a good one, is difficult. Howard |
| UncouthJ | 20/11/2020 14:19:32 |
| 143 forum posts 39 photos | A very true and sensible point, thanks Andy and Dave for the reality check. Forgetting my fundamentals there. I’ve been reading/watching up about levelling and test bars etc. So that’s probably a good first step to take, square everything up and remove as many environmentals from the equation as possible, and really see what’s what with the thing, prior to any thoughts of surgery. Absolutely Howard. I’ve had some bad experiences with rebar myself. Pretty sure the only thing its good for is burying in concrete. I’ll grab some nice FM bar stock.
|


Please login to post a reply.
Magazine Locator
Want the latest issue of Model Engineer or Model Engineers' Workshop? Use our magazine locator links to find your nearest stockist!
Sign up to our Newsletter
Sign up to our newsletter and get a free digital issue.
You can unsubscribe at anytime. View our privacy policy at www.mortons.co.uk/privacy
Latest Forum Posts
- hemingway ball turner
04/07/2025 14:40:26 - *Oct 2023: FORUM MIGRATION TIMELINE*
05/10/2023 07:57:11 - Making ER11 collet chuck
05/10/2023 07:56:24 - What did you do today? 2023
05/10/2023 07:25:01 - Orrery
05/10/2023 06:00:41 - Wera hand-tools
05/10/2023 05:47:07 - New member
05/10/2023 04:40:11 - Problems with external pot on at1 vfd
05/10/2023 00:06:32 - Drain plug
04/10/2023 23:36:17 - digi phase converter for 10 machines.....
04/10/2023 23:13:48 - More Latest Posts...
- View All Topics
Support Our Partners


Shopping Partners
Subscription Offer

Latest "For Sale" Ads
- Reeves** - Rebuilt Royal Scot by Martin Evans
by John Broughton
£300.00 - BRITANNIA 5" GAUGE James Perrier
by Jon Seabright 1
£2,500.00 - Drill Grinder - for restoration
by Nigel Graham 2
£0.00 - WARCO WM18 MILLING MACHINE
by Alex Chudley
£1,200.00 - MYFORD SUPER 7 LATHE
by Alex Chudley
£2,000.00 - More "For Sale" Ads...
Latest "Wanted" Ads
- D1-3 backplate
by Michael Horley
Price Not Specified - fixed steady for a Colchester bantam mark1 800
by George Jervis
Price Not Specified - lbsc pansy
by JACK SIDEBOTHAM
Price Not Specified - Pratt Burnerd multifit chuck key.
by Tim Riome
Price Not Specified - BANDSAW BLADE WELDER
by HUGH
Price Not Specified - More "Wanted" Ads...
Get In Touch!
Do you want to contact the Model Engineer and Model Engineers' Workshop team?
You can contact us by phone, mail or email about the magazines including becoming a contributor, submitting reader's letters or making queries about articles. You can also get in touch about this website, advertising or other general issues.
Click THIS LINK for full contact details.
For subscription issues please see THIS LINK.
Digital Back Issues


Donate

 Register
 Log-in
Model Engineer Magazine
- Percival Marshall
- M.E. History
- LittleLEC
- M.E. Clock

ME Workshop
- An Adcock
- & Shipley
- Horizontal
- Mill

Subscribe Now
- Great savings
- Delivered to your door

Pre-order your copy!
- Delivered to your doorstep!
- Free UK delivery!
All Forum Topics > Beginners questions > Desperate times and desperate measures...