Forum sponsored by:

Stuart No. 1 Build Progress
| Mark Gould 1 | 07/11/2018 11:09:42 |
| 231 forum posts 131 photos | Dad and I have started our Stuart No.1. We started with the easy parts. Here's our progress so far. Edited By Mark Gould 1 on 07/11/2018 11:27:42 |
| Mark Gould 1 | 07/11/2018 11:14:01 |
| 231 forum posts 131 photos | Sorry guys, I am struggling with photos in my album, they're all rotated incorrectly. Bear with me while I sort it out. |
| Mark Gould 1 | 07/11/2018 11:39:50 |
| 231 forum posts 131 photos | Here is our lathe, a Super 7 rebuilt to new here in the Netherlands by a MyFord specialist.
...and our small milling machine, an Emco FB-2.
And then the first machining on our new Stuart No. 1:
|
| Former Member | 07/11/2018 11:47:19 |
| 1329 forum posts | [This posting has been removed] |
| mechman48 | 07/11/2018 13:49:12 |
 2947 forum posts 468 photos | Looking good Mark; I like the lighting set up on your mill, I assume it's an 'angel eye' off eBay. is it powered off a 12v 'wall wart'? would be nice to see more pics of lighting set up. |
| Mark Gould 1 | 07/11/2018 15:11:39 |
| 231 forum posts 131 photos | George, It is a LED ring that attaches via magnets to the bottom of the milling head, around the spindle. I bought it on eBay but to be honest I am going to replace it with a larger diameter ring. This ring has an internal diameter which is 2mm larger than the spindle thickness and so the light is concentrated around the spindle. A collet/drill chuck or shell mill actually blocks the light from getting to the cutting surface. I am going to get a larger one with a 100mm diameter (€8 on Banggood) to see whether it clears the tool. Keep you posted.
Mark |
| mechman48 | 07/11/2018 15:37:13 |
2947 forum posts 468 photos | Posted by Mark Gould 1 on 07/11/2018 15:11:39:
George, It is a LED ring that attaches via magnets to the bottom of the milling head, around the spindle. I bought it on eBay but to be honest I am going to replace it with a larger diameter ring. This ring has an internal diameter which is 2mm larger than the spindle thickness and so the light is concentrated around the spindle. A collet/drill chuck or shell mill actually blocks the light from getting to the cutting surface. I am going to get a larger one with a 100mm diameter (€8 on Banggood) to see whether it clears the tool. Keep you posted.
Mark
|
| Mark Gould 1 | 09/12/2018 18:49:35 |
| 231 forum posts 131 photos |
Progress and Failure. Our engine is progressing steadily but it hasn't been plain sailing. We managed to get the lower bearings into the sole-plate. Just need a skim across the top to make the top surface exactly level. The upper halves were a different matter. We thought some, pondered a bit and then thought some more and then buggered them up. I have no idea how or where we made the mistake but it all went wrong when we got the 2 halves into the 4 jaw. I have ordered 2 more top halves from Stuart.
Here I am milling to mating surfaces of the top bearing halves to be able to super glue them together.
Failure. The radius is off centre. We could possibly salvage the parts but getting one side correct and placing the incorrectly turned faces on the inside of the engine but that would reduce the crankshaft bearing area so we decided to make 2 new ones.
|
| Mark Gould 1 | 10/01/2019 19:12:33 |
| 231 forum posts 131 photos | My Dad and I have made slow but steady progress on the No.1. The main bearings are complete and we have drilled and reamed the holes for the crankshaft. I was a little worried about this operation as it is quite important to get it right and we didn't want to ruin the main bearings. Anyway, here are some pics. Sorry they are rotated. I have tried and tried but am unable to post them the right way up. I managed a few weeks ago but have forgotten how I did it. Most infuriating.
Edited By Mark Gould 1 on 10/01/2019 19:18:51 |
| JasonB | 10/01/2019 19:15:16 |
 25215 forum posts 3105 photos 1 articles | Looks good so far. |
| Samsaranda | 10/01/2019 19:24:38 |
 1688 forum posts 16 photos | Nice work Mark, why does everyone’s workshop always look much tidier than mine? Dave W |
| Mark Gould 1 | 20/03/2019 17:34:58 |
| 231 forum posts 131 photos | Progress is slow. The workshop is at my folks place which is 50km from me and with work in the way our days spent machining have been few and far between. I hope to step it up a bit soon. Today we finished machining a simple but time consuming bit. Not even sure what it's called but it still needs a bit of light filing and sanding but the basic shape is there. It takes a lot of time if you're a newbie and this took quite a while! It tapers by 2mm from end to end, not clear on the pics.
Edited By Mark Gould 1 on 20/03/2019 17:35:59 |
| Mark Gould 1 | 05/04/2019 09:44:04 |
| 231 forum posts 131 photos |
Almost completed the next component. This also took quite a lot of time as we kept having to take it out, measure, put it back, find zero etc. It still needs a general deburring but the fit in the standard is excellent.
|
| mechman48 | 05/04/2019 10:24:26 |
2947 forum posts 468 photos | Looking good Mark. As Dave W. commented... ditto. George. |
| Mark Gould 1 | 20/04/2019 16:29:06 |
| 231 forum posts 131 photos | Got a bit more done. The con rod bearing and the slide valve. The con rod bearing is actually 2 parts super glued together for the machining. They turned out nice although this gun metal is very “bitey” to drill into!
|
| Mark Gould 1 | 30/05/2019 22:00:20 |
| 231 forum posts 131 photos |
Got another bit done. It's not perfect but I am happy with it. Somehow (I have no idea how) I messed up one of the inside dimensions so I might have to run this part with a thin bushing on either side. It took us hours and hours and getting the damn thing to run nicely in a 4 jaw chuck is a black art not mastered by me.
|
| Mark Gould 1 | 11/07/2019 07:02:01 |
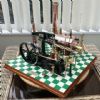
| 231 forum posts 131 photos | My dad and i got a bit more done on the Stuart yesterday. We have basically completed the crankshaft but still have to decide how to join it all together. This engine won't be powering a boat or anything and will probably only run on compressed air for short periods. Perhaps Loctite is good enough or otherwise pinning the crankshaft with taper pins. Anyway here are some quick photo's of everything loosely joined.
|
| Blue Heeler | 11/07/2019 07:09:00 |
 342 forum posts | Very nice workshop, I will thoroughly enjoy this build thread and thanks for putting it up |
| Lainchy | 11/07/2019 07:13:13 |
 273 forum posts 103 photos | What a great thread Mark. Many thanks Just picked it up from here. I'd personally build as if it's going to drive something on steam, so for me, Loctite and taper pin the crank. Personal choice though I guess. I'm very much a noob and haven't yet started into the world of machining a Stuart, but that's the way I'd like to go. The light on the mill indeed looks grand. I've gone the easy way mind... I bought some "sewing machine LED lamps" off eBay and they're REALLY cheap. The 30 LED version throws out enough light. It's basically a LED head, on metal gooseneck that mounted onto a magnetic base. They're less than £5 each from China of course. Great thread though as I say... Looking forward to seeing more |
| David George 1 | 11/07/2019 07:46:31 |
 2110 forum posts 565 photos | Keep going it looks great I can't wait for next instalment. I would loctite and pin, don't do half measures if you dont do it now you may regret it in the future. David |


Please login to post a reply.
Magazine Locator
Want the latest issue of Model Engineer or Model Engineers' Workshop? Use our magazine locator links to find your nearest stockist!
Sign up to our Newsletter
Sign up to our newsletter and get a free digital issue.
You can unsubscribe at anytime. View our privacy policy at www.mortons.co.uk/privacy
Latest Forum Posts
- hemingway ball turner
04/07/2025 14:40:26 - *Oct 2023: FORUM MIGRATION TIMELINE*
05/10/2023 07:57:11 - Making ER11 collet chuck
05/10/2023 07:56:24 - What did you do today? 2023
05/10/2023 07:25:01 - Orrery
05/10/2023 06:00:41 - Wera hand-tools
05/10/2023 05:47:07 - New member
05/10/2023 04:40:11 - Problems with external pot on at1 vfd
05/10/2023 00:06:32 - Drain plug
04/10/2023 23:36:17 - digi phase converter for 10 machines.....
04/10/2023 23:13:48 - More Latest Posts...
- View All Topics
Support Our Partners


Shopping Partners
Subscription Offer

Latest "For Sale" Ads
- Reeves** - Rebuilt Royal Scot by Martin Evans
by John Broughton
£300.00 - BRITANNIA 5" GAUGE James Perrier
by Jon Seabright 1
£2,500.00 - Drill Grinder - for restoration
by Nigel Graham 2
£0.00 - WARCO WM18 MILLING MACHINE
by Alex Chudley
£1,200.00 - MYFORD SUPER 7 LATHE
by Alex Chudley
£2,000.00 - More "For Sale" Ads...
Latest "Wanted" Ads
- D1-3 backplate
by Michael Horley
Price Not Specified - fixed steady for a Colchester bantam mark1 800
by George Jervis
Price Not Specified - lbsc pansy
by JACK SIDEBOTHAM
Price Not Specified - Pratt Burnerd multifit chuck key.
by Tim Riome
Price Not Specified - BANDSAW BLADE WELDER
by HUGH
Price Not Specified - More "Wanted" Ads...
Get In Touch!
Do you want to contact the Model Engineer and Model Engineers' Workshop team?
You can contact us by phone, mail or email about the magazines including becoming a contributor, submitting reader's letters or making queries about articles. You can also get in touch about this website, advertising or other general issues.
Click THIS LINK for full contact details.
For subscription issues please see THIS LINK.
Digital Back Issues


Donate

 Register
 Log-in
Model Engineer Magazine
- Percival Marshall
- M.E. History
- LittleLEC
- M.E. Clock

ME Workshop
- An Adcock
- & Shipley
- Horizontal
- Mill

Subscribe Now
- Great savings
- Delivered to your door

Pre-order your copy!
- Delivered to your doorstep!
- Free UK delivery!
All Forum Topics > Work In Progress and completed items > Stuart No. 1 Build Progress