Forum sponsored by:

Merryweather Steam Fire King self propelled
this is the story of my freelance constructed fire king
| Werner Schleidt | 13/06/2017 09:02:36 |
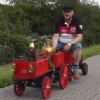 158 forum posts 180 photos | Hello , I want to share my work on a freelance construction of my fire king self propelled. All started with an auction on .bay UK with an vertical boiler of De Winton tea pot boiler. After I have this in my hands ,a nice made swindon boiler, I looked to an original locomotive to build. Then on our club we had a visit of friends from the DMC Schweiz with an traction engine and now I recognized I have a few steam locos and it would be nice to have an traction engine. Then I searched for an original with an vertical steam boiler. So I found photos of a Merryweather steam fire king self propelled. And that was my base to construct and built with a close fit to the picture my unique fire king. This is my second steam ride with it.
This is the result of about 1000 hours of work in more than 2.5 years. The beginning was the making of the wheels in relation of the bolier size and my transport possibilities. I had many limitations of my workshop capabillities to overcome and I learned a lot. The backwheel under construction
best regards Werner it will be updated Edited By Werner Schleidt on 13/06/2017 09:05:22 Edited By Werner Schleidt on 13/06/2017 09:27:33 |
| Ady1 | 13/06/2017 09:32:04 |
 6137 forum posts 893 photos | Lovely work Werner. You may not get a lot of replies as you post your work. Many people in here do not like to clutter (congest) a good engineering build thread with comments as it progresses, but many will be watching |
| Rik Shaw | 13/06/2017 09:35:04 |
 1494 forum posts 403 photos | Sehr gut Werner. Hope you will excuse my "clutter". |
| Werner Schleidt | 13/06/2017 09:42:25 |
158 forum posts 180 photos | Hello , I continue with the wheel construction.
the spokes are milled on the edges The ring was turned on a mill, the beech wood was very hard
The ring was turned by hand
Now one wheel is ready clued together with with white wood glue and get his outside trim. It was not easy to get the same diameter for two wheels under this primitve circumstance. After the wheels were ready, a drawing was made to the best fit of the old picture of the fire king and the size of the boiler . And I had a look to my transport capabilities.
Werner
Edited By Werner Schleidt on 13/06/2017 09:45:02 |
| mechman48 | 13/06/2017 10:04:01 |
 2947 forum posts 468 photos | Looking good Werner... |
| Werner Schleidt | 13/06/2017 13:34:17 |
158 forum posts 180 photos | Helllo, thanks to all who leave a comment . I have no problem with constructiv asks and critism. After the overall drawing I start with ordering of material for the wheel attachments and for the frame and spring attachments . After some months it look like this
Next step was building the steering gear. It is on the left side on the front axle. It is made from trapezoid spindle with a gunmetal nut. On the nut there is attached a pin with a screw in the middle of the nut and this is sliding in a slot in the housing. The whole is than connected to a L lever with connection to the track bar and the tie rods. The setup is like Lankensberger (munich coach builder) or better known as Ackermann setup.
with some cardboard I was dreaming how it can look if it is ready that was in summer 2015
For my opinion such cardboard prototypes are extrem helpful to get the right dimensions.Please keep in mind I have only old photos and no sketch of it. Next step the tea pot locomotive boiler lost the heat transfer sheet metal. It was not easy cutting and milling it away with my small mill.
some steps are worked in parallel the discription is one after the other. The brass top of the boiler was not easy to get. Such pots are today only in stainless steel to get ,but by chance I saw in.bay a brass flower pot very cheap and with the stones in the house wall I had an idea how big it is. In former times it was a pot from a sugar baker and then degradated to a flower pot. I cut the handles away and cut the upper side for the chimney. And I tried to buckling and finishing the old stuff. It looked not so bad but it was still in a conical shape. With three rolls ,all conical , two on the bed of the mill and one upside down in the bore head ,I tried to bend 10 milimeters from the downside to a cylindrical shape. That went good after some hours of work. And some hammering with a plastic hammer.
the working parts for the bolier and the adapter to come out of the insulation was made.
The fire door attachment was very difficult and made in several hours .It opens to floor direction ,because I think it is better to operate like this during driving. Werner
Edited By Werner Schleidt on 13/06/2017 13:38:15 |
| Werner Schleidt | 13/06/2017 14:29:09 |
158 forum posts 180 photos | Hello , the next big step was the steam engine. I had no experience how big it have to be and what traction effort is needed by road driving. So my son and I made a test with grandmother s walking frame. I take seat and my son pulled with a luggage scale. The pulling force was in minimum 100 N. From traction engine coleage I know that he pulled on first gear a small car. So I ball park 500 N. Then I calculated the gear ratio of my chain drives and added a two speed gear to the setup. In second gear the steam engine should run 500 rpm .With all these calculations and some rule of thumb I came to 42 mm bore and 60 to 70 mm stroke on the engine and a overall gear of 8 to 1. So I hoped with this setup I am in the 6 Km/h rule in germany and enough power to drive with two adults. By chance I saw in the second hand area of Maxitrak Cylinder with piston bore ready but all other stuff I made by my self. In eastern 2016 the engine runs.
In summer I saw some rust on the steel parts, so it was clear I have to paint. Before I tried to get all ready for the paint job. The next picture is befor painting.
That was lot of work to do. This is part 1 of the video with the steps I discribed and some more All steps I put together to an video on my youtube channel javamallet. i hope you can enjoy the video
Werner |
| Neil Wyatt | 13/06/2017 18:48:14 |
 19226 forum posts 749 photos 86 articles | Really nice work, Werner, and lovely characterful end result. Neil |
| Brian H | 13/06/2017 20:22:15 |
 2312 forum posts 112 photos | A very interesting subject Werner, thank you. Brian |
| Werner Schleidt | 13/06/2017 20:22:15 |
158 forum posts 180 photos | Thankyou Neil ! After painting I made many small work with much time lost. The boiler insulating is a time intensive job ,but this was nothing in the comparison of boring and making the M2 threads in aluminum. I had the feeling it was hundreds to bore and making the threads.
The boiler cover in brass was very difficult to made . The bending and rolling of the sheet was made by hand.. A template was made from cardboard the bores for the inputs and outputs were very difficult to transfer. And I learned that a round bore is eliptic on a bended metal cover. After that work with bending and rolling the sheet metal by hand I had pain in my hands.
Werner
|
| Werner Schleidt | 14/06/2017 08:33:42 |
158 forum posts 180 photos | Hello , after the boiler was ready covered I had a big step forward. Some time in between i build some parts like the front lamps. It was hard to decide which form I have to build ,because the original I had in my pictures are adapted several times with different lamps. The technical change from oil to gas lamps forced other look of the lamps. At first I made quick and dirty a cardboard lamp and found it is to big, then I made a sketch for the right lamp.
It was decided that the lamps in the model are iluminated by LED.
From a colleage I got a defect LED lamp after stripping I found that the voltage and current control chip was defective. The LED s were very well. I made than several tries to find a solution that they look similar to a petrol powered one. After I found a solution for "the burner" I decided to make a battery holder like a fireextinguisher for 3 AA cells.On the top the handle is the power switch. And I have to found a solution for easy connection of the power lines. The picture shows the holder and power connector.
Here is the battery holder and the handle is the switch.
And here are the lamps installed.
The firefighter was a special addition for the company Ziegler a german fire truck builder and is made by Steiff dolls. The next work intensiv step was doing the plate work. I was looking for Merryweather plate which are in the same time on the originals. With the free program inscape it was possible to make and overlay from the original and the new sketch.After a good fit it allowed to separate again sketch and picture. The used technic is the same as etching printed circuit boards , but you need much more time and new acid to get 0,25 mm deepness for the letters.
The brass is covered with a photoresistant paint. It is not easy to clean the brass and make a clean job. After one day of driying it was 5 minute developed with ultra violet light by special light tubes.
Here is the developed plate with photoresitant.
In this improvised etching box with heating and air bubbles it was made.
After some days of work I got this result. The left plate is very good the right Mw. plate is not deep enough etched. My acid was not good anymore. I have to have a new one.
The lamps get their small plates as big as thumb nail
and the fire extinguisher
Werner
|
| Werner Schleidt | 14/06/2017 09:12:42 |
158 forum posts 180 photos | Hello , I describe now the next steps. The wheels were covered with rubber. The pipe work was done with check valve ,bypass valves and so on. The plates were fitted. The watertank and the front box get theire golden lines. And email conversation was made with the hungerford virtual museum, merryweather and sons to find out what was in the box under the driver seat,because I had found no pictures of that stuff. I got some information material and I made my interpretation of it.
The front is nearly ready . The first time out of the basement . We pulled it out with an electrical winch carefully over the stairs. The black suction hose on the front is a standard suction hose for a gardenpump.It looked terrible like plastic. The idea came up to wrap around a mull bandage and paint it black. Now it looks like a suction hose. More pictures and step by step you can see in my video. I hope you can enjoy the video. Werner |
| V8Eng | 14/06/2017 11:05:09 |
| 1826 forum posts 1 photos | Great model Werner, some innovative solutions and ways of working as well. Love it! |
| Werner Schleidt | 14/06/2017 20:22:54 |
158 forum posts 180 photos | Hello, after the fire king was out of the basement I paint my sit car that it fit to the fire king. I tried to give the car a look similar to fire fighter car. So I mounted suction hoses and build some fire fighter ladders. Then I was waiting to the first steam up. In the time between I tested the pumps and all attachements with pressurised air .After the pumps worked well I decided to steam up. The documentation of the first steaming and the steaming on the DBC Rhein-Main e.V. I put together in a video. |
| Werner Schleidt | 15/06/2017 08:40:33 |
158 forum posts 180 photos | Hello , thanks to all for the positive commands. On the second test ride I found that the fire water pump is not able to get water from the suction hose. I was frustrated ,but never give up. So I investigated what is the the problem.I made a setup in my garage and put the boiler under air pressure. So I could run all for testing. After several test I found out that my compression gland is not suction tight. And I decided that I use only one water cylinder, because it was very difficult to get them out ,because the boiler is very close and it was difficult to come to the screws. After that I tried the pump again and it worked. Than I regognized with the water pressure it can build, that my flat hose is not thight. With several steps I got it under control. Than I made a special nozzle adapted to the flow the pump can bring. Here my experience making injector nozzles were very helpful. In normal working condition it can spray 5 to 6 meters wide. But I found that the ports to the check valves were very small. I started to rework one cylinder to get more flow and less back pressure, but this is not ready now. On a very hot second driving day on our club track I gave the fire king a 3. test ride. The test target was to found out how far I can drive with which amount of coal and how stable is the mechanical system. And testing my new made pop valves. Close by our club track we can drive to the junction of the river rhine and main with a nice look to the city of Mainz. That means a trip of 3 Km in total .I started with smaller steps of a about 1.2 Km in total. After two rounds it looked very good. And I ignored in that positiv sight that on the first round the oil pump failed. I had changed my mounting system and so I was able to replace it in a short time. On the first round we had proplems with one of the safety valves it stucked half open. The boiler hold 3 bar and we came back .With a small electronic pliers I gave a full lift and the valve was thight again and in full function. I had the feeling that there is some dirt in the boiler from soldering. After two rounds, water and pressure,mechanic and all was OK I decide to drive wider than before. I drove than about 1.4 Km and 100 meter to the base I ran out of water. I drove the machine into the gras on the side of the street and ran to took 5 Liter of feed water. All systems was OK on that day. In total I drove about 5 Km that was satisfying. Then we made a fire pump session . There was lot of improvisation to adjust the water jet. The idea came up to have a firemen with a water nozzle in his hand. The only remaining problem I have is that the rubber glued on the wheels is to soft with 65 shore. It is more a stone collecting rubber . And in winter I have to replace it. to hard rubber , but I have at the moment no idea were I can get the replacement. Here is the video of that day
Edited By Werner Schleidt on 15/06/2017 08:41:07 |
| David Standing 1 | 15/06/2017 09:06:48 |
| 1297 forum posts 50 photos | Werner A great thread, thank you for sharing it with us. Regarding tyre rubber, have you investigated what rubber people with horse drawn carriages use? - here in England, hard rubber tyred carriages are quite common. |
| Werner Schleidt | 15/06/2017 11:10:10 |
158 forum posts 180 photos | Hello David , thank you for your reply . I looked in Germany to conveyor belt rubber or flat drive belt. And don`t laugh to heel rubber. And I emailed MJ engineering, but I got no answer. From carriage suplier in Germany I only found that they make hot moulding for a high price. But thank you for your tip I will search again ,sometimes it is difficult to find the right keywords. I have time until winter. Good things need time. And with my construction of the Fire King I was much faster as I thought. Werner |
| NJH | 15/06/2017 12:23:56 |
 2314 forum posts 139 photos | Werner Absolutely splendid work! Really good to read a build thread like this. Even a bit funny - the trick of using Grannies walking frame as part of your planning made me laugh - nice to make it a family project! Norman
|
| SillyOldDuffer | 15/06/2017 12:43:24 |
| 10668 forum posts 2415 photos | Much appreciated Werner. Many thanks for the pictures and description. Dave |
| Werner Schleidt | 15/06/2017 15:18:22 |
158 forum posts 180 photos | Hello , thanks for the nice replies. Norman ,even if it is funny but it is good to know what you need in traction effort. Many years ago I calculate for a friend for his thomson tennant traction engine in a similar way with a good result. And I know the traction effort of my locomotives. Knowledge gives a good convidence even if it`s made with primitive possibilities. As the frame was ready with cylinder and propulsion sytem I made the same test with 2 bar on the cylinder in the basement with a good effort and I was glad as the engine starts that the hose was short it prevents from an accident. I want to add a picture of my clinder cover. Made from brass formed by hand and bended over a piece of pipe and refined with a small Merryweather sign. This sign was made and interpreted after old pictures of a stamped sign. I interpreted it as good as possible from the details of the pictures.
My fireman got now a footstool with a stand and so he can do better his job.
And the second fireman is eagerly waiting for his first work under real conditions his first test was very successful.
Fitted with an old breakfast plate and pole in the britches over booty to the head so the poor guy is under pressure to do his next job. Werner
Edited By Werner Schleidt on 15/06/2017 15:21:58 Edited By Werner Schleidt on 15/06/2017 15:27:13 |


Please login to post a reply.
Magazine Locator
Want the latest issue of Model Engineer or Model Engineers' Workshop? Use our magazine locator links to find your nearest stockist!
Sign up to our Newsletter
Sign up to our newsletter and get a free digital issue.
You can unsubscribe at anytime. View our privacy policy at www.mortons.co.uk/privacy
Latest Forum Posts
- *Oct 2023: FORUM MIGRATION TIMELINE*
05/10/2023 07:57:11 - Making ER11 collet chuck
05/10/2023 07:56:24 - What did you do today? 2023
05/10/2023 07:25:01 - Orrery
05/10/2023 06:00:41 - Wera hand-tools
05/10/2023 05:47:07 - New member
05/10/2023 04:40:11 - Problems with external pot on at1 vfd
05/10/2023 00:06:32 - Drain plug
04/10/2023 23:36:17 - digi phase converter for 10 machines.....
04/10/2023 23:13:48 - Winter Storage Of Locomotives
04/10/2023 21:02:11 - More Latest Posts...
- View All Topics
Support Our Partners


Shopping Partners
Subscription Offer

Latest "For Sale" Ads
- Reeves** - Rebuilt Royal Scot by Martin Evans
by John Broughton
£300.00 - BRITANNIA 5" GAUGE James Perrier
by Jon Seabright 1
£2,500.00 - Drill Grinder - for restoration
by Nigel Graham 2
£0.00 - WARCO WM18 MILLING MACHINE
by Alex Chudley
£1,200.00 - MYFORD SUPER 7 LATHE
by Alex Chudley
£2,000.00 - More "For Sale" Ads...
Latest "Wanted" Ads
- D1-3 backplate
by Michael Horley
Price Not Specified - fixed steady for a Colchester bantam mark1 800
by George Jervis
Price Not Specified - lbsc pansy
by JACK SIDEBOTHAM
Price Not Specified - Pratt Burnerd multifit chuck key.
by Tim Riome
Price Not Specified - BANDSAW BLADE WELDER
by HUGH
Price Not Specified - More "Wanted" Ads...
Get In Touch!
Do you want to contact the Model Engineer and Model Engineers' Workshop team?
You can contact us by phone, mail or email about the magazines including becoming a contributor, submitting reader's letters or making queries about articles. You can also get in touch about this website, advertising or other general issues.
Click THIS LINK for full contact details.
For subscription issues please see THIS LINK.
Digital Back Issues


Donate

 Register
 Log-in
Model Engineer Magazine
- Percival Marshall
- M.E. History
- LittleLEC
- M.E. Clock

ME Workshop
- An Adcock
- & Shipley
- Horizontal
- Mill

Subscribe Now
- Great savings
- Delivered to your door

Pre-order your copy!
- Delivered to your doorstep!
- Free UK delivery!
All Forum Topics > Work In Progress and completed items > Merryweather Steam Fire King self propelled