Forum sponsored by:

Perfectly ground Twist Drills every time.
| Clive Foster | 12/04/2015 14:10:58 |
| 3630 forum posts 128 photos | capnahab Assuming you have a genuine Picador drill jig simply set-up as per the instructions and it will work just fine. Your projection is far to great and the thing will never work. If you haven't got the instructions PM me and I can send a pdf. Summarising the instructions basic set up is cutting edges at 5 to 5 with minimal projection. Typically a little over 1/16" for drills below 1/4" and a bit more for larger sizes. Setting with the flutes touching the tip of the alignment stop should get it right but on bigger sizes you may need a bit more to grind clearance all the way along the heel. The three main sources of sharpening problems given the correct basic set up are:- 1) Tail of drill not sat properly in the second Vee carrier. Particularly with larger drills over tightening the clamp causes the front to tip down and tail to rise upsetting the tip angles. I've often considered adding a clamp to the second Vee to positively stop this but a bit of care in technique does the deed. 2) Hollow ground in side of grinding wheel. Results in arc of grind being too long upsetting all the inherent geometry. I use a 3/8" wide cup wheel which completely avoids the problem. It's important, and not sufficiently stressed in the instructions, that the basic set-up should be such that base and jig are exactly at 90° to the wheel so that the cutting edge leaves the wheel correctly. The 5 to 5 basic set up means that the centre point of the cutting edge leaves the wheel whilst the outer parts are still being ground. This angular lag generates the correct heel clearances and must be correct. The geometry is quite subtle. I have a fabricated U channel for the base to slide in so that the geometry is maintained. 3) It can be tricky to maintain correct positioning during the 180° rotation to do the second edge. If you use the front stop correctly angular position is usually held but its quite easy to alter projection by a few thou between sides. My practice is to set the basic projection on one edge using the back stop then remove the drill and replace it without altering the back stop so technique is the same for both edges. Don't forget that you must keep swinging the drill across the wheel until no further grinding takes place without pressure on the back of the unit. Regrettably Mr Hall failed to understand the geometry of these devices and, frankly, his contributions to the subject are unreliable. Especially where the Picador version is concerned. In general there is a vast amount of tosh written about these devices, not helped by the number of cheapy imports sent out with constructional errors and impossible geometry with corresponding published bodges where folks have made theirs work (sort of). So far as I'm aware Graham Meek is the only person who has bothered to take a proper look at the geometry and set out how to make things work properly given an incorrectly made import as a basis. Do remember that Mr Meek concerned himself with the style of device having a tilted back pivot axis whose geometry is fundamentally different to that of the Picador version. The Picador device generates clearance from rotation of the drill cutting edges relative to the pivot axis whilst the tilted style relies on a combination of tilt angle and drill projection. Clive
|
| capnahab | 12/04/2015 15:04:23 |
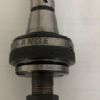
| 194 forum posts 17 photos | Thanks Clive, I wish I could delete that picture because no matter how much I say so I can't seem to get over that the drill was ground after I corrected that and followed the instructions. As you can see in the picture its a Picador. Its a new wheel, everything set up at right angles, drill seated properly and not tipping. I have hand ground better secondary clearance and it drills much better, so I think its the secondary clearance.
|
| Michael Gilligan | 12/04/2015 15:43:14 |
 23121 forum posts 1360 photos | Posted by capnahab on 12/04/2015 15:04:23:
Thanks Clive, I wish I could delete that picture because no matter how much I say so I can't seem to get over that the drill was ground after I corrected that ... . Capn' If you do want to delete that picture ... just remove it from your album Viewers will then just see a 'question mark' in its place [or whatever indicator their browser uses] MichaelG. |
| capnahab | 12/04/2015 15:58:30 |
| 194 forum posts 17 photos | Many thanks Michael. |
| Clive Foster | 12/04/2015 16:40:35 |
| 3630 forum posts 128 photos | capnahab When I first got my Picador over 40 years back things went right pretty much from the off. Maybe two or three practice then everything good. However after a few years things seemed to get a bit touchy. Got to the point where I'd be storing up unsharp drills until forced into a long enough session to make it worth getting my eye in. Which could take 15 minutes or so. Shortly after the Plasplugs sharpening system came out I got sufficiently frustrated with the Picador to buy one as it seemed much easier to set-up for smaller drills. Wasn't expecting that much from the device. It was plastic after all. But in practice it does a very acceptable job and gets used for drills under 1/4 or so. The drill holder being a very cunning and effective answer to the 180° flip problem but setting up still needs a careful look. When I moved into my new workshop I was very careful in how I set-up the grinder and Picador base but still found sharpening an art form. As all the proper T&C grinders use a cup wheel I figured one offered at "£ very, very reasonable" was worth a try. Certainly solved my "touchy need to get my eye in" difficulties and I get excellent results doing one drill at a time. Clive |
| Neil Wyatt | 12/04/2015 17:08:00 |
 19226 forum posts 749 photos 86 articles | Clive, I keep meaning to make a metal version of the plasplugs sharpener - I find it needs a gently touch to avoid distorting it, and I'm a bit too impatient! Neil |
| Clive Foster | 12/04/2015 18:05:50 |
| 3630 forum posts 128 photos | Neil I think its supposed to distort slightly to control the grinding pressure and how much is ground off. I usually make the first couple or three swings with a little pressure on the back of the drill to reduce the depth of cut which otherwise seems a bit heavy. After that its side to side swings with no pressure. Also convinced it does a better job if flipped every three or four swings. Lidl sold what looks to be a half decent copy about a month back for £14 or so. With a pair of the world cheapest, possibly nastiest, diamond wheels. Diamond on pressed steel base forsooth. Absolutely no need for it but curiosity won out. Might get round to trying it one day. Sealey do what looks to be a good copy for £ 40 or 50 odd. On reflection its arguable that any of these side to side swing devices without positively controllable fine cut adjustment should have some sort of spring effect to control initial grinding depth and pressure. Rigid set-up with potential for considerably excess cut to be put on by Mr (or Ms) V. Careless could be disastrous. Mouse power motor on Plasplugs device is probably good protection tho'. On the Picador and similar swing jigs the "thin plate across a Vee" pivot bearing has more inherent spring than one might expect. During my fed up with touchyness period with the Picador I tried a proper, rigid, close fitting bearing pivot. Not an improvement. The potential for disaster given momentary carelessness was obvious. Clive. |
| capnahab | 12/04/2015 19:48:43 |
| 194 forum posts 17 photos |
As the man said and I'm afraid it's gone back under the bench and I have gone back to drill doctor which works very reliably. It even thinned the point. Edited By capnahab on 12/04/2015 19:49:43 |
| John Stevenson | 12/04/2015 20:21:16 |
 5068 forum posts 3 photos | I had a play with a drill doctor last week. Brand new unit, well 2 hours work and the latest type as unfortunately the Drill Doctor has been thru about 4 changes of ownership and the first and current one are the only ones that seem to work correctly.
Iteration No 2 or was it 3 was that poor it was unusable.
This current one which puts results out like Capt. Ahab's above does work but what I didn't like about it, and this is confirmed on their own instructional video is the time taken to do a decent sized drill. Something like a 1/2" drill takes 20 swings each side. This is their instructions. TBH I found it wasn't that bad but after being used to doing a drill by hand in only 4 to 8 swings [ both edges ] I found it irritating.
This is one machine that sorely needs an upgrade to a bigger motor, more metal applying to the design and people will pay the extra price for the convenience.
Good tools don't cost. Good tools save. |
| Mike Poole | 12/04/2015 21:58:11 |
 3676 forum posts 82 photos | I seriously considered buying a drill doctor but some reviews seemed to indicate that it wasn't a foolproof solution, a Dormer 108 drill grinder came up on ebay for about the same money as a DD. It is somewhat larger with the extractor cabinet but it does sharpen perfect drills. Mike |
| Harold Hall 1 | 12/04/2015 22:07:00 |
| 418 forum posts 4 photos | I am Clive a little surprised regarding your comments on my published ideas on the subject of sharpening drills using the very common jig. My surprise is based on the fact that I get perfectly acceptable result using my approach. However, I am not the only one, a few on this forum have commented that a jig, stored away for some years, has been brought out and tested using my suggestions and with very good results, others have e-mailed me with similar comments. On the basis that not every one adds such a comment to the forum, or send e-mails there must be quite a number of other users satisfied with my approach. I am though prepared to accept that I am not foolproof so would be very happy to receive your comments as to where I am wrong, If you make a quick flit through my web pages on the subject and reply here this will both help me and those on the forum who visit the pages. Thanks! Please though take note that I am not concerned with the finer details of the drills geometry only that it produces drills that cut well and to size. For me, if the drill angle is say 116 degrees or 122 degrees I am not concerned. similarly the chisel angle if its a few degrees off 130. Harold |
| Harold Hall 1 | 13/04/2015 09:48:11 |
| 418 forum posts 4 photos | It occurs to me that a few facts, stated simply, may help those coming to terms with the common jig 1. No setting is critical but getting the rotation close to 180 degrees between edges is very desirable. 2. A lower drill projection from the jig results in greater backing off angle. 3. Greater backing off results in a greater chisel angle. 4. Greater chisel angle results in a longer chisel 5. A longer chisel results in more metal being removed by the chisel and less by the cutting edges. 6. More metal being removed by the chisel results in a greater force needed to drill the hole. 7. Conversely, item 2 typically. A greater projection from the jig results in a lower backing off angle. 8. Larger drills will need a larger projection. 9. The drill should be set in the jig with the cutting edge to be ground vertical. 10. After completing edge one the drill should be rotated 180 degrees as close as is possible. See note below. The aim therefore is to get the chisel angle close to 130 degrees, though this is not critical. A small metal plate, scribed at 130 degrees to the edge, and held against the drills cutting edge will be more than adequate, perhaps also scribed at 120 and 140 degrees to set the limits. Having adequately sharpened one drill, preferably a largish one, record the value that the drill was projecting from the jig. With a few drills sharpened and recorded, estimating the projection from the jig for intermediate sizes should be more than adequate. I would suggest viewers visit my website pages on the subject of sharpening drills and where a simple device for accurately achieving the 180 degree rotation is illustrated. Harold |
| Vic | 13/04/2015 10:17:53 |
| 3453 forum posts 23 photos | Anyone tried one of these? http://www.ebay.co.uk/itm/MR-13D-NEW-2-13-MM-GRINDER-DRILL-BITS-SHARPENER-GRINDING-MACHINE-100-135-ANGLE-/111545794583 |
| John Stevenson | 13/04/2015 10:51:31 |
5068 forum posts 3 photos | Yes, Tried one in China, Not impressed, take a look at the finished drill. |
| Clive India | 14/04/2015 09:54:13 |
 277 forum posts | The Quorn can be used to grind 4-facet drills. It can be used for many tasks but It seems to me its principles of drill grinding could be used in a relatively simple jig. The requirements are a grinding wheel and a clamp for the drill. From above the angle of the drill needs to be set at 59deg from the wheel face. This gives the point angle of 118deg and does not change. From the front (In the vertical plane) the drill must be tilted 10deg and 30deg from the vertical for the two facets. The only other requirement is to start with the drill in the right orientation and turn the drill through 180deg to grind each side. Surely someone has already done this? |
| Keith Long | 14/04/2015 13:16:13 |
| 883 forum posts 11 photos | Clive India Have a look at the following website the model 80M - is that along the lines that you were thinking of? I have a very similar machine picked up from EBay but made by Haase GmbH & Co. - not used it yet but it looks quite capable and VERYsturdy and solid. The principle is simple enough but I suspect it's all down to how accurately you can make one and how rigid it is when finished. The drill holder works on intersecting "v" shaped fingers to hold the drill so centre height is maintained regardless of diameter, which is from approx 1/16" to 13/16" |
| Clive Hartland | 14/04/2015 14:22:20 |
 2929 forum posts 41 photos | Here' |
| Chris Shelton | 14/04/2015 16:40:57 |
 92 forum posts 46 photos | Hi All, does anyone own or have any knowledge of the Holzmann BSG 13E drill sharpener,being sold on eBay For £59.95, states it has a die-cast chassis and weighs 2.5Kg. Chris
|
| capnahab | 12/05/2015 12:07:27 |
| 194 forum posts 17 photos | Anyone ?, I have also spotted this , looks better made than many .
|
| John Stevenson | 12/05/2015 13:25:56 |
5068 forum posts 3 photos | More or less a copy of the drill doctor ? Still has a load of plastic on board and the bit I'm uncertain of is the 80 watt motor driving a 78mm wheel.
The current drill doctor has about a 25mm grinding wheel but I can't find any info on the motor wattage but from using one it's underpowered. Also in the genuine Drill Doctor user guide it reckons 200 sharpening from a £33 wheel ? |


Please login to post a reply.
Magazine Locator
Want the latest issue of Model Engineer or Model Engineers' Workshop? Use our magazine locator links to find your nearest stockist!
Sign up to our Newsletter
Sign up to our newsletter and get a free digital issue.
You can unsubscribe at anytime. View our privacy policy at www.mortons.co.uk/privacy
Latest Forum Posts
- hemingway ball turner
04/07/2025 14:40:26 - *Oct 2023: FORUM MIGRATION TIMELINE*
05/10/2023 07:57:11 - Making ER11 collet chuck
05/10/2023 07:56:24 - What did you do today? 2023
05/10/2023 07:25:01 - Orrery
05/10/2023 06:00:41 - Wera hand-tools
05/10/2023 05:47:07 - New member
05/10/2023 04:40:11 - Problems with external pot on at1 vfd
05/10/2023 00:06:32 - Drain plug
04/10/2023 23:36:17 - digi phase converter for 10 machines.....
04/10/2023 23:13:48 - More Latest Posts...
- View All Topics
Support Our Partners


Shopping Partners
Subscription Offer

Latest "For Sale" Ads
- Reeves** - Rebuilt Royal Scot by Martin Evans
by John Broughton
£300.00 - BRITANNIA 5" GAUGE James Perrier
by Jon Seabright 1
£2,500.00 - Drill Grinder - for restoration
by Nigel Graham 2
£0.00 - WARCO WM18 MILLING MACHINE
by Alex Chudley
£1,200.00 - MYFORD SUPER 7 LATHE
by Alex Chudley
£2,000.00 - More "For Sale" Ads...
Latest "Wanted" Ads
- D1-3 backplate
by Michael Horley
Price Not Specified - fixed steady for a Colchester bantam mark1 800
by George Jervis
Price Not Specified - lbsc pansy
by JACK SIDEBOTHAM
Price Not Specified - Pratt Burnerd multifit chuck key.
by Tim Riome
Price Not Specified - BANDSAW BLADE WELDER
by HUGH
Price Not Specified - More "Wanted" Ads...
Get In Touch!
Do you want to contact the Model Engineer and Model Engineers' Workshop team?
You can contact us by phone, mail or email about the magazines including becoming a contributor, submitting reader's letters or making queries about articles. You can also get in touch about this website, advertising or other general issues.
Click THIS LINK for full contact details.
For subscription issues please see THIS LINK.
Digital Back Issues


Donate

 Register
 Log-in
Model Engineer Magazine
- Percival Marshall
- M.E. History
- LittleLEC
- M.E. Clock

ME Workshop
- An Adcock
- & Shipley
- Horizontal
- Mill

Subscribe Now
- Great savings
- Delivered to your door

Pre-order your copy!
- Delivered to your doorstep!
- Free UK delivery!
All Forum Topics > Workshop Tools and Tooling > Perfectly ground Twist Drills every time.