Forum sponsored by:

The Workshop Progress Thread (2017)
Report your modeling and workshop progress here
| Martin Cottrell | 09/02/2017 20:53:06 |
| 297 forum posts 18 photos | Posted by Neil Wyatt on 09/02/2017 18:44:06:
Posted by Mike Poole on 05/02/2017 21:51:28: Looks like Dave Brock to me, if it is I saw the current version Nov. 2015 in Oxford. Chuffed to sneak Hawkwind into the Workshop Progress Thread. I haven't seen them for about 25 years Neil 'Silver Machine' is one of my favourites & always takes me back to my mis-spent youth! Martin. |
| ChrisH | 09/02/2017 22:59:00 |
| 1023 forum posts 30 photos | Jason - Mr Sieg's gear cutters - what supplier/s stocks these? Chris |
| JasonB | 10/02/2017 07:28:05 |
 25215 forum posts 3105 photos 1 articles | From China via e-bay They are no connection with Sieg. |
| ChrisH | 10/02/2017 17:26:59 |
| 1023 forum posts 30 photos | I did wonder if it might be e-bay - many thanks for that Jason |
| JasonB | 15/02/2017 20:19:17 |
25215 forum posts 3105 photos 1 articles | I am getting a bit fed up of having to put a kink in the airhose to alter the speed of my engines when run on air particularly when trying to hold a video camera in the other hand. So today the postie dropped off a couple of jiffy bags of push fit pneumatic fittings and some hose. I sawed a 3/4" piece off a bit of 3x1 ali, flycut it down to size then poped it in the 4-jaw to drill a 10mm hole 140mm deep then opened up the hole and tapped 1/4BSP. Back onto the mill and drilled M5, M6 and 1/4BSP for the flow adjusters and jobs done. A quick test of the Jowit and they are a real improvement, the adjusting screws have a fine metric thread and the "needle" anout a 4 degree included angle which makes for a very fine adjustment, takes 4-5 full turns to go from off to full flow so very easy to tweak the speed of the engine.
|
| Gray62 | 15/02/2017 20:51:27 |
| 1058 forum posts 16 photos | Jason, where did you get your flow adjusters from, I've seen them on ebay but all from china, did you get yours in the UK ? |
| JasonB | 15/02/2017 20:55:25 |
25215 forum posts 3105 photos 1 articles | E-bay but UK companies Wrekin Pneumatics and Hosemaster |
| JasonB | 17/02/2017 19:54:54 |
25215 forum posts 3105 photos 1 articles | As most of my existing adaptors are threaded 3/8" x 32 to suit an airbrush hose I had to make up some new ones to suit the 1/8" BSP push fit connectors before I could test the manifold on a few engines. Quite happy with the result as it is easy to tune each engine's speed and there is no noticable drop in speed of one engine as the others are opened up. |
| Brian H | 18/02/2017 13:19:10 |
 2312 forum posts 112 photos | My 1858 Burrell Boydell engine is coming along. Fitted the chimney base, chimney and part of the boiler levelling system this week. The Acme threaded rod and nuts arrived from the US of A so am battling with worms and wheels. I have ordered the appropriate booklet by Ivan Law in the hope that it makes more sense than the rather old and technical books that I have. Brian
Edited By Brian Hutchings on 18/02/2017 13:19:52 |
| Muzzer | 18/02/2017 13:47:41 |
 2904 forum posts 448 photos | Made good progress removing the bearings from the X and Y axes of the CNC machine. The X axis bearings were moaning louder than a Daily Mail reader on the Jeremy Vine program and sure enough the bearing surface was visibly shot. The Y axis bearings didn't sound too bad but it seemed like a good time to check them. As it would be otherwise exposed, the Y axis ballscrew has those conical spring covers to keep swarf and coolant off it. I knew it would be easier to get them off than to get them back on but obviously that didn't hold me back. So now I have the challenge of getting the thing back on.
Sounds easy enough but the large end has to fit into a cylindrical hole that is smaller than the spring wants to be and it is a spring ie wants to be longer than the ballscrew. So it's going to involve coiling it up from the fat end and trying to stop it jumping out as I go. Just to make matters worse, it's as greasy as a very greasy thing and could potentially be quite sharp (=gloves). Being quite sizable, there will be a fair amount of potential energy bound up in it when finally confined. Does anybody have experience of doing this? I'm sure we all have ideas how we might do it but hard earned (bitten?) experience would be helpful at this stage. I don't see any instructions on the few websites that sell them but I may have missed something. In the absense of any btter suggestion, I'm visualising a broomstick and possibly some cable ties to progressively confine it as I gradually cram the genie back in the bottle. Possibly a piece of plastic pipe the right size if I'm lucky. Finally I would feed it onto the ballscrew and release the ties once the bearings are back on. I'm sure it will still be somewhat fraught.... Murray |
| John Haine | 18/02/2017 14:10:27 |
| 5563 forum posts 322 photos | Murray, it's a cop-out but cncyourmyford uses Dyson Van moses to cover the leadscre and keep the swarf out - maybe just replace it? |
| Michael Gilligan | 18/02/2017 14:17:22 |
 23121 forum posts 1360 photos | Posted by Brian Hutchings on 18/02/2017 13:19:10:
My 1858 Burrell Boydell engine is coming along. ... . That's looking lovely, Brian MichaelG. |
| Brian H | 18/02/2017 15:18:52 |
2312 forum posts 112 photos | Posted by Michael Gilligan on 18/02/2017 14:17:22:
Posted by Brian Hutchings on 18/02/2017 13:19:10:
My 1858 Burrell Boydell engine is coming along. ... . That's looking lovely, Brian MichaelG. Many thanks Michael. Brian |
| HOWARDT | 18/02/2017 15:33:12 |
| 1081 forum posts 39 photos | Telescopic spring leadscrew guards come wired fully closed. Put it on the lead screw and assemble completely then release the wire and fit the ends into or over there location. so your first job is to slide it over something, a broom handle and collapse it to wire it up, plastic cable ties may be risky on the sharp edges. |
| SillyOldDuffer | 18/02/2017 15:35:59 |
| 10668 forum posts 2415 photos | Posted by Michael Gilligan on 18/02/2017 14:17:22:
Posted by Brian Hutchings on 18/02/2017 13:19:10:
My 1858 Burrell Boydell engine is coming along. ... . That's looking lovely, Brian MichaelG. +1 from me too. I wish I could produce such good looking work! |
| Iain Downs | 18/02/2017 18:20:52 |
| 976 forum posts 805 photos | An unusually productive day today. I've stripped my lathe down and have been Wyattising it
This fairly nasty piece of work is to keep swarf out ot the saddle gears. In my defence, I broad my fretsaw blade after doing the outside and can't find the 10 I know I have somewhere. The inside was done with a dremel hence the erratic nature (I know - bad workman and so on). The next thing on the lathe is to replace the spindle which I probably mucked up when removing it to replace the gears in my first act of machine destruction. To do that I'm making a press. A bit of 12 inch girder from the scrapyard is the starting point. Chop out some of the middle...
A strikingly challenging task which has consumed 2 angle grinders half a dozen milling cutters, a hacksaw blade, a considerable amount of time and a very large amount of bad language. Today I was boring out the hole in the top with a core drill. The girder *just* fits under my mill, so I was able to mill a flat on the top, but no way will it get a chuck there. and I'd burn out it's little motor.
This worked much better than I expected, though it took 20 minutes or so. I'd managed to get a 10mm hole through with a milling cutter, so I made an 10mm/ .25 adapter for the arbor which work quite well (which is what I've been waiting for to get the lathe back together).
core drill top right, core on the left and the adapter (the drill bit wasn't in of course) at the bottom. I did try and cut an M20 rod on my lathe, but this was not a success, so I invested in one made by a professional. I've got another scrapyard steel block which I will mill out to take an M20 nut and bolt it into the recess. Hey pressto! (sorry).
Iain
|
| Muzzer | 18/02/2017 18:30:52 |
2904 forum posts 448 photos | Posted by HOWARDT on 18/02/2017 15:33:12:
Telescopic spring leadscrew guards come wired fully closed. Put it on the lead screw and assemble completely then release the wire and fit the ends into or over there location. so your first job is to slide it over something, a broom handle and collapse it to wire it up, plastic cable ties may be risky on the sharp edges. Thanks Howard, I guessed that was how they came. So I will focus on getting the genie back in the bottle before letting it loose in situ. I have some giant Tyraps and the edges aren't actually very sharp. The other side is slightly messed up from when I pulled it back to examine the radial bearing (floating, no thrust) at the far end of the ballscrew. I have a feeling that won't be entirely straightforward either. Murray |
| Neil Wyatt | 18/02/2017 18:38:12 |
 19226 forum posts 749 photos 86 articles | Wow, lots of great things happening - well done folks! Neil |
| charadam | 18/02/2017 19:07:53 |
| 185 forum posts 6 photos | Muzzer, How about Jubilee clips to compress the end? |
| John Hinkley | 18/02/2017 19:25:45 |
 1545 forum posts 484 photos | Muzzer, Re: your spring cover dilemma. If you put a rod in your lathe (assuming you have one!) "floating" in the chuck and passing through the spindle to provide lateral support to the spring, slide the uncompressed spring onto it and the secure the other end in a tailstock chuck. Use the tailstock to compress the spring to its limit and tie off with strong wire. Wind the tailstock barrel back in and move the tailstock up to where you left off. Secure the tailstock and repeat the procedure until the spring is sufficiently compressed to go over the mill leadscrew. Would that work? You might even be able to firmly attach one end of the spring to the lathe chuck to impart a bit of windy-uppy action at the same time, should it be needed. I think that's how I'd at least try to do it. Mind you, I'd make sure I used some hefty wire to secure it once compressed. One of those going twang at the wrong time could do some serious damage to you or the surroundings, or both. Good luck! John |
 but I do like 'The Machine Stops'. I'd better shut up now!
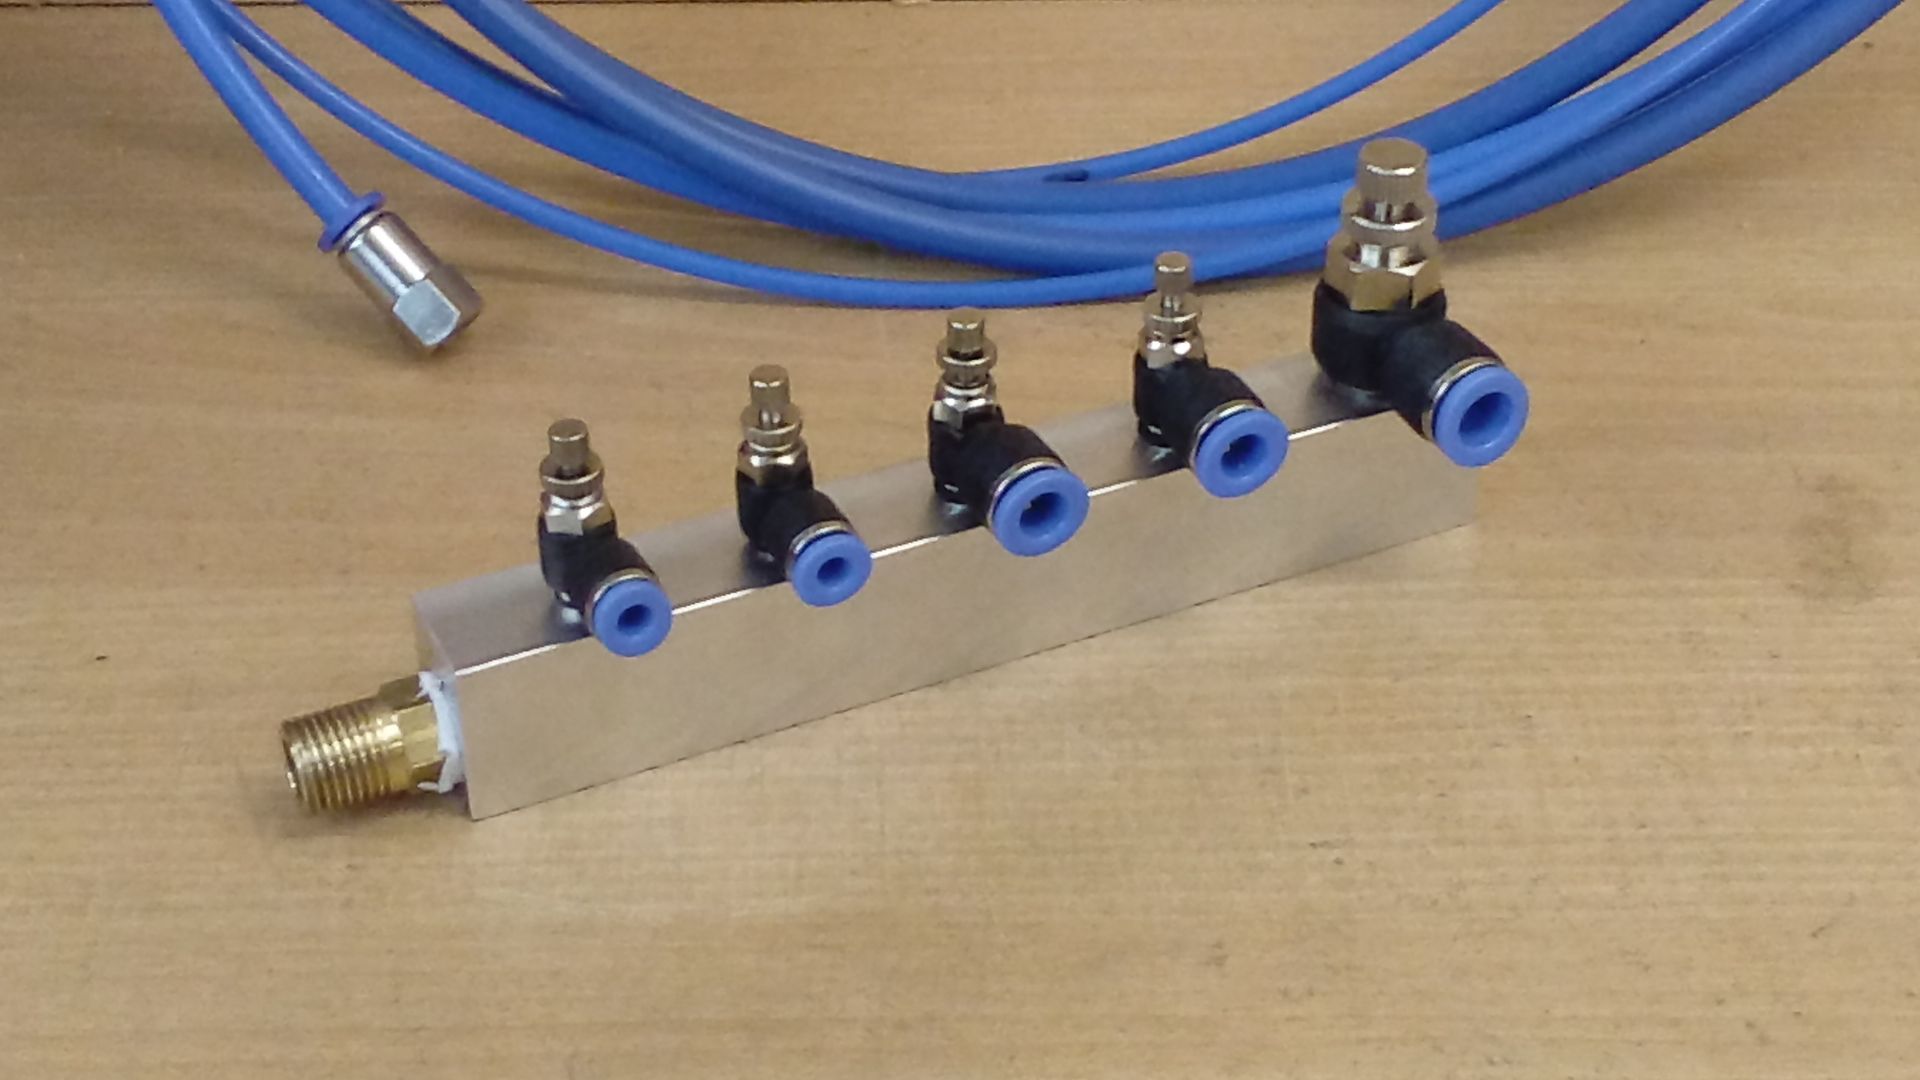


This thread is closed.
Magazine Locator
Want the latest issue of Model Engineer or Model Engineers' Workshop? Use our magazine locator links to find your nearest stockist!
Sign up to our Newsletter
Sign up to our newsletter and get a free digital issue.
You can unsubscribe at anytime. View our privacy policy at www.mortons.co.uk/privacy
Latest Forum Posts
- hemingway ball turner
04/07/2025 14:40:26 - *Oct 2023: FORUM MIGRATION TIMELINE*
05/10/2023 07:57:11 - Making ER11 collet chuck
05/10/2023 07:56:24 - What did you do today? 2023
05/10/2023 07:25:01 - Orrery
05/10/2023 06:00:41 - Wera hand-tools
05/10/2023 05:47:07 - New member
05/10/2023 04:40:11 - Problems with external pot on at1 vfd
05/10/2023 00:06:32 - Drain plug
04/10/2023 23:36:17 - digi phase converter for 10 machines.....
04/10/2023 23:13:48 - More Latest Posts...
- View All Topics
Support Our Partners


Shopping Partners
Subscription Offer

Latest "For Sale" Ads
- Reeves** - Rebuilt Royal Scot by Martin Evans
by John Broughton
£300.00 - BRITANNIA 5" GAUGE James Perrier
by Jon Seabright 1
£2,500.00 - Drill Grinder - for restoration
by Nigel Graham 2
£0.00 - WARCO WM18 MILLING MACHINE
by Alex Chudley
£1,200.00 - MYFORD SUPER 7 LATHE
by Alex Chudley
£2,000.00 - More "For Sale" Ads...
Latest "Wanted" Ads
- D1-3 backplate
by Michael Horley
Price Not Specified - fixed steady for a Colchester bantam mark1 800
by George Jervis
Price Not Specified - lbsc pansy
by JACK SIDEBOTHAM
Price Not Specified - Pratt Burnerd multifit chuck key.
by Tim Riome
Price Not Specified - BANDSAW BLADE WELDER
by HUGH
Price Not Specified - More "Wanted" Ads...
Get In Touch!
Do you want to contact the Model Engineer and Model Engineers' Workshop team?
You can contact us by phone, mail or email about the magazines including becoming a contributor, submitting reader's letters or making queries about articles. You can also get in touch about this website, advertising or other general issues.
Click THIS LINK for full contact details.
For subscription issues please see THIS LINK.
Digital Back Issues


Donate

 Register
 Log-in
Model Engineer Magazine
- Percival Marshall
- M.E. History
- LittleLEC
- M.E. Clock

ME Workshop
- An Adcock
- & Shipley
- Horizontal
- Mill

Subscribe Now
- Great savings
- Delivered to your door

Pre-order your copy!
- Delivered to your doorstep!
- Free UK delivery!
All Forum Topics > Work In Progress and completed items > The Workshop Progress Thread (2017)