Forum sponsored by:

ED Racer 'times two'
| LADmachining | 05/05/2010 10:58:32 |
 126 forum posts 11 photos | Very! Be careful out there!  |
| Ramon Wilson | 20/05/2010 23:29:27 |
 1655 forum posts 617 photos | Hi All
Well as you have probably seen elsewhere sometime has been spent on the anodising process but the parts for the engines were steadily worked on and were finished just over a week ago.
I turned one rotor from the oil filled nylon which looks like Fairy soap and turns a bit like it too! Actually it wasn't that bad and proved to be reasonably dimensionally stable after parting off. Biggest problem was having to do several test holes to establish a decent sized hole to fit the rotor pin freely but without wobble. Reaming it proved a non starter as it just closed in after the reamer was with drawn. The other (and a spare ) was machined from Tufnol and was much easier to do.
As with any new design there were one or two 'tweaks' to get things to fit better - a mm off the first shoulder on the crankshaft to allow the prop driver to go back further and quite a bit off the contra piston length and the cylinder head register to allow the contra piston to rise - still haven't worked out why this was but the maths obviously went a bit awry in this area it appears!
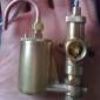
The first full test assembly then with just the anodising to go
 After a strip down and another clean it was time for the anodising and the final assembly
 I decided not to anodise the prop drivers because of the difference in colour up take as described on the anodising thread. Something I shall be aware of in future. That was it then nothing left to do but to try 'em.
The first one tried (steel liner CI piston) fired on the first flick - honestly - but it was only on the exhaust prime! It soon burst into life however and after clearing itself of a bit of fuel settled down to a nice rich run on the 13 x 5 prop revs just over 4000. I have to think of the neighbours so it only ran for about 2/3 mins.
 The second (C/I piston and liner) proved a bit more difficult but this was due to the contra piston not being able to back off enough - more fettling required there - and it proved easier to flood the but once going the run was faster - just short of 7000 but despite a rich setting it began to heat a bit so the run was curtailed after opening the needle right out had little effect on reducing the revs compared to the previous one. I should add that three spray bars were made of differing diameters to see what difference they would give. This second engine had the second smaller dia fitted.
That's it, the end of the project and very enjoyable it has been too. The nice thing about these engines is their relatively short build time.
I will post a few more shots of the engines on the album section and of course just a reminder that most of the machining pics are on this link.
A friend has offered to video them running next week on a decent camera so I'll post the link. In the meantime I hope it's been of interest to some, the feedback I have recieved both here and the other relevant threads has been very encouraging - Thank you all indeed.
Regards for now - Ramon
Edited By Ramon Wilson on 20/05/2010 23:35:07 Edited By David Clark 1 on 27/05/2010 16:02:07 |
| Martin W | 21/05/2010 00:55:55 |
| 940 forum posts 30 photos | Ramon
Truly magnificent what a beautiful pair of engines, a project like that I can only dream of. Thanks for sharing it.
Best regards
Martin |
| Bill Pudney | 21/05/2010 01:01:31 |
| 622 forum posts 24 photos | Ramon, I'm with Martin, absolutely superb. The Racer was always a handsome engine, in my opinion and your two motors are even better! Thanks cheers Bill Pudney Adelaide, Australia p.s. What material did you use for the crankshaft?? |
| Ramon Wilson | 21/05/2010 22:49:50 |
1655 forum posts 617 photos | Thanks Martin, sharing it has been a pleasure - I can learn as well as others thats the great thing about this forum. You too Bill, yes the Racer was always a favourite - my second engine after an AM10 way back in '58! It started me on a long love affair with rear intake motors - always had a weakness for those ever since.
The crankshaft is a composite - the main part including the two bearing diameters the web and crankpin was made from EN24T and was drilled and reamed right through 6.35mm. It was counterbored at the web end 7mm dia for about 8mm deep and the inner shaft was turned to suit from a 8mm caphead bolt to a good push fit and Loctited in. The whole was then turned between centres and the thread screwcut. The only reason I did this was to conserve the rather limited supply of EN24 and of course it does mean a lot less roughing to do.
Thanks again - glad you enjoyed it
Regards - Ramon
PS - I notice the advert overlap has crept back again.
Ian(Circlip), is the long link the culprit? I notice your occasional friendly dig at Terryd for those. If so how does one post a short link ie ones like - "see(here)" ? Can you (or anyone else) cast any light on the matter. Edited By Ramon Wilson on 21/05/2010 22:54:48 |
| Terryd | 22/05/2010 03:33:17 |
 1946 forum posts 179 photos | hI ramon, Thanks for sharing your engines with us. It's been an inspiration watching those little lumps of metal from your first postings grow into such lovely things. Your experiences with anodising have also been interesting, seeing all of those experiments and failures leading to such a success. let us know how the dyes last or if there is any fading over time, I'd be really interested I don't mind the occasional dig from Circlip, I enjoy his posts and he's been really helpful at times. . I've now cracked the 'short' link process.  As I have said, I'm always ready to learn new skills. Nor do I mind taking the rise out of myself. When one has taught for nearly 40 years one learns humility. Unlike some others around on forums  Here's a (hopefully) 'short' link to the C1 lathe at Arc Eurotrade: Easy Peasy (cross fingers , I hope it works!!!) Best regards and thanks, Terry Edited By Terryd on 22/05/2010 03:34:48 Edited By Terryd on 22/05/2010 03:35:55 |
| Frank Dolman | 22/05/2010 10:43:15 |
| 106 forum posts | Ramon, both threads have been exciting and awe inspiring. Not least because of your speed. Quite delighted at your success. |
| Circlip | 22/05/2010 12:33:46 |
| 1723 forum posts | Yippeeeeeeeeeeeeeeeeeeeeeeeeeeeeeeeeeeeeeeeeeeeeeeeeeeeeeeeeeeeeeeeeeeeeeee
Regards Ian.
Just cut it down a bit in case I get Conductified
Edited By Circlip on 22/05/2010 12:39:48 Edited By Circlip on 22/05/2010 12:40:38 |
| Ramon Wilson | 22/05/2010 21:56:24 |
1655 forum posts 617 photos | Ah Terry - so you have but how do you do it? Obviously my plea for help fell on Circlips deaf ears or am I missing something? His cryptic comments are always way beyond my old grey cells comprehension.
I have ordered some different colours from the ebay site but will also try a red and blue ink when I can get up to the city as the green was really powerful. Trouble is it's only 57ml for near £4. It appears inks are no longer available in large sizes except from very specialist - read epensive- suppliers. The colour on the heads was diluted 50/50 so a couple of bottles will make plenty enough for a cylindr head. How long they remain light fast remains to be seen.
That's it for a while - I'm taking some time to revamp the workshop shelving behind lathe and mill. Another thingy in the wood pile is the fact that my wife - shouldn't call her SWMBO really as she is always so supportive of my modelling - has just begun to work part time. Hmmm - could be two days less in't workshop thn!
I have my eyes on another engine to scale up though maybe a glow this time, before that sparkie.
Thanks for the kind comments and all your friendly input - it's much valued.
Regards - Ramon |
| Rob Manley | 23/05/2010 01:00:16 |
 71 forum posts 14 photos | (hope this hasn't already been said but..) I really think this would make a great mini series in the magazine so that our non-internet friends could see. From how you started right through to anodizing. Really enjoyed following it :D. Rob. |
| Terryd | 23/05/2010 06:37:55 |
1946 forum posts 179 photos | Looks like your trick worked Circlip, well done. Terry |
| Circlip | 23/05/2010 09:24:12 |
| 1723 forum posts | Ramon, not a DIG at you or Terry whatsoever, just nurfed off with having to
KEEP asking for the web designers to do the job properly so that long links
will automatically fold over and not dissapear under the "Ads".
Obviously too much to ask while the "Boffins" are trying to create more and
more futile tricks to wind us up.
It were a LOT longer Terry but I chickened out in case I contravened the
"Please refrain from"
Regards Ian.
 PS, The Yippee is that it's up and running and a credit to you. Edited By Circlip on 23/05/2010 09:31:50 |
| Ramon Wilson | 23/05/2010 23:07:30 |
1655 forum posts 617 photos | Hi Ian - and there I was thinking it was some kind of conspiracy
You are soooo right - this overlap issue really is annoying and spoils the reading of the threads - no not just this one - but for all of us when it happens.
If it is the long URL postings that cause it and it looks very much if it does then I would still like to hear from you or Terry (or maybe some one else in the know) just how to actually shorten it to prevent it reoccuring. I would have thought that it was exactly the kind of thing a web editor would look out for and help prevent
Frank sorry to ignore you, not intentional. Thanks for your kind thoughts. Speed comes from those years in a jobbing shop environment I guess - I must admit I never think about that side of things - but as you see above somewhere things could get a little slower in future.
 Rob - thanks to you too, No I don't think anyone has mentioned this on this thread but I have just done something similar for the Nova so I guess they won't want anything too soon but perhaps a piece on the anodising 'adventure' would be in order if DC is interested that is at some stage.
Regards - Ramon
|
| Terryd | 23/05/2010 23:53:04 |
1946 forum posts 179 photos | Hi Ramon, I cracked the method of producing short posts a few days ago and posted the method above, perhaps you missed it? If you type a word such as 'Here' and then highlight it, you then click on the 'link' button at the top of the post window and past or type your link and it is attached to the word. Here is an example Try that, and go to Stuart Models. I hope that this posting isn't edited by David. Cross fingers that I get it through the censorship. Regards Terry Edited By Terryd on 23/05/2010 23:53:35 |
| Ramon Wilson | 24/05/2010 13:42:18 |
1655 forum posts 617 photos | Thanks Terry that seems quite straightforward enough.
Do I have to fill in any of the other boxes or just the URL box?
|
| Terryd | 24/05/2010 21:31:37 |
1946 forum posts 179 photos | Hi Ramon, Just the url, you could change the other preferences if you wish, but it's not neccessary. Glad to be of help, Best regards Terry |
| Alan Worland | 27/05/2010 14:06:00 |
| 247 forum posts 21 photos | Hi Ramon, what a lovely bit of workmanship, a true craftsman bet they sound gorgeous!
Alan |
| David Clark 1 | 27/05/2010 16:08:24 |
 3357 forum posts 112 photos 10 articles | Hi Terry
There is no censorship from me.
Occasionally there is a need to delay messages until a problem is solved.
This thread is messed up, I have managed to fix the two previous pages in this thread but can't see where the problem is in this one.
regards David
|
| Stub Mandrel | 27/05/2010 22:14:31 |
 4318 forum posts 291 photos 1 articles | Crikey Ramon! For some reason I jkkept skipping over this thread, then I noticed the level of interest. Those engines are phenomenal! I grovel down in the face of such achievement! I have a couple of DC engine, a Spitfire and a Merlin IIRC. I flew the Merlin f/f a few times, so i might try starting them up again. Oddly I got along much better with these old engines than more modern ABC ones (Thunder Tiger??) Neil |
| Ramon Wilson | 28/05/2010 22:51:03 |
1655 forum posts 617 photos | Cor! Steady on Neil. You should take a step back and look a fresh look at that lovely crane you have just built. - a very unusual subject and a lovely piece of model making. You should be justifiably proud. I suppose though we never see our own work as others do.
Hi Alan nice to hear from you too, sorry I haven't been in touch - had my 'head down' as you can see. Yes they do 'ring' out a bit. I ran them both today while a friend took a bit of video - not a lot but enough to get a idea. All I have to do now is work out how to get it on here. Hows that 'Magnum' BTW - got it in an airframe yet
Initial two runs have been on a 13 x 5 wood - the CI piston in CI liner so far seeming the free-er of the two though that piston needs to be improved for better compression. Today I ran them with an 12 x 5 to get the revs up - nice and oily so not to get them over heated. The CI piston in steel liner engine probably turning about 7000ish suddenly siezed. Checking it, it was not locked solid but extremely stiff to rotate. Immediate thoughts were the Loctited shaft had failed but after it had cooled a bit the stiffness eased slightly and the piston was moving. Must be the phosi bronze big end bearing on the unhardened crankpin then. No not that either. Turned out to be a 'pick up' between the shaft and the ali in the bore just in front of the main ballrace. Remarkably given the stiffness this was a very narrow band - probably less than half a mil wide but it certainly brought it to a rapid stop. The other thing noticed was the now apparently very slack contra piston - not so slack as to get a compression but too slack to be able to feel its resistance with the comp screw.
The 'pick up' polished out with some 1200 wet and dry and the contra piston was 'grown'
by heat treating - brought to a bright red heat and allowed to soak at that temp for a few mins then left to cool. Sometimes, on cast iron this will increase the diameter of contra pistons and pistons too by a small amount. This one grew just .01mm but without any distortion which allowed it to be used again. I have reclaimed several worn out diesels by this method. It doesn't work all the time and you can't do it twice to the same piece but if the piston or CP is worn you have nothing to lose. Obviously a piston needs to be relapped along with the bore, success depending on the amount of growth but I have seen as much as .04mm which is more than adequate. Not my idea I hasten to add - something that great engine guru George Aldrich wrote about sometime ago.
 Showing the pick up/heat mark in front of the main bearing area
 Shows the pick up inside the bore - (first dark line is gap between case and forward face of bearing - second line is the pick up area).
 Contra piston before heat treatment
 Held at this temp/colour for two - three mins. Left to cool slowly. Not quenched to avoid potential distortion
 Shows the .01 gain - no distortion to the OD circularity.
Hope this is of interest
Regards for now - Ramon |
Please login to post a reply.
Magazine Locator
Want the latest issue of Model Engineer or Model Engineers' Workshop? Use our magazine locator links to find your nearest stockist!
Sign up to our Newsletter
Sign up to our newsletter and get a free digital issue.
You can unsubscribe at anytime. View our privacy policy at www.mortons.co.uk/privacy
Latest Forum Posts
- hemingway ball turner
04/07/2025 14:40:26 - *Oct 2023: FORUM MIGRATION TIMELINE*
05/10/2023 07:57:11 - Making ER11 collet chuck
05/10/2023 07:56:24 - What did you do today? 2023
05/10/2023 07:25:01 - Orrery
05/10/2023 06:00:41 - Wera hand-tools
05/10/2023 05:47:07 - New member
05/10/2023 04:40:11 - Problems with external pot on at1 vfd
05/10/2023 00:06:32 - Drain plug
04/10/2023 23:36:17 - digi phase converter for 10 machines.....
04/10/2023 23:13:48 - More Latest Posts...
- View All Topics
Support Our Partners


Shopping Partners
Subscription Offer

Latest "For Sale" Ads
- Reeves** - Rebuilt Royal Scot by Martin Evans
by John Broughton
£300.00 - BRITANNIA 5" GAUGE James Perrier
by Jon Seabright 1
£2,500.00 - Drill Grinder - for restoration
by Nigel Graham 2
£0.00 - WARCO WM18 MILLING MACHINE
by Alex Chudley
£1,200.00 - MYFORD SUPER 7 LATHE
by Alex Chudley
£2,000.00 - More "For Sale" Ads...
Latest "Wanted" Ads
- D1-3 backplate
by Michael Horley
Price Not Specified - fixed steady for a Colchester bantam mark1 800
by George Jervis
Price Not Specified - lbsc pansy
by JACK SIDEBOTHAM
Price Not Specified - Pratt Burnerd multifit chuck key.
by Tim Riome
Price Not Specified - BANDSAW BLADE WELDER
by HUGH
Price Not Specified - More "Wanted" Ads...
Get In Touch!
Do you want to contact the Model Engineer and Model Engineers' Workshop team?
You can contact us by phone, mail or email about the magazines including becoming a contributor, submitting reader's letters or making queries about articles. You can also get in touch about this website, advertising or other general issues.
Click THIS LINK for full contact details.
For subscription issues please see THIS LINK.
Digital Back Issues


Donate

 Register
 Log-in
Model Engineer Magazine
- Percival Marshall
- M.E. History
- LittleLEC
- M.E. Clock

ME Workshop
- An Adcock
- & Shipley
- Horizontal
- Mill

Subscribe Now
- Great savings
- Delivered to your door

Pre-order your copy!
- Delivered to your doorstep!
- Free UK delivery!
All Forum Topics > I/C Engines > ED Racer 'times two'