Forum sponsored by:

Todays update from Bodgers Lodge
| jason udall | 22/05/2014 13:16:34 |
| 2032 forum posts 41 photos | John..you save your "precision"..for the finished part. The intermediate steps and or tooling are just that. For some the clearance between a washer and the bolt would need honing..fine if that's your interest..but polish does not equate to good engineering..as you know...good on you. Maybe if more of us were brave enough to show this sort of thing then maybe less people would turn away from what can appear elitist. |
| Oompa Lumpa | 22/05/2014 13:22:42 |
| 888 forum posts 36 photos | Looking at the finished tip ("finished" being loosely applied here) I see the striations from the grinder go mostly in the up/down orientation. Wouldn't it be better if they went from left to right, or vice versa? graham. |
| Rik Shaw | 22/05/2014 20:43:46 |
 1494 forum posts 403 photos | "When grinding or lapping tungsten you must always grind or lap in the direction of cut when mounted on the lathe, so up/down rather than across." Just so John and true the carbide may well fracture and chip but de-laminate it will not. Cemented Tungsten Carbide is not of a laminate structure. Sorry to be a bit picky but my local Ford service centre has REALLY hacked me of today so nothing personal mate. (Peugot next time I think). Rik |
| ChrisH | 23/05/2014 10:11:06 |
| 1023 forum posts 30 photos | Now I do like this thread - a 'life in the real world' thread if ever there was one. Keep it going JS, all good stuff, Chris |
| Gray62 | 23/05/2014 10:57:10 |
| 1058 forum posts 16 photos | John, whats the spec of the MIG wire you are using, I've got a couple of old motors here with knackered shafts so fancy having a go at a repair Graeme |
| John Stevenson | 23/05/2014 13:04:27 |
 5068 forum posts 3 photos | Graeme, Mostly just common or garden MiG wire although I do keep one welder with some better quality wire on for things like the Bridgy rotors that are a wear item. Usually everything on a motor is pressed or bolted up solid so if it's all tight, it should stay tight.
This one landed a short while ago.
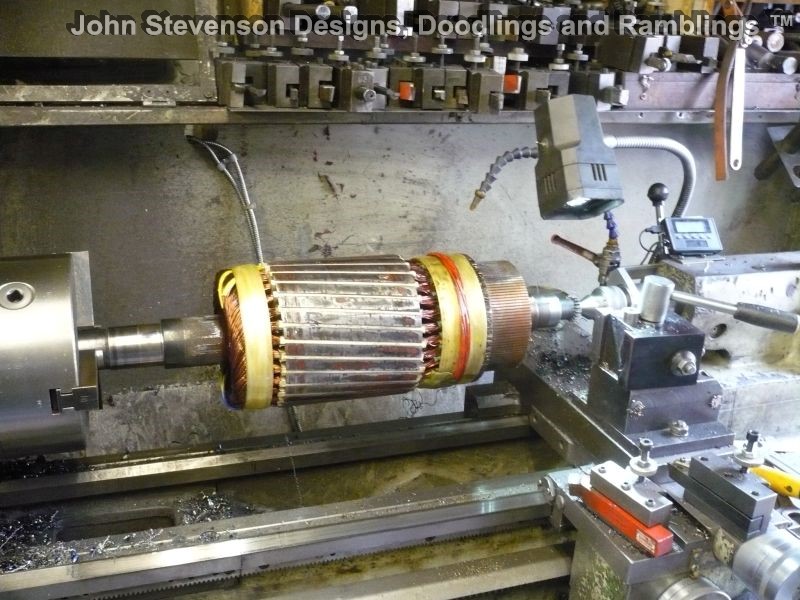
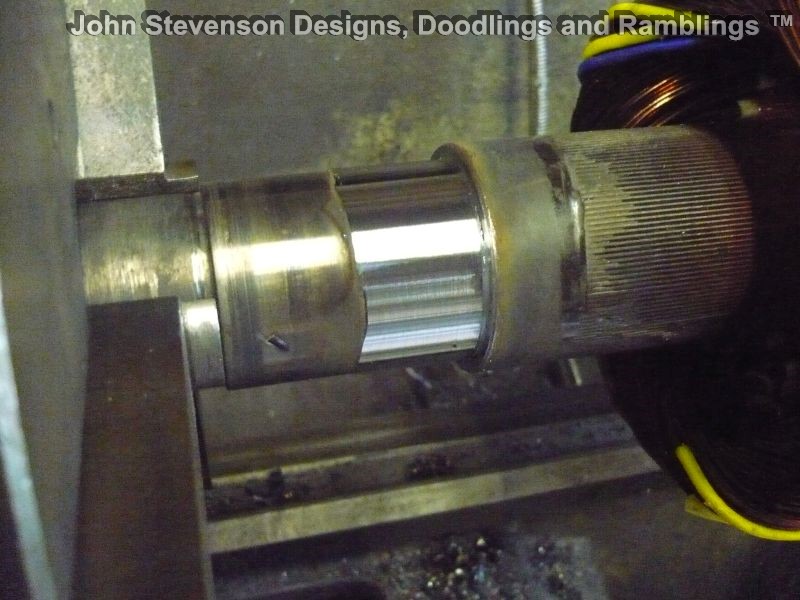
Typical Friday job seeing as Friday 'should' be play day. Armature out of god knows what [ does it even matter ? ], both bearing surfaces worn. Annoying job this in that it's been rewound and they have only just found out the journals are down so panic stations - a-gain [ best Forrest Gump voice ] Worn journals.
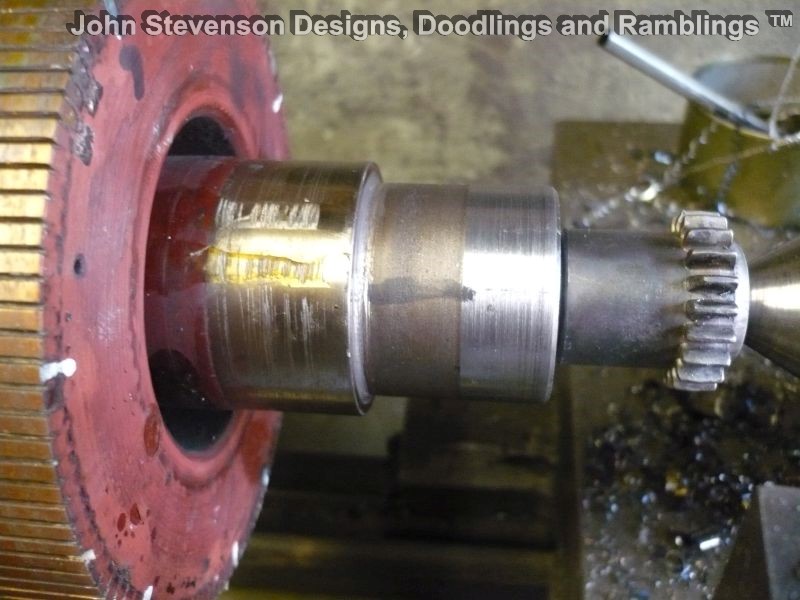
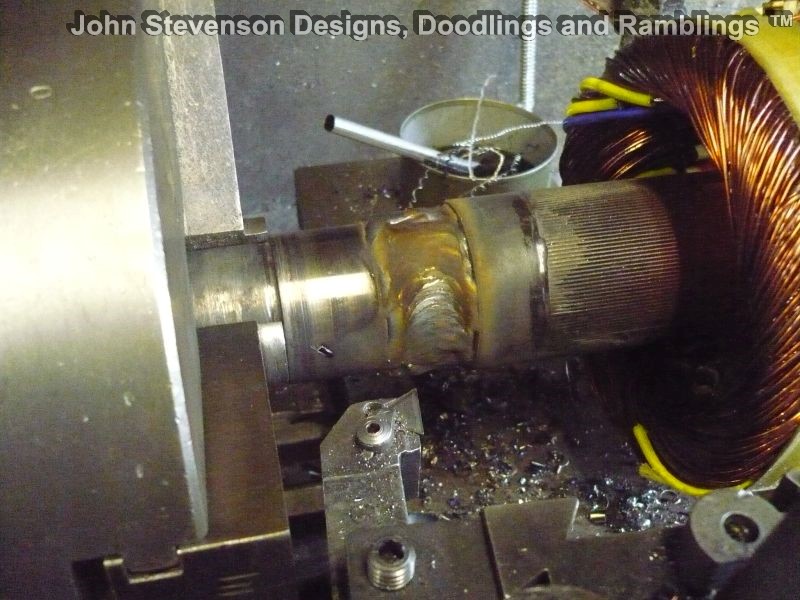
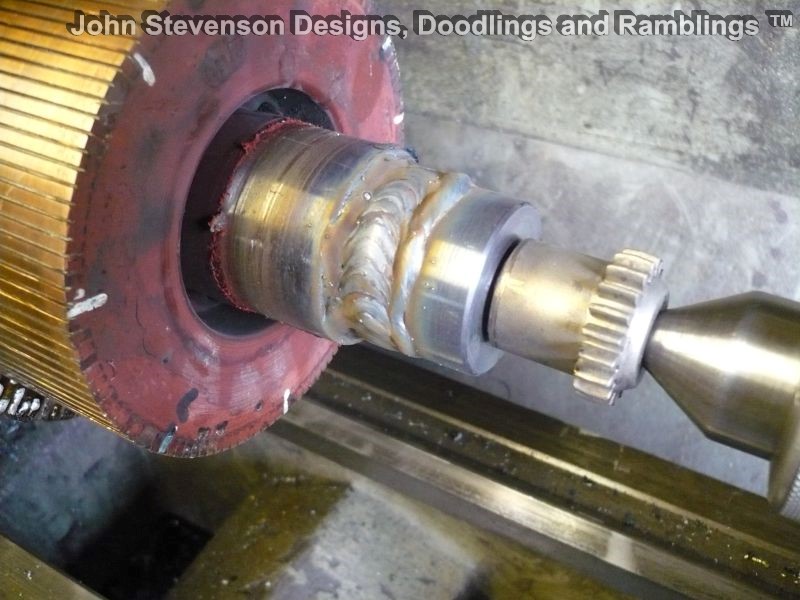
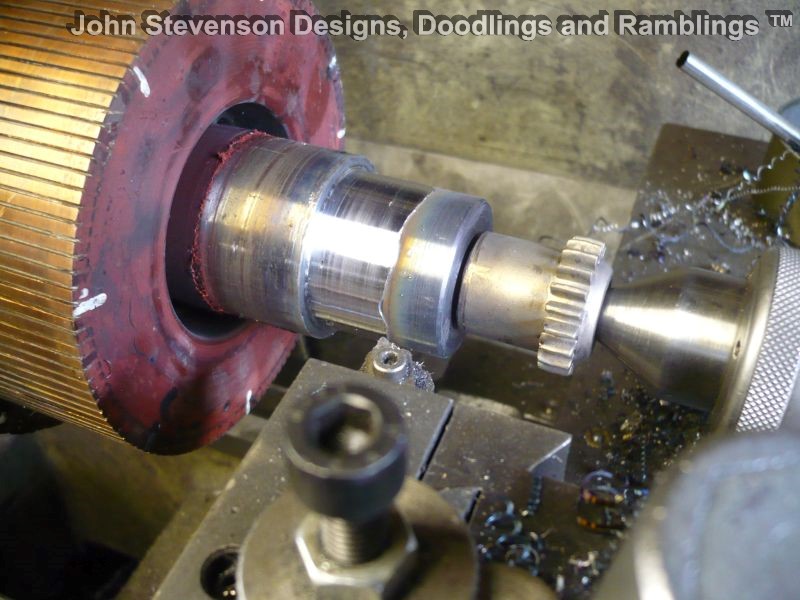
So machine under size by about 1 to 2 mm not critical, the idea is the get the weld transition point below finished size as you can sometimes get flaking and you need some depth to the weld.
Throw on the precision welding bench that was thinly disguised the other day as the precision grinding bench and stick some weld on. Just plain of the shelf MiG wire. I can get the spec off the box if needed but it won't be anything special as I usually bulk buy the cheapest I can get in 15KG reels.
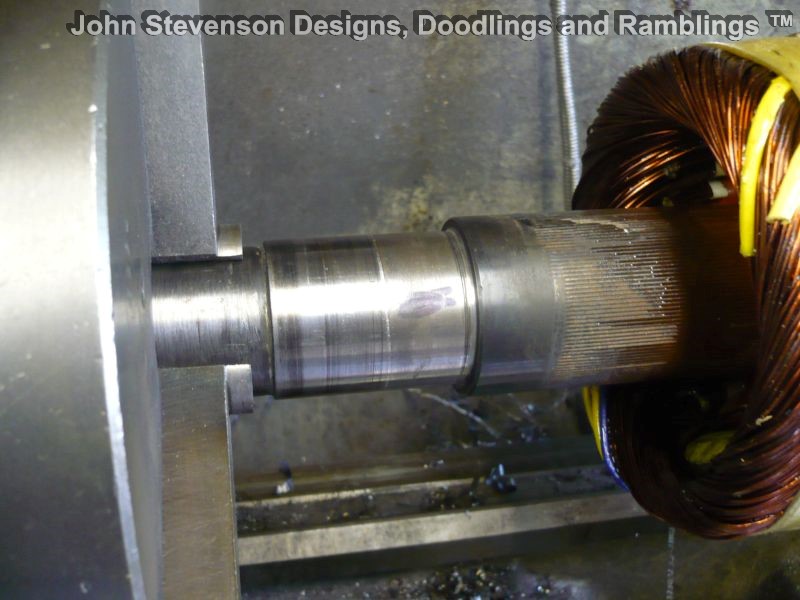
Then skim whilst still hot. Remember the chicken, plucks better when warm.
Both these diameters are about 0.5mm up on finished size as they are still hot so came in to answer this post, get a coffee and a bite whilst it all dries.
Doesn't take a lot of doing or fancy equipment, if anyone wants to check the pictures there is 20 minutes from first to last and probably another 10 minutes to finish off. Then wait an hour before you ring them, don't want them knowing how easy it is
Seriously they are not bothered, they all used to run their own machine shops and still do for small jobs like skimming comms but all other work is farmed out as it works out cheaper in the long run. |
| Martin Cottrell | 23/05/2014 17:57:06 |
| 297 forum posts 18 photos | Posted by ChrisH on 23/05/2014 10:11:06:
Now I do like this thread - a 'life in the real world' thread if ever there was one. Keep it going JS, all good stuff, Chris Couldn't agree more Chris, nothing more satisfying than seeing a "quality bodger" at work! Keep it coming John! Kind regards, Martin. |
| OuBallie | 24/05/2014 13:19:37 |
 1181 forum posts 669 photos | JohnS, How did you discover the trick of machining the weld whilst it was still hot? Anyone have the tech details of why this is so? Geoff - Drawer organising finished! Promise! |
| John McNamara | 24/05/2014 14:21:38 |
 1377 forum posts 133 photos | hi All Maybe this is the reason At around 600 degrees Centigrade Steel softens, I would think that is the reason John S finds it easier to machine the weld hot, it is easier to cut. Also if the rotor shaft is alloy or carbon steel it is not likely to be chilled (hardened) when cooling in air possibly forming a hard skin. Near red heat will not worry the carbide cutting tip. If you click on the graphs below you can follow them back to the source site. Regards |
| John Stevenson | 28/05/2014 22:08:26 |
5068 forum posts 3 photos | First off my apologies from the bodgers lodge on the quality of the first picture. Taken at 3:42 it was eight minutes short of my mid afternoon intravenous caffeine transplant.
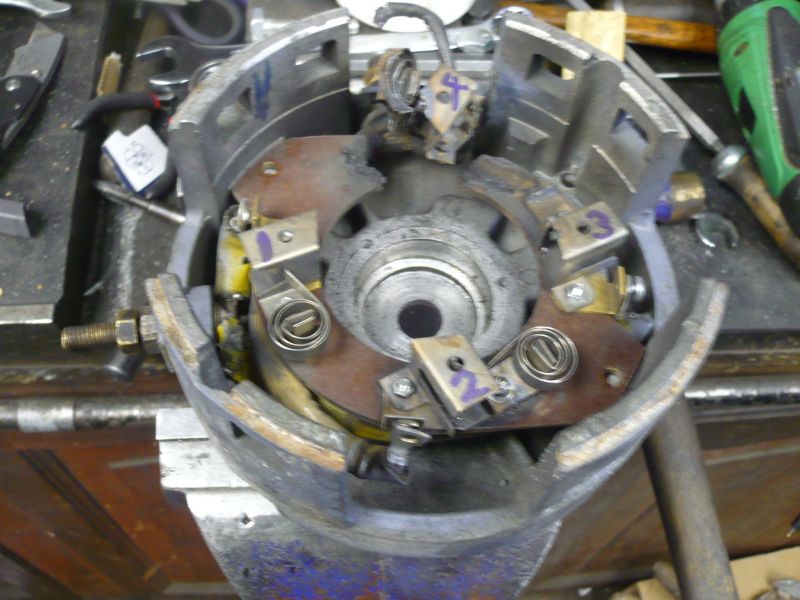
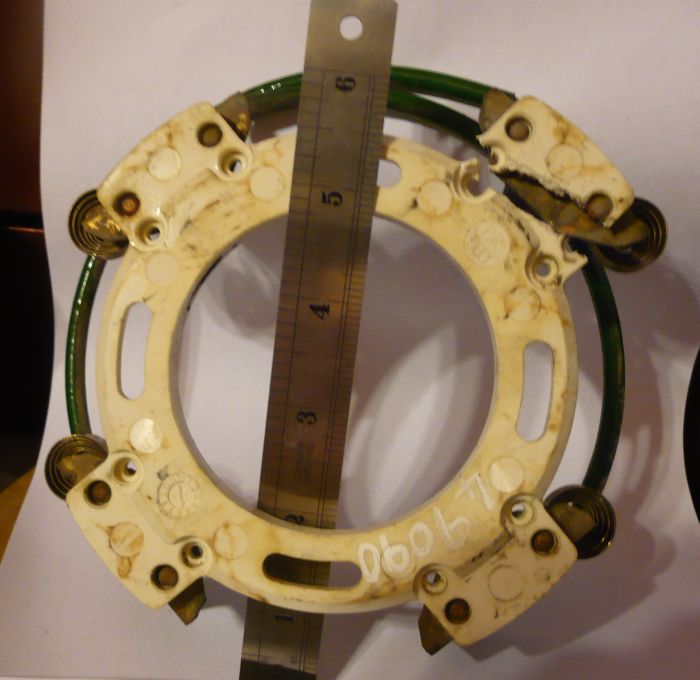
End cover off a fork truck motor, apparently when they run these with flat batteries the volts go down but the amps increase and the revs drop so no cooling and they over heat and often catch fire. In this case the brush ring is toast and no 4 brush holder is well past it's use by date and no3 holder has lost the upstand for the spring. According to the rewinders a new motor is £1760
Usually these are a quite easy job because as a rule only a new brush ring is needed as they usually have loads of dead motors to rob brush boxes off, never rings as they are always burnt out. This one isn't that beefy in that it's only 4mm thick tufnol. A few years ago these would have been band sawn out of a tufnol sheet then turned, milled and drilled to shape. Some of the more complex ones like this one.
Would have taken a couple of hours to do.
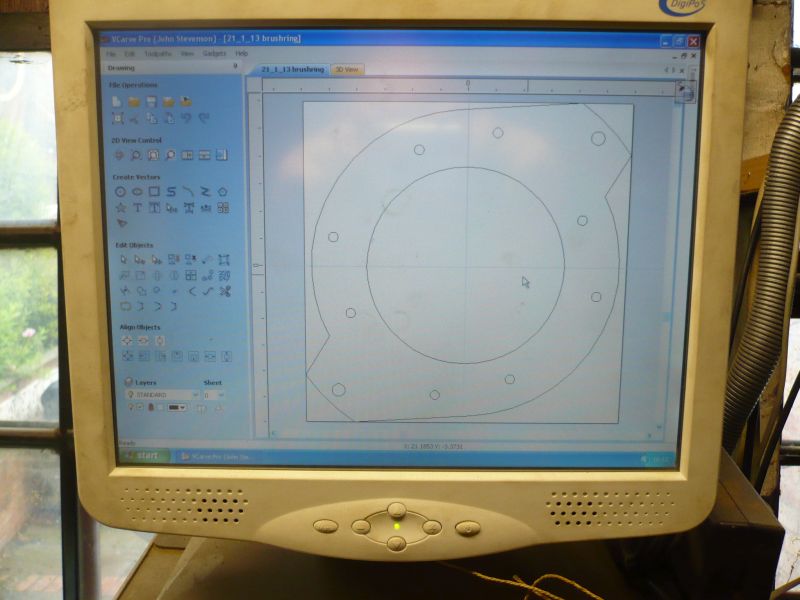
However fast forwards to today's well equipped bodging shop and it's quicker to draw this out in CAD then get the code off the drawing for the little desktop router to spit out.
So eight minutes later as the caffeine has chance to mainline we get a simple drawing.
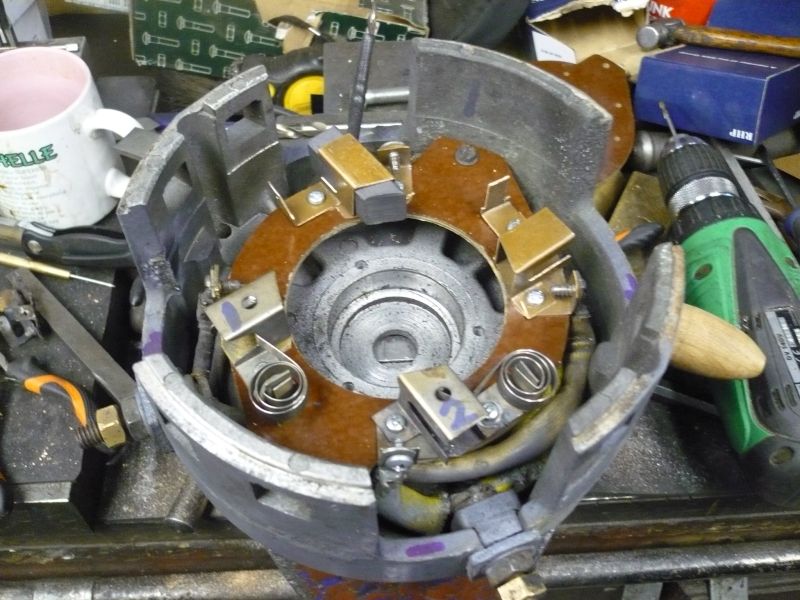
And twelve minutes after this we get a nearly finished brush ring.
However the finished job is still a couple of hours away because of the missing brush boxes and spring supports.
I must admit I find sheet metal work arduous, tiresome and like trying to weld pasta. In the case of these fiddly boxes from 0.75mm brass that wants to bend everywhere but where I want it to I seem to spend more time than the job warrants.
Anyway finished, the sample brush slides in and out easily without binding or flopping about and it doesn't look like someone has kicked a baked bean tin down the hard shoulder to Milton Keynes, [ as it usually does ]
So another happy camper and another £3 17s and 6d in the bank with a bit of luck. Edited By John Stevenson on 28/05/2014 22:10:22 |
| Brian Wood | 30/05/2014 09:34:33 |
| 2742 forum posts 39 photos | Thank you John for starting this utterly practical and informative thread. I for one have found these windows into your business world very interesting, showing as they do that what many might regard as job stoppers can be salvaged and turned around with admirable speed. Please keep them coming. Regards Brian
Edited By Brian Wood on 30/05/2014 09:35:40 |
| Rik Shaw | 30/05/2014 10:31:38 |
1494 forum posts 403 photos | John - Looks like Brian is volunteering to be your PR manager. |
| John Stevenson | 30/05/2014 10:53:12 |
5068 forum posts 3 photos | As long as he works cheaper than me he's got the job. |
| Brian Wood | 30/05/2014 11:15:58 |
| 2742 forum posts 39 photos | What's the going rate John? I'll work out a start date as your man Oop North!. Brian Edited By Brian Wood on 30/05/2014 11:17:59 |
| John Stevenson | 30/05/2014 14:01:11 |
5068 forum posts 3 photos | Friday again init ?
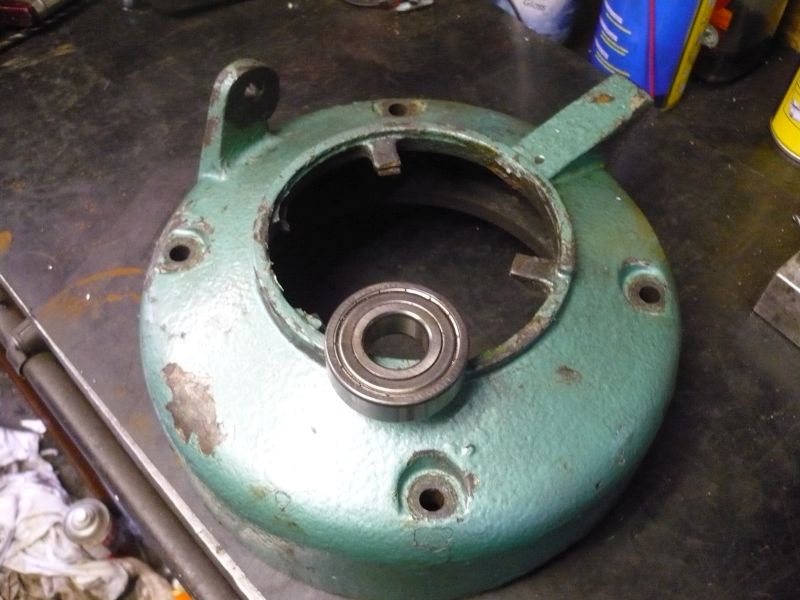
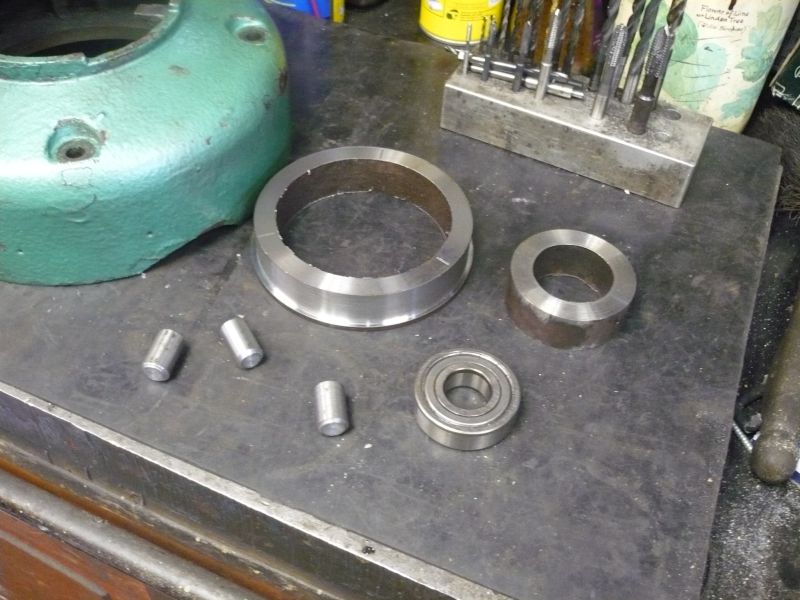
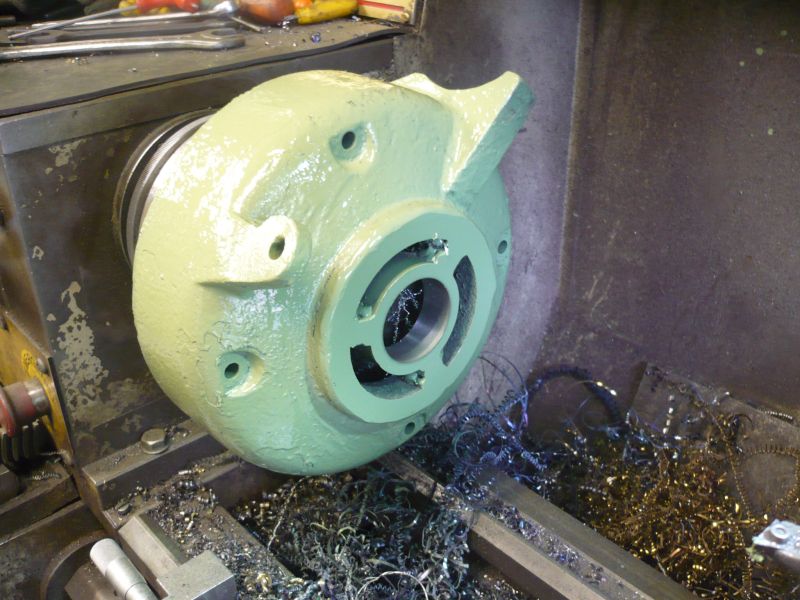
Judging by the build up inside on various diameters it's off some sort of pump. Should be a boos in the middle to take the bearing but it's gone walkabout somewhere. Told can't use a solid plate as it needs vent slots in it.
So raid the scrapbinium rack and get this lot.
Followed by a bit of judicial hammering, banging, crashing and weld it where it touches and we get.
Just so not to upset the flat earth society it got wafted with one of Mr Warco's finest rattle cans which should also
First pic timed at 12:13, last pic timed at 1:13.
Can I get me diner now ?
Brian, you up to handling the PR ? |
| Brian Wood | 30/05/2014 14:39:35 |
| 2742 forum posts 39 photos | John, It depends on what's involved---some clues please and how much you expect is needed. Brian |
| Michael Gilligan | 30/05/2014 16:03:22 |
 23121 forum posts 1360 photos | John, Great work on that motor end-cap !! On another thread, there is mention of this BCA Mk.3 Jig Mill which has some of the worst tee-slot damage I have ever seen. It would be an education for us all if you could tell how you would go about fixing something like this. The Seller has suggested one approach, and I would probably do it differently; but if anyone knows the quick and effective method, it's likely to be you. MichaelG. . Edit: added link to thread.
Edited By Michael Gilligan on 30/05/2014 16:06:03 |
| Rik Shaw | 30/05/2014 16:56:25 |
1494 forum posts 403 photos | BCA bodge? Just mill 4 x new "T" slots at 45 degrees to the damaged ones and you're done! Rik |
| Michael Gilligan | 30/05/2014 17:58:35 |
23121 forum posts 1360 photos | Rik, I can't find the "smiley" that depicts "sticking two fingers down my throat and retching" MichaelG. |
| Neil Wyatt | 30/05/2014 18:22:34 |
 19226 forum posts 749 photos 86 articles | J B Weld?
Neil |

Please login to post a reply.
Magazine Locator
Want the latest issue of Model Engineer or Model Engineers' Workshop? Use our magazine locator links to find your nearest stockist!
Sign up to our Newsletter
Sign up to our newsletter and get a free digital issue.
You can unsubscribe at anytime. View our privacy policy at www.mortons.co.uk/privacy
Latest Forum Posts
- *Oct 2023: FORUM MIGRATION TIMELINE*
05/10/2023 07:57:11 - Making ER11 collet chuck
05/10/2023 07:56:24 - What did you do today? 2023
05/10/2023 07:25:01 - Orrery
05/10/2023 06:00:41 - Wera hand-tools
05/10/2023 05:47:07 - New member
05/10/2023 04:40:11 - Problems with external pot on at1 vfd
05/10/2023 00:06:32 - Drain plug
04/10/2023 23:36:17 - digi phase converter for 10 machines.....
04/10/2023 23:13:48 - Winter Storage Of Locomotives
04/10/2023 21:02:11 - More Latest Posts...
- View All Topics
Support Our Partners


Shopping Partners
Subscription Offer

Latest "For Sale" Ads
- Reeves** - Rebuilt Royal Scot by Martin Evans
by John Broughton
£300.00 - BRITANNIA 5" GAUGE James Perrier
by Jon Seabright 1
£2,500.00 - Drill Grinder - for restoration
by Nigel Graham 2
£0.00 - WARCO WM18 MILLING MACHINE
by Alex Chudley
£1,200.00 - MYFORD SUPER 7 LATHE
by Alex Chudley
£2,000.00 - More "For Sale" Ads...
Latest "Wanted" Ads
- D1-3 backplate
by Michael Horley
Price Not Specified - fixed steady for a Colchester bantam mark1 800
by George Jervis
Price Not Specified - lbsc pansy
by JACK SIDEBOTHAM
Price Not Specified - Pratt Burnerd multifit chuck key.
by Tim Riome
Price Not Specified - BANDSAW BLADE WELDER
by HUGH
Price Not Specified - More "Wanted" Ads...
Get In Touch!
Do you want to contact the Model Engineer and Model Engineers' Workshop team?
You can contact us by phone, mail or email about the magazines including becoming a contributor, submitting reader's letters or making queries about articles. You can also get in touch about this website, advertising or other general issues.
Click THIS LINK for full contact details.
For subscription issues please see THIS LINK.
Digital Back Issues


Donate

 Register
 Log-in
Model Engineer Magazine
- Percival Marshall
- M.E. History
- LittleLEC
- M.E. Clock

ME Workshop
- An Adcock
- & Shipley
- Horizontal
- Mill

Subscribe Now
- Great savings
- Delivered to your door

Pre-order your copy!
- Delivered to your doorstep!
- Free UK delivery!
All Forum Topics > Workshop Techniques > Todays update from Bodgers Lodge