Forum sponsored by:

What Did You Do Today 2019
| V8Eng | 09/03/2019 21:42:37 |
| 1826 forum posts 1 photos | Posted by Limpet on 09/03/2019 19:54:31:
Not just today but last week acquired this ML7, it needed a little TLC
It's now in a lot of bits - anyone know how it goes together
Nice work there Limpet, I was wondering how to lighten mine prior to moving it, now I know😉. What are the bedways looking like wear wise after de-rusting? Expect you will find the odd homeless washer after re-assembly anyway😉 Edited By V8Eng on 09/03/2019 21:49:15 |
| Limpet | 10/03/2019 08:03:59 |
| 136 forum posts 5 photos | Swarf, Mostly! Thanks for the parts listing, useful info V8Eng I suspect the reassembly may take a little longer - the bedways look good so is worth the effort. I may even put a few extras in like clutch, ball racees on the feedscrtews and DRO still deciding Luckily I still have the DB8 to use until it goes when this is working. I'll post up what's left over so was obviously not needed in the first place :0 :0 :0 |
| DrDave | 14/03/2019 21:34:10 |
| 264 forum posts 52 photos | Went to Oxford to collect a rotary table that I bought. When I got home, I found a high speed drill press that had snuck into the boot while I was not watching. Seriously, though, I have been after one to replace my el Cheapo drill for some time & the gent that I visited offered it to me at a price that I could not refuse. The drill is by Multico, but there is no other info that I can see. I cannot find any info on lathes.co.uk about this machine: does anyone have any info about it? The three speeds would be a start! |
| Michael Gilligan | 14/03/2019 21:57:42 |
 23121 forum posts 1360 photos | Posted by DrDave on 14/03/2019 21:34:10:
When I got home, I found a high speed drill press that had snuck into the boot ... The drill is by Multico, but there is no other info that I can see. I cannot find any info on lathes.co.uk about this machine: does anyone have any info about it? The three speeds would be a start! . Best known for their Chisel Mortisers, I believe: **LINK** https://www.scosarg.com/leaflets/Multico/Multico%20mortiser%20range.pdf But you might find what you seek in the parent directory: https://www.scosarg.com/leaflets/Multico/ MichaelG. Edited By Michael Gilligan on 14/03/2019 21:59:38 |
| DrDave | 14/03/2019 22:18:45 |
| 264 forum posts 52 photos | Thanks for providing those links, Michael. I looked through the pdfs, but no sign of my “new” drill. I’ll put a photo in my album tomorrow to see if that stirs any further memories from anyone. Dave |
| Andrew Johnston | 18/03/2019 20:57:05 |
 7061 forum posts 719 photos | After many months of fighting bullders, kitchen designers and kitchen fitters I'm on the home leg of getting my new kitchen done and dusted. The main downside is that I've been banned from putting the traction engines back into the new kitchen. On the plus side I've had some "me" time this afternoon (and also tomorrow) so I've been able to restart on the traction engines. I've started to make some press tooling so that I can form the rear wheel strakes to the correct shape. The first operation is to clean and square up some lengths of hot rolled steel. I thought this would be a good chance to try some of the slab mills I bought ages ago on Fleabay. First operation is to clean up the narrow surfaces:
The HSS cutter is 4" diameter and 4" long. Cutting parameters were 88rpm, 160mm/min feedrate (with 20 teeth about 3.6 thou per tooth), width of cut just over 1.5" and depth of cut 0.1". A bit of vibration but nothing serious. The fuzzy grey area behind the cutter is steam. I tried doubling the depth of cut but the cutter pulled the work out of the vice. Once the sides were cleaned up I started on the wider sides:
Same spindle speeds and feeds with a WOC of 2.5" and DOC of 0.02". I've only got about 40thou to play with in terms of bringing the work to thickness. Clearly I've still got a lot to learn about using man size cutters. I don't think I'm ever going to manage to stall the horizontal mill, unlike the Bridgeport. Andrew |
| Boiler Bri | 18/03/2019 21:18:37 |
 856 forum posts 212 photos | Started to take the masking tape of all the bits and pieces for my 4" Durham engine after painting all the black bits, ready to rebuild it. At work. Riveted the strakes on the back wheels which can now be put on the jig ready for the spokes riveting.
I tried to up load photos to my files, which I have not done for a while, for some reason they will not load up. I will try from a PC tomorrow.
BRI |
| Nigel Graham 2 | 18/03/2019 21:59:19 |
| 3293 forum posts 112 photos | Continued putting my Harrison L5 Lathe back into use. By today I'd already given it a 3ph conversion courtesy of Newton-Tesla (I told them the machine and they chose the appropriate conversion set.) The new motor is on an adjustable bracket arrangement on the steelwork for what will be an overhead hoist arrangement, and above the headstock. This puts the motor up into cleaner conditions and allows the lathe to go back close to the wall. I made the adjustable tie-bars involved, from bits of scrap miniature-railway track. The original, large, 1-ph motor was on a massive steel box welded to the back of the cabinet, too greedy of space in a cramped workshop so now very un-welded. I'll also need to chop the original change-wheel guard, or make a custom one.. The inverter and "pendant" control-box live on the wall above the tailstock.
Today's task was adding oil to the headstock and replacing the cover, with a new greaseproof paper gasket cut from the bag inside a cornflakes box. Then oiling round, and carefully testing the machine. Finally, sorted out the "pre-owned" QC tool-post I'd acquired for it. It needs appropriate stud bushes but they are no problem. However, I discovered the three blocks with it, all have the same clamping and guide grooves but slightly different tool channels and screw-threads! For consistency so I need just the one key I have, I will have to make the replacements for missing locking and clamping screws, with square heads are equal across the set. So that's the next shopping-list: more QC blocks (2 or 3 more will probably be sufficient), and replacing missing change-wheels.
Ummmm, how can anything be "pre-owned (pre- booked / ordered / existing)? Unless you are Doctor Who?
|
| Neil Wyatt | 18/03/2019 22:29:16 |
 19226 forum posts 749 photos 86 articles | I wanted a PSU for guitar effects pedals, should be 9V. Found a lovely old 10V 1amp nominal transformer PSU notable for having both a thermal fuse in the mains line and a self-resetting thermal trip on the output, as well as oversize laminations. Lovely little bit of kit, but 15.7V off load. Luckily the inside was also well laid out with a neat cradle for the transformer and the rectifier circuit board and not remotely crowded so plenty of air-space for a regulator. Digging in the bits box found a 7805 and a 3.6V zener, so with the zener on the middle pin I got a nice solid 8.6V which will be fine. Nice neat job of piggybacking the extra components on the existing PCB with some insulation tape and heat-shrink tube to avoid any risk of a short out. The pedals all consume about 10-15mA except one with a tuning readout that's 85mA in 'daylight mode', so max about 120mA so no worries about overheating. Very simple job, but satisfying to give such a well made bit of kit a new life. |
| Mark Rand | 19/03/2019 00:02:28 |
| 1505 forum posts 56 photos | Spent the day nailing up a bit of plasterboard to finish a built in cupboard location and then stripping wallpaper for the rest of the day. Desperately waiting for the delivery of some 6-32x1/8" grub screws from Emkay so I can retreat back to the safety of the shed... |
| Andrew Johnston | 19/03/2019 20:23:24 |
7061 forum posts 719 photos | More progress on the press tooling. The parts were machined to length on the vertical mill, and the curved surface on the press tool base machined on the CNC mill:
The CAM was set to leave a scallop height of 0.05mm. That's probably ok as it is, but a few minutes with a fine file will knock off the peaks. The finish feels better than it looks:
It's most likely that I will be forming the strakes hot so whatever the finish it isn't going to look pristine by the time I've finished. I also made a threaded spigot to hold the moveable part of the press tool in the flypress. The thread chosen was 3/4" BSW at 10tpi, screwcut at 180rpm with a full form profile insert:
Back to work tomorrow, so the press tooling is now on hold. Andrew |
| Nigel Graham 2 | 19/03/2019 20:33:40 |
| 3293 forum posts 112 photos | Was supposed to have had a visitor but he'd fallen ill. My model-engineering society was to have had a Magic Lantern demonstration this evening but the speaker (himself a society member) had fallen ill. Spent some hours trying to progress my Hindley wagon-engine's design.... I'm not sure which is harder, designing an enclosed, inverted-vertical compound engine with Stephenson's Link Motion, or learning to draw it by CAD! |
| JasonB | 19/03/2019 20:34:45 |
 25215 forum posts 3105 photos 1 articles | Looking good Andrew, have you made the former to the wheel rim radius or a bit tighter to allow for some spring back? |
| Andrew Johnston | 19/03/2019 20:49:16 |
7061 forum posts 719 photos | I've set the radius of the press tool to 10", whereas the radius of the wheel is 11.75". I used CAD to determine the radius as it means the strakes will be curved 2 thou or so too much at the outer edges. I hope that means they'll be a nice fit on the outer edges. The rivets may pull the parts together as well. The strakes are 1/4" thick and to match the wheel radius only need to move about 20 thou at the edges, so I suspect that springback would be a real problem, especially forming cold. That's why I think I'll need to form hot. But I'll experiment once I've finished the tooling. Andrew. |
| Mike Poole | 19/03/2019 21:28:16 |
 3676 forum posts 82 photos | Posted by Andrew Johnston on 18/03/2019 20:57:05:
The HSS cutter is 4" diameter and 4" long. Cutting parameters were 88rpm, 160mm/min feedrate (with 20 teeth about 3.6 thou per tooth), width of cut just over 1.5" and depth of cut 0.1". A bit of vibration but nothing serious. The fuzzy grey area behind the cutter is steam. I tried doubling the depth of cut but the cutter pulled the work out of the vice. Andrew One of the lads had the same problem when we were apprentices, it put some savage gashes in the job as it hauled it out of the vice, Slab cutters have a long cutting edge so they are probably one of the biggest single loads for a mill, like you say you are probably not going to run out of power as the machine is probably speced for gang milling so one slab mill is not going to bring things to a halt. It might be worth swinging the Kurt round so the cutting force is against the fixed jaw, it looks as though the vice is big enough to clamp the job endways to still cut in one pass. Mike |
| Windy | 20/03/2019 00:29:58 |
 910 forum posts 197 photos | As I have a strong interest in mechanical speed machines I went to Elvington Top Speed meeting today. Little did I know I was being set up by friend Roger, Andy Lincoln Smith and his wife Helen. Andy brought his BSA C10 and let me sit on it then Helen said your riding it doing the measured Top Speed mile. A group of speed nuts had brought the riding gear for me. I had not ridden a motorbike for 40 years What a nostalgia trip on that 2 mile runway a bit more sedate to 1974's 207.9mph run. That model BSA was my first motorbike bought in 1969 for £10 they now fetch £2600. You have to watch out 40mph can be achieved ha,ha. Then back home and got back in the workshop to do some work on my pumps. The competitors you meet some are involved in ME and full size projects connected to speed |
| Bazyle | 20/03/2019 13:01:52 |
 6956 forum posts 229 photos | A skip gave me a defunct 100w LED floodlight. Chip dead of course and I wouldn't want something so big. The psu is good but 36v constant current 100w is potted so not worth trying to modify. What use is it except driving LEDs? A new smaller floodlight is cheaper than a replacement lower power psu so I think the heavy alloy casting is best melted down. Must get into this home casting aspect of the hobby. |
| Neil Wyatt | 20/03/2019 21:19:36 |
19226 forum posts 749 photos 86 articles | Posted by Windy on 20/03/2019 00:29:58:
As I have a strong interest in mechanical speed machines I went to Elvington Top Speed meeting today. Little did I know I was being set up by friend Roger, Andy Lincoln Smith and his wife Helen. Andy brought his BSA C10 and let me sit on it then Helen said your riding it doing the measured Top Speed mile. A group of speed nuts had brought the riding gear for me. I had not ridden a motorbike for 40 years What a nostalgia trip on that 2 mile runway a bit more sedate to 1974's 207.9mph run. That model BSA was my first motorbike bought in 1969 for £10 they now fetch £2600. You have to watch out 40mph can be achieved ha,ha. Then back home and got back in the workshop to do some work on my pumps. The competitors you meet some are involved in ME and full size projects connected to speed An excellent day, Paul! Neil |
| Terry Kirkup | 20/03/2019 21:53:13 |
 108 forum posts 82 photos | I've just finished this for my lathe. laugh if you like, once a biker always... (I'm a better biker than machinist).
|
| Danny M2Z | 21/03/2019 08:12:34 |
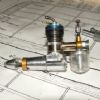 963 forum posts 2 photos | Today I started test flights on a new Free Flight model from a 1952 design that has kept me busy in the workshop for the last month (Aussie Nats in April). It's looking promising Only use of the C3 Mini-lathe was to manufacture the fuel shut-off and tweak the ports of the equally ancient FROG 150 model diesel engine. If anybody is interested in such things, here is a linky **LINK** * Danny M *
|


This thread is closed.
Magazine Locator
Want the latest issue of Model Engineer or Model Engineers' Workshop? Use our magazine locator links to find your nearest stockist!
Sign up to our Newsletter
Sign up to our newsletter and get a free digital issue.
You can unsubscribe at anytime. View our privacy policy at www.mortons.co.uk/privacy
Latest Forum Posts
- *Oct 2023: FORUM MIGRATION TIMELINE*
05/10/2023 07:57:11 - Making ER11 collet chuck
05/10/2023 07:56:24 - What did you do today? 2023
05/10/2023 07:25:01 - Orrery
05/10/2023 06:00:41 - Wera hand-tools
05/10/2023 05:47:07 - New member
05/10/2023 04:40:11 - Problems with external pot on at1 vfd
05/10/2023 00:06:32 - Drain plug
04/10/2023 23:36:17 - digi phase converter for 10 machines.....
04/10/2023 23:13:48 - Winter Storage Of Locomotives
04/10/2023 21:02:11 - More Latest Posts...
- View All Topics
Support Our Partners


Shopping Partners
Subscription Offer

Latest "For Sale" Ads
- Reeves** - Rebuilt Royal Scot by Martin Evans
by John Broughton
£300.00 - BRITANNIA 5" GAUGE James Perrier
by Jon Seabright 1
£2,500.00 - Drill Grinder - for restoration
by Nigel Graham 2
£0.00 - WARCO WM18 MILLING MACHINE
by Alex Chudley
£1,200.00 - MYFORD SUPER 7 LATHE
by Alex Chudley
£2,000.00 - More "For Sale" Ads...
Latest "Wanted" Ads
- D1-3 backplate
by Michael Horley
Price Not Specified - fixed steady for a Colchester bantam mark1 800
by George Jervis
Price Not Specified - lbsc pansy
by JACK SIDEBOTHAM
Price Not Specified - Pratt Burnerd multifit chuck key.
by Tim Riome
Price Not Specified - BANDSAW BLADE WELDER
by HUGH
Price Not Specified - More "Wanted" Ads...
Get In Touch!
Do you want to contact the Model Engineer and Model Engineers' Workshop team?
You can contact us by phone, mail or email about the magazines including becoming a contributor, submitting reader's letters or making queries about articles. You can also get in touch about this website, advertising or other general issues.
Click THIS LINK for full contact details.
For subscription issues please see THIS LINK.
Digital Back Issues


Donate

 Register
 Log-in
Model Engineer Magazine
- Percival Marshall
- M.E. History
- LittleLEC
- M.E. Clock

ME Workshop
- An Adcock
- & Shipley
- Horizontal
- Mill

Subscribe Now
- Great savings
- Delivered to your door

Pre-order your copy!
- Delivered to your doorstep!
- Free UK delivery!
All Forum Topics > The Tea Room > What Did You Do Today 2019