How to centre a boring bar
| David Hatfield 1 | 12/08/2014 21:43:07 |
| 5 forum posts | I'm sure this is one of those stupid questions but here goes anyay: I have very limited experience of lathe work but have managed to accurately centre several cutting tools. Howver I'm not sure how to centre a boring bar. I have an A2Z tool post and a Sumitoma boring bar. The only way a can think is to drill a center hole in some scrap bar and try and use this to centre the boring bar. Can anyone suggest how best to achieve a true centre on the bar? Thanks and apologies if this has already been covered (I did check back posts but couldn't find anything relevant.
Regards David |
| John Haine | 12/08/2014 22:07:46 |
| 5563 forum posts 322 photos | What do you mean by "centre" the bar? Do you mean align it's long axis on the spindle centre line? Or the insert cutting edge at centre height? Or the long axis parallel to but not necessarily at the same height as the spindle axis? The Sandvik boring bars I have have a flat on their top and bottom surfaces which ensures that when clamped in the holder the insert is correctly oriented for the right rake angles. I set the tool height in the same way as for a normal turning tool using a height gauge. All that's left is setting the tool axis relative to the spindle axis, which you can do by setting the tool post square to the topslide, or even just by eye. does this help, have I understood your question? |
| Clive Foster | 12/08/2014 22:31:57 |
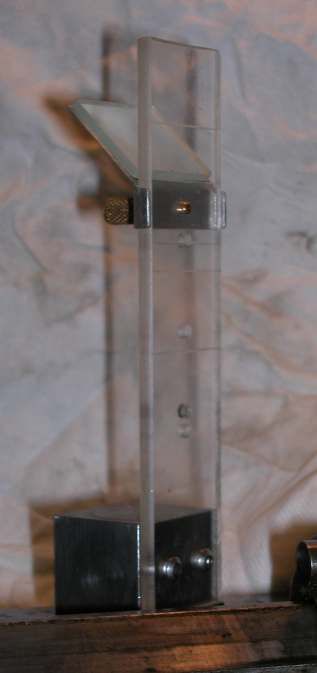
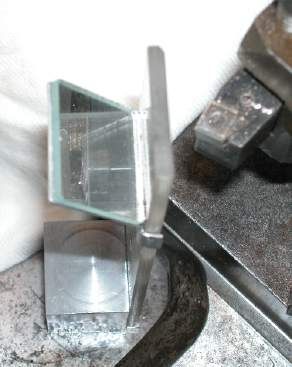
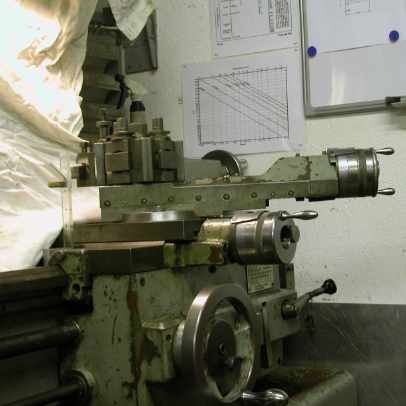
| 3630 forum posts 128 photos | I find a simple optical tool centre height indicator versatile, effective and easy to use. Easy to make too and inherently right with no tricky adjustments. Mine is a "lightly modified to use components to hand" version of a design featured many years ago in Model Engineers Workshop. Probably second or third year of publication. Concept is to set a suitable size blade of thick perspex, or other transparent plastic, vertically upright on a base heavy enough to stay put but small enough to slide into the right places on the lathe. Within reason the thicker the perspex is the better. Mine is only 4 mm, 10 or 12 would have been much better. Using a sharp centre in either spindle or tailstock scribe a line on each side of the perspex blade. Depending on the machine you may need to put a bridge piece across the ways to support the gauge or you may find it conveinient to work off the cross slide. I put two sets of lines on mine, one at each height. Arrange a small mirror at 45° so you can look down and see both lines in the mirror. To set centre height put the gauge in a position where you can see both lines and the tool tip in the mirror. Adjust the tool height until the images of the tip and both lines co-incide so effectively you see a single line running across the cutting edge. Tool is now on centre height. Big advatage of this device is that tool tip and gauge don't have to be right up against each other, anywhere within a couple or three inches will do so long as you have a clear line of sight. It works fine if you simply brigh the tip up to lightly touch the appropriate line but obviously you don't want to scratch things. Three (poor) pictures of mine may help illustrate the idea. Two more in my photo album.
Extra lines and associated mirror bracket fixing holes are for other uses. One is in wrong place. Ooops! Clive Edited By Clive Foster on 12/08/2014 22:36:08 |
| NJH | 13/08/2014 00:12:12 |
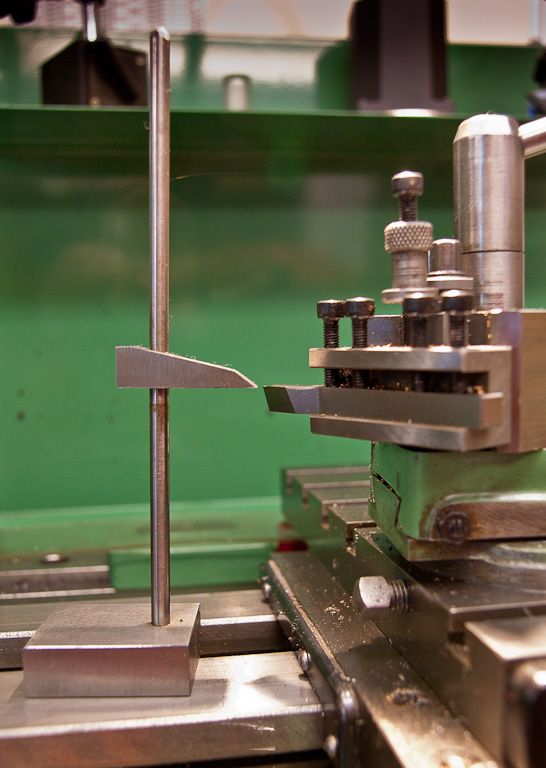
2314 forum posts 139 photos | My quick and simple solution was to make this:- Works for turning or boring tools. Blade was set to centre height and locked. Norman
Edited By NJH on 13/08/2014 00:13:52 |
| _Paul_ | 13/08/2014 01:31:27 |
543 forum posts 31 photos | Clive I do like your optical centre height indicator I can think of a situations when that will be handy, I do have a question though when cutting the mirror to size is that classed as breaking said mirror and subject to the superstitious 7 years bad luck? Paul |
| mechman48 | 13/08/2014 06:12:26 |
2947 forum posts 468 photos | Get a small mirrored mosaic wall tile ... small inspection mirror... ? George. |
| JasonB | 13/08/2014 07:31:47 |
25215 forum posts 3105 photos 1 articles | Use one of your already centred tools to scribe a light line across a faced bit of bar in the chuck and set your boring bar tip to that. If the tip is angled as it is on a lot of indexable bars then the cutting point on the tip wants to be on ctr
J |
| Clive Foster | 13/08/2014 08:42:48 |
| 3630 forum posts 128 photos | Given that my shop gremlin colony is large, hyper-active and on a 50 speed diet I didn't notice any bad luck effects from breaking the original mirror and cutting a small piece out of the remains. Probably past 7 years by now anyway. If you use insert tooling it might be just as easy to make a simple block toolpost dedicated to that tool, or retrieve the factory 4-way if your lathe came with such, and just swop the toolpost over when boring. Leaves the expensive QC holders for other duties where the ready adjustability is important. Inserts of any quality are accurately sized so no need to move the shank once set. I find the general run of small insert boring tools over-long making them prone to chatter and resticting cut. Three or four inches overhang isn't needed when boring short, inch or less long, holes. If you do go the dedicated route might be worth experimenting with a u section sleeve to wrap round the overhang portion and clamping on that as well as on the square shank. Might be a bit tricky to get it just so but should reduce considerably cut chatter tendencies. Such a dedicated post arrangment would be ideal for rear mounting especially useful if it is made so as to turn an accurate 180° and also carries a parting off blade. Its been reported that an inverted boring tool produces better results in smaller holes than the conventional type due to chips falling clear of the tool rather than settling on top. Clive |
| Robbo | 13/08/2014 09:54:19 |
| 1504 forum posts 142 photos | For those interested, Clive's Perspex height gauge was in an article by Ted Wale in MEW 102, Nov 2004. Do I remember correctly that Ted is from Nova Scotia? Phil |
| Jon Gibbs | 13/08/2014 10:28:38 |
| 750 forum posts | I really like the perspex sighting device and can see it being useful but am I the only one who thinks the blade type is a bit superfluous? Isn't it just as easy and quick to stick a sharp centre in the tailstock and reference off that? What am I missing? Jon |
| Chris Trice | 13/08/2014 11:13:42 |
1376 forum posts 10 photos | If you don't have any gadgets to set the tool, stick a centre in the headstock spindle or face the end of a piece of bar leaving just the smallest pip in the centre. |
| Doubletop | 13/08/2014 11:31:00 |
439 forum posts 4 photos | Posted by Chris Trice on 13/08/2014 11:13:42:
If you don't have any gadgets to set the tool, stick a centre in the headstock spindle or face the end of a piece of bar leaving just the smallest pip in the centre.
Unfortunately with indexed tips you are just as likely to break the tip off the tool before you get it right. As most of us should have a 6” rule John B's method of testing against a bar should be achievable. I don't know why I don't do that on the lathe, I do it for quick centering of bar in the mill.
Pete Edited By Doubletop on 13/08/2014 11:31:47 |
| Clive Foster | 13/08/2014 12:20:59 |
| 3630 forum posts 128 photos | Robbo Thanks for crediting Ted Wale with the optical centre gauge design. Saved me digging out the back numbers this evening. Students of how to miss the b.... obvious may be amused to know that I used devices of similar principle in the optics lab for many years without realising that the principle easily translated to a lathe tool setting gauge. Jon Referencing off a tailstock centre is fine if you have room to swing the tool post round. Many folk scribe a line on the tailstock barrel and use that, some machines were factory fitted with such a line. To my mind the biggest advantage of the optical gauge is its ability to work at a distance from the tool tip. The angle of view through the mirror is good with negative rakes too. All other systems require you to either get close and personal to the tip or set-up the lathe to help. If needing to gauge a tool mid job this frequently isn't practical. In an ideal world one would be able to set all the tools needed for a job before starting. Far as I can see the rule for that is X + 3 holders where X is the number of holders you have! The trapping a ruler method is sensitive to stock diameter, 1/2" is about largest before you start getting noticable errors. Clive |
| Ian S C | 13/08/2014 12:52:41 |
7468 forum posts 230 photos | Not long after getting my lathe I fitted a centre in the tail stock, and scribed a line across the blade of my 6" square, Some time after that I added another line at the centre height of my 6" Vertex rotary table(3 mm higher than the lathe). Ian S C |
| John McNamara | 13/08/2014 13:07:44 |
1377 forum posts 133 photos | Hmmm One rule that should not be broken is to keep boring bars sharp if ground or with a nice unworn replicable insert. A small tip radios rather than a large contact area at the cutting tip will usually chatter less and give a better finish particularly when working with small holes and thin boring bars that flex. There is also the problem of making sure the body of the boring bar clears the hole and allows the chips to clear. Ideally this should not be a problem if you have the correct size bar for the job. However needs must.... Regards |
| Nigel Bennett | 13/08/2014 13:18:34 |
500 forum posts 31 photos | I have often machined holes with a boring tool in my lathe, setting the tip height well above centre height. Yes, the tool geometry is probably wrong, but it means that it is possible to have a little more meat on the tool to support it without it rubbing on the bore. Meatier tools are always an advantage in deep bores. If the boring tool height is way out, remember that the amount of metal you take off will be a bit less than the cross-slide dial (or DRO) would have you believe. The tip was given to me by my apprentice school turning instructor, rather more years ago than I care to remember. |
| Hopper | 13/08/2014 13:21:09 |
7881 forum posts 397 photos | Posted by Bogstandard2 on 13/08/2014 10:53:56:
Unfortunately, over the last few years, and especially with boring bars using replaceable tips, some of the methods are now no use for setting, as the tips have negative top rake.
Ah, but most of them are not really negative rake, they just look that way. EG, they use a CCMT06 insert which is a positive rake insert. Trick is to set the tip of the insert well below centre, so the top surface of the insert is aligned with an imaginary line running from the centre of the work to the point where the tip contacts the diameter being bored. They are made like this to provide more clearance for high speed CNC work etc. It took me a few broken tips to work this out. But now I find if the boring bar is not behaving itself, lower it some more below centre. Works for me.
|
| JasonB | 13/08/2014 13:28:49 |
25215 forum posts 3105 photos 1 articles | I have always set the tip of mine on ctr height and not had any problems. Also a lot of these bars are said to be capable of facing the bottom of a blind bored hole, can't see how they can do that with the tip below centre? Also that imaginary line will constantly vary depending on the dia of the hole as its being cut and wil only be right on teh finished cut?? J Edited By JasonB on 13/08/2014 13:31:26 |
| Jon Gibbs | 13/08/2014 13:58:42 |
| 750 forum posts | Posted by Clive Foster on 13/08/2014 12:20:59:
Jon ... To my mind the biggest advantage of the optical gauge is its ability to work at a distance from the tool tip. The angle of view through the mirror is good with negative rakes too. All other systems require you to either get close and personal to the tip or set-up the lathe to help. ... Clive Many thanks Clive - I can appreciate both the "at a distance" advantage and the elegance of the of the optical method. Jon |
| Marcus Bowman | 13/08/2014 14:30:54 |
| 196 forum posts 2 photos | I sometimes use a Laser Centre Finder in the tailstock chuck. It shines its beam right along the lathe axis, so you want to adjust the cutting edge to split the beam, so to speak. I use a Polarising filter to get a really small beam.
Marcus
|
Please login to post a reply.
Want the latest issue of Model Engineer or Model Engineers' Workshop? Use our magazine locator links to find your nearest stockist!
Sign up to our newsletter and get a free digital issue.
You can unsubscribe at anytime. View our privacy policy at www.mortons.co.uk/privacy
- *Oct 2023: FORUM MIGRATION TIMELINE*
05/10/2023 07:57:11 - Making ER11 collet chuck
05/10/2023 07:56:24 - What did you do today? 2023
05/10/2023 07:25:01 - Orrery
05/10/2023 06:00:41 - Wera hand-tools
05/10/2023 05:47:07 - New member
05/10/2023 04:40:11 - Problems with external pot on at1 vfd
05/10/2023 00:06:32 - Drain plug
04/10/2023 23:36:17 - digi phase converter for 10 machines.....
04/10/2023 23:13:48 - Winter Storage Of Locomotives
04/10/2023 21:02:11 - More Latest Posts...
- View All Topics
- Reeves** - Rebuilt Royal Scot by Martin Evans
by John Broughton
£300.00 - BRITANNIA 5" GAUGE James Perrier
by Jon Seabright 1
£2,500.00 - Drill Grinder - for restoration
by Nigel Graham 2
£0.00 - WARCO WM18 MILLING MACHINE
by Alex Chudley
£1,200.00 - MYFORD SUPER 7 LATHE
by Alex Chudley
£2,000.00 - More "For Sale" Ads...
- D1-3 backplate
by Michael Horley
Price Not Specified - fixed steady for a Colchester bantam mark1 800
by George Jervis
Price Not Specified - lbsc pansy
by JACK SIDEBOTHAM
Price Not Specified - Pratt Burnerd multifit chuck key.
by Tim Riome
Price Not Specified - BANDSAW BLADE WELDER
by HUGH
Price Not Specified - More "Wanted" Ads...
Do you want to contact the Model Engineer and Model Engineers' Workshop team?
You can contact us by phone, mail or email about the magazines including becoming a contributor, submitting reader's letters or making queries about articles. You can also get in touch about this website, advertising or other general issues.
Click THIS LINK for full contact details.
For subscription issues please see THIS LINK.
Model Engineer Magazine
- Percival Marshall
- M.E. History
- LittleLEC
- M.E. Clock
ME Workshop
- An Adcock
- & Shipley
- Horizontal
- Mill
Subscribe Now
- Great savings
- Delivered to your door
Pre-order your copy!
- Delivered to your doorstep!
- Free UK delivery!


 Register
 Log-in


