Forum sponsored by:

Todays update from Bodgers Lodge
| John Stevenson | 19/05/2014 19:10:48 |
 5068 forum posts 3 photos | Greetings to all my weld it where it touches fans.
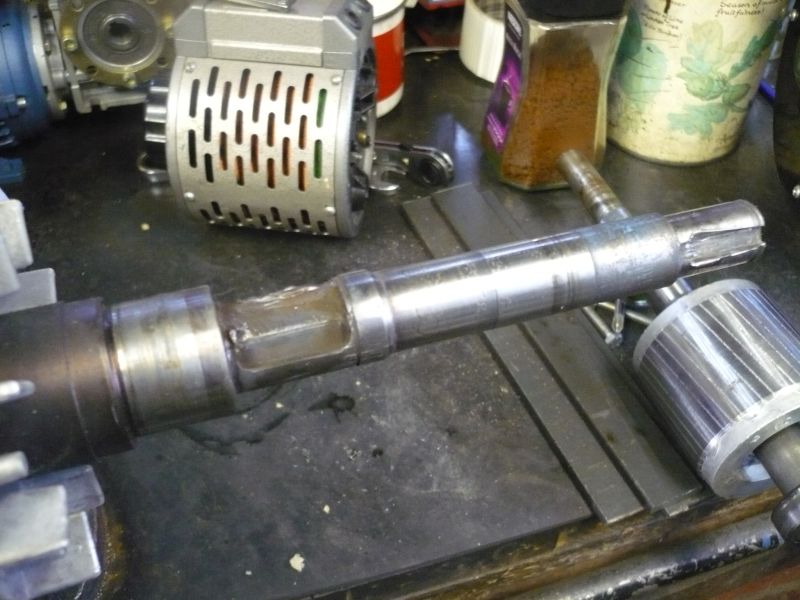
Todays little problem landed on the floor, literally at dinnertime today.
It's a brake rotor out of the electric motor that opens the local fire station door. Pretty standard motor bus has a brake extension to hold the door in a given position. That chewed up bit should be 22mm plus a gnats cock with a 6 mm keyway in, far end is worn but this just carries a fan.
So need to get this sorted as they have three firemen all called Dennis standing on each others shoulders holding said door up.
Three things to do, buy a new motor, not going to happen as it was made in Outer Mongolia in 1921.
Press shaft out and make new shaft and press in, lot of work just for two diameters.
Three, weld worn bits up with 21 miles of 1.2mm MiG wire and machine back, sounds a winner to me.
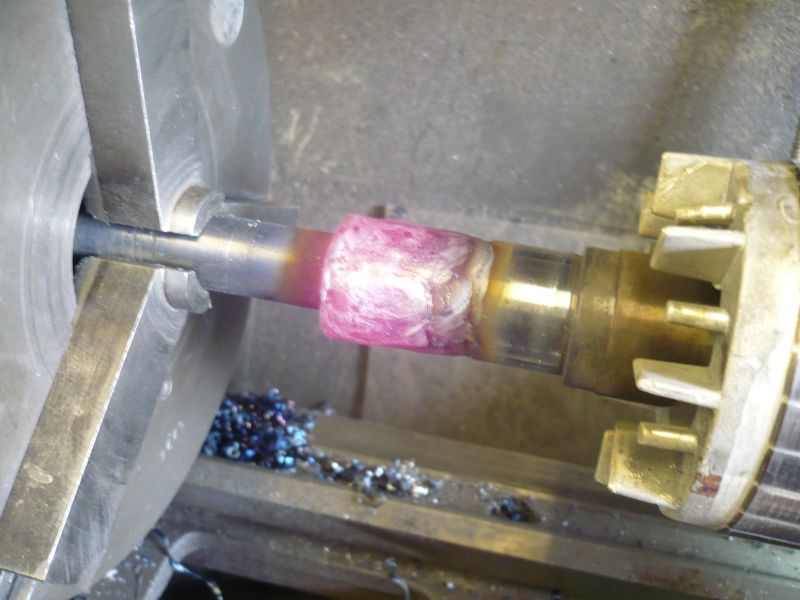
So turn both diameters undersize so the weld transition isn't on the finished diameter and splat some weld on then bung it back in the lathe before it has time to dry.
Welding rotors is like plucking chickens, best done whilst hot but you can only go so far as the last few cuts has to be at room temperature otherwise when it does cool off you are way undersize. So belt it down to 23mm and leave.
Then get a phone call because the rewinders have found out 22mm brake hubs are obsolete so can I do it to 25mm.
Weld up yet again, rinse and repeat.
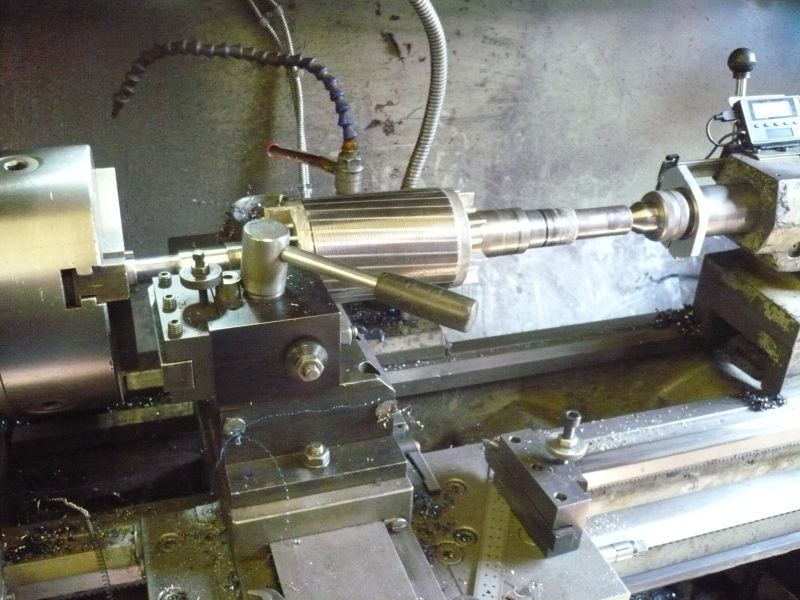
If they have a long shaft extension I do them this way as the bit in the chuck I know is running true because of the soft jaws and the bit in the tailstock centre is also true and being red hot running it get the shaft pretty straight to get the bulk off. Once cool if it's critical like a bearing diameter then you can swap to a steady to get true support.
Welding in the middle of a long shaft and running off centres at each end is an exercise in futility, it will be like a banana.
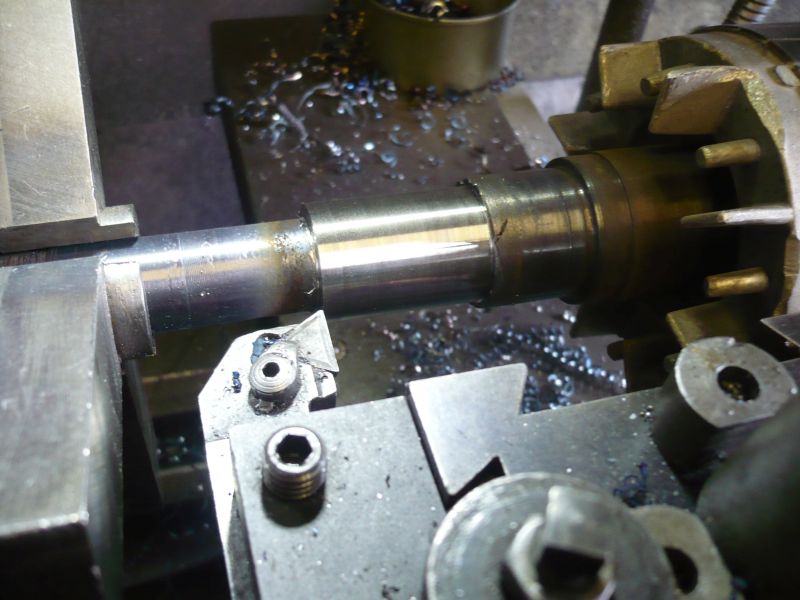
Final cut on a cold shaft, thats 0.02 up just requiring a final polish.
End job with the keyways in, just needs reassembling and the 3 Dennis's will be able to nip home for their tea.
Please note, no microns or scraped surfaces were harmed in the making of this post.
Stay tuned for more from Bodgers Lodge |
| Michael Gilligan | 19/05/2014 20:11:18 |
 23121 forum posts 1360 photos | Great stuff, John I bet 3xDennis are relieved ...truly a weight off their shoulders. You may like to look here ... Similar work on a much smaller scale. Geoffrey Walker brought his kit into one of the BHI meetings a while back, and was kind enough to let me try. MichaelG. |
| _Paul_ | 19/05/2014 21:19:14 |
 543 forum posts 31 photos | John can you post some pics of your "rotisserie" if it's not too secret please. Paul |
| John Stevenson | 19/05/2014 21:36:52 |
5068 forum posts 3 photos | Posted by _Paul_ on 19/05/2014 21:19:14:
John can you post some pics of your "rotisserie" if it's not too secret please. Paul .
You mean the advanced rotary welding jig ? |
| Les Jones 1 | 19/05/2014 22:31:27 |
| 2292 forum posts 159 photos | Very nice work John, Les. |
| fizzy | 20/05/2014 00:28:50 |
 1860 forum posts 121 photos | they should reward you with pretty things!
|
| _Paul_ | 20/05/2014 01:02:40 |
543 forum posts 31 photos | Posted by John Stevenson on 19/05/2014 21:36:52:
You mean the advanced rotary welding jig ? Thats the name I was looking for! yes please |
| John Stevenson | 20/05/2014 01:46:39 |
5068 forum posts 3 photos | Posted by _Paul_ on 20/05/2014 01:02:40:
Posted by John Stevenson on 19/05/2014 21:36:52:
You mean the advanced rotary welding jig ? Thats the name I was looking for! yes please .
OK
|
| _Paul_ | 20/05/2014 03:40:20 |
543 forum posts 31 photos | I see, it looks like a pair of precision matched multi faceted monolithic support columns
|
| Speedy Builder5 | 20/05/2014 09:02:14 |
| 2878 forum posts 248 photos | I hope the fire brigade respond 'Tout suite' if ever you should need them. Looks a proper job. BobH |
| John Stevenson | 20/05/2014 10:08:40 |
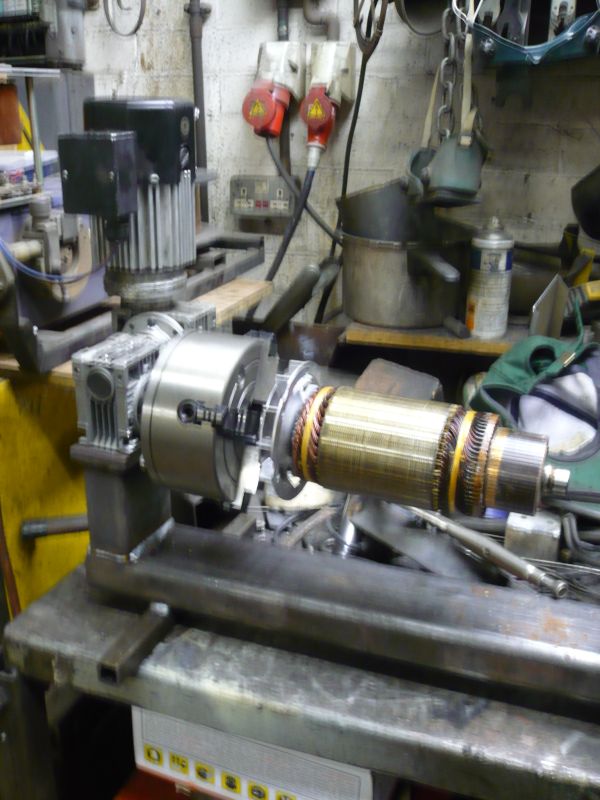
5068 forum posts 3 photos | Paul, I do have a proper one. That bar you see in the background is this.
It's a 240v DC motor running thru a variac to a 60:1 gearbox and then to another 60:1 gearbox. Speed is form 0 to about 15 rpm First one I did with only one gearbox went far too fast hence the second box. Until you try this you don't realise how slow you need to go rev wise.
I think I have used it twice. Takes too long to set up plus due to keyways and wear the weld isn't equal all the way round so you find yourself having to do more welding in one area. It's a bit of a black art knowing where to weld, when to knock off and come back later.
Very common repair, that's the rotor out of a varispeed Bridgy. With no exaggeration I do between 12 and 20 of these a year and that's just from this area. If you were to run along and weld that keyway up it would just go like a banana so you weld a bit of keyway, weld a bit on the opposite side, do the other end for a bit then come back.
In the early days I could weld one of these and keep them true to 1/4" these days I usually get about 1/16" Sounds really rough but everything is re-machined so the new centres and shaft are dead on.
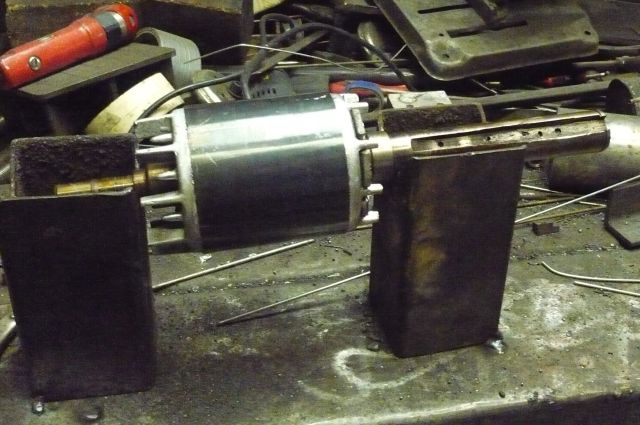
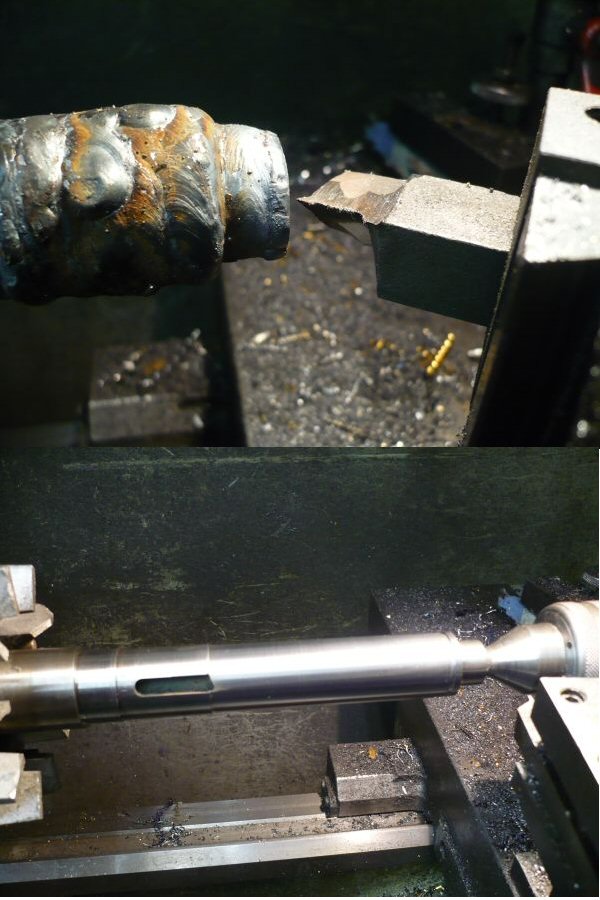
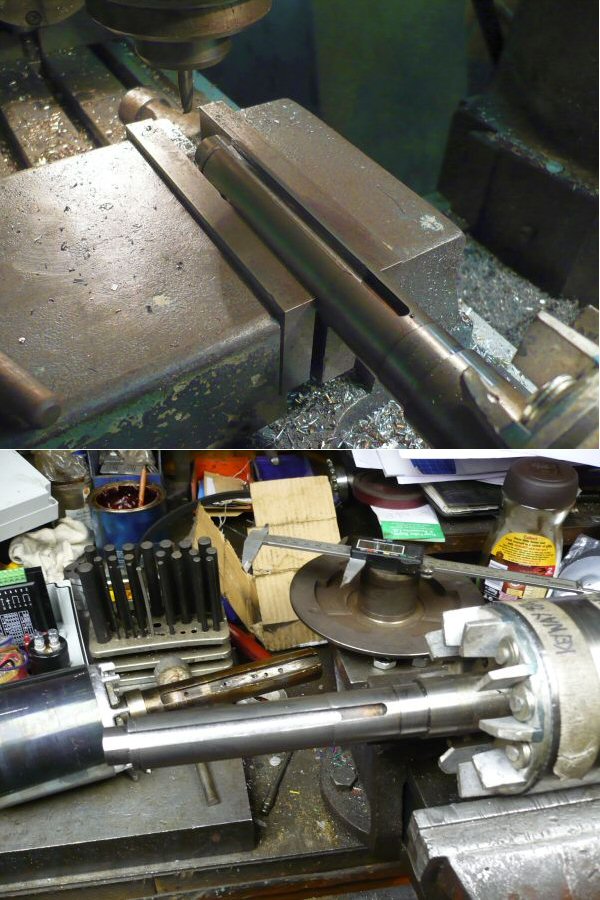
Here's a bit of a photo essay on one I did earlier, 2 pics on each frame. First one is just a close up of the damage you get when they run these with worn bushings.
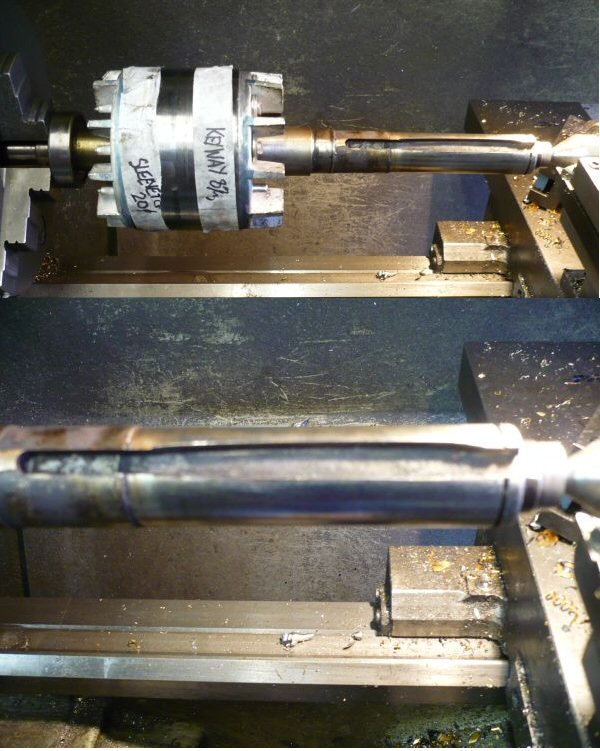
Second shot is it all welded up and running on a steady to get the centre back in the end. In this case I'd managed to keep it pretty true that a single point tool was able to true the hole up. No point using a centre drill, it will follows the path of least resistance.
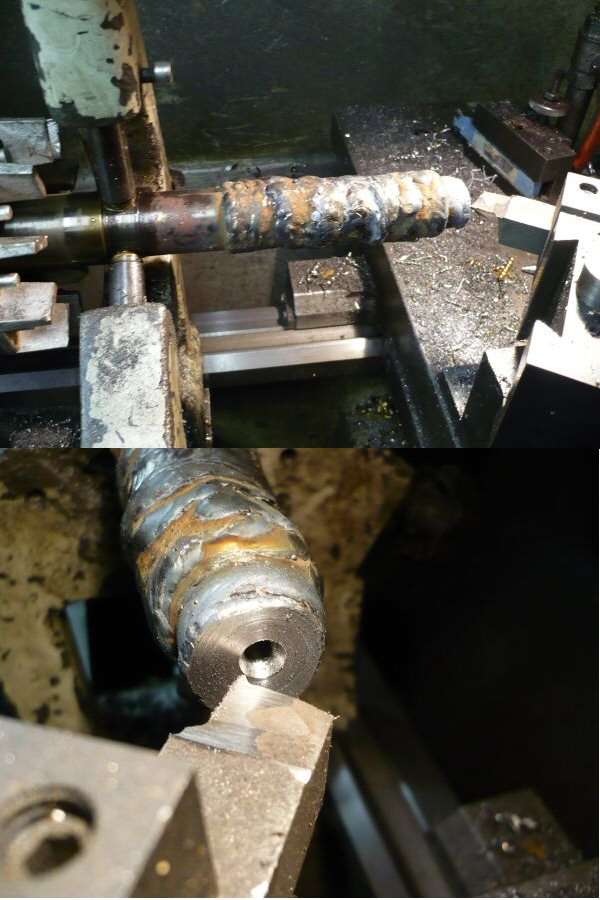
Third pic is a better shot of the centring tool to show the insane clearances needed and then the shaft turned down and polished and circlip groove being turned in.
Last shot is keyway being put in and final job. If I get time I send the rotor over the road and have the shaft end Tuftrided which we talked about in a recent thread to make it hard wearing on the sliding surfaces but to be honest most times they go out as is because they can't wait the extra day for heat treat.
Just noticed there is another rotor in the background waiting just to show I'm not telling porkies about the number I do.
Basically there is nothing special in doing these, you need basic equipment, lathe , welder and tooling. I have been told that the current price of a Bridgy motor is £480 plus VAT and that's no belt sheaves so a repair of this type will more than pay for itself.
Hope you are enjoying the Bodgers Lodge channel ? |
| Rick Kirkland 1 | 20/05/2014 10:31:24 |
 175 forum posts | Loving every minute of it. This is proper stuff like some of the things wot I do! And the satisfaction of a job well done is the cherry on top. Rick |
| Gordon W | 20/05/2014 11:32:00 |
| 2011 forum posts | Very useful , I have two questions- how do I persuade my wife to turn it slowly ? and what grade rods are you using ? (stick). |
| _Paul_ | 20/05/2014 12:01:22 |
543 forum posts 31 photos | John, great essay thank you, I hear what you say about turning too fast, I did try using an old lathe with an inverter but even with backgear it didnt like doing consistent really low rpm. My job was nothing as complicated as yours I "just" needed to weld several hundred "Railheads" onto 12mm 4' lengths of bar, in the end I threw in the towel and propped them up on some sacrificial timber vee blocks it did the job but then they had to do back in the lathe for a straightening pop with the mallet and a skim to take off the weld snotters. As you say there are spots you will want to stop at or perhaps even reverse back to, I wonder how well some find of Tig style foot pedal (with reverse) would work? As this is "Bodgers Lodge" I hope its' ok to make a contribution especially as John did mention Bridgeport Motors, no pics but the last Bridgeport motor I did (my own) I cheated and cut a new slot 180* around from the original. Paul
|
| Ian S C | 20/05/2014 12:09:09 |
 7468 forum posts 230 photos | I was just wondering, when you have the armature in the lathe chuck and centre, would a spring loaded centre help with taking up the expansion/ contraction due to heat, and help eliminate bending? Ian S C |
| John Stevenson | 20/05/2014 12:16:55 |
5068 forum posts 3 photos | Gordon,
Best way to teach her to turn slowly is tell her to imagine you have just trod a birds nest of turnings and soluble oil onto the lounge carpet and she's wringing you neck. Rest assured it will be sloooooow.
Welding is by MiG as being quicker and having less intrusions than stick welding. The wire is a low carbon grade roughly the same as EN8 which machines nice, wers well and can be heat treated if needed but a big no no is it has to cool naturally, quench this and its hardaswitchestits.
Edited By John Stevenson on 20/05/2014 12:59:01 |
| John Stevenson | 22/05/2014 12:07:58 |
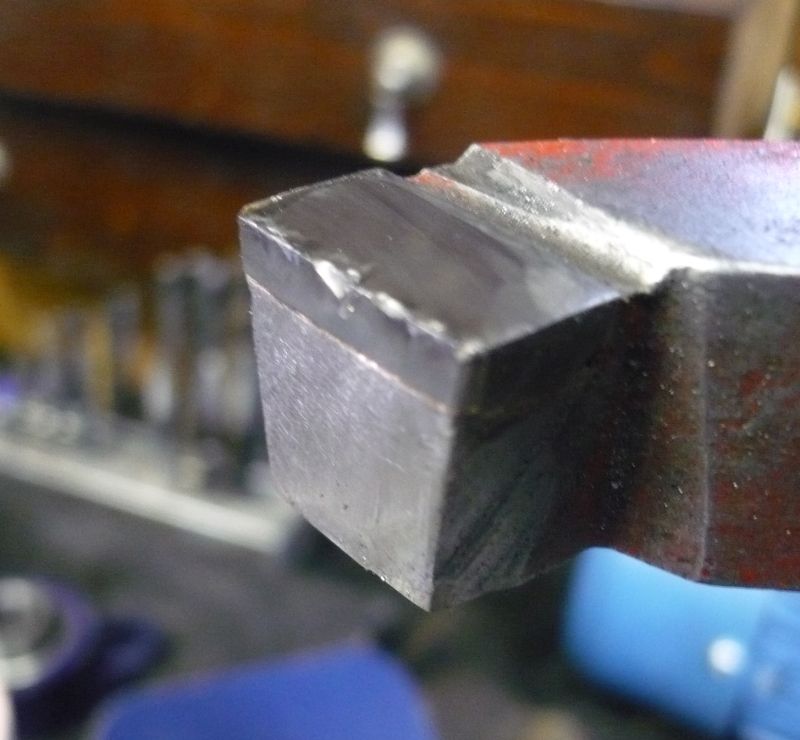
5068 forum posts 3 photos | OK gentlemen today's lesson is in the art of precision tool grinding without the precision [ it costs money ] First picture is a brazed tipped carbide tool in 20mm section so hefty chunk, that I use for weld prep on some laser cut discs.
I prefer this tool to a tipped one as it stands the hammer a lot better and a tip that will accept an interrupted cut isn't cheap and a bought a shed load of these brazed tipped tools ages ago for £1 17s 9d the box.
However as you can see they do take a hammering. With a green grit wheel this will still take time to get back to virgin material and also waste quite a lot of wheel as the green grit wheels are very soft bonded. Diamond wheel works OK but will take twenty one and a half days.
So the answer is ?
Which is situated on the precision grinding bench. Standard ALDI / NETTO / LIDL angle grinder in standard crap cut off saw holder but hey it holds it.
The wheel in this case is one sold by ARC with diamond on both sides and made for the high speed an angle grinder runs at before the H&S Nazi's get on my case. Incidentally I don't do H&S, PC or decorating
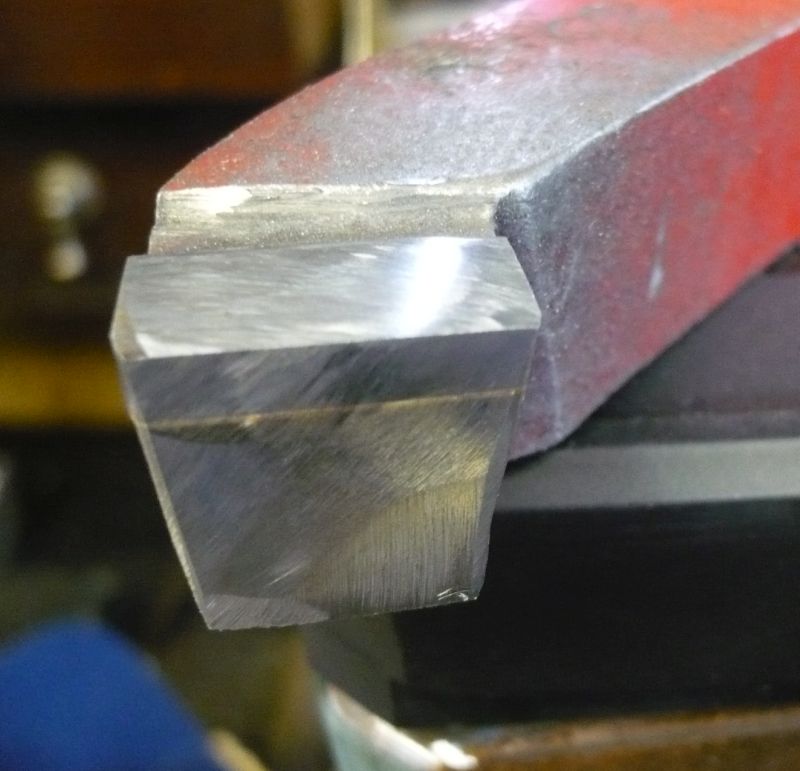
I just use this freehand to touch up the 4 faces of the tool.
In this case it's plenty good enough to do the next batch of 100 washers before it needs a quick lick up again but if I wanted to better then it would be a matter of a minute or two to do a final lick with a proper fine diamond wheel.
Unlike a green grit wheel the edges of this as is are very good with only minute flaking hence needing a quick lick to get to the same state as a honed piece of HSS.
Main advantage is it quick and cheap. The disks are not expensive and last, this one is the first one of two I bought about 4 years ago and it does get used. The spare is still in the cupboard. As regards quickness the difference between first pic and last is 7 minutes but in this time I had to setup for the pics, level the precision grinding jig up and drink my coffee.
Stay tuned to the bodging channel for more precision work. |
| Jon Gibbs | 22/05/2014 12:22:16 |
| 750 forum posts | Great tip John - thanks for sharing. Jon |
| Nigel Bennett | 22/05/2014 12:49:31 |
 500 forum posts 31 photos | Yes, excellent bit of "bodgy engineering", John! Good to point out the advantages of brazed tooling over inserted-carbide when doing heavy or interrupted work. Back in the 1950's, Michael Oxley, writing in ME in one of his brilliant pieces of Christmas Fun, wrote that one of the beauties of tipped tools was that would completely remove two or three sets of chuck jaws before they even needed touching up... |
| roy entwistle | 22/05/2014 12:50:28 |
| 1716 forum posts | John I see your workshop is about as tidy as mine funny thing is I can usually find everything Roy |


Please login to post a reply.
Magazine Locator
Want the latest issue of Model Engineer or Model Engineers' Workshop? Use our magazine locator links to find your nearest stockist!
Sign up to our Newsletter
Sign up to our newsletter and get a free digital issue.
You can unsubscribe at anytime. View our privacy policy at www.mortons.co.uk/privacy
Latest Forum Posts
- *Oct 2023: FORUM MIGRATION TIMELINE*
05/10/2023 07:57:11 - Making ER11 collet chuck
05/10/2023 07:56:24 - What did you do today? 2023
05/10/2023 07:25:01 - Orrery
05/10/2023 06:00:41 - Wera hand-tools
05/10/2023 05:47:07 - New member
05/10/2023 04:40:11 - Problems with external pot on at1 vfd
05/10/2023 00:06:32 - Drain plug
04/10/2023 23:36:17 - digi phase converter for 10 machines.....
04/10/2023 23:13:48 - Winter Storage Of Locomotives
04/10/2023 21:02:11 - More Latest Posts...
- View All Topics
Support Our Partners


Shopping Partners
Subscription Offer

Latest "For Sale" Ads
- Reeves** - Rebuilt Royal Scot by Martin Evans
by John Broughton
£300.00 - BRITANNIA 5" GAUGE James Perrier
by Jon Seabright 1
£2,500.00 - Drill Grinder - for restoration
by Nigel Graham 2
£0.00 - WARCO WM18 MILLING MACHINE
by Alex Chudley
£1,200.00 - MYFORD SUPER 7 LATHE
by Alex Chudley
£2,000.00 - More "For Sale" Ads...
Latest "Wanted" Ads
- D1-3 backplate
by Michael Horley
Price Not Specified - fixed steady for a Colchester bantam mark1 800
by George Jervis
Price Not Specified - lbsc pansy
by JACK SIDEBOTHAM
Price Not Specified - Pratt Burnerd multifit chuck key.
by Tim Riome
Price Not Specified - BANDSAW BLADE WELDER
by HUGH
Price Not Specified - More "Wanted" Ads...
Get In Touch!
Do you want to contact the Model Engineer and Model Engineers' Workshop team?
You can contact us by phone, mail or email about the magazines including becoming a contributor, submitting reader's letters or making queries about articles. You can also get in touch about this website, advertising or other general issues.
Click THIS LINK for full contact details.
For subscription issues please see THIS LINK.
Digital Back Issues


Donate

 Register
 Log-in
Model Engineer Magazine
- Percival Marshall
- M.E. History
- LittleLEC
- M.E. Clock

ME Workshop
- An Adcock
- & Shipley
- Horizontal
- Mill

Subscribe Now
- Great savings
- Delivered to your door

Pre-order your copy!
- Delivered to your doorstep!
- Free UK delivery!
All Forum Topics > Workshop Techniques > Todays update from Bodgers Lodge