Forum sponsored by:

Holding small items
| GaryM | 01/02/2014 11:23:40 |
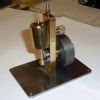 314 forum posts 44 photos | Hi, The photo below is a part-made forked end for the S50 I'm building. I need to cut the slot for the eccentric rod in the square end. I'll probably hold it in the bench vice and use hacksaw and file but I was wondering how you would do it. I thought about holding the round end in a collet block and using a slitting saw but thought the clamping might not be good enough. Any suggestions welcomed. Gary
|
| IanT | 01/02/2014 11:31:18 |
| 2147 forum posts 222 photos | Hi Gary, I'm afraid that I might have done the work in a different order and machined the fork before I parted the piece off from the main stock. However, you are where you are. Either start over or make up two small brass clamping pieces and hold the work piece between them. Then saw the whole lot (clamps included) - they will be sacrificial. It's something you learn the hard (e.g. expensive way) but it's always best to try and think through all the required operations before you start doing anything - something I will admit I am yet to completely master! Regards,
IanT |
| Jeff Dayman | 01/02/2014 12:47:57 |
| 2356 forum posts 47 photos | I second Ian's opinion about doing parts like this while still on the end of the bar, with the last op being to part it off,complete. However there are a couple of things you can do now. If the 7BA thread is tapped already, you could make a 3/16 dia mandrel with a stub of 7 BA thread on it, Thread that into the part and hold the whole thing in a 4 jaw chuck or a vise, gripping both the mandrel and a bit of the unslotted square, while you cut the slot and file it or mill it. Or you could make a brass rod end with a hole a thou or two larger than the 11/64 stub and soft solder the part into it temporarily to make a bigger handle to grip the part in a vise for cutting or milling the slot. The slot can then machined. and the solder melted to separate the finished part from the rod, and excess solder wiped away. Good luck, JD |
| JasonB | 01/02/2014 13:09:01 |
 25215 forum posts 3105 photos 1 articles | As the others have said work on the end of a longer bar but I suspect that as this is a Stuart kit they did not give you much extra stock to play with in which case you could have drilled for the pin, cut the slot and then inserted a packer so the fork did not collapse while held in the 4-jaw to turn and thread the end.
J |
| Bazyle | 01/02/2014 13:33:25 |
 6956 forum posts 229 photos | One of the advantages of reading ME articles on eg Loco construction that some on here moan is so boring and blah blah they won't subscribe any more, yes the advantage is you pick up ideas for this kind of thing and store it away in your brain for use ten years down the line. |
| Michael Gilligan | 01/02/2014 14:00:06 |
 23121 forum posts 1360 photos | Posted by Jeff Dayman on 01/02/2014 12:47:57:
Or you could make a brass rod end with a hole a thou or two larger than the 11/64 stub and soft solder the part into it temporarily to make a bigger handle to grip the part in a vise for cutting or milling the slot. The slot can then machined. and the solder melted to separate the finished part from the rod, and excess solder wiped away. Good luck, JD . As per Jeff's recommendation ... but I would use either Shellac, or Wood's Metal ... a bit easier to handle, and to clean off, than Solder. MichaelG.
|
| GaryM | 01/02/2014 14:41:36 |
314 forum posts 44 photos | Thanks for the suggestions chaps. For this project I have been following a Tubal Cain article published in ME Aug 92 to May 93. His instructions were for someone who only had a lathe and for this part he suggested mounting on a vertical slide and using a 3/32 slot drill. With hindsight, it may have been easier to mill the slot first then part off last. I could have then tapped the hole afterwards. As Jason says you don't get much to play with in Stuart kits (about 5/8" in this case) but obviously that doesn't stop me using another bit of brass bar. Jeff's mandrel idea sounds appealing if the vice won't hold it well enough. I've got some 7BA screws so I could just fasten it to a short piece of 3/16" bar as suggested which would give extra support. Bazyle, my problem would then be finding it again in my brain. As I said above I'll try holding it in the bench vice first and sawing and filing it but thanks for the ideas. I'll let you know how I get on. Gary |
| Dave C | 01/02/2014 16:23:47 |
| 102 forum posts 37 photos | Hi Gary I have just made 16 fork ends the same as you need to do. Mine were from quarter inch square steel. I Completed mine ( Rightly or wrongly ) as you suggested. The parts were made unto the stage you have now and then they were held in the collet block and the fork done with a slitting saw on the mill. Although this is the first time I have made forked ends and also used a slitting saw I had no problems and all came out spot on. Even the extra, Just incase I cock up ones came out well. If I had to make more I would probably do them the same way to be honest. Like I say I'm no toolmaker but it worked for me so that'll do. Good luck Dave
|
| Brian Wood | 01/02/2014 16:39:42 |
| 2742 forum posts 39 photos | Hello Gary, I don't think you have much to lose by glueing it into a hole in perspex or tufnol, whatever you have, using a modern foaming polyurethane adhesive and leaving it over gentle heat overnight. It will give you a handle to grip and it works very well holding short ends on wooden handles for sawing in a bandsaw. I recommend Everbuild Gater glue. If you are canny you can preshape the 'handle' to give you support underneath it to help resist slitting saw forces. Take it gently though. It will clean up nicely afterwards too, just run the tap through to restore the 7BA hole. Good luck Brian
|
| colin hawes | 01/02/2014 17:43:42 |
| 570 forum posts 18 photos | You could soft solder it into the end of a drilled bar. Colin |
| IanT | 01/02/2014 20:22:21 |
| 2147 forum posts 222 photos | Gary, A slightly more sophisticated version of my earlier (clamping) suggestion would be to drill and tap two square bars and make a very small toolmakers clamp - assuming you don't already have a small one. Just make sure the clamp will lie flat by drilling the clamping holes in line. A spot of superglue on the jaw tips will help stop the work from twisting and the small clamp (if held correctly) would be re-usable in that you could saw between the jaws without damage to them. Extra time to make but it might "come in handy" again sometime. However, if you don't mind soldering the piece - I thought Jeff's suggestion was a good/quick one. Regards,
IanT. |
| John Stevenson | 01/02/2014 20:38:42 |
 5068 forum posts 3 photos |
I have about 6 or 8 of these for small repetition work. they are one of those tools that if you gave them to 6 people they would all use them differently. I use them for holding small parts like the one the OP has posted, stops on jaws, stops on parts. They are one of those things you wonder how you managed before.
|
| Carl Wilson 4 | 01/02/2014 20:42:43 |
 670 forum posts 53 photos | "One of the advantages of reading ME articles on eg Loco construction that some on here moan is so boring and blah blah they won't subscribe any more, yes the advantage is you pick up ideas for this kind of thing and store it away in your brain for use ten years down the line." What would be even better would be if the article was about solving this problem and the loco bit was left out entirely.Far more chance of remembering the technique then. Edited By Carl Wilson 4 on 01/02/2014 21:04:18 |
| Michael Gilligan | 01/02/2014 21:13:04 |
23121 forum posts 1360 photos | Posted by Carl Wilson 4 on 01/02/2014 20:42:43:
"One of the advantages of reading ME articles ... What would be even better would be if the article was about solving this problem and the loco bit was left out entirely.Far more chance of remembering the technique then. . I suppose they could have another magazine ...maybe call it MEW
MichaelG. |
| julian atkins | 01/02/2014 23:15:07 |
 1285 forum posts 353 photos | hi gary, i agree with IanT, but always pretty useless to be 'wise' after the event. Cherry Hinds/Hill made all her intricate bits by machining the bits on material then cutting off afterwards - a lesson well learned for your future parts! yep junior hacksaw and file job in my book! probably just a few minutes work so good luck! cheers, julian |
| Carl Wilson 4 | 02/02/2014 08:50:09 |
670 forum posts 53 photos | <<"One of the advantages of reading ME articles ... What would be even better would be if the article was about solving this problem and the loco bit was left out entirely.Far more chance of remembering the technique then. . I suppose they could have another magazine ...maybe call it MEW>>
They do, and it doesn't. Edited By Carl Wilson 4 on 02/02/2014 08:50:37 |
| Michael Gilligan | 02/02/2014 09:36:29 |
23121 forum posts 1360 photos | Posted by Carl Wilson 4 on 02/02/2014 08:50:09:
<<"One of the advantages of reading ME articles ... What would be even better would be if the article was about solving this problem and the loco bit was left out entirely.Far more chance of remembering the technique then. . I suppose they could have another magazine ...maybe call it MEW>>
They do, and it doesn't. Edited By Carl Wilson 4 on 02/02/2014 08:50:37 . Sorry, Carl ... A wasted attempt at sarcasm on my part. I thought that was what the stupid winky smiley thing was meant to denote. MichaelG. |
| IanT | 02/02/2014 10:14:52 |
| 2147 forum posts 222 photos | Having completed my EW slitting saw - I was anxious to test it and cut off Qty8 x 20mm lengths of brass angle for one of my modelling projects. It all worked well - nice clean cuts (no cleaning up) and very little wastage - & I was a Happy Bunny! This morning I've realised that some of the next machining operations would have been much easier if the parts were still attached to the parent metal. As I said Gary - I've not completely mastered this myself yet. Regards,
IanT |
| GaryM | 02/02/2014 13:51:07 |
314 forum posts 44 photos | Well here is the result. It fits and seems to do the job, but it's not pretty. In the end I adapted Jeff's idea and drilled a piece of 3/16 bar with 7BA clearance so I could use a 7BA screw to hold it, which made working with it much easier. Slot still ended up rounded even with a flat needle file. If I decide to make another I'll try slitting it before the turning operations and while still on the stock. Might be a good learning exercise anyway as it's only a small part. I didn't fancy soldering or gluing as I thought it might take me longer to get it clean afterwards. John S - I thought I knew the Arc catalogue inside out but hadn't spotted these small clamps. Worth having some at the price (that should get you your £2 back). Again thanks for all the suggestions, even though I didn't use some of them they are stored away for the future. Gary
|


Please login to post a reply.
Magazine Locator
Want the latest issue of Model Engineer or Model Engineers' Workshop? Use our magazine locator links to find your nearest stockist!
Sign up to our Newsletter
Sign up to our newsletter and get a free digital issue.
You can unsubscribe at anytime. View our privacy policy at www.mortons.co.uk/privacy
Latest Forum Posts
- *Oct 2023: FORUM MIGRATION TIMELINE*
05/10/2023 07:57:11 - Making ER11 collet chuck
05/10/2023 07:56:24 - What did you do today? 2023
05/10/2023 07:25:01 - Orrery
05/10/2023 06:00:41 - Wera hand-tools
05/10/2023 05:47:07 - New member
05/10/2023 04:40:11 - Problems with external pot on at1 vfd
05/10/2023 00:06:32 - Drain plug
04/10/2023 23:36:17 - digi phase converter for 10 machines.....
04/10/2023 23:13:48 - Winter Storage Of Locomotives
04/10/2023 21:02:11 - More Latest Posts...
- View All Topics
Support Our Partners


Shopping Partners
Subscription Offer

Latest "For Sale" Ads
- Reeves** - Rebuilt Royal Scot by Martin Evans
by John Broughton
£300.00 - BRITANNIA 5" GAUGE James Perrier
by Jon Seabright 1
£2,500.00 - Drill Grinder - for restoration
by Nigel Graham 2
£0.00 - WARCO WM18 MILLING MACHINE
by Alex Chudley
£1,200.00 - MYFORD SUPER 7 LATHE
by Alex Chudley
£2,000.00 - More "For Sale" Ads...
Latest "Wanted" Ads
- D1-3 backplate
by Michael Horley
Price Not Specified - fixed steady for a Colchester bantam mark1 800
by George Jervis
Price Not Specified - lbsc pansy
by JACK SIDEBOTHAM
Price Not Specified - Pratt Burnerd multifit chuck key.
by Tim Riome
Price Not Specified - BANDSAW BLADE WELDER
by HUGH
Price Not Specified - More "Wanted" Ads...
Get In Touch!
Do you want to contact the Model Engineer and Model Engineers' Workshop team?
You can contact us by phone, mail or email about the magazines including becoming a contributor, submitting reader's letters or making queries about articles. You can also get in touch about this website, advertising or other general issues.
Click THIS LINK for full contact details.
For subscription issues please see THIS LINK.
Digital Back Issues


Donate

 Register
 Log-in
Model Engineer Magazine
- Percival Marshall
- M.E. History
- LittleLEC
- M.E. Clock

ME Workshop
- An Adcock
- & Shipley
- Horizontal
- Mill

Subscribe Now
- Great savings
- Delivered to your door

Pre-order your copy!
- Delivered to your doorstep!
- Free UK delivery!
All Forum Topics > Workshop Techniques > Holding small items