Forum sponsored by:

Rotary Broaching
| Glyn Davies | 19/03/2013 16:31:01 |
| 146 forum posts 56 photos |
Some years ago, I bought a rotating tailstock chuck at a Harrogate show. I thought it might come in handy for some future job. So when I needed to cut some Allen key hexagon holes, I thought of using the chuck as a rotary broach. It worked very well. The broach is milled from silver steel, being a 1/8" hexagon with a 2 degree (4 degree included) taper. Harden and temper to straw. Set the rotating chuck in the vertical slide and set it to 1 degree relative to the lathe mandrel centre line. Drill a 1/8 hole in the work and cone its entry with a centre drill. Then adjust the broach so it just enters the hole, apply oil, start the lathe (very gently) and use the tailstock to push the broach in. You may notice that my broach has a spiral at one end. i didn't make it that way - I was a little careless in engaging the lathe chuck. But the broach still worked.
Image edited Edited By JasonB on 19/03/2013 17:39:24 |
| martin perman | 19/03/2013 17:05:23 |
 2095 forum posts 75 photos | Otley, My friend and I were discussing this subject at the weekend and watching video's as to how this works as I couldnt see or understand what happens, any chance you could explain it please. Martin Perman |
| Glyn Davies | 19/03/2013 17:30:20 |
| 146 forum posts 56 photos | Hello Martin, My pic seems to be a bit squashed! Anyway, imagine trying to force a short length of hardened hexagon bar (a 'broach) into a pre drilled hole. If you apply enough force, the hexagon will enter the hole and cut a hexagonal form. But it will need a lot of force. Now mount the hexagon broach in a holder which is free to rotate. Hold the work to be cut in the lathe chuck and start the lathe. Trying to push the broach into the work will still need a lot of force. So now angle the rotating broach holder. Just a little, say 1 degree. Now only one point of the hexagon broach is trying to cut at a time. As the work and the broach rotate, each point of the hexagon broach in turn takes a little peck at the work and much less force is needed to push the broach. If the rotating broach is set to a 1 degree angle relative to the lathe axis, the hexagon cutter needs to have a similar taper angle, or say a degree more to give some clearance.
Edited By Otley on 19/03/2013 17:30:56 Edited By Otley on 19/03/2013 17:31:14 |
| Bazyle | 19/03/2013 18:41:10 |
 6956 forum posts 229 photos | Aynone used an Armag profiling head?
|
| martin perman | 19/03/2013 19:11:01 |
2095 forum posts 75 photos | Otley,
Thank you for that, I know have to tell my friend he was correct Martin Perman
|
| Stub Mandrel | 19/03/2013 20:35:36 |
 4318 forum posts 291 photos 1 articles | Nice one, Otley. Neil |
| john kennedy 1 | 20/03/2013 07:36:14 |
 214 forum posts 24 photos | Very interesting, but one question. Does the hole end up with a 1deg pos taper or does the taper on the broach negate that ? Or even make it 1deg neg ? |
| Windy | 20/03/2013 08:06:41 |
 910 forum posts 197 photos | Thank you Otley a good explanation I would like to know the maximum depth you can do. Paul |
| jason udall | 20/03/2013 09:52:51 |
| 2032 forum posts 41 photos |
Posted by Windy on 20/03/2013 08:06:41:
Thank you Otley a good explanation I would like to know the maximum depth you can do. Paul prob relates to 4 degree included taper...the tool necks a bit but in practice relief at 4 degree then slows to 2 degree for rest of reach... **LINK**...
|
| Glyn Davies | 20/03/2013 10:20:29 |
| 146 forum posts 56 photos |
The hole size is determined by the size of the cutting end of the broach and is constant throughout the depth of the hole. The holes I made were 1/8" across flats and .35" deep. A 1/8" Allen key is a nice fit to the bottom of the hole. I think the technique is probably best suited to holes with depths about twice the diameter of the broach - I had to withdraw the broach after it was .2" deep and drill out the swarf before continuing. Then, making sure that the broach was properly entering the already cut hexagon was a bit tricky. I have also read that as the hole gets very deep, the broach can cut a slight spiral form. I still cannot get over the way my hardened and tempered silver steel broach twisted so far without breaking... Edited By Otley on 20/03/2013 10:36:31 |
| Andrew Johnston | 20/03/2013 10:29:51 |
 7061 forum posts 719 photos | Otley: That's a neat explanation, thanks. I believe that the technique is also called wobble broaching, which may help visualise the action of the cutting tool. Andrew |
| Gordon W | 20/03/2013 11:40:37 |
| 2011 forum posts | Thanks for the simple explanation. Is there any reason why the broach could not be made from a good quality hex key, grind on relief and harden ? |
| Windy | 20/03/2013 12:42:42 |
910 forum posts 197 photos | Thanks Jason that link answers my question and the pictures on it are useful when I make one. Paul |
| Glyn Davies | 20/03/2013 14:08:40 |
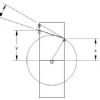
| 146 forum posts 56 photos | Too cold for the workshop today, so I thought I'd draw up a wobble broach for when it gets warmer.
If anyone wants to make one, make sure that the centre of the tool 'A' is on the centre line of the holder 'B'. |
| Andyf | 21/03/2013 10:11:33 |
| 392 forum posts | Otley, PM sent Andy |
| Gray62 | 21/03/2013 11:09:18 |
| 1058 forum posts 16 photos | There is a very good article in MEW 157 describing the construction of a wobble broaching device
Graeme |


Please login to post a reply.
Magazine Locator
Want the latest issue of Model Engineer or Model Engineers' Workshop? Use our magazine locator links to find your nearest stockist!
Sign up to our Newsletter
Sign up to our newsletter and get a free digital issue.
You can unsubscribe at anytime. View our privacy policy at www.mortons.co.uk/privacy
Latest Forum Posts
- *Oct 2023: FORUM MIGRATION TIMELINE*
05/10/2023 07:57:11 - Making ER11 collet chuck
05/10/2023 07:56:24 - What did you do today? 2023
05/10/2023 07:25:01 - Orrery
05/10/2023 06:00:41 - Wera hand-tools
05/10/2023 05:47:07 - New member
05/10/2023 04:40:11 - Problems with external pot on at1 vfd
05/10/2023 00:06:32 - Drain plug
04/10/2023 23:36:17 - digi phase converter for 10 machines.....
04/10/2023 23:13:48 - Winter Storage Of Locomotives
04/10/2023 21:02:11 - More Latest Posts...
- View All Topics
Support Our Partners


Shopping Partners
Subscription Offer

Latest "For Sale" Ads
- Reeves** - Rebuilt Royal Scot by Martin Evans
by John Broughton
£300.00 - BRITANNIA 5" GAUGE James Perrier
by Jon Seabright 1
£2,500.00 - Drill Grinder - for restoration
by Nigel Graham 2
£0.00 - WARCO WM18 MILLING MACHINE
by Alex Chudley
£1,200.00 - MYFORD SUPER 7 LATHE
by Alex Chudley
£2,000.00 - More "For Sale" Ads...
Latest "Wanted" Ads
- D1-3 backplate
by Michael Horley
Price Not Specified - fixed steady for a Colchester bantam mark1 800
by George Jervis
Price Not Specified - lbsc pansy
by JACK SIDEBOTHAM
Price Not Specified - Pratt Burnerd multifit chuck key.
by Tim Riome
Price Not Specified - BANDSAW BLADE WELDER
by HUGH
Price Not Specified - More "Wanted" Ads...
Get In Touch!
Do you want to contact the Model Engineer and Model Engineers' Workshop team?
You can contact us by phone, mail or email about the magazines including becoming a contributor, submitting reader's letters or making queries about articles. You can also get in touch about this website, advertising or other general issues.
Click THIS LINK for full contact details.
For subscription issues please see THIS LINK.
Digital Back Issues


Donate

 Register
 Log-in
Model Engineer Magazine
- Percival Marshall
- M.E. History
- LittleLEC
- M.E. Clock

ME Workshop
- An Adcock
- & Shipley
- Horizontal
- Mill

Subscribe Now
- Great savings
- Delivered to your door

Pre-order your copy!
- Delivered to your doorstep!
- Free UK delivery!
All Forum Topics > Workshop Tools and Tooling > Rotary Broaching