Forum sponsored by:

74 TX650 build.
| Tony sacc | 11/08/2023 05:12:42 |
| 69 forum posts 74 photos |
Not a lot of Yamaha left on the bike now, lots of custom bits and pieces made in my workshop. I do everything myself: Anodising, painting, electrical, welding, fabrication, machining , et al. Over the three years I've been building it I've made a seat pan, tail light, headlight brackets, aluminium battery carrier,side covers, chain guard, chain adjuster, air filters, manifolds, PMA mount, single points cam and points backing plate, remote spin on filter mount, engine brackets, cooler mount, handlebar risers, fuel distributor, brake line divider, catch can, Reed valve breather, laced the wheels, turned the hubs, modified the forms, polished lots and lots of aluminum, made two harnesses - one for lights, one for ignition, converted to VM carbs, rebuilt the engine and painted the bike. Plus lots and lots of minor stuff. This is the finished bike. I can't ride the bike myself as I have chronic RA, which has robbed me of all strength and fused fingers, joint replacements have robbed me of dexterity. That why it took three years to build. I got the two young fellas next door to take it for it first run. Everything worked fine, they ride modern technicolour nightmares, now they want a classic. A quick video fly around. https://www.youtube.com/watch?v=cCiit3y8NMA Adam taking it for it's first run. https://www.youtube.com/watch?v=MaFxHRc3C-Yo
|
| Dave Wootton | 11/08/2023 07:50:54 |
| 505 forum posts 99 photos | Very nice job Tony, welcome to the forum. Nice to see a custom bike that is so well finished and looks like it should have come out of the factory that way. Sorry to read that you are unable to ride it, looks like you had to overcome a number of obstacles apart from the poor condition before the rebuild. Thanks for posting I'm off to see the youtube video's! Dave
|
| colin brannigan | 11/08/2023 07:55:33 |
| 125 forum posts 29 photos | That looks really nice Tony, a brilliant job, nothing looks out of place, a real credit to you, well done Colin |
| SillyOldDuffer | 11/08/2023 10:05:33 |
| 10668 forum posts 2415 photos | I'm amazed what chaps like Tony achieve. Most impressive! Dave |
| Alan Jackson | 11/08/2023 10:06:18 |
 276 forum posts 149 photos | Well done Tony, It really looks the business, Looks more purposeful than the original must have looked. Such a shame you cannot ride it. Alan |
| Ady1 | 11/08/2023 10:33:56 |
 6137 forum posts 893 photos | wow Great job |
| Circlip | 11/08/2023 11:34:10 |
| 1723 forum posts | Just like Muddle Ingineerin Tony. You will NEVER get back the true value of the bike but you WILL enjoy the journey. Regards Ian. |
| bernard towers | 11/08/2023 11:37:23 |
| 1221 forum posts 161 photos | well done nice job. |
| Tony sacc | 11/08/2023 11:39:52 |
| 69 forum posts 74 photos | Posted by Circlip on 11/08/2023 11:34:10:
Just like Muddle Ingineerin Tony. You will NEVER get back the true value of the bike but you WILL enjoy the journey. Regards Ian. You can't make money out of restoring or cuctomising bikes at home, even if you do all the work yourself,the cost is extremely high. But, it keeps me off the streets at night. |
| A Smith | 11/08/2023 11:44:24 |
| 104 forum posts 4 photos | What a challenge! What a result! Well done. |
| Tony sacc | 11/08/2023 12:16:58 |
| 69 forum posts 74 photos |
I didn't like that idea, so decided to make a reed valve and couple it to a catch can. Blowby gas enter the main body, out the reed valve and is funnelled upward, does a Umturn at the top and is then funnelled down and out the exit spigot which is connected to,the catch can. Any oil caught before the reed is collected in a small pocket at the bottom and fed back to the rocker area. The catch can has four baffles topped with stainless pot scrubber material. Blowby gas enters the can via the tube half way up is then directed downward were some oil is separated and pools in the bottom. The gas is then directed upward through the four baffles and pot scrubber, any trapped oil drops down into the bottom of the can. That's the plan anyway. Cleanish gas, exits via a tube at the top and into the atmosphere via a foam filter. Reed valves are supposed to maintain negative sump pressure, thus preventing leaking through seals and gasses. The lower pressure in the sump also provides less pressure acting against the underneath of the piston on the downstroke. It also minimises I think all modern vehicles have similar systems fitted as standard, although most breath through the intake filter.. Due to the mounting position of the Reed valve, polishing was not considered, rather it was bead blasted. Edited By Tony sacc on 11/08/2023 12:22:48 |
| Oldiron | 11/08/2023 12:27:15 |
| 1193 forum posts 59 photos | Very nice job Tony. A really nice looking restoration/rebuild. That must have given you hours of pleasure & a few headaches no doubt. regards |
| duncan webster | 11/08/2023 16:03:55 |
| 5307 forum posts 83 photos | This is excellent, far beyond what I've ever achieved. On old Brit bikes I thought the leaks were designed in so you never had to change the oil, just keep adding more. I very briefly had a job with TriumphBSA, at the interview tour round the factory one chap actually said they'd cured the oil all over the showroom floor issue, they drained it out after the rolling road test before shipping to the dealer. I don't blame the engineers, they knew they had to move to new designs (not the triple, which was a bodge), but the management wouldn't invest in new machine tools etc Edited By duncan webster on 11/08/2023 16:04:47 |
| Howard Lewis | 11/08/2023 16:55:31 |
| 7227 forum posts 21 photos | Super work! Great skill and patience. Value the satisfaction, not the time spent. How do you charge for pleasure? The breather system is impressive, to brteathe withoutb oil going everywhere can be a major problem. Howard |
| Michael Gilligan | 11/08/2023 18:42:34 |
 23121 forum posts 1360 photos | Add me to the list of admirers, Tony Lovely work. MichaelG. |
| Tony sacc | 12/08/2023 00:28:30 |
| 69 forum posts 74 photos |
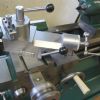
A couple of manifolds I machined up for the VM carb conversion. The TX650 originally had BS38 carbs, these are a CV carb, similar to SUs, which I detest.. Diaphragms and other bits were junk, and I don't like CV carbs so they were junked and I bought a couple of VM34 round slides.the carbs came with manifolds, rubbers, cables, pod filters and cable splitter. The manifolds were nicely made but had elongated 8mm mounting holes, requiring 6-8mm adapters and jiggling the manifolds around to line up with the inlet tract on the cylinder hea - not on my my bike!. On fitting, I also found the cables exiting the top of the carbs interfered with the petcocks, the only option was to tilt the carbs over at a rather serious angle. This is quite a popular conversion for this bike and that's what everyone does, tilt the carbs over. Again, not on my bike! So I decided to machine up a couple of longer manifolds to move the carbs behind the petcocks. To make them from one piece would have required a 90mm round piece of stock, a lot of waste and a lot of turning,so, I decided to make them from two pieces and press them together. The manifold plenums are 40mm with a 34mm bore to suitt both the intake size and the mounting rubbers. The mounting flanges are 90mm wide and the plenums around 30mm longer than stock. I made one to see how it would fit and look,it worked out well, so I made a matching one for the other side. First turning down the plenum, then shaping the flange. As the two are a press fit, I made the first 25 mm of the plenum .40 mm bigger than the the remaining length, that allowed me to press them togeer without scratching the hell out of the plenums. Once pressed together I mounted them on the lathe and machined the face of the flange nice and flat, then turned up a couple of 6mm spiggots and pressed them into place. The spigots are to connect vacuum lines from the manometer I made for syncing the carbs. Once done I mounted everything, spun up some brass cable nipples, shortened the cables and soldered the nipples in place. I also had to turn up a couple of fuel hose adapters as the carb intakes are 8mm, whereas the petcock outlets are 6mm. I overcame this problem with a different fuel feed methodology later, but more on that later. I then started the bike, read the plugs, changed a few jets, connected the manometer, started the bike up again and synced the carbs. Sweet as a loolly, that's how it ran. Nice crisp throttle response. Later on, I made up a couple of pancake filters and a fuel distributor block to overcome and neaten the jumble of fuel hoses, adapters, T pieces and elbows. More on them later. Longer manifolds do change torque and power curves, however, more so on two strokes than four. On four strokes, the change is minimal and a 30mm increase in length does not affect power and torque curves at all. Edited By Tony sacc on 12/08/2023 00:34:08 Edited By Tony sacc on 12/08/2023 00:36:03 |
| Howard Lewis | 12/08/2023 08:37:14 |
| 7227 forum posts 21 photos | Possibly, the slightly longer induction tract lowers peak torque speed? But the longer column of air may give a little better cylinder filling / scavenge at max power speed? And the chnage of carbs, and mixture strengths will obviously have an effect. Superb job though! Howard |
| Graham Titman | 12/08/2023 09:05:00 |
 158 forum posts 28 photos | As already said beautiful work and that sound keep up the excellent work |
| Tony sacc | 12/08/2023 10:11:44 |
| 69 forum posts 74 photos |
A longer inlet tract can increase the engine’s lower rpm power and torque output. Conversely, at higher engine rpms, a longer inlet tract can limit the engine’s higher rpm power output. In a nutshell increasing tract length can make engine power more usable for everyday riding. The XS650 is a 360 degree twin, 1ie, it is a shaker, and not really suitable for a short inlect tract runner. The higher the revs the more uncomfortable it is to ride. Of course, that's not the end of it, to realise any changes in performance the length of the inlet runner should be tuned to match the pressure wave at selected rpms, tuned correctly, the pressure wave will arrive back at the intake valve just as it opens. Longer runners also slow the pressure wave which can have detrimental effects if the runner is too long. As an example of carb intakes,the picture shows the filter base at the same level as the bellmouth, that's not ideal, moving the filter base back a little, so a rounded bell mouth edge protrudes above the filter base would be better. However, the difference would be minimal, as is the extra 30mm in manifold length: The manifold is not a tuned length, so would not affect performance much at all. Unles of course I lucked on the right length. Minor changes like these are of no real use on their own, however, in conjunction with two into one exhausts, lumpy cams, high comp pistons, flat slide carbs, 270.degree cranks, big bores, etc. the increase in performance can be startling. Individually, you'd be hard pressed to notice a difference though. Inlet tract design is a real can of worms.
Edited By Tony sacc on 12/08/2023 10:15:23 Edited By Tony sacc on 12/08/2023 10:35:04 Edited By Tony sacc on 12/08/2023 10:37:29 Edited By Tony sacc on 12/08/2023 10:41:19 |


.jpg")


.jpg")


Please login to post a reply.
Magazine Locator
Want the latest issue of Model Engineer or Model Engineers' Workshop? Use our magazine locator links to find your nearest stockist!
Sign up to our Newsletter
Sign up to our newsletter and get a free digital issue.
You can unsubscribe at anytime. View our privacy policy at www.mortons.co.uk/privacy
Latest Forum Posts
- *Oct 2023: FORUM MIGRATION TIMELINE*
05/10/2023 07:57:11 - Making ER11 collet chuck
05/10/2023 07:56:24 - What did you do today? 2023
05/10/2023 07:25:01 - Orrery
05/10/2023 06:00:41 - Wera hand-tools
05/10/2023 05:47:07 - New member
05/10/2023 04:40:11 - Problems with external pot on at1 vfd
05/10/2023 00:06:32 - Drain plug
04/10/2023 23:36:17 - digi phase converter for 10 machines.....
04/10/2023 23:13:48 - Winter Storage Of Locomotives
04/10/2023 21:02:11 - More Latest Posts...
- View All Topics
Support Our Partners


Shopping Partners
Subscription Offer

Latest "For Sale" Ads
- Reeves** - Rebuilt Royal Scot by Martin Evans
by John Broughton
£300.00 - BRITANNIA 5" GAUGE James Perrier
by Jon Seabright 1
£2,500.00 - Drill Grinder - for restoration
by Nigel Graham 2
£0.00 - WARCO WM18 MILLING MACHINE
by Alex Chudley
£1,200.00 - MYFORD SUPER 7 LATHE
by Alex Chudley
£2,000.00 - More "For Sale" Ads...
Latest "Wanted" Ads
- D1-3 backplate
by Michael Horley
Price Not Specified - fixed steady for a Colchester bantam mark1 800
by George Jervis
Price Not Specified - lbsc pansy
by JACK SIDEBOTHAM
Price Not Specified - Pratt Burnerd multifit chuck key.
by Tim Riome
Price Not Specified - BANDSAW BLADE WELDER
by HUGH
Price Not Specified - More "Wanted" Ads...
Get In Touch!
Do you want to contact the Model Engineer and Model Engineers' Workshop team?
You can contact us by phone, mail or email about the magazines including becoming a contributor, submitting reader's letters or making queries about articles. You can also get in touch about this website, advertising or other general issues.
Click THIS LINK for full contact details.
For subscription issues please see THIS LINK.
Digital Back Issues


Donate

 Register
 Log-in
Model Engineer Magazine
- Percival Marshall
- M.E. History
- LittleLEC
- M.E. Clock

ME Workshop
- An Adcock
- & Shipley
- Horizontal
- Mill

Subscribe Now
- Great savings
- Delivered to your door

Pre-order your copy!
- Delivered to your doorstep!
- Free UK delivery!
All Forum Topics > Related Hobbies including Vehicle Restoration > 74 TX650 build.