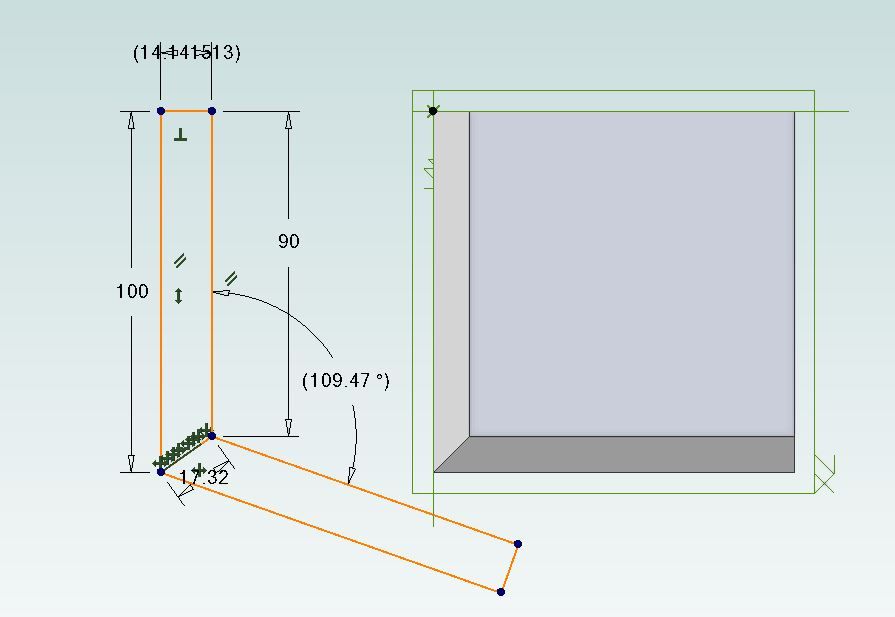
Geometry question: What is the angle between two 45° chamfers, after the two connecting surfaces have been 'flattened'?
| Donald MacDonald 1 | 20/03/2022 23:59:25 |
| 50 forum posts | Hi Geometry question:
If we now take just the two connecting surfaces ("A." and "B." ) , and imagine that they are made out of a single thin sheet of paper, that has been creased to get around the corner...
Thanks! Don PS By experiment it seems to be something like 19° off straight ( i.e. 161° in my diagram). Does that seem about correct?
Edited By Donald MacDonald 1 on 21/03/2022 00:19:36 |
| Michael Cooper 5 | 21/03/2022 02:43:56 |
| 16 forum posts | I’m getting 109.5 deg, for your 161 .Definitely try it on paper before you take my word for it lol.Good luck Don |
| not done it yet | 21/03/2022 07:08:48 |
| 7517 forum posts 20 photos | You know the dimensions of the parts. A bit of trigonometry would provide you with the proper value. |
| Gary Wooding | 21/03/2022 07:13:16 |
| 1074 forum posts 290 photos | I get 109.47° |
| JasonB | 21/03/2022 07:15:50 |
25215 forum posts 3105 photos 1 articles | yes 109.5 approx Measure the 4 edges of the chamfered face off your CAD model and draw that "flat" then measure the angle, easier than trig |
| DC31k | 21/03/2022 07:24:29 |
| 1186 forum posts 11 photos | Assuming that the chamfer is 45 degrees and the corner of the block is 90 degrees, you only need the chamfer distance to calculate this: In either a side or end view of the part (does not matter because the chamfer is 45 and the corner is 90), you see the vertical height of the chamfer (top to bottom) as a true length (1). This is the chamfer distance. In a plan view of the chamfer, you see the base length as a true length. It is the hypoteneuse of a 45 degree right triangle with side length = chamfer distance (2) . Those two lengths allow you to calculate the true length of the intersection slope (the vertex of your unfolded pattern) (3). The side or end view gives you the true length of the chamfer (the sloping bit) (4). (3) and (4) allow you to calculate the half angle. Using the same reasoning, you can write a general formula where the inputs are: chamfer angle, a characteristic chamfer distance (either vertical or horizontal) and corner angle. A good place to start is an old technical drawing book, where you learn how to draw a view of something such that a particular feature is shown as its true length and its angle to a plane is a true angle. |
| Michael Gilligan | 21/03/2022 08:32:52 |
23121 forum posts 1360 photos | Good explanation, DC31K It’s also worth noting that Builders have been doing this stuff for millennia … so a visit to ‘Builder Bill’ is quite informative: **LINK** http://www.builderbill-diy-help.com/roofing-angles.html MichaelG. |
| Hopper | 21/03/2022 10:48:37 |
7881 forum posts 397 photos | Sheet-metalworkers handbooks have all that information too. They use it for making ducting etc. I suppose these days there would be sheetie websites and calculators that would do it for you like the builders site MG posted above. Pipefitters handbooks/websites have all the same kind of info for circular forms (pipes) and cones etc.if you ever need it. How's the invention going? Edited By Hopper on 21/03/2022 10:50:32 |
| Donald MacDonald 1 | 21/03/2022 11:11:22 |
| 50 forum posts | Thanks everyone.
...Just in case anyone else might need all those decimal places! Don
Edited By Donald MacDonald 1 on 21/03/2022 11:15:19 |
| Paul Lousick | 21/03/2022 12:47:24 |
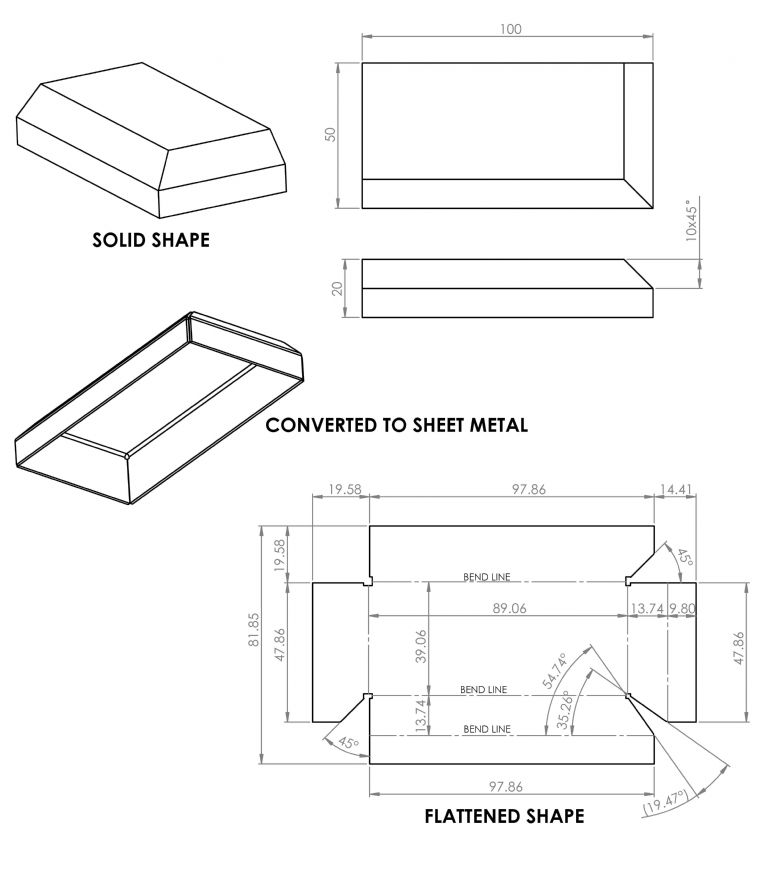
| 2276 forum posts 801 photos | CAD software that has a sheet metal module can produce a flat pattern that is used for bending. It is first modeled as a solid 3D part to the final shape. Then the software converts it into a part that is made from sheet metal. This part can then be flattened and dimensions added. Lines for bending are also shown. |
| blowlamp | 21/03/2022 14:30:48 |
1885 forum posts 111 photos | I did it in CAD by using the Mirror tool.
Martin.
|
| old mart | 21/03/2022 17:44:00 |
| 4655 forum posts 304 photos | Paul Lousick has the answer with 19.47 degrees, (19-28-12" |
Please login to post a reply.
Want the latest issue of Model Engineer or Model Engineers' Workshop? Use our magazine locator links to find your nearest stockist!
Sign up to our newsletter and get a free digital issue.
You can unsubscribe at anytime. View our privacy policy at www.mortons.co.uk/privacy
- hemingway ball turner
04/07/2025 14:40:26 - *Oct 2023: FORUM MIGRATION TIMELINE*
05/10/2023 07:57:11 - Making ER11 collet chuck
05/10/2023 07:56:24 - What did you do today? 2023
05/10/2023 07:25:01 - Orrery
05/10/2023 06:00:41 - Wera hand-tools
05/10/2023 05:47:07 - New member
05/10/2023 04:40:11 - Problems with external pot on at1 vfd
05/10/2023 00:06:32 - Drain plug
04/10/2023 23:36:17 - digi phase converter for 10 machines.....
04/10/2023 23:13:48 - More Latest Posts...
- View All Topics
- Reeves** - Rebuilt Royal Scot by Martin Evans
by John Broughton
£300.00 - BRITANNIA 5" GAUGE James Perrier
by Jon Seabright 1
£2,500.00 - Drill Grinder - for restoration
by Nigel Graham 2
£0.00 - WARCO WM18 MILLING MACHINE
by Alex Chudley
£1,200.00 - MYFORD SUPER 7 LATHE
by Alex Chudley
£2,000.00 - More "For Sale" Ads...
- D1-3 backplate
by Michael Horley
Price Not Specified - fixed steady for a Colchester bantam mark1 800
by George Jervis
Price Not Specified - lbsc pansy
by JACK SIDEBOTHAM
Price Not Specified - Pratt Burnerd multifit chuck key.
by Tim Riome
Price Not Specified - BANDSAW BLADE WELDER
by HUGH
Price Not Specified - More "Wanted" Ads...
Do you want to contact the Model Engineer and Model Engineers' Workshop team?
You can contact us by phone, mail or email about the magazines including becoming a contributor, submitting reader's letters or making queries about articles. You can also get in touch about this website, advertising or other general issues.
Click THIS LINK for full contact details.
For subscription issues please see THIS LINK.
Model Engineer Magazine
- Percival Marshall
- M.E. History
- LittleLEC
- M.E. Clock
ME Workshop
- An Adcock
- & Shipley
- Horizontal
- Mill
Subscribe Now
- Great savings
- Delivered to your door
Pre-order your copy!
- Delivered to your doorstep!
- Free UK delivery!


 .
.


 Register
 Log-in


