Forum sponsored by:

Fitting Chuck Jaws
Issue
| Chris V | 27/02/2020 16:04:22 |
 313 forum posts 42 photos | With my lathe came a 5" 3 jaw chuck, with both sets of numbered jaws, inside & outside. Clearly it hadn't seen one set of jaws for some time as I had to gently persuade two of the jaws that were fitted out with a wooden mallet due to rust. I now wish to fit the other set of jaws. Question is do I fit No1 jaw in chuck marked No1 & so on? I ask as two went in ok-ish but the other is putting up a struggle, obviously I don't want to force it and damage something. I have a VERY vague memory from metalwork at school that two of the jaws have to be swapped over? Maybe I'm completely miss remembering but would appreciate knowing for sure? Thanks Chris |
| JasonB | 27/02/2020 16:09:26 |
 25215 forum posts 3105 photos 1 articles | Generally the jaw numbers should match the slots, only chucks with single reversible jaws need the numbers mixing.
|
| Chris V | 27/02/2020 16:12:11 |
313 forum posts 42 photos | Thanks Jason that's good to know. Big mallet then (-; Cheers Chris. |
| Brian H | 27/02/2020 16:37:39 |
 2312 forum posts 112 photos | Chris, the jaws also need inserting in the order 1, 2, 3. Brian |
| Chris V | 27/02/2020 16:49:10 |
313 forum posts 42 photos | Thanks Brian! Chris. |
| David Standing 1 | 27/02/2020 17:05:36 |
| 1297 forum posts 50 photos | To insert jaws of a self centring chuck, this is an easy way. All jaws should be removed. Go to empty jaw slot 1. Turn the key until you see the start of the scroll thread cross the slot. Back off slightly, push jaw 1 in, lightly hold it in, turn the key and engage the scroll thread in jaw 1. As soon as it engages, stop, go to empty slot 2. Repeat jaw 1 instructions for jaw 2 and then 3.
Edited By David Standing 1 on 27/02/2020 17:06:10 |
| Chris V | 27/02/2020 17:09:57 |
313 forum posts 42 photos | Thanks very much David, that looks like a really handy tip! Cheers Chris. |
| Steviegtr | 27/02/2020 18:48:10 |
 2668 forum posts 352 photos | Or do what I did & being new to this technology was trying to fit the jaws the wrong way around from the radiused threads. Wondered why it was tight. Live & learn. Steve. |
| Chris V | 27/02/2020 19:23:24 |
313 forum posts 42 photos | Nice one Stevie, .....its not just me then (-: Chris. |
| Dalboy | 27/02/2020 19:55:49 |
 1009 forum posts 305 photos | Check that you have not mixed the jaws up and that you have two internal and one external.
|
| old mart | 27/02/2020 21:16:26 |
| 4655 forum posts 304 photos | I have marked the outside of some of the chucks with the 1-2-3 numbers and the ends of the matching jaws with a vibro etcher for easier jaw changing. The Toolmex four jaw independent is numbered by the manufacturer, but the cheap and not so good Chinese four jaw was numbered by me after juggling the jaws around to get the best fits. |
| Dalboy | 27/02/2020 22:25:04 |
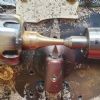
1009 forum posts 305 photos | if you have a set of jaws not numbered looking at the thread you will see that the first tooth on each jaw will be in from the centre slightly from the previous one. See ringed tooth on this set of woodturning chuck jaws.
|
| Enough! | 27/02/2020 22:27:40 |
| 1719 forum posts 1 photos | Posted by David Standing 1 on 27/02/2020 17:05:36:
To insert jaws of a self centring chuck, this is an easy way. Go to empty jaw slot 1. Turn the key until you see the start of the scroll thread cross the slot. Back off slightly, push jaw 1 in, lightly hold it in, turn the key and engage the scroll thread in jaw 1. As soon as it engages, stop, go to empty slot 2. Repeat jaw 1 instructions for jaw 2 and then 3.
I use essentially the same technique but rather than watch for the start of the thread each time, I insert the jaw, lightly press it down with a thumb then turn the scroll backwards. When the jaw "jumps" it's at the start of the scroll and I turn the scroll forward to capture it. Repeat for next jaw etc. Sounds a lot more complicated when written than when doing. |
| Neil Wyatt | 27/02/2020 22:43:20 |
 19226 forum posts 749 photos 86 articles | The problem is, of course, that some chucks are numbered 1,2,3 clockwise and some anti-clockwise... Quickest soliution Enter each jaw into a slot (don't worry which ones), reverse the scroll until all three jaws have 'clicked' at least once and appear to be level. Now tighten them up, if one jaw is clearly way out, loosen again applying inward pressure to this jaw until it clicks over the end of the scroll thread and moves in to align with the others. If it becomes apparent they still won't quite meet in the middle, undo and swap over two of the jaws. Ideal world. Ideally, know which slot is for which jaw, so if you have a new chuck, consider marking each slot to match the jaws as supplied by punching numbers on the body. Best Guess If you have already removed the jaws, slot 1 is usually the one opposite the logo and if they don't quite meet in the middle swap 2 and 3 to reverse the order and keep jaw 1 in slot 1. Neil |
| Tim Stevens | 28/02/2020 11:14:44 |
 1779 forum posts 1 photos | If you are dealing with rusty parts it would be an advantage to dismantle the chuck and give it a thorough clean. In normal chucks the front and back are held together by bolts - usually hex-socket headed - and there is nothing complex about the mechanism. Mark front and back before taking them apart so it all goes back exactly as it was. Once apart the mysteries of which jaw goes where will be obvious - but the main object is to allow for a thorough clean out. Not just rust but odd bits of swarf and crud. A good soak in paraffin (kerosene) will help, followed perhaps by a blast with a pressure washer and ten minutes on a warm stove to dry it all out. Then use (eg) graphite grease in the sliding surfaces as you reassemble, and fit the jaws in the order which you should now understand and perhaps, remember. Hope this helps. And PS - the time you need to swap jaws endways is with an independent chuck - where each jaw slides on its own and not as a set. Jaws for this type of chuck can be turned endways to change 'inside' jaws to 'outside' - but you can't do this with self centreing chucks. Exactly why will be clear when you have the bits in your hand. Cheers, Tim |
| Howard Lewis | 28/02/2020 11:34:04 |
| 7227 forum posts 21 photos | It may be that the slots, and / or the jaws are dirty or burred. Having cleaned everything, rotate the three jaw chuck until No 1 slot is easily visible. use the chuck key to rotate the scroll until the start of the scroll just becomes visible Enter No 1 jaw, and rotate scroll to engage the jaw. Continue rotating the scroll to repeat for Jaw 2 and then for Jaw 3. When fully rotated, the scroll should bring all three jaws to the centre. If this does not happen, either you have engaged one of the jaws in the scroll at the wrong time, or one of the jaws may have the first "tooth" broken off. This is not a complete disaster. If you ensure that the damaged jaw engages with the scroll at the second rotation of the scroll, all three Jaws should arrive at the centre at the same time. But do not expect absolute concentricity from a three jaw chuck. A good one will hold work to slightly better than 0.005" (0.127 mm ) T I R. A badly worn one could five times worse! You just need to be aware and make allowances for this. Howard
|
| Chris V | 28/02/2020 15:47:08 |
313 forum posts 42 photos | Thank you all, I'm almost glad I had the problem now, Ive picked up so many useful tips. BTW it did occur to me after I had made my request that if the manufacturer have gone to the effort of supplying two sets of jaws and had bothered to number them they why would he have numbered say no 3 jaw if its correct position was slot 4! Doh! Anyway I got the jaws in today, seems to have been localised rust. Thank you all again, Cheers Chris. |
| Howard Lewis | 28/02/2020 16:33:33 |
| 7227 forum posts 21 photos | Jaw position is less vital with a 4 jaw, since YOU determine the concentricity by the way that you adjust the jaws A 3 jaw with he jaws incorrectly sited will never meet at the centre, so NO hope of ever holding anything even vaguely concentric With a 4 jaw if you wish, you can set work concentric to less than half a thou (12 microns for the metricated ) or as eccentric as you wish. All good experience! Howard |
| Chris V | 28/02/2020 16:55:06 |
313 forum posts 42 photos | Thanks Howard, yes setting one up properly is something Ive yet to tackle. With not as much time as I'd like it seems the way forward is to learn these new (to me) ways of working as and when I need them. Not ideal but needs must! Chris. |
| Enough! | 28/02/2020 16:57:48 |
| 1719 forum posts 1 photos | Posted by Chris V on 28/02/2020 15:47:08:
BTW it did occur to me after I had made my request that if the manufacturer have gone to the effort of supplying two sets of jaws and had bothered to number them they why would he have numbered say no 3 jaw if its correct position was slot 4! Doh!
Now I'm confused. This suggests you're talking about a 4 jaw chuck (in which case it wouldn't have a scroll anyway). The original post said 3-jaw. |
1.jpg")
Please login to post a reply.
Magazine Locator
Want the latest issue of Model Engineer or Model Engineers' Workshop? Use our magazine locator links to find your nearest stockist!
Sign up to our Newsletter
Sign up to our newsletter and get a free digital issue.
You can unsubscribe at anytime. View our privacy policy at www.mortons.co.uk/privacy
Latest Forum Posts
- hemingway ball turner
04/07/2025 14:40:26 - *Oct 2023: FORUM MIGRATION TIMELINE*
05/10/2023 07:57:11 - Making ER11 collet chuck
05/10/2023 07:56:24 - What did you do today? 2023
05/10/2023 07:25:01 - Orrery
05/10/2023 06:00:41 - Wera hand-tools
05/10/2023 05:47:07 - New member
05/10/2023 04:40:11 - Problems with external pot on at1 vfd
05/10/2023 00:06:32 - Drain plug
04/10/2023 23:36:17 - digi phase converter for 10 machines.....
04/10/2023 23:13:48 - More Latest Posts...
- View All Topics
Support Our Partners


Shopping Partners
Subscription Offer

Latest "For Sale" Ads
- Reeves** - Rebuilt Royal Scot by Martin Evans
by John Broughton
£300.00 - BRITANNIA 5" GAUGE James Perrier
by Jon Seabright 1
£2,500.00 - Drill Grinder - for restoration
by Nigel Graham 2
£0.00 - WARCO WM18 MILLING MACHINE
by Alex Chudley
£1,200.00 - MYFORD SUPER 7 LATHE
by Alex Chudley
£2,000.00 - More "For Sale" Ads...
Latest "Wanted" Ads
- D1-3 backplate
by Michael Horley
Price Not Specified - fixed steady for a Colchester bantam mark1 800
by George Jervis
Price Not Specified - lbsc pansy
by JACK SIDEBOTHAM
Price Not Specified - Pratt Burnerd multifit chuck key.
by Tim Riome
Price Not Specified - BANDSAW BLADE WELDER
by HUGH
Price Not Specified - More "Wanted" Ads...
Get In Touch!
Do you want to contact the Model Engineer and Model Engineers' Workshop team?
You can contact us by phone, mail or email about the magazines including becoming a contributor, submitting reader's letters or making queries about articles. You can also get in touch about this website, advertising or other general issues.
Click THIS LINK for full contact details.
For subscription issues please see THIS LINK.
Digital Back Issues


Donate

 Register
 Log-in
Model Engineer Magazine
- Percival Marshall
- M.E. History
- LittleLEC
- M.E. Clock

ME Workshop
- An Adcock
- & Shipley
- Horizontal
- Mill

Subscribe Now
- Great savings
- Delivered to your door

Pre-order your copy!
- Delivered to your doorstep!
- Free UK delivery!
All Forum Topics > Beginners questions > Fitting Chuck Jaws