Forum sponsored by:

Silver steel
Bending silver steel
| derek hall 1 | 22/04/2018 18:43:58 |
| 322 forum posts | Hi I am currently making one of John wildings clocks with maintaining gear. This calls for a special spring to be made from square section silver steel. The question for you guys is how to bend it? Book says anneal first and bend. But what's the best way to anneal silver steel? Or should i heat it up to red heat and bend in this state? Either way after the bending job, the spring needs to be hardened and tempered in the usual way for silver steel. So any ideas ? Regards Del |
| John Haine | 22/04/2018 19:53:15 |
| 5563 forum posts 322 photos | Heat it to carrot colour, keep it there for a minute or two, let cool down as slowly as possible. |
| Martin Dowing | 22/04/2018 20:20:55 |
 356 forum posts 8 photos | Your steel might be delivered in annealed form or you may purchase it as such. Otherwise heat it to about 800*C in molten salt bath (NaCl/KCl), cool down *slowly*, wash with water and dry. Wind a spring, heat it to 760-800*C, best in furnace or molten salt (KCl/NaCl) bath and austemper it, eg quench into molten sodium or potassium nitrate bath at 300*C bath themperature. Keep at 300*C for 30 minutes more, take out, cool and wash with water. Martin |
| Jon | 22/04/2018 22:51:18 |
| 1001 forum posts 49 photos | What type of spring is this Leaf or irregular shape? What Size are you dealing with, sounds very weird using 01 rather than tyhe better and numerous spring steels available. Annealing after forging we used to re heat cherry red or higher, cover over and let the coal go out. Every one a winner for 11 years as a pro. Cold bend after.
|
| Sam Stones | 22/04/2018 23:35:31 |
 922 forum posts 332 photos | Hi Derek, To some extent, Jon has beaten me to it. However, I wouldn’t bend (off the shelf) silver steel cold. It will bend, but chances are that it could break in a sort of delaminating fracture. If the spring design includes sharp bends, failure would be even more likely. It would be advantageous to make ready any radius formers before you start bending. Heat the steel to cherry red and bend it while it is at this temperature. Reheat as necessary. In the ME forum (as elsewhere), there are many versions of heat treatment for silver steel. [Search the M.E. Forum files for Silver steel.] Having successfully hardened silver steel over the years, I have found (the easiest home workshop method) that heating it to cherry red (my only means of assessing temperature), then quenching quickly and evenly into clean cold water. Carefully polish off the oxide layer before tempering. For springs, they need tempering to a deep blue. This can best be achieved by having the spring almost covered in brass filings/swarf and gently applying only enough heat to turn the spring blue. Chris of **LINK** has several great videos which describe aspects of the above in more detail. Have fun, Sam |
| Mark Rand | 23/04/2018 01:02:19 |
| 1505 forum posts 56 photos | An addition to Martin's comments. Table salt (NaCl) melts at 802°C. This is quite a handy temperature for hardening stuff. Just a little bit more, 850°C, is about the right temperature to quench from for many steels to harden them or as Martin states, to anneal them from. The only downside of a salt bath is that you really want to have good ventilation leaving the shed, or to do it out doors. Somehow the salt bath magically causes flash rusting of all steel surfaces within throwing distance of the pot. DAMHIKT
Here is one we prepared earlier:- **LINK** |
| Sam Stones | 23/04/2018 02:45:04 |
922 forum posts 332 photos | Probably chlorine gas Mark The same thing (rusting) happens in factories processing PVC. I'd guess it could be toxic, but other Forum members might like to clarify. Good luck, Sam
|
| Bill Pudney | 23/04/2018 03:28:45 |
| 622 forum posts 24 photos | When I was doing my apprenticeship, in the 60s, so before modern OHS stuff, the firm had their own salt baths. They were in a separate building with it's own ventilation system. There were big signs saying "be careful", "go away", "don't touch anything". The people who worked there wore fairly extensive personal protection stuff. We were told to only go there if we had to. As a result I have always kept well away from salt baths, and wouldn't even contemplate having such a set up. Each to their own I suppose!! cheers Bill |
| Sam Stones | 23/04/2018 03:40:10 |
922 forum posts 332 photos | Likewise Bill. In 1950 when I started my apprenticeship, the toolroom hardening shop was separate. The three baths, two gas fired, the third electric arc for HSS hardening were cyanide filled. All were equipped with hoods and extraction fans. I often wondered about the toxicity aspect. A bit of a worry Regards, Sam |
| Speedy Builder5 | 23/04/2018 07:06:55 |
| 2878 forum posts 248 photos | During my apprenticeship at Weybridge in 1965?? the site flooded when the Brooklands banking collapsed into the river Wey and flooded the site. The overhead crane hoists were used to lift the cyanide baths well clear of the flood level before the electricity was cut off. Not so well protected was the Blue Dip baths. These contained a sort of blue rubberised plastic solution that aluminium panels were dipped in to protect their finish before being riveted to the airframe. When the site flooded, the blue 'slick' floated on the water and wrapped itself around anything at the flood line - shades of Tory Canyon! |
| derek hall 1 | 23/04/2018 17:17:43 |
| 322 forum posts | Thanks for your help guys. I will try annealing first but not sure how I can slow the cooling process down other than to fire up the woodburner and leave it in there! If that doesn't work I will heat it up and while a red hot try and bend it. Btw the shape of this spring is like a Sheppard crock with the majority of the spring needing to be bent around 3/4 inch dia. .. I will let you know how it goes, as maybe someone will follow in my footsteps ! Thanks again Del |
| Stuart Bridger | 23/04/2018 21:02:57 |
| 566 forum posts 31 photos | Posted by Speedy Builder5 on 23/04/2018 07:06:55:
During my apprenticeship at Weybridge in 1965?? the site flooded when the Brooklands banking collapsed into the river Wey and flooded the site. The overhead crane hoists were used to lift the cyanide baths well clear of the flood level before the electricity was cut off. Not so well protected was the Blue Dip baths. These contained a sort of blue rubberised plastic solution that aluminium panels were dipped in to protect their finish before being riveted to the airframe. When the site flooded, the blue 'slick' floated on the water and wrapped itself around anything at the flood line - shades of Tory Canyon! The flood would have been 1968. I was there much later, only being 4 years old in '68. We are told that it was a very close thing that a major explosion was avoided if the flood water had got into the molten salt. I believe that they managed to cool it in time. "034 process" department was a fascinating place even in the 1980's. It was full of all-sorts of nasties. Chromic acid, cyanide salts, phosphoric acid, vapour phase degreasers, etc. |
| Jon | 25/04/2018 20:48:30 |
| 1001 forum posts 49 photos | Posted by derek hall 1 on 23/04/2018 17:17:43:
If that doesn't work I will heat it up and while a red hot try and bend it. Btw the shape of this spring is like a Sheppard crock with the majority of the spring needing to be bent around 3/4 inch dia. ..Del No idea what one of them is but assuming its something like 300 degrees wrapped round the 3/4".
|
| roy entwistle | 25/04/2018 21:59:56 |
| 1716 forum posts | For the maintaining spring on my regulator, which is similar to Wildings , I used hammer hardened brass. 24 years later it's going strong Roy |
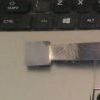
| Sam Stones | 25/04/2018 22:41:38 |
922 forum posts 332 photos | Derek, I’m guessing the Wilding maintaining spring looks like this, and relies on support from the central boss. Of course this one shows round wire whereas yours is square in section.
John Stevens cut his from an old 1/16” slitting saw which he annealed before filing to shape. Lots more work than plain rod/wire. He then followed up with H & T (harden and temper) to blue.
I chose gauge plate (high carbon steel similar to silver steel in terms of carbon content), before hardening and tempering. Have fun, Sam Edited By Sam Stones on 25/04/2018 22:44:55 |
| derek hall 1 | 13/05/2018 17:37:28 |
| 322 forum posts | Hi all Well today I tackled this strange looking spring, its exactly like Sam's first picture above. I had to file down some 1/8 square silver steel and then made a bending jig and practised using 1/16 round soft copper wire. Using the copper wire gave an approx length of silver steel needed for the spring. I first heated the silver steel to red hot and allowed it to cool naturally in still air. I then heated it to red heat where I needed to put in the bends around the jig. I all went very well to be honest. Thanks to all of you for your advice. So one other question this spring needs to be hardened and tempered. So obviously heating to red hot and quenching in oil or water, what sort of colour should i temper the spring down to? Regards to all Del
|
| Sam Stones | 13/05/2018 22:13:59 |
922 forum posts 332 photos | Hi Derek, Doing a Model Engineer Forum search for the word 'Tempering' produces four threads. I haven't read them all but would recommend practicing watching colours 'run' as you warm up a piece of scrap. Aiming for a uniform colour is perhaps the hardest part, especially with simple home workshop equipment. My preference for tempering silver steel springs would be to a colour between dark straw and purple/blue. On this chart - 260°C to 290°C would be my target. https://www.westyorkssteel.com/technical-information/steel-heat-treatment/tempering-temperatures/ https://www.westyorkssteel.com/technical-information/steel-heat-treatment/tempering-temperatures/ Chris of http://www.clickspringprojects.com/ http://www.clickspringprojects.com/ shows how (for appearances) he blues his clock parts. Hope this all helps. Regards, Sam
Edited By Sam Stones on 13/05/2018 22:44:08 |
| Sam Stones | 13/05/2018 22:50:33 |
922 forum posts 332 photos | Sorry about the double link. Sometimes it's automatic, sometimes not. Now I can't edit. Perhaps Neil will step in and fix it. Thanks Neil! |
| duncan webster | 13/05/2018 22:59:54 |
| 5307 forum posts 83 photos | Posted by Sam Stones on 25/04/2018 22:41:38:
Derek, I’m guessing the Wilding maintaining spring looks like this, and relies on support from the central boss. Of course this one shows round wire whereas yours is square in section.
John Stevens cut his from an old 1/16” slitting saw which he annealed before filing to shape. Lots more work than plain rod/wire. He then followed up with H & T (harden and temper) to blue.
I chose gauge plate (high carbon steel similar to silver steel in terms of carbon content), before hardening and tempering. Have fun, Sam Edited By Sam Stones on 25/04/2018 22:44:55 That looks a lot like an internal circlip, can you adapt one rather than making from scratch? |
| Sam Stones | 13/05/2018 23:35:37 |
922 forum posts 332 photos | Duncan, I'd reckon you could. Mr Stevens used an old 1/16" slitting saw blade. Loosely wrapped around a central boss however, the spring Derek is making becomes rapidly stiffer as torque wraps it around the boss. The spring shown in Mr Stevens' drawing is only supported sideways; nothing in the middle. Also, and as I found out from my (one and only) clock, there isn't sufficient stiffness in Mr Stevens' maintaining spring to keep the clock running for more than fifteen seconds. This is ample for its purpose, but the point being that the spring has to be stiff enough. That would bring us to simple beam theory (thickness cubed) to determine the correct spring thickness, shown as 1/8" in Mr Stevens' drawing. Sam
|


Please login to post a reply.
Magazine Locator
Want the latest issue of Model Engineer or Model Engineers' Workshop? Use our magazine locator links to find your nearest stockist!
Sign up to our Newsletter
Sign up to our newsletter and get a free digital issue.
You can unsubscribe at anytime. View our privacy policy at www.mortons.co.uk/privacy
Latest Forum Posts
- hemingway ball turner
04/07/2025 14:40:26 - *Oct 2023: FORUM MIGRATION TIMELINE*
05/10/2023 07:57:11 - Making ER11 collet chuck
05/10/2023 07:56:24 - What did you do today? 2023
05/10/2023 07:25:01 - Orrery
05/10/2023 06:00:41 - Wera hand-tools
05/10/2023 05:47:07 - New member
05/10/2023 04:40:11 - Problems with external pot on at1 vfd
05/10/2023 00:06:32 - Drain plug
04/10/2023 23:36:17 - digi phase converter for 10 machines.....
04/10/2023 23:13:48 - More Latest Posts...
- View All Topics
Support Our Partners


Shopping Partners
Subscription Offer

Latest "For Sale" Ads
- Reeves** - Rebuilt Royal Scot by Martin Evans
by John Broughton
£300.00 - BRITANNIA 5" GAUGE James Perrier
by Jon Seabright 1
£2,500.00 - Drill Grinder - for restoration
by Nigel Graham 2
£0.00 - WARCO WM18 MILLING MACHINE
by Alex Chudley
£1,200.00 - MYFORD SUPER 7 LATHE
by Alex Chudley
£2,000.00 - More "For Sale" Ads...
Latest "Wanted" Ads
- D1-3 backplate
by Michael Horley
Price Not Specified - fixed steady for a Colchester bantam mark1 800
by George Jervis
Price Not Specified - lbsc pansy
by JACK SIDEBOTHAM
Price Not Specified - Pratt Burnerd multifit chuck key.
by Tim Riome
Price Not Specified - BANDSAW BLADE WELDER
by HUGH
Price Not Specified - More "Wanted" Ads...
Get In Touch!
Do you want to contact the Model Engineer and Model Engineers' Workshop team?
You can contact us by phone, mail or email about the magazines including becoming a contributor, submitting reader's letters or making queries about articles. You can also get in touch about this website, advertising or other general issues.
Click THIS LINK for full contact details.
For subscription issues please see THIS LINK.
Digital Back Issues


Donate

 Register
 Log-in
Model Engineer Magazine
- Percival Marshall
- M.E. History
- LittleLEC
- M.E. Clock

ME Workshop
- An Adcock
- & Shipley
- Horizontal
- Mill

Subscribe Now
- Great savings
- Delivered to your door

Pre-order your copy!
- Delivered to your doorstep!
- Free UK delivery!
All Forum Topics > Help and Assistance! (Offered or Wanted) > Silver steel