Forum sponsored by:

Bearing removal, Chuck removal, motor cleaning (drill renovation central)
| Rainbows | 23/05/2016 22:52:00 |
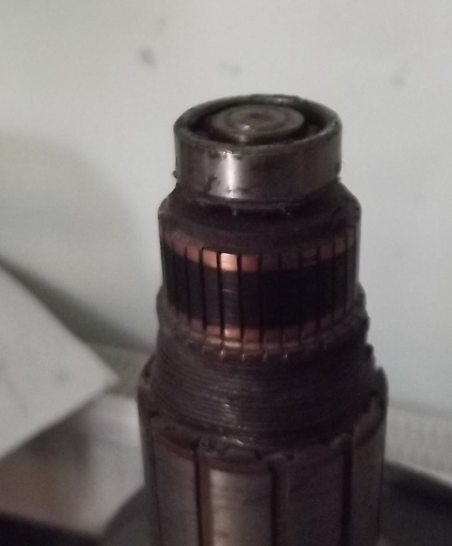
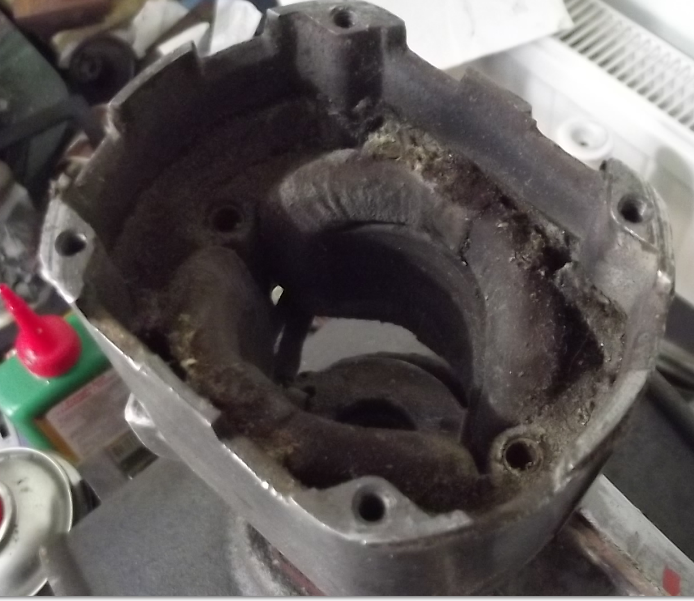
| 658 forum posts 236 photos | Recently picked up a Wolf Light Production Drill, partially because I am a sucker for Wolf (it takes my collection to 3 drills), partially because wolf drills are good when they work and partially because of the challenge of restoration (who can make a lathe if they can't repair a drill?) Cable had been slightly pulled out the drill so it was immediately taken apart. Checks on the armature with a voltmeter show it is fine. Gears are decent. Casing is fine. Brushes still long. Insides are completely covered in crud. Bearings have more grit than grease. Chcuk is a 1/4" CVA with a chuck key stripped of all teeth. Q1 Whats the best way to get this bearing off the amature shaft? I considered prying off with a screwdriver but didn't want to bear onto the commutator. Feels kinda gritty so I want to replace with a new sealed for life bearing.
Q2 CVA seem to be a while out of business so since the condition of the chuck and key is questionable I was planning to buy a new chuck, probably jacobs. 3/8x24 mount so I know the chuck should just turn off (I cann't see any screw inside the chuck). I can't think of any way to lock the spindle in place while rotating the chuck. Originally I tried an allen key in the screw retaining the gear but that just indid the screw. With the screw off I couldn't get the gear (keyed and pressed) off the spindle to slide the spindle out towards the chuck. Anyone got ideas?
Q3 As previously mentioned the drill is full of crud. Most places that involved oil and tissue to remove but I thought the windings might be more delicate. Anyone know how to safely clean these out? I imagine the thick fluff layer could hamper heat dissipation or something.
Also anyone else have one of these?I'm struggling to place the green colour on the front. Want to spray paint it back to original when I get the chuck off.
|
| Alex Collins | 23/05/2016 23:54:02 |
 147 forum posts 38 photos | Hi Rainbows. |
| John Reese | 24/05/2016 00:14:51 |
 1071 forum posts | Alex, It does not appear to me that there is enough space behind the bearing to clear the jaws of a 2 jaw or 3 jaw puller. I think a bearing separator is a better choice. John |
| John Reese | 24/05/2016 00:26:26 |
1071 forum posts | Rainbows, To remove the chuck first check inside to see if there is an allen head screw holding the chuck onto the spindle. If you find one, remove it. It will have a left hand thread. For the next step cut a piece of hardwood to jam the gear against inside of the housing. Insert a steel rod into one of the holes in the chuck (the holes for the chuck key). Give it sharp rap with a hammer to loosen the chuck. (Right hand thread) If you had removed the chuck before dismantling the drill the inertia of the armature and gear train would probably have been sufficient to resist rotation when you hammered on the rod. John |
| StephenS | 24/05/2016 04:01:19 |
| 38 forum posts | Hi Rainbows, In a past life I used to repair power tools, so the way I would approach this would be:- Do NOT remove the armature bearing yet. Reassemble the drill, not worrying about the motor brushes. No need to remove the gearbox grease, or if you have already removed it, no need to relubricate it just yet. The main criteria is that it all turns. Make up a rod, about 6-8" long, from steel bar or rod that you can grind the end down to be a snug fit in the hole for the chuck key in the chuck. Hold the drill in one hand, with the rod stuck in the chuck key hole, and give the rod a good whack with a big hammer. This should loosen the chuck which can then be unscrewed by hand. Sometimes several whacks are needed, but this is the best way to loosen screwed-on chucks. As John Reese has said, the inertia of the armature and gearbox will be sufficient to resist the rotation. Then dismantle the drill again. As you thought, if you try to lever the bearing off, you WILL damage the commutator. What you need is the bearing separator shown by John Reese, but these are rather expensive for a one-off. You could probably bodge something up. The advantage here is that as the bearing starts to move, you can tighten the separator jaws under it, so getting better purchase on the bearing. If you cannot sort out something here, try to see if a garage or auto-electrician can remove it for you. When you have dismantled the gearbox and removed the chuck, you should be able to see how to remove the gear and chuck bearings. Then wash out the gearbox housing (kerosene or similar), replacing any bearings that you can, reassemble and lubricate it. I like to use a grease with Molybdenum Disulfide in it as you are unlikely to take this apart to lubricate it again. The best way to clean out the windings of all the accumulated crud in there is just to give it a really good blow out with compressed air. I would prefer not to poke at anything, just to give it a prolonged blow-out. Poking could compromise insulation that old, and anything left after a really good blow-out would probably not affect things too much. Hope that helps and have fun with your new toy. Cheers, Stephen S. Edited By StephenS on 24/05/2016 04:02:30 (Edited for spelling) Edited By StephenS on 24/05/2016 04:03:21 |
| StephenS | 24/05/2016 05:50:21 |
| 38 forum posts | Hi Rainbows, Just a few extra thoughts. In case you have not seen a bearing separator before, the main advantage of them is that they have a taper on the inside of the plates so that they can be slid under a bearing that has very little clearance, or much too little space for a bearing puller. Then as you start to pull the bearing off, and get more space, you can tighten the screws and pull the plates in further and get better purchase on the bearing. It may be possible to bodge something similar, but I don't know what your workshop holds. Which is why I suggested a motor garage or auto-electrician as they do this sort of thing quite commonly. Someone else may have a better idea than me as to how to bodge something for this job. In the gearbox, once you have undone the chuck and the screw that holds the gear on, you may need a puller to remove the gear, or it may be more obvious from the chuck end what holds what on or in. Just take it carefully here until you are sure what holds what. Cheers and have fun, StephenS.
|
| Martin Connelly | 24/05/2016 06:02:32 |
 2549 forum posts 235 photos | An alternative to the rod in the chuck key hole is a large Allen Key in the chuck. As long as you can close the chuck down on to the hex hand tight is enough. Martin |
| Nicholas Farr | 24/05/2016 06:51:36 |
 3988 forum posts 1799 photos | Hi, I agree with Martin, put the largest hex key in the chuck and then use a copper/hide or other soft face hammer to give it a swift blow or two, don't use a ordinary hammer. Using a rod in one of the holes can lead to it flying around out of control. You should use safety glasses at least while doing this operation, with want ever method you use, but a full face visor would be better. Remove the bearing with a puller as suggested or cut it off with care, using a cutting disc in a Dremel or similar tool. Do not use levers or wedges against the commutator, as this will most likely damage it permanently. Regards Nick. |
| Rainbows | 24/05/2016 07:50:19 |
| 658 forum posts 236 photos | 3.5mm dehind the bearing. 22mm od bearing. Will see what I can make cause bearing seperators seem to have a 30mm starting point. |
| Neil Wyatt | 24/05/2016 09:25:35 |
 19226 forum posts 749 photos 86 articles | If all else fails, cut through the bearing at an angle using a carbide cutoff wheel 9well several it will be!) in a Dremel type tool. This worked on a washing machine.
Neil |
| john fletcher 1 | 24/05/2016 09:51:13 |
| 893 forum posts | I've never seen a bearing puller small enough to get behind the commutator end bearing. I have used a Dremel to cut up the bearing and that can also very tricky to get the inner portion cut away without catching the com, proceed with care!. The field coils are removable and can then be cleans as necessary. When you use compressed air you blast the rubbish further in, when actually it needs to come out. Be careful when fitting new brushes, if you can bed them in using very fine sand paper . Paper side to the com, using a see sawing motion. Maybe I'm telling you some thing you already know. Hope not John |
| Gordon W | 24/05/2016 16:32:58 |
| 2011 forum posts | Since you are going to replace the end bearing ,can you not put it in the vice and tap the shaft thru' ? If the inner stays on ,do the same with that. Or have I got it all wrong again? |
| John Rudd | 24/05/2016 16:50:55 |
| 1479 forum posts 1 photos | From my experience of a Stanley Bridges drill refurb, the chuck is screwed onto the shaft normal rh thread. Once removed, there is a circlip and large washer in front of the bearing located at the front of the gearbox housing. The helical gear is retained on the shaft with a small screw (4BA thread I think.) once removed, the gear can be levered off the shaft, it is keyed with two small square keys about 5/32 long. Once the gear is off, the bearing and shaft can be removed from the housing by pressing out in a hydraulic press ( a hot air gun is useful for warming the housing ) there may be another circlip on the back side of the bearing, once removed allows the bearing to be pressed off the shaft....rebuild in reverse...dont over grease its not necessary. I used a home made two leg puller( featured in EIM magazine) to remove small bearings and a g clamp helps stop the legs springing out.... Good luck with the refurb, its quite rewarding, I was quite pleased on the trial afterwards... Edited By John Rudd on 24/05/2016 16:52:48 |
| Neil Wyatt | 24/05/2016 17:10:32 |
19226 forum posts 749 photos 86 articles | Posted by John Rudd on 24/05/2016 16:50:55:
From my experience of a Stanley Bridges drill refurb, the chuck is screwed onto the shaft normal rh thread. Always a right hand thread on the chuck itself, but there often a LH screw inside the chuck as a precaution. Yes it caught me first time,. and I got caught again once when I found a cheap drill with a right handed screw inside the chuck! Neil |
| Rainbows | 24/05/2016 18:15:18 |
| 658 forum posts 236 photos | It being a single direction drill I think they skipped the inner left hand screw. All I can see down there is a lil nub that I guess is where the lathe centre was during manufacture. Put an allen key and whacked it counterclockwisewith a small hammer but it would do anything. I was about to post my failure here when I considered: What if I used a bigger hammer? Anyway then it worked. Thats one part down.
Also grabing the bearing with a vise is an idea. Unless anyone can declare how could have unforseen consequences I'm gonna go ahead and do that. |
| Nicholas Farr | 24/05/2016 21:52:24 |
3988 forum posts 1799 photos | Hi Rainbows, two things really, there is a possibility of the bearing shattering with small splinters flying about if you tighten it up in a vice, so if you are going to try it, I'd advise you to wear a visor and anyone else who may be helping you to wear one also. Second thing, the bearing being hard may not grip very well in a vice and when you try to tap the rotor out of it, the whole thing may just skid out of the vice and hit the floor or other things and damage it especially the windings and or the commutator. Regards Nick. Edited By Nicholas Farr on 24/05/2016 21:53:25 |
| Jeff Dayman | 24/05/2016 22:03:58 |
| 2356 forum posts 47 photos | +1 on the gripping in vise and (carefully) pin punching shaft through brg method. Safety visors a must. A "catcher" / helper holding the armature as Nicholas mentioned is a very good idea too. Heavy gloves on the catcher/helper might be a good idea depending on your hammer skills. >ahem< If this does not work or the outer shell shatters during the op then Dremel cutting the inner race is a good option. Just be careful not to nick the shaft or anything else nearby. A couple of wraps of low tack masking tape on the armature windings to protect them during |
| StephenS | 25/05/2016 06:27:23 |
| 38 forum posts | Don't like the grabbing the bearing in the vice idea, too much chance of things going wrong and causing damage. If the armature falls, the most likely thing to get damaged is the fan and that can be nearly impossible to repair. The Dremel cutting disk is a good idea. If you cut a sheet of cardboard and slip it under the bearing it will keep the cutting dust away from the armature windings. Same thing doing the bearing inner race. Be careful but a very small nick in the shaft as you remove the inner race will not cause any problems at all. If you do, just smooth it out a little and put a new bearing on. Depends if you are going in for a "making a working drill refurbishment" or a "exhibition standard refurbishment". If it is the working drill one, then I would definitely not try to remove the field coils in something this old. If it ain't broke, don't try to fix it. Trying to remove the field coils to clean things up is fraught with possible problems with insulation that is old. If you are re-using the old motor brushes, as you seemed to suggest earlier, and not skimming the commutator, (and it looks like it doesn't need doing), then you don't need to worry about bedding the brushes in. Being run in the past has already done that. Not wanting to disagree with some on here who I know do know much more than me, just trying to be practical. Have fun, StephenS. |
| john carruthers | 25/05/2016 07:18:27 |
 617 forum posts 180 photos | I spent an hour making a tiny 2 arm bearing puller, well worth the time. Now it's made I use it frequently for pulling spur gears from telescope mount motors and worm shafts, as well as bearings. |
| Rainbows | 25/05/2016 07:50:59 |
| 658 forum posts 236 photos | A steady stream of crud has been pouring out the windings when I was hammering bearings in and out of their housings reassembling then taking apart the drill again. Now its still got a layer of filth but lacks the big clumps it had before. Might not need anything more considering the risks. My kingdom for a dremel tool.
|


Please login to post a reply.
Magazine Locator
Want the latest issue of Model Engineer or Model Engineers' Workshop? Use our magazine locator links to find your nearest stockist!
Sign up to our Newsletter
Sign up to our newsletter and get a free digital issue.
You can unsubscribe at anytime. View our privacy policy at www.mortons.co.uk/privacy
Latest Forum Posts
- *Oct 2023: FORUM MIGRATION TIMELINE*
05/10/2023 07:57:11 - Making ER11 collet chuck
05/10/2023 07:56:24 - What did you do today? 2023
05/10/2023 07:25:01 - Orrery
05/10/2023 06:00:41 - Wera hand-tools
05/10/2023 05:47:07 - New member
05/10/2023 04:40:11 - Problems with external pot on at1 vfd
05/10/2023 00:06:32 - Drain plug
04/10/2023 23:36:17 - digi phase converter for 10 machines.....
04/10/2023 23:13:48 - Winter Storage Of Locomotives
04/10/2023 21:02:11 - More Latest Posts...
- View All Topics
Support Our Partners


Shopping Partners
Subscription Offer

Latest "For Sale" Ads
- Reeves** - Rebuilt Royal Scot by Martin Evans
by John Broughton
£300.00 - BRITANNIA 5" GAUGE James Perrier
by Jon Seabright 1
£2,500.00 - Drill Grinder - for restoration
by Nigel Graham 2
£0.00 - WARCO WM18 MILLING MACHINE
by Alex Chudley
£1,200.00 - MYFORD SUPER 7 LATHE
by Alex Chudley
£2,000.00 - More "For Sale" Ads...
Latest "Wanted" Ads
- D1-3 backplate
by Michael Horley
Price Not Specified - fixed steady for a Colchester bantam mark1 800
by George Jervis
Price Not Specified - lbsc pansy
by JACK SIDEBOTHAM
Price Not Specified - Pratt Burnerd multifit chuck key.
by Tim Riome
Price Not Specified - BANDSAW BLADE WELDER
by HUGH
Price Not Specified - More "Wanted" Ads...
Get In Touch!
Do you want to contact the Model Engineer and Model Engineers' Workshop team?
You can contact us by phone, mail or email about the magazines including becoming a contributor, submitting reader's letters or making queries about articles. You can also get in touch about this website, advertising or other general issues.
Click THIS LINK for full contact details.
For subscription issues please see THIS LINK.
Digital Back Issues


Donate

 Register
 Log-in
Model Engineer Magazine
- Percival Marshall
- M.E. History
- LittleLEC
- M.E. Clock

ME Workshop
- An Adcock
- & Shipley
- Horizontal
- Mill

Subscribe Now
- Great savings
- Delivered to your door

Pre-order your copy!
- Delivered to your doorstep!
- Free UK delivery!
All Forum Topics > General Questions > Bearing removal, Chuck removal, motor cleaning (drill renovation central)