Forum sponsored by:

supercharged V12 2 stroke
Methanol burning beast!!
| Nick_G | 10/12/2015 10:10:37 |
 1808 forum posts 744 photos | . Awesome. .............. Truly awesome.
Nick |
| dean clarke 2 | 10/12/2015 21:09:42 |
 169 forum posts 330 photos | Yea me too!!!!!! (can't wait to see the next bit that is,lol) Thanks for the kind words Nick Dean Edited By dean clarke 2 on 10/12/2015 21:10:44 |
| Howard Lewis | 14/12/2015 17:23:49 |
| 7227 forum posts 21 photos | INCREDIBLE skill and patience! To ask a stupid question, how do you plumb four carburretors to feed six cylinders per bank? On naturally aspirated four strokes, two carbs give equal induction pulse intervals, but often three are used. So are all four outside the blower, feeding mixture into a common gallery to it? Howard |
| dean clarke 2 | 14/12/2015 18:06:11 |
169 forum posts 330 photos | All four carbs feed mixture into the intake off the blower, then all six crankcase cavities are feed directly from the blower exhaust through six separate ports. each pair of cylinders in the v configuration is running in a sealed off crankcase cavity with the conrods running on a single big end journal. This gives 5 main center bearings and 6 big end journals. As the blower is one single unit there is an evening out of the mixture internally and therefore an even distribution of mixture to the cylinders. Hope this explains it clearly? Cheers Dean |
| Skel | 15/12/2015 22:43:50 |
| 12 forum posts 4 photos | This is very cool. |
| dean clarke 2 | 19/12/2015 00:23:10 |
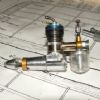
169 forum posts 330 photos | SUCCESS AT LAST ,,,,,,,,,,, Finally I have been able to get all the pistons lapped in to the liners and ready to run so to speak YAY what a saga that was but all dun now and it's onto the glow plug inserts/combustion chambers, photos below show progress to date
here's the glow inserts/combustion chambers....
Cheers for now Dean |
| dean clarke 2 | 23/12/2015 08:37:16 |
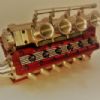
169 forum posts 330 photos | Well, having been able to spend a couple more nights in the shed this week I have been able to complete the next stage of the engine build. Tonight saw the completion of the glow inserts/combustion chambers and the final assembly of the cylinder heads. I have also been able to modify the fuel rail and freed up the throttle linkage movement. Photos below show the progress to date............................
Last photo below is the front view of the engine so far, all that remains to be done is the 4 fuel needles and the ignition rail. I think it will then be time to breathe life into the beast (hopefully)
Cheers for now Dean
Edited By dean clarke 2 on 23/12/2015 08:40:12 |
| Michael Gilligan | 23/12/2015 09:01:43 |
 23121 forum posts 1360 photos | Dean, I have run-out of superlatives to express my admiration. ... Now just looking forward to seeing & hearing it run. MichaelG. |
| Ady1 | 23/12/2015 10:30:27 |
 6137 forum posts 893 photos | looking forward to seeing & hearing it run Don't forget, it's a them run, not an it run because he's going to knock out a flat 12 at the same time, scratch built of course, heck, it gave him something to do Edited By Ady1 on 23/12/2015 10:30:41 |
| Jeff Dayman | 23/12/2015 13:52:15 |
| 2356 forum posts 47 photos | Looking great Dean, good luck on the first startup. JD |
| Peter Krogh | 23/12/2015 15:47:02 |
 228 forum posts 20 photos | I just read this whole build log and this has to be one of the most amazing 'model' engines I've ever seen. Just can't wait to see this monster belching fire!! Pete |
| dean clarke 2 | 30/12/2015 02:39:58 |
169 forum posts 330 photos | WELL.......... We're getting closer to life. I have now been able to make and fit the two ignition rails and also the four needles. The engine is off the assembly stand and refitted to the running mount, fuel line is all hooked up and I am now just charging up the power unit for the glow plug ignition system and mixing up the fuel. Here are a few more photos of progress to date........
Photo below shows us all ready to go with the new dog clutch starter mechanism
Well I'm off to mix some fuel up, see you in a while...... Cheers for now Dean |
| dean clarke 2 | 30/12/2015 22:20:23 |
169 forum posts 330 photos | Well that didn't quite go as I had planned........ the first attempt to bring the beast to life has ended in failure!!!! Bugger! there isn't enough grunt in the power supply to light up the glow plugs!!, Now where have I heard that before..... (grumble, groan, quietly swearing) worse than that though is when I removed the glow plugs to check things I found they were all dry as a bone!!!! that means no sucking in of the fuel and transferring to the combustion chamber........ double bugger and more groans and grumbles (and a bit louder swearing!) Ok so why is it not transferring? Simple answer.... no pressure in the crankcase.........no pressure in the crankcase equals no pumping from the blower...... Umm how can that be ? it worked well when I tested it!!!!! Hopefully the simple answer is that the vanes have become gummed up in the slots and the starter simply isn't spinning the engine over fast enough. When I first tested the blower there was no other engine components fitted and the turnover speed was very high with the starter and the blower was freshly assembled and could be heard very clearly working. A good friend of mine has suggested the addition of a leaf spring arrangement behind the vanes to keep them in contact with the case.... I may have to follow this idea up if I can't get it to work otherwise.,, Blast!!! More work!!! Oh well I guess if it was easy then everyone would be doing it right??? Oh yea and the other little bug in the system was a slight fuel leak at the fuel rail from a split hose, funny how these things always wait until the last moment to show themselves, just to let you know they aren't going to make it easy!! So its off to the decompression chamber for me ( a few bourbons should do the trick quite nicely I think) and then I may look at trying to resolve some of the tribulation issues with giving this engine life...IGOR YOU FOOL WHERE IS THAT EXTRA POWER!!!!!!!!! Cheers for now Dean |
| Jeff Dayman | 31/12/2015 03:16:45 |
| 2356 forum posts 47 photos | Did you prime the cyls a bit thru the venturis Dean? You do need a good glow on the plugs of course but you may also need a little raw fuel right down the pipes to get it primed to run, at least at first. Looks great by the way, well done. Good luck with first startup. JD |
| Danny M2Z | 31/12/2015 05:27:24 |
 963 forum posts 2 photos | Dean, you are nearly there, just teething probs. As you appear to have each bank of glow-plugs in parallel, the whole 12 at 1.5V would require about 36A from your power supply (about 54W). More if flooded An adjustable (voltage regulated to 1.5V tweakable) supply that can handle that sort of current may be required. As the plugs are in two banks, twin power supplies rated to about 30A each @1.5V may be the go, one to each rail. As for the blower, how is it lubed? Light leaf springs could be the answer but once its up to speed probably redundant and just extra wear. What about a metered (miniscule) prime through each plug hole just to get the blower up to speed. I have looked at your other engines, very impressive! **LINK** I think that many people are awaiting the video and the sound once the beastie runs. * Danny M *
|
| David Colwill | 31/12/2015 09:22:22 |
| 782 forum posts 40 photos | Posted by Danny M2Z on 31/12/2015 05:27:24:
I think that many people are awaiting the video and the sound once the beastie runs. * Danny M * +1 for that. Regards. David.
|
| dean clarke 2 | 07/01/2016 03:56:01 |
169 forum posts 330 photos | IT LIVES YESSSS!!!!!! Well it has finally breathed its first breath of life yay.......... still a bit of work required in the fine adjustments and finishing touches etc but the beast lives..... here is the youtube link to the first run video
|
| dean clarke 2 | 07/01/2016 04:04:48 |
169 forum posts 330 photos | So its a big thankyou to all of you who encouraged me and also to those few who told me it couldn't be done. Nothing fires up the determination more than being told it won't work or can't be done. While I admit there is still a lot of work to be done in the fine tuning department and no doubt a few more modifications to a few things to deliver peak performance, but there is now no doubt that you can in fact supercharge a 2 stroke engine. For those keen or mad enough to keep following my complete breakdown of all sane thinking the next project is a follow on development of the theory used in this v12 engine only slightly different. The next project is a twin blown w 24 glow 2 stroke.
Cheers for now Dean |
| Peter Krogh | 07/01/2016 05:34:16 |
228 forum posts 20 photos | Wow, that's just great! I had my doubts when I first read your early posts, then as I followed the build seeing the attention you were putting into the details..... I've seen glow engines. I've seen supercharged engines. I've seen two cycle engines. I've seen V 12s. But I've never seen, or heard about, all of those together in one engine. And a small one too boot!! Geez that's wonderful! Congratulations Dean!!! Pete
|
| thaiguzzi | 07/01/2016 05:57:34 |
 704 forum posts 131 photos | Buloody Hell Man! What a noise! Stupendous. Orgasmic. Brilliant. |


Please login to post a reply.
Magazine Locator
Want the latest issue of Model Engineer or Model Engineers' Workshop? Use our magazine locator links to find your nearest stockist!
Sign up to our Newsletter
Sign up to our newsletter and get a free digital issue.
You can unsubscribe at anytime. View our privacy policy at www.mortons.co.uk/privacy
Latest Forum Posts
- hemingway ball turner
04/07/2025 14:40:26 - *Oct 2023: FORUM MIGRATION TIMELINE*
05/10/2023 07:57:11 - Making ER11 collet chuck
05/10/2023 07:56:24 - What did you do today? 2023
05/10/2023 07:25:01 - Orrery
05/10/2023 06:00:41 - Wera hand-tools
05/10/2023 05:47:07 - New member
05/10/2023 04:40:11 - Problems with external pot on at1 vfd
05/10/2023 00:06:32 - Drain plug
04/10/2023 23:36:17 - digi phase converter for 10 machines.....
04/10/2023 23:13:48 - More Latest Posts...
- View All Topics
Support Our Partners


Shopping Partners
Subscription Offer

Latest "For Sale" Ads
- Reeves** - Rebuilt Royal Scot by Martin Evans
by John Broughton
£300.00 - BRITANNIA 5" GAUGE James Perrier
by Jon Seabright 1
£2,500.00 - Drill Grinder - for restoration
by Nigel Graham 2
£0.00 - WARCO WM18 MILLING MACHINE
by Alex Chudley
£1,200.00 - MYFORD SUPER 7 LATHE
by Alex Chudley
£2,000.00 - More "For Sale" Ads...
Latest "Wanted" Ads
- D1-3 backplate
by Michael Horley
Price Not Specified - fixed steady for a Colchester bantam mark1 800
by George Jervis
Price Not Specified - lbsc pansy
by JACK SIDEBOTHAM
Price Not Specified - Pratt Burnerd multifit chuck key.
by Tim Riome
Price Not Specified - BANDSAW BLADE WELDER
by HUGH
Price Not Specified - More "Wanted" Ads...
Get In Touch!
Do you want to contact the Model Engineer and Model Engineers' Workshop team?
You can contact us by phone, mail or email about the magazines including becoming a contributor, submitting reader's letters or making queries about articles. You can also get in touch about this website, advertising or other general issues.
Click THIS LINK for full contact details.
For subscription issues please see THIS LINK.
Digital Back Issues


Donate

 Register
 Log-in
Model Engineer Magazine
- Percival Marshall
- M.E. History
- LittleLEC
- M.E. Clock

ME Workshop
- An Adcock
- & Shipley
- Horizontal
- Mill

Subscribe Now
- Great savings
- Delivered to your door

Pre-order your copy!
- Delivered to your doorstep!
- Free UK delivery!
All Forum Topics > I/C Engines > supercharged V12 2 stroke