Forum sponsored by:

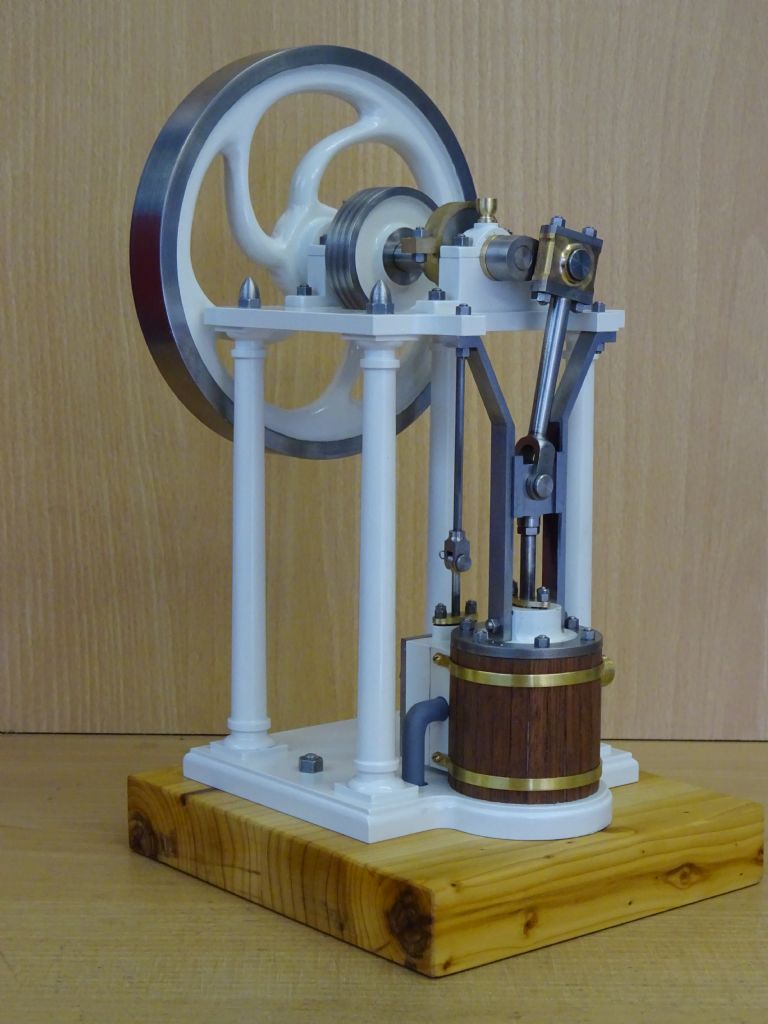
Muncaster's Simple Entablature Engine
| paul rayner | 26/10/2019 16:01:39 |
| 187 forum posts 46 photos | cheers Jason regards Paul |
| john Chappell 1 | 28/10/2019 22:03:40 |
| 14 forum posts 3 photos | Hi Jason, Attached photos of my build so far. By the way I used your method to make the cross head guides, Thanks. It may be of interest to others how I made a poor mans "soft jaws." for machining the cylinder cover. I bored out 3 large nuts to fit over the chuck jaws and added grub screws to hold them on the jaws. In this case I tightened up jaws on the nuts and then bored out a recess slightly smaller than the OD of the cover. Regards, John ps sorry I could not work out how to insert photos |
| JasonB | 29/10/2019 06:53:38 |
 25215 forum posts 3105 photos 1 articles | John, this should explain about adding photos |
| john Chappell 1 | 01/11/2019 02:54:19 |
| 14 forum posts 3 photos | Here are the photos!
Edited By JasonB on 01/11/2019 06:55:32 |
| Mick B1 | 01/11/2019 10:54:19 |
| 2444 forum posts 139 photos | Posted by john Chappell 1 on 28/10/2019 22:03:40:
... It may be of interest to others how I made a poor mans "soft jaws." for machining the cylinder cover. I bored out 3 large nuts to fit over the chuck jaws and added grub screws to hold them on the jaws. In this case I tightened up jaws on the nuts and then bored out a recess slightly smaller than the OD of the cover. Regards, John That's neat - even though I've got soft jaws I sometimes come across diameters I want to hold that don't fit my existing machining, and I know I'm unlikely to come across a similar diameter requirement anytime soon, and don't want to machine away what I've already got. This provides a workable solution for the 'one time' oddball job. Thanks. Edited By Mick B1 on 01/11/2019 10:55:31 |
| JasonB | 10/11/2019 20:24:12 |
25215 forum posts 3105 photos 1 articles | Don't all rush but Lee has the Muncaster flywheel castings back in stock here get them while there hot! Edited By JasonB on 10/11/2019 20:25:58 |
| john Chappell 1 | 10/11/2019 20:51:20 |
| 14 forum posts 3 photos | Thanks Jason. Very good news... but he doesn't post to Australia! so how is one to buy? I wanted to buy 2 or more if others in Australia would like them Regards, John |
| Stuart Smith 5 | 13/11/2019 10:22:29 |
| 349 forum posts 61 photos | I ordered a flywheel casting from Lee on eBay on Sunday and it arrived today. Looks good. |
| Philip Borland | 18/11/2019 15:29:03 |
| 10 forum posts 14 photos | Is there a material list anywhere, or do I need to work through all the components to work out what is needed ? I plan to start this and don't want to have to keep making trips to the metal monger.
|
| JasonB | 18/11/2019 16:20:06 |
25215 forum posts 3105 photos 1 articles | Good to hear another one is going to be built, give me a couple of hours and I'll post a list. |
| JasonB | 18/11/2019 18:54:11 |
25215 forum posts 3105 photos 1 articles | I think I have said before that I am not a fan of lists of materials as I feel sitting down and going through the drawings is a good way to get to know the parts and think about how you will machine them with what tools are available. However I can see the appeal to those who don't have much material in stock and want to get all that is required in one go to keep postage costs to a minimum. I have done a bill of materials in both Word and PDF format that can be downloaded. The sizes given are the minimum that the part will come out of, the individual builder will need to make allowances for Cutting, parting sawing and how much they need to hold the part. I have also indicated where it will be easier to buy small amounts of imperial stock as not all ME suppliers keep metric sizes and there is little point in buying 3m lengths when you may only need 10mm. Any Queries please ask. |
| Philip Borland | 18/11/2019 22:47:35 |
| 10 forum posts 14 photos | Excellent - Thanks Jason |
| john Chappell 1 | 18/11/2019 23:00:18 |
| 14 forum posts 3 photos | Regarding bending exhaust pipe. I selected a piece of pipe longer than needed, crimped one end and then filled the pipe with solder.I then bent the pipe with my home made pipe bender, threaded one end ( reversing the die to finish up close to the bend ), cut off to length, deburr and finally heat up and pour out the solder. Worked well for me! |
| Philip Borland | 20/11/2019 12:55:17 |
| 10 forum posts 14 photos | I found these on a US site
Anyone else want one ? I have a friend coming over second week of December and I could slip a few in his luggage |
| Philip Borland | 23/11/2019 20:55:12 |
| 10 forum posts 14 photos | Thought I'd share my build.
Squaring the stock
Cutting out the excess using a scroll saw - saw this on clickspring (youtube) and it works really well.
Centering the rotary table with my new toy -works great
Struggled with clamping this on my small roatary table. I used a woodworking router bit for the roundover and it worked well
Working my way round the edges
PCD was easy with the DRO
Looks good!
I built a live centre for my boring head. 2 quid bearing from ebay, then made an insert to hold the centres from my tailstock live centre. Used a dti to give me 1mm of offset at the tail end.
|
| Paul Lousick | 23/11/2019 21:17:46 |
| 2276 forum posts 801 photos | The bottom photo shows the job supported at the tailstock by your live centre (I assume in the offset position) but the headstock end in a collet instead of a centre. Did the work piece just flex as it was rotated ? Paul. |
| Philip Borland | 23/11/2019 21:23:28 |
| 10 forum posts 14 photos | Paul, yes just flexed - as per the advice in the magazine articles.
Phil |
| geoff walker 1 | 24/11/2019 07:07:49 |
| 521 forum posts 217 photos | Hi Phil Wow, you've made a really good start there. The base looks great, I reckon J would be proud of that and you used a wood router!!! I have a set of wood routers but I never imagined they would cut alloy. Still smile when I see that flexed offset turning method. I used the method as well just as J described. Clever stuff and one of a few machining gems he has used on this model. Well they are to me!!!! Geoff |
| JasonB | 24/11/2019 07:16:35 |
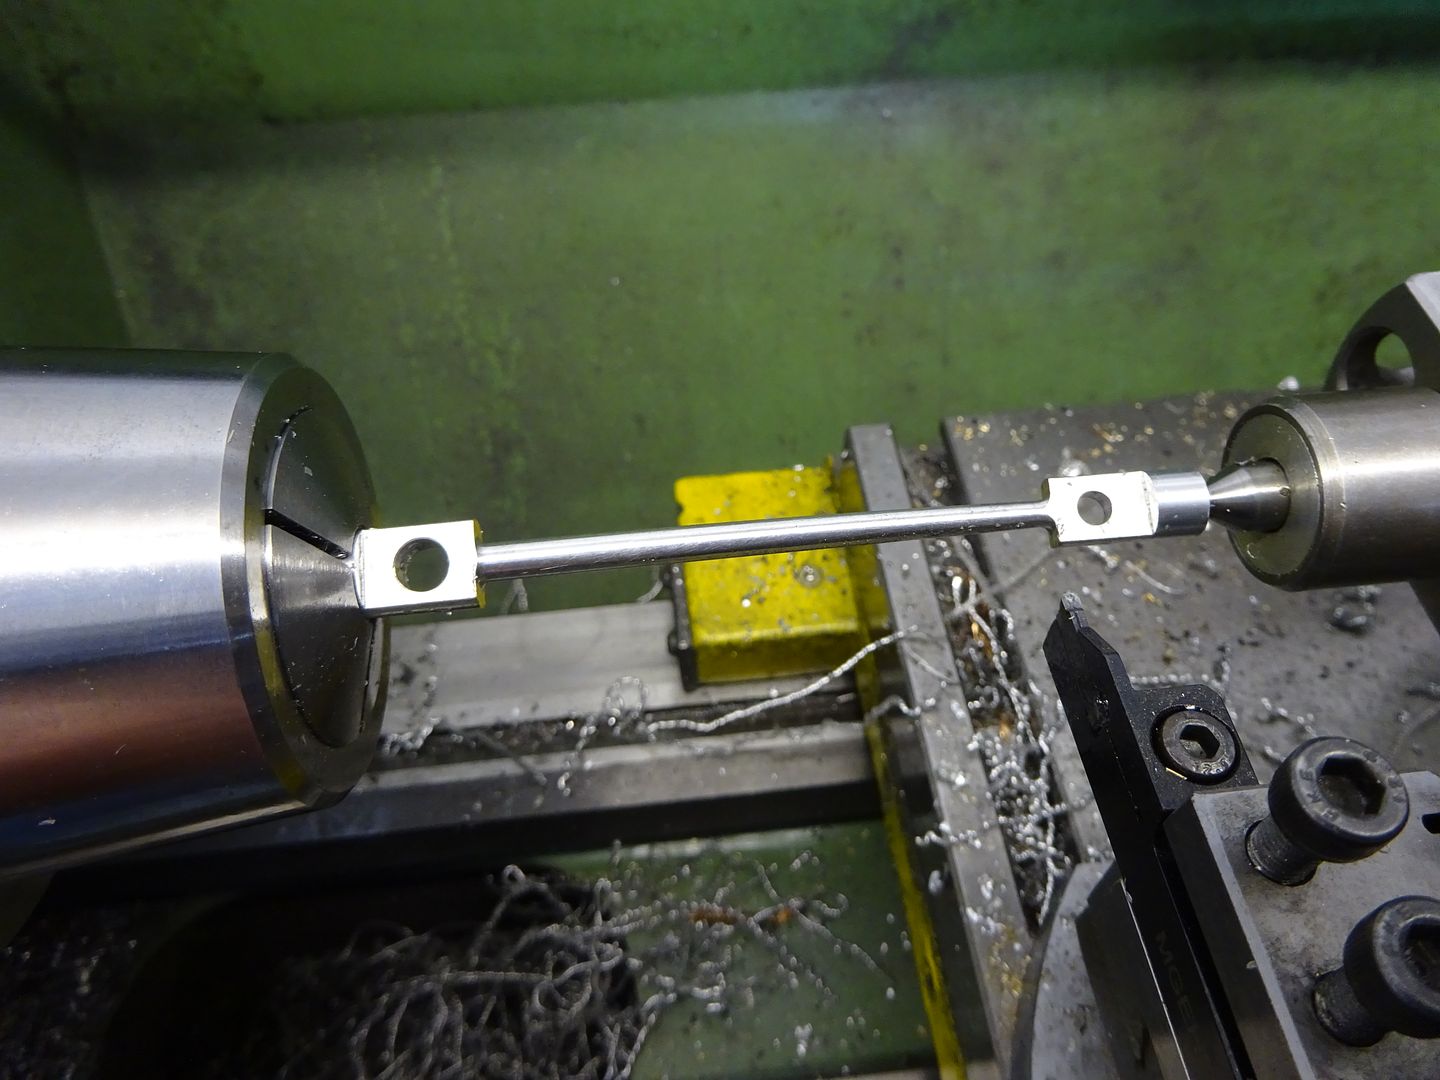
25215 forum posts 3105 photos 1 articles | Off to a very good start Phillip. Paul on this job with a 4mm spigot at both ends the job flexes quite easily so the setup with chuck or collet is a lot easier than between ctrs and driving with a dog. It can also be used where there is no spigot on the work if ample is left to hold, this will cause bending within the "tapered" part of the column and actually result in a slightly convex cut which replicated the classic column shape which is also not a straight taper. A good method for conrods on steam engines where the od tapers and has a similar result to blending tapers to get the "fish belly" look.
|
| Stuart Smith 5 | 26/11/2019 23:43:33 |
| 349 forum posts 61 photos | Jason I have just started the base today. Are the columns fixed to the base with nuts under the base? I can see that the holes for fixing the cylinder to the base are countersunk but the holes for the columns aren't. Thanks Stuart |


Please login to post a reply.
Magazine Locator
Want the latest issue of Model Engineer or Model Engineers' Workshop? Use our magazine locator links to find your nearest stockist!
Sign up to our Newsletter
Sign up to our newsletter and get a free digital issue.
You can unsubscribe at anytime. View our privacy policy at www.mortons.co.uk/privacy
Latest Forum Posts
- hemingway ball turner
04/07/2025 14:40:26 - *Oct 2023: FORUM MIGRATION TIMELINE*
05/10/2023 07:57:11 - Making ER11 collet chuck
05/10/2023 07:56:24 - What did you do today? 2023
05/10/2023 07:25:01 - Orrery
05/10/2023 06:00:41 - Wera hand-tools
05/10/2023 05:47:07 - New member
05/10/2023 04:40:11 - Problems with external pot on at1 vfd
05/10/2023 00:06:32 - Drain plug
04/10/2023 23:36:17 - digi phase converter for 10 machines.....
04/10/2023 23:13:48 - More Latest Posts...
- View All Topics
Support Our Partners


Shopping Partners
Subscription Offer

Latest "For Sale" Ads
- Reeves** - Rebuilt Royal Scot by Martin Evans
by John Broughton
£300.00 - BRITANNIA 5" GAUGE James Perrier
by Jon Seabright 1
£2,500.00 - Drill Grinder - for restoration
by Nigel Graham 2
£0.00 - WARCO WM18 MILLING MACHINE
by Alex Chudley
£1,200.00 - MYFORD SUPER 7 LATHE
by Alex Chudley
£2,000.00 - More "For Sale" Ads...
Latest "Wanted" Ads
- D1-3 backplate
by Michael Horley
Price Not Specified - fixed steady for a Colchester bantam mark1 800
by George Jervis
Price Not Specified - lbsc pansy
by JACK SIDEBOTHAM
Price Not Specified - Pratt Burnerd multifit chuck key.
by Tim Riome
Price Not Specified - BANDSAW BLADE WELDER
by HUGH
Price Not Specified - More "Wanted" Ads...
Get In Touch!
Do you want to contact the Model Engineer and Model Engineers' Workshop team?
You can contact us by phone, mail or email about the magazines including becoming a contributor, submitting reader's letters or making queries about articles. You can also get in touch about this website, advertising or other general issues.
Click THIS LINK for full contact details.
For subscription issues please see THIS LINK.
Digital Back Issues


Donate

 Register
 Log-in
Model Engineer Magazine
- Percival Marshall
- M.E. History
- LittleLEC
- M.E. Clock

ME Workshop
- An Adcock
- & Shipley
- Horizontal
- Mill

Subscribe Now
- Great savings
- Delivered to your door

Pre-order your copy!
- Delivered to your doorstep!
- Free UK delivery!
All Forum Topics > Stationary engines > Muncaster's Simple Entablature Engine