Forum sponsored by:

First Time Milling Cutter Issues Help Needed Please
| Andrew Johnston | 26/05/2014 11:09:45 |
 7061 forum posts 719 photos | Jamie: Here are some more thoughts: 3. It is difficult to say what power is available at the spindle without knowing more about the drive arrangements. However, I'll make an assumption that the mill uses a DC motor with PWM speed control? I note that the spec states two geared ranges; were you using the low range. We can do a simple calculation to get a feel for the power needed. A rule of thumb states that 1hp will remove 1 cubic inch per minute in low carbon steel. So if we assume that your depth of cut is 0.08" (2mm), width of cut is 1/4" (6.35mm) and feedrate is 6" per minute (~150mm/min) we get 0.12 cubic inches per minute, ie, about 90W. I would have thought the mill should have no problem achieving that. There is a caveat though; the setup may well not be rigid enough even though the power is adequate. The feedrate may seem a bit high, but it does take into account 'chip thinning' (Google it) as the depth of cut is shallow compared to the cutter diameter. 4. Personally I'd bin the cutters and buy a brand name one, say Dormer, Guhring etc. A HSS cutter should be fine, and no coating is needed. There are two rules for buying cutters. One, never buy cheap cutters; two, see rule one. Cheap unbranded cutters are often poorly ground with incorrect clearances, or even no clearance, and can lead to intense frustration. 5. The ER collet chuck definitely doesn't look right, you ought to be able to see the collet flush with the closing nut, between the nut and cutter. Follow the link provided by JasonB for details. 6. I meant that the distance from the point where the spindle exits the milling machine head to the end of the cutter is quite long, 5" or so? Cutting forces will cause the cutter to deflect and overhangs make it disproportionally worse. The rigidity follows a cubic law. In other words if you double the overhang the setup isn't half as rigid, but only 1/8 as rigid, so way more deflection. I don't see why the mill shouldn't accomplish what you want, but I think the setup and cutter are the limiting factors at the moment. Regards, Andrew |
| colin hawes | 26/05/2014 12:35:48 |
| 570 forum posts 18 photos | In my opinion 500rpm on a 20mm dia cutter is too fast on any steel using a hobby machine I would settle for about 400rpm on mild steel and less for tougher steels. With a light machine it is often necessary to have the table locks lightly applied and the column lock tight to give more rigidity. Colin |
| JasonB | 26/05/2014 12:38:57 |
 25215 forum posts 3105 photos 1 articles | I've just done a couple of cuts using some of the figures andrew suggest, uploading the video youtube at the moment will post after lunch. |
| Jamie Jones | 26/05/2014 12:47:32 |
| 39 forum posts 8 photos | Thanks for the hepl
Sorted the collet out I am only try to take out 1-2000th cut and it has been pullin the cuter out. The work is very steady in the vice although I am going clamp it flat to the bed (on block) and try again |
| JasonB | 26/05/2014 13:23:23 |
25215 forum posts 3105 photos 1 articles | Jamie, can you post a couple of photos of the collet close up as it should not pull out with those loads.
Anyway while waiting for some paint to dry I thought I would try out a few cuts based on Andrews calcs above, in the past we have had a difference of oppinion on cutting rates for the hobby machines
Constants X3 mill with 600w motor, slow speed range 100-1000rpm, 16mm 4 flute cutter (high quality Richon brand for £2!! ) 110mm spindle to end of cutter. X and Z axis locked. 10tpi leqadscrew. Cut No 1 ( two cuts infact) 2mm Depth, 6mm width, 750ish rpm. You can hear a slight chatter and looking back at teh viodeo my feed rate looks less than the suggested 6"/min but a reasonable cut and the machine was not complaining.
Cut No 2 2mm depth, 6mm width, 500rpm I don't have a readout for speed on the mill so thought it would be worth checking the speed so used the lazer tacho and a bit of tape on the collet chuck to set the speed. To be fair my 750rpm on the first test was at "half knob" but the tacho showed I'm actually getting just under 1300rpm in the low range not 1000. Can't hear the chatter this time and wa sprobably able to feed a bit faster.
Cut No 3 0.6mm depth, 19mm width, 500rpm To replicate more what Jamie was doing I took a full width cut across the now 19mm end, to keep the amount of metal removed the same as above the depth was reduced to 0.6mm, width 19mm. You can hear it start to chatter as I tried out teh feed, a slight reduction stopped that. To be be continued Edited By JasonB on 26/05/2014 14:07:26 |
| JasonB | 26/05/2014 13:32:40 |
25215 forum posts 3105 photos 1 articles | The finish from cut No3 showed some vertical ripples so I did what I would usually do and took a skim to finish - 0.05mm depth, 19mm width 750rpm. I stopped this cut half way across to compare finishes.
So in conclusing Andrews suggested figures should work on Jamies machine and they are not that different to what I would actually use with my feel and sound approach. But if taking a full width cut he may want to run a skim cut to finish. I would also normally use a bit of soluable oil as well but not enough hands on this occasion. This does seem to back up what most people have said and that its the set-up that is at fault not the machine. J PS Andrew if you want me to try any other combitations just ask. |
| Bill Robley | 26/05/2014 14:08:51 |
| 21 forum posts 1 photos | Hi Jamie. As a relative newbie to all this machining malarkey myself, I can sympathise with your frustration. I would like to take this time to give you a few pointers that I have learned since getting my milling machine. Sorry if some or all of this is obvious, but I knew none of this when I started out. Tightness is everything. Well, that and rigidity. Both of the machine, cutters, collets and work piece, and I have to say, you are already onto a loser with the work piece being held vertically as you currently have it. I would first suggest that the collet is not in the holder correctly. As others have said, the front face of the collet should be flush with the front of the collet nut. that could be why your cutter is slipping. ER collets are designed to seat into an offset ring at the bottom of the nut. If you find your collet is left in the holder after releasing the nut, then the collet was not correctly inserted into the nut. You should also ensure that both the tool holder taper (MT3) and the bore on the mill are free from grease, oil and dirt; as dirt and grease can, on occasion, prevent the taper from seating securely. Not to mention running an increased risk of scoring the internal taper. It's also important that the drawbar is tightened sufficiently. Now, this, does NOT mean hauling as hard as you can on the top nut, the drawbar should be just about a quarter turn past finger tight, just enough to prevent the taper tooling from slipping. Do the drawbar up too tight and you end up having to wail on the top of it with a hammer to release the tooling from the taper and that can be bad for the bearings. Also, the collet nut should be good and tight otherwise, again, you have the possibility of an end mill slipping. Most oriental milling machines benefit from the head of the machine being kept as low as possible, a setup I think you will agree, you do not have with your current setup. If at all possible, try to lay the plate flat on the table (With something sacrificial underneath it) and clamp it there, rather than have it as you have now, it's much more likely to result in a better finish. Even though you have the vice clamped down there will still be movement. Remember to lock off all unused axis on X,Y & Z. It may seem trivial but it makes a HUGE difference to how the machine reacts to a cut. Know & respect the machines limitations. These machines, although capable, are NOT industrial grade machines and should not be expected to perform as such. I would suggest that your cutter is too big for the machine. having looked at machines similar to yours, they quote a maximum cutter size of 12mm so as you can see 20mm is well above that suggested maximum. I would also suggest that a 25mm cut is too big a cut to be taking all at once. Especially in steel. I have found that even with all the axis locked off chatter and excessive vibration will start. Were I making the cut, I would have the plate clamped to the table and slowly lower the cutter down in increments until the cut is finished. Do not try to climb mill, especially with such a large work piece, it will end in tears, ruined work and possibly a broken cutter. Again, these oriental machines are great at what they do but climb milling in thick steel isn't one of the things they do well. Ideally, especially when starting out, you should be using the conventional milling mode. In conventional milling, the work piece is presented to the cutter AGAINST the rotation of the cutter, thus the cutter tries to push the work piece away from it. In climb milling, the work piece is presented to the cutter WITH the rotation of the cutter, thus the cutter tries to pull the work into the cutter. Climb milling is the setup you have pictured and as these machines are not as rigid as they could be (especially with the setup as pictured) you are asking for trouble. It's important to remember that the lead screws WILL have some play in them, even from new, and even with the unused axis locked off, the forces generated by the cutter can be enough to overcome the locks. I suspect this, along with the less than ideal setup is your main issue.
Unrelated things to consider with ANY metalworking and especially powered metal working: 1. Did I tighten EVERYTHING down? 2. If it DOES all go wrong, what's the worst that can happen & how can I prevent it happening in the first place. 3. NEVER operate your machines while tired or feeling less than well. 4. There are days when everything seems to be going wrong. Don't fight it, shut down and walk away, it'll wait until tomorrow. Increased frustration leads to mistakes, leads to injury. 5. If it doesn't feel right, it almost certainly isn't. stop and check. I apologise if my post seems to be all negative, I had no intention of it coming across like that. For engineering videos, try You Tube, there are loads of videos on there that have helped me in the past but, do be aware that everyone has their own ideas of how things can and should be done.
Have fun and the very best of luck.
Bill.
Edited By Bill Robley on 26/05/2014 14:10:05 Edited By Bill Robley on 26/05/2014 14:11:37 |
| Andrew Johnston | 26/05/2014 15:14:23 |
7061 forum posts 719 photos | Posted by JasonB on 26/05/2014 13:23:23:
Anyway while waiting for some paint to dry I thought I would try out a few cuts based on Andrews calcs above, in the past we have had a difference of oppinion on cutting rates for the hobby machines I had an uncomfortable feeling over lunch that I was going to end up looking a complete plonker for pontificating about feeds 'n' speeds on hobby machines. Thanks for posting the videos, reality normally trumps theory, at least in engineering. I would associate the slight 'squealing' sound on a couple of the videos with too low a feedrate. I think it indicates that the cutter is rubbing, then cutting, then rubbing and so on. Jamie: As a guide the recommended tightening torque for an ER40 collet is 130 ft-lbs (176Nm). By the way you should be using a collet that is nominally the same size as the cutter shank when not compressed. For example, if the cutter shank is 20mm you should be using a 19-20mm collet, not 20-21mm. Right, back to reality. I've got a load of machining to do for work and I was on a roll this morning when there was a bang from the mill and the spindle stopped.
I do have a spare drive belt, but while I've got the whole thing apart I might as well change the brake shoes and possibly a few other items. So first job tomorrow is to get on the dog 'n' bone and order spare parts. Regards, Andrew
Edited By Andrew Johnston on 26/05/2014 15:14:49 |
| Jamie Jones | 26/05/2014 21:59:16 |
| 39 forum posts 8 photos | Hi Guys Thanks for all the feed back. I am a little overwhelmed at the amount of info that has come back... THANKS TO EVERYONE FOR YOUR TIME AND ADVICE So where am I... A kind local with some experience popped around... He felt that the work was secure enough in the vice. Yes the collet was an issue and it was not fully located at the front of the nut... That aspect is now sorted. Ensured that the cutter was fully seated in the collet Tried milling as suggested from the other direction... Works a little better... Milling speed reduced and tried various speeds.... 300rpm, 400rpm 500rpm. The collect nut did have a habit of coming loose Everything has had a supper tightening down... still shaking the collet nut free.... Feed rate is slow, Still not covering the full width of the piece.. The cut being applied is 1500th... I am still a little disappointed with the progress... It was then suggested that it might be better having the head milling from above and trying a slot drill... Re set up the head and adjusted the big vice to run so that the work piece will run along the the bed (LtoR) instead of front to back. This uses different vice clamp points and it was obvious at the vice was far less stable set up this way. So I have removed the vice all together with a view to clamp the work piece flat and directly to the bed. (So it will no longer be upright) This has given me a new set of problems.. The work piece is as wide as the bed... So This rules out cutting front to back... Tried setting the work piece up so it would over hang the front of the bed... But I can't get the bed back far enough (DRO measuring device on the back) So this leaves me setting up the work piece so that I will have it overhanging the rear of the bed. I have very little space to play with before the cutter will make contact with the DRO measuring device. So I can't afford for the cutter to get pulled out of the collet anymore. The answer would be to raise the work piece up off the bed with a spacing work block... But I don't have one... And I was concerned that this would be less secure. At this stage I was a little frustrated with the project and thought it best to have a break from it. I also needed to look at some YouTube advice on clamping... As it was a very rare case in Wales of being a dry day and the sun was out. I then went for a short ride on my motorbike to the dams..... That lasted the whole afternoon.. So I will look at clamping the work piece down on to the bed tomorrow night and see how that goes .... Will try End Milling at 3-400rpm.... Someone asked which of the two drive setting gears I was in.... I have been using the high gear... So I will try both options tomorrow.. Which Gear would you guys suggest? As it is a big work piece should I clamp it direct to the bed or should I butt it up to another block of metal (Having Drilled some hole through it and also clamping it to the bed as well as using clamps? I will also try reading through all the extra advice that everyone has kindly given and watching the videos before I setup and try again tomorrow...I will let you all know how I get on. All the advice is really gratefully received.... THANKYOU... Jamie |
| Jamie Jones | 26/05/2014 22:36:27 |
| 39 forum posts 8 photos | Posted by NJH on 25/05/2014 12:50:48:
Hi Jamie Lots of good advice above but, anxious as I'm sure you are to get going with your new machine, I would advise just pausing for a bit and doing a little reading on the subject. There are a couple of little books in the "Workshop Practice" series which will give you lots of useful information and hopefully avoid damage to your work, your machine or, worst of all, yourself! They are:- Workshop Practice Series No2 - Vertical Milling in the Home Workshop by Arnold Throp and Workshop Practice Series No 49 - The Milling Machine by Harold Hall
( Harold is an ex editor of MEW , a helpful & knowledgeable guy, who also has a website with lots of info. and pictures of set-ups) regards Norman Just ordered those books thanks |
| Jamie Jones | 26/05/2014 23:26:33 |
| 39 forum posts 8 photos | Posted by JasonB on 26/05/2014 13:32:40:
The finish from cut No3 showed some vertical ripples so I did what I would usually do and took a skim to finish - 0.05mm depth, 19mm width 750rpm. I stopped this cut half way across to compare finishes.
So in conclusing Andrews suggested figures should work on Jamies machine and they are not that different to what I would actually use with my feel and sound approach. But if taking a full width cut he may want to run a skim cut to finish. I would also normally use a bit of soluable oil as well but not enough hands on this occasion. This does seem to back up what most people have said and that its the set-up that is at fault not the machine. J PS Andrew if you want me to try any other combitations just ask.
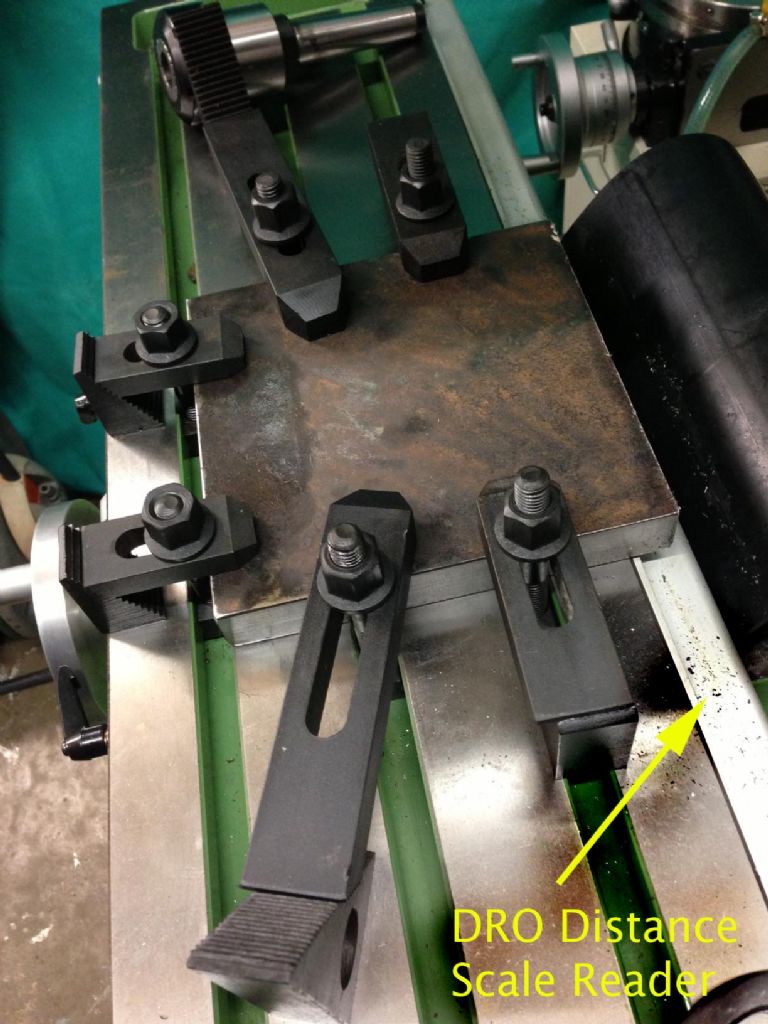
Hi Andrew I have been feeding at a slower pace than that (1/4 to a third) and a much shallower cut (1-2000th) Here is a picture of the collet that you have asked for along with the cutter beside it. This is the clamping setup I am looking to use... I will try and get some thin packing for the underside of my work piece. I still feel that the clamps won't be strong enough with out something solid to butt the work piece against to give it some more support. What's your thoughts Jamie
|
| Involute Curve | 26/05/2014 23:45:48 |
 337 forum posts 107 photos | I'm sorry to say that holding a piece of plate in a vice sticking up in the air as you had it could in no way be considered OK, you are simply asking for trouble, get it bolted down onto the bed preferably onto parallels or failing that pieces of scrap, I would probably use 1/4 plate or similar, then at least you are giving your machine half a chance, with the proper setup it should be a relatively easy job, and will give you confidence, a milling machine without some decent clamping kit, is pointless, a bit like a motorbike without tyres. Shaun Seen the pictures after my post this looks much better, I would ditch the front two, the four on the ends are enough, then move the plate towards the front and sit it on packing and you should be good to go. Edited By Involute Curve on 26/05/2014 23:49:50 |
| John Stevenson | 27/05/2014 00:01:48 |
 5068 forum posts 3 photos | Those 4 short clamps will be OK in the position they are in. Then use the 2 long clamps as packing. |
| JasonB | 27/05/2014 07:29:10 |
25215 forum posts 3105 photos 1 articles | Jamie, the suggestion to hang the work over the front of the table is so you can machine the back of it, something like this with the cutter on the side that is away from you. Should put the cutter over the table. Probably best to add some studs and nuts though
Are you locking the spindle or using a second spanner when tightening teh collet or just using your hand on the collet chuck body? The very shallow cut may also be allowing the tool to rub and vibrate. Can you also say what it is 1/1500 of as thats not a usual measurement, what is the DRO saying. Could it be you are taking a 0.015" ( fifteen thou) cut? Edited By JasonB on 27/05/2014 08:05:33 |
| Andrew Johnston | 27/05/2014 11:28:06 |
7061 forum posts 719 photos | I am also a bit confused on what depth of cut you are using? I would also agree that a very small depth of cut combined with a slow feedrate will almost certainly mean that the cutter is rubbing rather than cutting cleanly. I am not familiar with the speed ranges on your mill, but if it is possible to get a speed of around 500rpm on the low range that is what I would use as it means there will be more power available at the cutter. I would probably only use two clamps to hold the work down, but with the proviso that I have a bigger mill with bigger T-slots, so the clamps can be tightened rather more. It is good that you have studs and nuts close to the work, as they should be. From your picture the collet now seems to be correctly inserted into the nut, it's not obvious the first time round! I note that the collet is 22-19mm? That seems a very wide range, ER collets usually only span 1mm, or less. If the shank of the endmill is 20mm ideally you should be using a 20-19mm collet. Right, got to go, off to the university chemistry department now to see one of the profs about some work. Regards, Andrew |
| JasonB | 27/05/2014 11:39:41 |
25215 forum posts 3105 photos 1 articles | You may want to stop off a specsavers on the way Andrew it does read 20-19 |
| Nigel McBurney 1 | 27/05/2014 18:02:56 |
 1101 forum posts 3 photos | looked at the posts,oh dear, putting 25 mm plate on a small mill is like this and then trying to cut with the side flutes of a 20mm cutter is not good practice and wont do the mill much good. Endmills always cut better on the end face ie the work would be set vertical on a stiff angle plate and the mill spindle would also be vertical, Speed about 250 cut depth about 3mm and cut half the width of the plate. probaly not enough room under your spindle, you could try a fly cutter mounted direct in the spindle which gives a lot more clearance under the head.ok you may say its a bit slow with a flycutter but it will get the job done . If you want to mill pieces of inch plate you require a horizontal mill with a sturdy vertical head with 40 int spindle. I once saw demonstrated by a well known carbide tooling supplier ,an inserted tooth cutter with just two inserts milling an inch wide bar held in a vice in a bridgeport ,it cut at a very high speed and feed,no lubricant and produced red hot chips it was impressive particularly as the machine is only a light turret mill and the tooling was expensive,plus there is a considerable fire risk plus adjoining operators need protection, the point is it was face cutting not side cutting. Travelling around many machine shops in the 1960/70s the operators favourite tool on the turret mills was the single point fly cutter on smaller batchwork , some operators loved a bridgeport as the controls are all to hand and the machine easy and quick to use particularly if a bonus system was in use . others preferred a lot sturdier mill for heavier cutting , though you did not see much side cutting with larger end mills,the shorter stubbier clarkson deadlock cutter was more popular. Also the clarkson threaded cutters in their clarkson holders were in widespread use as the end mills did not move as they were lock solid. I have collet holders on my large turret mill and universal mill but when I am cutting tougher steels the Clarkson auto locks are set up they are far superior as collets will let the cutter slip. The popularity of collet systems has increased with cnc and solid carbide cutters which have plain shanks. |
| mechman48 | 27/05/2014 18:39:44 |
 2947 forum posts 468 photos | Hi Jamie I can only concur with all the advice previously given, I have the WM 16 (smaller brother to what you have) & I have taken reasonable cuts with it, dependant on material. one thing that I did note was that you state that the cutter kept coming loose. . I wonder if you have got a collet spanner, you must ensure that the collet nut is securely fastened up tight, I hold the spindle with the spanner provided in the set that came with the machine (power off of course) then have the cutter extended out only as far as is necessary for the job, then pull up tight with the collet spanner, really hand tight, not hammered! there will be enough grip in the collet to prevent any movement of the cutter, if you haven't got a collet spanner there are plenty available on the tool suppliers sites or flea bay for as little as a fiver, or make one. When I got my machine I trammed it in vertically & locked it up permanently with a couple of head locking blocks, so for the angles I needed to machine I use an angle vice or set up in my main vice, both set ups checked with digital angle gauge. I have no intention of moving my machine head from the vertical in the foreseeable future, before starting any cuts I ask myself.. is everything locked.. is all as rigid as it could be, after all these are only hobby machines not industrial grade but are quite good enough for what we 'hobbyists' need, happy milling George. p.s. Have you considered MT3 indexible tip cutters? I have a 19 mm 2 tip & a 50 mm 4 tip that I use if I want to rip off any heavy cuts.I hope this hasn't come across as patronising, it is certainly not intended to be, just constructive commenting. Edited By mechman48 on 27/05/2014 18:43:32 Edited By mechman48 on 27/05/2014 18:49:56 |
| Jamie Jones | 28/05/2014 22:05:45 |
| 39 forum posts 8 photos |
lol... I have been using the spanner to tighten the collet and also used a long spanner on the collet to get tension. What are head locking blocks and how would I apply them to my mill? I have not considered indexable tip cutters because I have not heard of them before, what is their benefits, pro's and con's? While I agree I don't have a full on industrial machine it is still not a small bit of kit imho.. The dealer knew I wanted it for motorcycle restoration, making bits and custom projects.
Edited By Jamie Jones on 28/05/2014 22:09:06 |
| Involute Curve | 29/05/2014 07:45:28 |
337 forum posts 107 photos | There's nothing wrong with your kit, it will be ok for what you want, if you had a Bridgeport and held your plate as you had it initially you would have the same problems, all you lack is experience, this will come only with time but you cannot rush this process, you are right to ask here, most use similar kit, the term bite off more than you can chew comes to mind, start of with a small job maybe in Ali to start with, its more forgiving, use HSS cutter initially, then as you gain experience and the feel of your machine move up to bigger jobs and tougher materials, in a few months time you will re read this thread and chuckle............ or wince... |


Please login to post a reply.
Magazine Locator
Want the latest issue of Model Engineer or Model Engineers' Workshop? Use our magazine locator links to find your nearest stockist!
Sign up to our Newsletter
Sign up to our newsletter and get a free digital issue.
You can unsubscribe at anytime. View our privacy policy at www.mortons.co.uk/privacy
Latest Forum Posts
- *Oct 2023: FORUM MIGRATION TIMELINE*
05/10/2023 07:57:11 - Making ER11 collet chuck
05/10/2023 07:56:24 - What did you do today? 2023
05/10/2023 07:25:01 - Orrery
05/10/2023 06:00:41 - Wera hand-tools
05/10/2023 05:47:07 - New member
05/10/2023 04:40:11 - Problems with external pot on at1 vfd
05/10/2023 00:06:32 - Drain plug
04/10/2023 23:36:17 - digi phase converter for 10 machines.....
04/10/2023 23:13:48 - Winter Storage Of Locomotives
04/10/2023 21:02:11 - More Latest Posts...
- View All Topics
Support Our Partners


Shopping Partners
Subscription Offer

Latest "For Sale" Ads
- Reeves** - Rebuilt Royal Scot by Martin Evans
by John Broughton
£300.00 - BRITANNIA 5" GAUGE James Perrier
by Jon Seabright 1
£2,500.00 - Drill Grinder - for restoration
by Nigel Graham 2
£0.00 - WARCO WM18 MILLING MACHINE
by Alex Chudley
£1,200.00 - MYFORD SUPER 7 LATHE
by Alex Chudley
£2,000.00 - More "For Sale" Ads...
Latest "Wanted" Ads
- D1-3 backplate
by Michael Horley
Price Not Specified - fixed steady for a Colchester bantam mark1 800
by George Jervis
Price Not Specified - lbsc pansy
by JACK SIDEBOTHAM
Price Not Specified - Pratt Burnerd multifit chuck key.
by Tim Riome
Price Not Specified - BANDSAW BLADE WELDER
by HUGH
Price Not Specified - More "Wanted" Ads...
Get In Touch!
Do you want to contact the Model Engineer and Model Engineers' Workshop team?
You can contact us by phone, mail or email about the magazines including becoming a contributor, submitting reader's letters or making queries about articles. You can also get in touch about this website, advertising or other general issues.
Click THIS LINK for full contact details.
For subscription issues please see THIS LINK.
Digital Back Issues


Donate

 Register
 Log-in
Model Engineer Magazine
- Percival Marshall
- M.E. History
- LittleLEC
- M.E. Clock

ME Workshop
- An Adcock
- & Shipley
- Horizontal
- Mill

Subscribe Now
- Great savings
- Delivered to your door

Pre-order your copy!
- Delivered to your doorstep!
- Free UK delivery!
All Forum Topics > Beginners questions > First Time Milling Cutter Issues Help Needed Please