Forum sponsored by:

Michael Cox Tangential Tool Holder- MEW 179
| mick H | 02/09/2011 09:37:02 |
| 795 forum posts 34 photos |
Gary, thanks....it certainly looks like another way of doing the same job, but the jig that Mike Cox describes looks more like the one on the left, in the photo posted by Chris Stephens on 22nd August. Edited By mick H on 02/09/2011 10:03:27 |
| chris stephens | 02/09/2011 12:16:07 |
| 1049 forum posts 1 photos | Hi Mick H,
Cox's jig is set at 30 /60 degrees and the tool bit that is to be sharpened is placed with the long corner downwards. The jig is used with the trough pointing downwards at the wheel so that the tool bit is trailing, short corner to long corner. If you get worried that your fingernails are getting close to the wheel, some find a simple screwed down tool bit clamp useful.
For general purpose use the V jig is superior to the jig in the previous post, which will work best with the the Oz style tool, as it is intended more for cutting in one direction only. As I have said before the striations favour one edge only , but the V one favours both cutting edges, so will also cut equally well on the back cut and when facing.
When your screen goes blue, scroll up to the top of the page where you will find a box where you can insert details for your insertions.
 It is also the place where you can find little smiley faces. It is also the place where you can find little smiley faces.chriStephens
|
| John Coates | 02/09/2011 12:19:01 |
 558 forum posts 28 photos |
Gary
Thanks for this. I can now make it and get my tool steel correctly ground
John |
| Gary Wooding | 02/09/2011 13:00:04 |
| 1074 forum posts 290 photos | Posted by chris stephens on 02/09/2011 12:16:07: For general purpose use the V jig is superior to the jig in the previous post, which will work best with the the Oz style tool, as it is intended more for cutting in one direction only. As I have said before the striations favour one edge only , but the V one favours both cutting edges, so will also cut equally well on the back cut and when facing. With the V-jig the striations are the same for both cutting edges, but, since neither are perpendicular to a cutting edge, both are less than ideal. Well, that's how it seems to me. I don't have an axe to grind about this; I simply worked the angles out for the Oz style jig, which seemed to be rather easier to make than the V one. It certainly seems to work OK. Gary |
| mick H | 02/09/2011 16:20:41 |
| 795 forum posts 34 photos |
Thanks Chris, but I still have queries.....I have left you a member message asking you to email me. Sorry to be a pain. Edited By mick H on 02/09/2011 16:21:07 |
| mick H | 02/09/2011 21:27:19 |
| 795 forum posts 34 photos | Thanks for contacting me Chris. You have now explained that the groove angle in the grinding jig is 90 degrees and this has resolved my queries. I shall now get on and make the jig. |
| Michael Cox 1 | 03/09/2011 13:10:16 |
| 555 forum posts 27 photos | Hi mick H,
I have just returned from holiday and caught up with this thread. As Chris has already told you the channel on the grinding jig is a 90 degree groove so there is only one possibleorientation for the tool.
Mike |
| mick H | 03/09/2011 18:39:10 |
| 795 forum posts 34 photos | Mike....I hope you enjoyed yourself.....we have been talking about you whilst you were away!
I picked up MEW 181 today and I am looking forward to the flycutter article.
|
| mick H | 14/09/2011 17:36:28 |
| 795 forum posts 34 photos | The recommended toolbit grind cuts superbly on BMS and stainless but what about brass. Do you grind different angles? I don't get the finish I would expect on brass. Can Mike or Chris help on this one? |
| Michael Cox 1 | 14/09/2011 22:58:16 |
| 555 forum posts 27 photos | Hi mick H,
I have not used my tangential tool for cutting brass many times but I have not found any big problems with it. However there are so many grades of brass that maybe my experience is not representative of all brasses.
Normal cutting tools for brass are ground with zero top rake. This could be achieved on the tangential tool by grinding the tool tip at a different angle. This could be achieved by setting up the tool in the tangential tool holder, with some protrusion, and then grinding the tip of the tool parallel to the upper clamping surface of the tool holder shank. A simple jig could be made to hold the tool in the correct orientation during grinding by clamping the upper clamping surface of the shank to a square bar and then just touching the tip against the side of a grindstone.
I hope this helps
Mike |
| chris stephens | 14/09/2011 23:40:41 |
| 1049 forum posts 1 photos | Hi Mick H,
I'm in complete agreement with Mike on this.
I seem to recall that MGJ, another former member, ground his tools with zero rake for brass and if he recommends it then you can be sure it works, although I have not found it necessary but then I don't use much brass it's far too expensive.
 As Mike says all the usual recommendations are for zero top rake for brass because of its chippy cutting characteristics. When you use a middling sort of tool there is a risk that the tool will grab. What I find with my favourite type of tool, with its very sharp edge, is that grabbing is not a problem as it just cuts its way through the metal. If you are getting a less than satisfactory finish, is it that you are working on small diameter stock? Brass is not as stiff, size for size, as steel and will flex and can give a rippled surface. You can improve the finish if you run the tool backwards, while supporting the work with a piece of oiled leather. This might sound very non H&S but can be very effective on small diameters, as with all things lathe if you don't like the sound of it, DON'T DO IT.
chriStephens
|
| ady | 15/09/2011 00:06:02 |
| 612 forum posts 50 photos | Funny how these things pop up as you do your own thing. I found boring toolholders easy to use and "self sharpening" but struggled with surfacing work. While final cuts are always best done with "on the money" and established procedures alternative techniques for roughing out big chunks of barstock can be handy. I've found that if you don't cut too deep, then below the centreline at the back or above it at the front can give good roughing results and the workpiece "grinds" the tooltip keeping it in a reasonable working condition until seriously accurate cuts and finish are required. Works for both carbide and hss. Don't go too deep or you might dig in. Great for auto feed work. |
| mick H | 15/09/2011 06:54:56 |
| 795 forum posts 34 photos | Thanks for the response. My comment arose as a result of working on a piece of small diameter brass......perhaps that explains it, but I should emphasise I still get a "good" finish as opposed to a "superb" finish on BMS. I shall experiment further. |
| Stub Mandrel | 09/10/2011 21:16:11 |
 4318 forum posts 291 photos 1 articles | Lacking a chunk of metal big enough to make Michael Cox's toolholder without wasting loads, I've just milled a crude copy of the eccentric holder out of some 3/4" bar. It's a bit rough as it was very much an experiment to work out how the clamping manages not to foul the work. The answer is 'with difficulty', I had to grind a lot of the clamp away. I ground the top of the tool by eye, and tidied it up and out a tiny radius on with a diamond slip. Problem was I made the clamp 'hooked' around the front edge of the bar; the eccentric tool squeezes it from the sides. but at least I've worked out how to get the angles. I was still able to see what happened on some intractable 1/2" stainless. And the result - was rather good. At least as good as any other tool I've used on what is nasty work-hardening stainless. The swarf came off as a continuous spiral, hot but not blued. Depth of cut was about 20 thou with 4 thou fine feed. Another try needed to make a tool that will face and deal with large diameters, but on the wholea useful proof of concept. Neil |
| Johnande | 24/11/2011 01:30:31 |
| 5 forum posts | I read with interest the Fly-cutter by Michael Cox in MEW 181. I intend to make it as I think it could solve some of my machining difficulties. Rather than use the complicated method of drilling the 12mm hole for the shaft at the 12 degree angle. Would it be possible to mill the slot for the tool at 12 degree's and mount the shaft at 90 to the base plate? Or are there other things come into play to make this not an option? Regards Johnande |
| Michael Cox 1 | 24/11/2011 08:28:53 |
| 555 forum posts 27 photos | Hi Johnande,
Sure you could mill the slot at 12 degrees and keep the base plat at right angles to the shaft but you would then have to modify the clamping screw arrangement because the tool would be in a deep channel.
I agree, my method of drilling the angled hole was overly complex. It would be much easier to drill the angled hole using a slot drill but I did not think of that at the time. Hindsight is wonderful.
Mike |
| Johnande | 24/11/2011 10:46:00 |
| 5 forum posts | Thanks for the reply Michael, your dead right, we all have 20 - 20 vision in hindsight.  Johnande |
| Anthony Knights | 28/05/2023 09:02:59 |
| 681 forum posts 260 photos | Michael Cox tangential tool holder. MEW 179. I made both left and right handed versions.
|
| Vic | 28/05/2023 10:27:32 |
| 3453 forum posts 23 photos | This is my tool holder from ten years ago. It was very straightforward to machine. The work on the clamping side including the drilling was all done in one sitting.
|
| Grizzly bear | 29/05/2023 20:42:55 |
| 337 forum posts 8 photos | Hi Vic, That's very nice, a masterpiece no less. Bear............ |


Please login to post a reply.
Magazine Locator
Want the latest issue of Model Engineer or Model Engineers' Workshop? Use our magazine locator links to find your nearest stockist!
Sign up to our Newsletter
Sign up to our newsletter and get a free digital issue.
You can unsubscribe at anytime. View our privacy policy at www.mortons.co.uk/privacy
Latest Forum Posts
- *Oct 2023: FORUM MIGRATION TIMELINE*
05/10/2023 07:57:11 - Making ER11 collet chuck
05/10/2023 07:56:24 - What did you do today? 2023
05/10/2023 07:25:01 - Orrery
05/10/2023 06:00:41 - Wera hand-tools
05/10/2023 05:47:07 - New member
05/10/2023 04:40:11 - Problems with external pot on at1 vfd
05/10/2023 00:06:32 - Drain plug
04/10/2023 23:36:17 - digi phase converter for 10 machines.....
04/10/2023 23:13:48 - Winter Storage Of Locomotives
04/10/2023 21:02:11 - More Latest Posts...
- View All Topics
Support Our Partners


Shopping Partners
Subscription Offer

Latest "For Sale" Ads
- Reeves** - Rebuilt Royal Scot by Martin Evans
by John Broughton
£300.00 - BRITANNIA 5" GAUGE James Perrier
by Jon Seabright 1
£2,500.00 - Drill Grinder - for restoration
by Nigel Graham 2
£0.00 - WARCO WM18 MILLING MACHINE
by Alex Chudley
£1,200.00 - MYFORD SUPER 7 LATHE
by Alex Chudley
£2,000.00 - More "For Sale" Ads...
Latest "Wanted" Ads
- D1-3 backplate
by Michael Horley
Price Not Specified - fixed steady for a Colchester bantam mark1 800
by George Jervis
Price Not Specified - lbsc pansy
by JACK SIDEBOTHAM
Price Not Specified - Pratt Burnerd multifit chuck key.
by Tim Riome
Price Not Specified - BANDSAW BLADE WELDER
by HUGH
Price Not Specified - More "Wanted" Ads...
Get In Touch!
Do you want to contact the Model Engineer and Model Engineers' Workshop team?
You can contact us by phone, mail or email about the magazines including becoming a contributor, submitting reader's letters or making queries about articles. You can also get in touch about this website, advertising or other general issues.
Click THIS LINK for full contact details.
For subscription issues please see THIS LINK.
Digital Back Issues


Donate

 Register
 Log-in
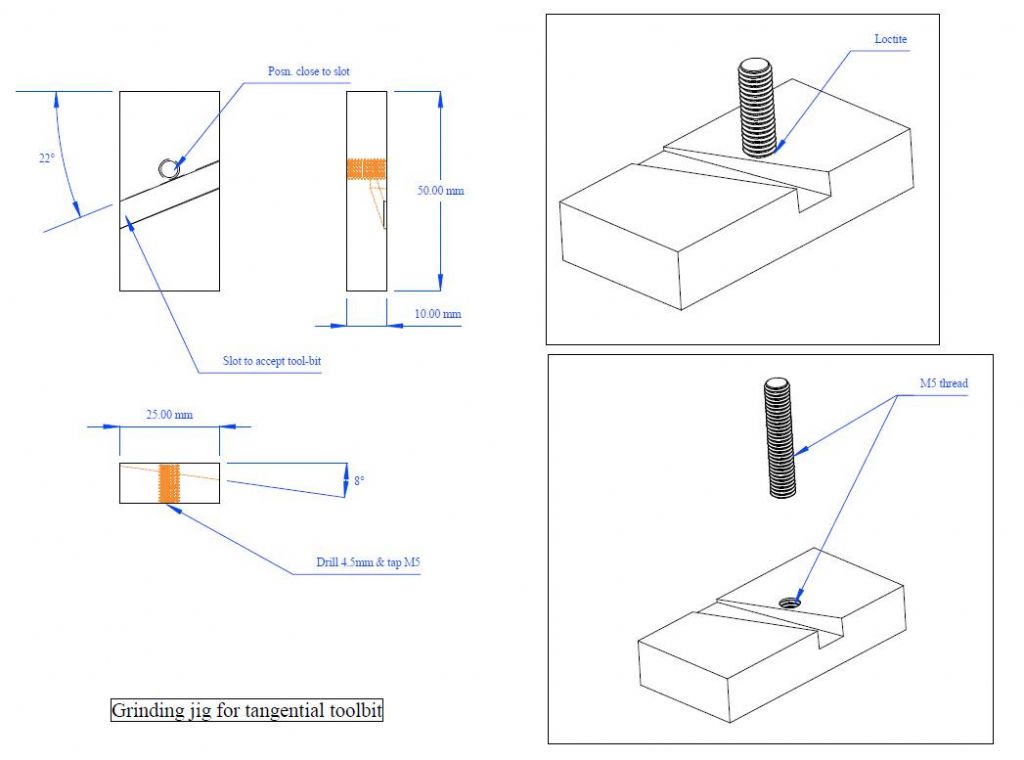
Model Engineer Magazine
- Percival Marshall
- M.E. History
- LittleLEC
- M.E. Clock

ME Workshop
- An Adcock
- & Shipley
- Horizontal
- Mill

Subscribe Now
- Great savings
- Delivered to your door

Pre-order your copy!
- Delivered to your doorstep!
- Free UK delivery!
All Forum Topics > Workshop Tools and Tooling > Michael Cox Tangential Tool Holder- MEW 179