Forum sponsored by:

What is a Good Second Steam Engine Model to Build?
| Buffer | 11/10/2020 17:29:51 |
| 430 forum posts 171 photos | Just start the traction engine. You don't need to build any more skills you will pick them up as you go. Start on the simpler parts. I went from a stuart 10V to a 5 inch gauge Black 5 only stopping to make a George Thomas Pillar Tool. If you get stuck on bits then use this forum for advice.
|
| Dr_GMJN | 11/10/2020 19:19:58 |
 1602 forum posts | Thanks all. I suppose I’ve got most if not all the BA and ME taps and dies for the Twin Victoria now anyway, so if the cost of appropriate fasteners is similar to metric it wouldn’t be worth changing. Perhaps a daft question, but re. Jason’s point about the box beds: how difficult would it be to cast them in aluminium from a 3D printed pattern - Just to try something new? Im guessing the dimensions aren’t given on the Stuart drawings, so I’d have to ask someone to measure them, or make an educated guess based on hole positions that are presumably on the drawing.
|
| JasonB | 11/10/2020 20:10:04 |
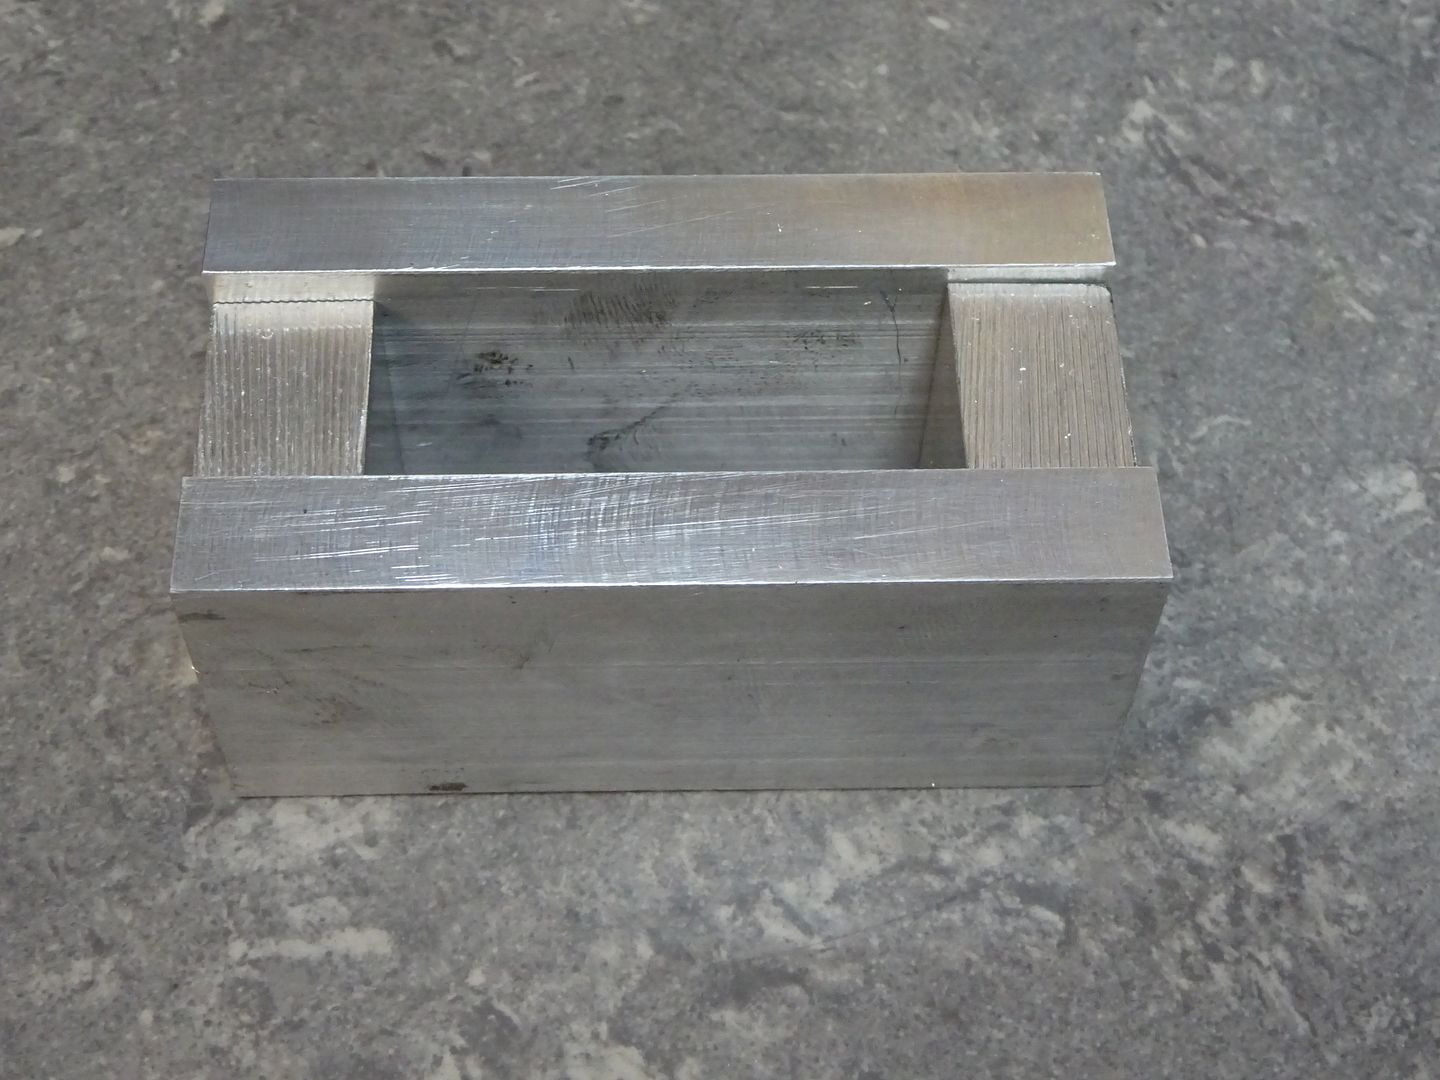
 25215 forum posts 3105 photos 1 articles | If you have a printer and means to cast them then not too difficult. But also easy to take say a bit of 3/4" x 1.5" Aluminium bar and mill a few rectangular holes in it and add a couple of feet or if you don't fancy so much swarf then use smaller rectangular sections and join together to form the base with it's cross pieces. This is how the bas efor that vertical started
And under the paint
The Victoria drawings are not ones I have but will see if I have the Goliath ones tomorrow which I think were in some mags I was given last year. |
| Dr_GMJN | 11/10/2020 21:08:21 |
1602 forum posts | In terms of means to cast stuff, I’ve got a camping stove and an old pan. How hard can it be? |
| Stuart Bridger | 11/10/2020 21:16:05 |
| 566 forum posts 31 photos | Check out Elmer's Engines plans. "Bar Stock" engines with varied complexity. I'm.working on the #29 mine engine as a follow up to a 10V. Albeit with a diversion via a Universal Pillar Tool to help with tapping. |
| Paul Lousick | 11/10/2020 22:23:52 |
| 2276 forum posts 801 photos | Aluminium melts at 660+ deg C. You will need a BIG camping stove. Paul |
| Paul Lousick | 12/10/2020 02:45:20 |
| 2276 forum posts 801 photos | The Grasshopper Haulage engine published in the recent editions of Model Engineer looks like an interesting one to build and is made from stock materials. Paul.
|
| JasonB | 12/10/2020 09:12:00 |
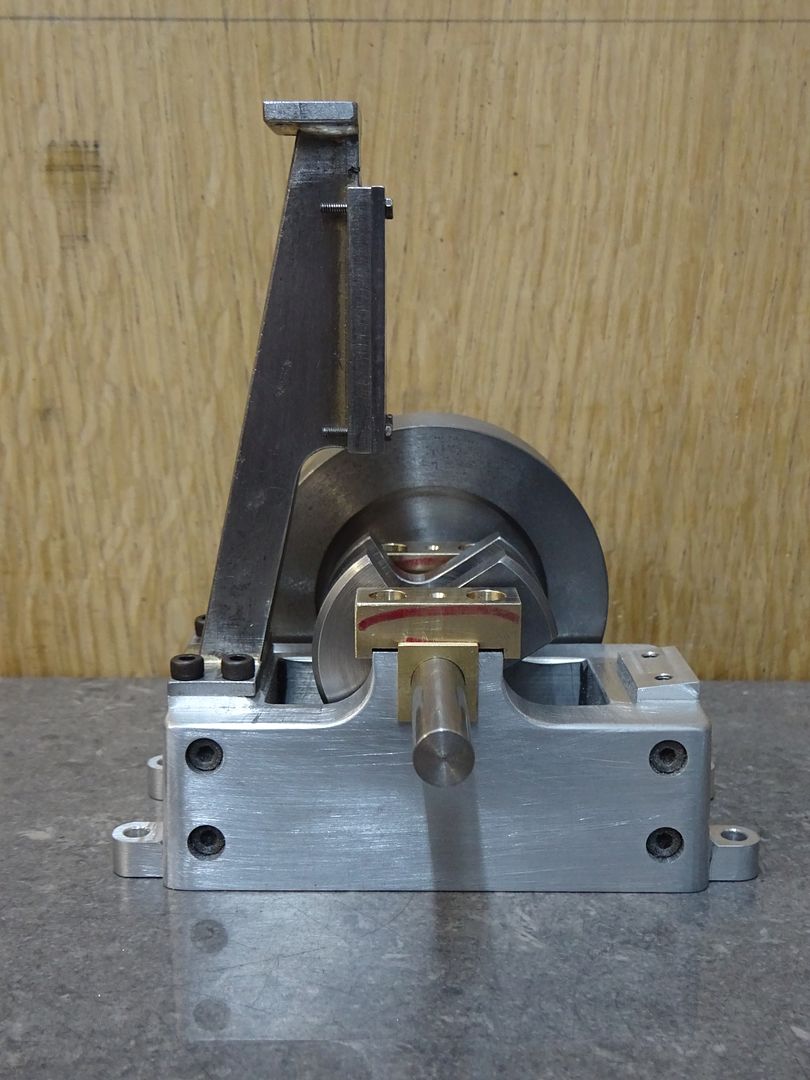
25215 forum posts 3105 photos 1 articles | I had a bit of a doodle of teh Victoria base casting and my thoughts on costings were about right. To buy two base castings will set you back £122 plus postage from Stuarts. They could be made in the sa,e way as the vertical I pictured above for 1/4 of that, aluminium would be £20 and say £10 for some M3 cap heads and a tube of JB Weld, less if you used steel flat. Make the basic frame parts
Drill and tap the cross pieces and drill & counterbore the sides then screw together with a smear of JB Weld. Then a bit of milling to form the pads for various parts
Finally add some feet, round the edges over and a bit of filler to add fillets to internal corners. I have also shown a bit more shape and taper to the base which is easily done by milling round the outer edges. Also omitted the unused bearing mounting pad.
If it were mine I'd probably go a bit further adding an integral "cast" mounting for the governor. Changing the way the cylinder mounts as the angled brackets onto the cylinder covers would never be seen on full size but just allow the same casting to be used on several engines. Would also do away with the feet as they are not really scale and show it is a model going for some round bosses on the top edge of the base for studs right through.
|
| Henry Artist | 12/10/2020 09:20:55 |
 121 forum posts 46 photos | If you've built a steam engine how about a boiler as your next project? PM Research do a couple of boiler kits. The materials supplied with these kits are an absolute joy to machine. The only problems I have with them is translating those oddball 'merican measurements into something sane (i.e. metric)! GLR Kennions also do a very nice boiler kit. If it must be an engine the kits sold by Bengs Modellbau are very good indeed. Most of the milling is already done for you so the only machines you really need are a lathe and a drill press. And if you fancy having a go at something "a bit different" take a look at the casting kits available from TS Modelldampfmachinen... |
| Paul Lousick | 12/10/2020 09:52:30 |
| 2276 forum posts 801 photos | As well as bolting together plates as a substitute for castings, they can be silver soldered if made from steel or brass (and cast iron). Also have a look at the early editions om ME. There are a number of different engines to build and a free set of detail drawings. Paul. Edited By Paul Lousick on 12/10/2020 09:53:29 |
| Dr_GMJN | 12/10/2020 13:02:33 |
1602 forum posts | Thanks all. OK, so I'll fabricate the box beds - I suppose when I buy the plans I can scale them if there are no external dimensions. The 10V box bed drawings have no dimensions apart from hole centres - not even an overall height. What would be the best setup method of machining the draw and raised base on the sides, to reflect the casting? Do you put JB weld on the face-to-face interfaces, and sand back? Also, to give some texture to the surfaces, and reduce any milling marks, could they be shot-blasted before machining the pads? How about the governor? Same deal in terms of buying only the essentials? I appreciate all the comments on alternative designs, but I don't really have any reason to go with another design now that the cost issue has been mitigated. OK it's a bit of extra effort, but I'll end up with a model I always liked. To be honest I enjoy machining a lot more than soldering, so making a boiler wouldn't really be my thing. I have made a start on compiling the ME articles on the 1" Minnie traction engine. My plan is to buy castings and parts as and when I have the spare cash. Hopefully by the time the Victoria is done, i will be in a position to at least make a start on the traction engine. It seems like a good plan to a) Have the satisfaction of completing another engine, and b) Achieve my ultimate goal of building a live steam traction engine. I must admit I hadn't envisaged doing this at this point on my model engineering career, but it seems do-able, considering a bit of man-maths. Once again thanks for all the advice. |
| JasonB | 12/10/2020 15:03:07 |
25215 forum posts 3105 photos 1 articles | Plans show the machined features but easy enough to get overall sizes and thicknesses. For this one I would make up the basic frame and then the ends can have the draft and moulded detail added by holding at an angle in the vice, the sides would need the underside of the vice packing so that work is therefore at an angle. A flycutter could be used as could a corner radius milling cutter or just use a flat ended milling cutter and add an internal fillet with filler. Have a look at the base of this engine being built. Yes a smear of JB Weld on the mating faces. Use car body filler to add fillets to internal corners and fill the screw holes as it's quicker to sand than JB Weld. If you think that an engine like this is probably 1/12 to 1/16th scale in most peoples eyes there will not be much of a cast texture at that scale but yes blasting will work as will spraying thick primer at low pressure or using a splatter cap on the airbrush. Plenty of nicer governor details about that don't need castings, etc, always feel the Stuart ones look rather heavy. The Princess Royal variation that I mentioned has a governor that stands between the two box beds and would be an option, bear in mind that in these scales the governors are usually more cosmetic than working. Edited By JasonB on 12/10/2020 15:14:04 |
| Dominic Bramley | 12/10/2020 16:34:09 |
| 60 forum posts 1 photos | If when you get the drawings you find they don't have the dimensions you need, then let me know and I will get my calipers out. I have the full kit in an unmachined state.
Regards Dom |
| Dr_GMJN | 12/10/2020 17:33:49 |
1602 forum posts | Posted by JasonB on 12/10/2020 15:03:07:
Plans show the machined features but easy enough to get overall sizes and thicknesses. For this one I would make up the basic frame and then the ends can have the draft and moulded detail added by holding at an angle in the vice, the sides would need the underside of the vice packing so that work is therefore at an angle. A flycutter could be used as could a corner radius milling cutter or just use a flat ended milling cutter and add an internal fillet with filler. Have a look at the base of this engine being built. Yes a smear of JB Weld on the mating faces. Use car body filler to add fillets to internal corners and fill the screw holes as it's quicker to sand than JB Weld. If you think that an engine like this is probably 1/12 to 1/16th scale in most peoples eyes there will not be much of a cast texture at that scale but yes blasting will work as will spraying thick primer at low pressure or using a splatter cap on the airbrush. Plenty of nicer governor details about that don't need castings, etc, always feel the Stuart ones look rather heavy. The Princess Royal variation that I mentioned has a governor that stands between the two box beds and would be an option, bear in mind that in these scales the governors are usually more cosmetic than working. Edited By JasonB on 12/10/2020 15:14:04 OK I'll look into governor details a bit further. |
| Dr_GMJN | 12/10/2020 17:35:22 |
1602 forum posts | Posted by Dominic Bramley on 12/10/2020 16:34:09:
If when you get the drawings you find they don't have the dimensions you need, then let me know and I will get my calipers out. I have the full kit in an unmachined state.
Regards Dom Thanks Dom. The 10V drawings are 1:1, so assuming the Victoria is similar, for something like the box beds I could scale them. Presumably the hole centres and thread types are on there, which is the main thing. |
| Dr_GMJN | 14/10/2020 17:40:10 |
1602 forum posts | Guys - any idea what grade of Mild Steel the components are on Stuart models? The crank web material I got from my supplier was a bright (drawn IIRC) Mild Steel. Is this right for the rest of the components such as connecting rods, crosshead guides etc etc? Also, presumably the cast iron bar for the piston and end caps (the ends withoug the packing) isn't anything special? Thanks. |
| Ramon Wilson | 14/10/2020 18:12:34 |
 1655 forum posts 617 photos |
This is the sort of packing I mean - piston is out of the Waller engine
As fitted
I usually make the groove 2/3 thou shallower than the nominla thickness and the groove 2/3 thou wider, and as you can see the packing is fitted with a scarf joint. I would stress this is only for running on air though I did run the Twin Vic on steam at shows for several years after fitting this method for several years without any problems Hope that's of use Regards - Ramon Edited By Ramon Wilson on 14/10/2020 18:13:29 |
| JasonB | 14/10/2020 18:19:26 |
25215 forum posts 3105 photos 1 articles | Square and flat section is likely to be EN3 (080A15) and round EN1A (230M0) Iron will be what is often sold as "Meehanite" or Grade 250 It's not too hard to machine an oval gland boss with a boring head or a "rounded diamond" one with the aid of the rotary table if you did not want to spend on the casting. Also a round boss and gland with three studs is quite common and easily done on the lathe. Yes there is enough info on the drawings to come up with the right shape for the bed casting. I have the one for Princess Royal and the only difference with that is it uses modified cylinder mountings more like you would find on a real engine rather than the get around Stuarts used so the Beam cylinder casting could be used. Any queries with sizes just ask, I'll even draw one up for you if needed.. Edited By JasonB on 14/10/2020 18:21:10 |
| Dr_GMJN | 14/10/2020 20:58:34 |
1602 forum posts | Thanks Ramon - I like the look of the bronze pistons and packing. I’ll use that method - I need to order some bronze anyway for some other part of the model. Like the 10V it will only be run on air I think. Jason, thanks for the drawing offer - I’ll let you know as and when. It might be next year when I start on it, although I will start getting materials together now. I’ll discuss metal grades with my supplier again tomorrow. He said that bright mild steel was usually drawn, and this could leave residual stress in the surface, sometimes causing issues with distortion once the surface is machined away. I know this can be a serious issue on non stress-relieved items in industry, but I don’t know how relevant it is to model engineering in this scale. He also mentioned two types of iron - SG and another; in very simple terms, one cracks with impact, one dents. He said he’d just supply the easiest one to machine based on what I said it was for. My plan was to buy the Iron castings for the gland ends, and use cast stock For the others. I don’t have a rotary table. I’d like to stick to the original Stuart geometry. Cheers both.
|
| Ramon Wilson | 14/10/2020 22:13:30 |
1655 forum posts 617 photos | Just a point to watch for Dr G - be sure you get the PTFE impregnated yarn as opposed to PTFE pure yarn. The latter does look superb, is very square and uniform but frays as you look at it. I thought it would be perfect when I first bought some but its a nightmare to fit at these small sizes. The impregnated yarn is a fibre based product filled, as the name suggests with PTFE and silicone. It's soft and waxy to the touch whereas the other is very firm with little give. As Jason suggests the cast iron of choice is Meehanite or grade 250. SG iron is lovely stuff to machine but SG stands for spheroidal graphite and believe me you and your work area will be black everywhere - for some time!!! I've got quite a bit of it stashed away but would always go for the continous cast (Meehanite/Gr250) every time and that's black enough. Rectangular or square section Cold Rolled Steel (CRS) or 'bright bar' contains stresses no matter what size and will manifest itself in machining unless pre-annealed. It can be got over by a careful approach as described elsewhere so many times but that can be a pain. Bright round bar does not appear to move anywhere near as much so providing there's not too much waste square parts can be milled from round bar with less far less concern of distortion. 'Black bar' has few if any stresses - the skin does have to be removed first but much more reliable from a low movement aspect. Unlike Jason I use JB Weld throughout but I agree that other filler would be easier to file/sand away. It's a truly great product but again I would strongly recommend using the standard rather than the fast version. It can be a bit runny when first mixed but it can be thickened with a little colloidal silica or left an hour before using as fillets. As the mixture is squeezed out of joints as brought together my thinking is that using it as fillets gives more strength. Not disagreeing with Jason - just my approach. The product is best bought from ebay mainly for the reason of cost. For some reason this product attracts some of the most diverse pricing depending on source - a trawl on ebay will soon prove that!. I also bought my packing from ebay - 3/16 square is about the smallest but you can sometimes find 1/8 Hope that's of use too Ramon
Edited By Ramon Wilson on 14/10/2020 22:34:28 Edited By Ramon Wilson on 14/10/2020 22:36:24 |


Please login to post a reply.
Magazine Locator
Want the latest issue of Model Engineer or Model Engineers' Workshop? Use our magazine locator links to find your nearest stockist!
Sign up to our Newsletter
Sign up to our newsletter and get a free digital issue.
You can unsubscribe at anytime. View our privacy policy at www.mortons.co.uk/privacy
Latest Forum Posts
- *Oct 2023: FORUM MIGRATION TIMELINE*
05/10/2023 07:57:11 - Making ER11 collet chuck
05/10/2023 07:56:24 - What did you do today? 2023
05/10/2023 07:25:01 - Orrery
05/10/2023 06:00:41 - Wera hand-tools
05/10/2023 05:47:07 - New member
05/10/2023 04:40:11 - Problems with external pot on at1 vfd
05/10/2023 00:06:32 - Drain plug
04/10/2023 23:36:17 - digi phase converter for 10 machines.....
04/10/2023 23:13:48 - Winter Storage Of Locomotives
04/10/2023 21:02:11 - More Latest Posts...
- View All Topics
Support Our Partners


Shopping Partners
Subscription Offer

Latest "For Sale" Ads
- Reeves** - Rebuilt Royal Scot by Martin Evans
by John Broughton
£300.00 - BRITANNIA 5" GAUGE James Perrier
by Jon Seabright 1
£2,500.00 - Drill Grinder - for restoration
by Nigel Graham 2
£0.00 - WARCO WM18 MILLING MACHINE
by Alex Chudley
£1,200.00 - MYFORD SUPER 7 LATHE
by Alex Chudley
£2,000.00 - More "For Sale" Ads...
Latest "Wanted" Ads
- D1-3 backplate
by Michael Horley
Price Not Specified - fixed steady for a Colchester bantam mark1 800
by George Jervis
Price Not Specified - lbsc pansy
by JACK SIDEBOTHAM
Price Not Specified - Pratt Burnerd multifit chuck key.
by Tim Riome
Price Not Specified - BANDSAW BLADE WELDER
by HUGH
Price Not Specified - More "Wanted" Ads...
Get In Touch!
Do you want to contact the Model Engineer and Model Engineers' Workshop team?
You can contact us by phone, mail or email about the magazines including becoming a contributor, submitting reader's letters or making queries about articles. You can also get in touch about this website, advertising or other general issues.
Click THIS LINK for full contact details.
For subscription issues please see THIS LINK.
Digital Back Issues


Donate

 Register
 Log-in
Model Engineer Magazine
- Percival Marshall
- M.E. History
- LittleLEC
- M.E. Clock

ME Workshop
- An Adcock
- & Shipley
- Horizontal
- Mill

Subscribe Now
- Great savings
- Delivered to your door

Pre-order your copy!
- Delivered to your doorstep!
- Free UK delivery!
All Forum Topics > Beginners questions > What is a Good Second Steam Engine Model to Build?