Forum sponsored by:

supercharged V12 2 stroke
Methanol burning beast!!
| dean clarke 2 | 19/06/2016 06:51:47 |
 169 forum posts 330 photos | Hi Richard, yes I am still planning on flying a V12 but probably not this exact one as I have already started devolpment on a mk2 version with some fairly major modifications and design alterations, expected power output is about the 10 hp mark with the rev top end somewhere between 12k and 15k, I guess time will be the ultimate judge of these expectations. as for the current project work commitments have limited time but I have been able to progress the project a little bit. Below is an update on the new starter and also the new carb and manifold which I have made as 1 unit eliminating and separate manifold unit.
all thats left for this bit is a bit of cosmetic profiling and they should be ready for some barrels and bits, lol.
Thats all for now I'm afraid cheers Dean Edited By dean clarke 2 on 19/06/2016 06:54:00 |
| dean clarke 2 | 31/07/2016 07:33:57 |
169 forum posts 330 photos | Well at last a bit more to share on this V 12 build project. Sorry for the extended delay in updates but been overly busy with other life demands recently. Here are a few photos showing what I've been up to in recent weeks with this engine build and the related side projects. The anodizing plant is moving ahead slowly and I have finally finished the new starter. photos below show progress to date
Currently working on the remaining parts for the anodizing plant and will post the photos as soon as I can.. here's the finished starter.
So now all I need to do is get the damn anodizing plant all done and put the engine back together and start it up again. YAY getting there slowly.......... but surely thankfully. Cheers for now Dean |
| dean clarke 2 | 25/09/2016 19:15:19 |
169 forum posts 330 photos | Well after much ado about nothing here I am again with another update, finally! having plucked up the courage to give this anodizing lark a go I found it wasn't actually so hard after all.Not sure why I was so chicken about doing it, just nervous of the unknown probably, oh and the risk of ruining irreplacable parts maybee. Right so now that i have faced my fears the photos below show the progress to date. here's the results of the first test run.
not too bad an effort me thinks......... so onwards we go..... here's the anodizing bath in action doing the first run of the v12 fin blocks and heads.
I had originally set up to do all the parts at the same time but found that the load was way too high for the power supply to cope with requiring more than 15 amps to run and as the power supply is only rated to 15 amps max it just wasn't going to work. The solution was to just downsize the parts stack to both fin blocks and heads as the parts are mated together and had to be the same colour. even then I had to drop the voltage to 10 volts and keep watch on it as the overload would trip out every 10/ 15 mins or so and needed to be reset. this was less than ideal in theory but seems to have worked out ok in practice as the parts came out perfectly barring a small blemish where the colour didn't take up, I suspect because the cleaning stage wasn't good enough. Oh well. photo below shows the first parts run fresh out of the bath.
A very nice even colour and finish so on with the next bits, drive belt housing and cover.
These parts didn't quite go as planned and were a very dissapointing result. It looks like they anodized ok but they didn't appear to take up any colour. These were the only failure of the day and were also the only parts that were sandblasted in finish so I'm not sure if that was the cause or weather it is something else, anyone got any bright intelligent ideas? below is a photo showing all the parts that were done including the test parts, not a bad days effort I reckon but there's still a few questions that need answers.
Cheers for now Dean Edited By dean clarke 2 on 25/09/2016 19:19:58 |
| JasonB | 25/09/2016 20:23:42 |
 25215 forum posts 3105 photos 1 articles | Look good Dean, I was talking to another engine builder at the MEX show last week and he said that he was going to have to sand down some parts that he had blasted as the finish would not take due to lack of an oxide layer. |
| dean clarke 2 | 30/09/2016 09:59:38 |
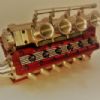
169 forum posts 330 photos | Well I have managed to start the reassembling process of the v12, starting to look rather loverly me thinks, so here's the latest photos of progress.
I reckon this looks preeetttyyy mean lol
Busy stripping the blower drive case and cover ready for re anodizing at the moment along with cleaning up some other bits and pieces to do another anodizing run this weekend. I will endeavour to post photos when i'm all done.
cheers for now Dean |
| V8Eng | 30/09/2016 10:14:55 |
| 1826 forum posts 1 photos | Superb! |
| Vic | 30/09/2016 11:33:04 |
| 3453 forum posts 23 photos | Very nice work Dean! |
| John Olsen | 30/09/2016 20:57:10 |
| 1294 forum posts 108 photos 1 articles | I saw this in the flesh last night, it looks even better than the photos. John |
| dean clarke 2 | 01/10/2016 13:52:08 |
169 forum posts 330 photos | Hey there, me again and it's only been a couple of days, guess the wife is away, lol......... anyway I've been up to more mischief in the shed this weekend and have been able to do the re-anodizing of the blower drive case and cover. While they aren't perfect I think that they've come out quite well. Photos below.....................
Doesn't look to shabby I reckon, not bad for an amateur anyway. So feeling quite encouraged by the good results I had a go at anodizing some other stuff, unrelated to the v12 but interesting none the less..
Ones dark blue and the other violet, nice good even colouring and no missed spots so I'm getting better at it. the blue heads and fins are actually the same colour but the lighting shows them different for some reason. All in all a very pleasing weekends work.......... now what else can I colour in???
Cheers for now Dean |
| Doubletop | 01/10/2016 22:49:26 |
 439 forum posts 4 photos | Dean Love the anodising your results may entice others to give it a go. I've been meaning to comment on the starter. Have you used it yet? I did something similar for my bobcat but couldn't get it to work the load imposed by pushing the starter into the starter dog and the kick when the engine fired and pushed the starter out of the dog caused the engine to stall. maybe not a problem when you've got 12 cylinders. My solution was a sprag clutch bearing in a unit purchased from Hobby King. It’s for starting large scale helicopters. It made starting so much easier
Pete |
| dean clarke 2 | 02/10/2016 00:30:44 |
169 forum posts 330 photos | Hey Pete, how's it going mate? the starter works great in the test setup but haven't got the v12 ready to run yet so can't answer your question, still working on the new carbs. It should be fine though as the lead-out on the dog drive is quite gentle and when the engine fires up I just pull the starter out with it still running so there's no significant loading on the engine at disengagement. will let you know how I get onn when the time comes to bring it back to life. Thanks for all the encouragement guys I really appreciate it. cheers for now Dean |
| Hopper | 02/10/2016 01:24:03 |
 7881 forum posts 397 photos | The intricacy of your work is just astounding. Beautiful result. Thanks for sharing. The anodizing was worth the agonizing, it looks brilliant. |
| dean clarke 2 | 15/11/2016 08:19:24 |
169 forum posts 330 photos | Hi all, been a little while I know but here is a bit more of the happenings from the workshop. Have finished the new carb bodies and intake trumpets, photos below....
Cheers for now Dean
|
| Bill Pudney | 15/11/2016 08:45:50 |
| 622 forum posts 24 photos | Absolutely stunning!!! cheers Bill |
| dean clarke 2 | 01/12/2016 08:41:26 |
169 forum posts 330 photos | Well we have some more progress, albeit slow so slow................. I have got the new ignition loom sorted and fitted, looks a bit more like the real thing I reckon.............. photo below, next is to finish the new carbs and fuel rail then it's startup time yay........ only been far toooo long. oh well.
cheers for now Dean |
| not done it yet | 01/12/2016 09:09:39 |
| 7517 forum posts 20 photos | Carbs? Look deserving of multi point fuel injection, to me
If they don't make anything suitable, I reckon you could build your own!
Keep up the excellent work. I am just one of those eagerly awaiting further progress on this amazing project!! |
| dean clarke 2 | 03/12/2016 22:40:08 |
169 forum posts 330 photos | So here's the next step in the addition of new bigger and better breathing carbs........ photo's show the progress to date......
Next it's barrels and levers and we're all ready for start up.... cheers Dean |
| Jeff Dayman | 03/12/2016 23:40:52 |
| 2356 forum posts 47 photos | Looking great Dean, really like the new carbs. Good luck with barrels etc and do please let us see/hear a video when there's fresh noise. JD |
| dean clarke 2 | 04/12/2016 18:30:56 |
169 forum posts 330 photos | Ok so I thought I might just put this photo up to show the difference in the cab throat diameters....
hopefully this cures the breathing restriction problem!!!!!!!!! LOL Cheers Dean |
| David Taylor | 06/12/2016 09:41:48 |
 144 forum posts 39 photos | Wow, that's beautiful! |


.jpg")


Please login to post a reply.
Magazine Locator
Want the latest issue of Model Engineer or Model Engineers' Workshop? Use our magazine locator links to find your nearest stockist!
Sign up to our Newsletter
Sign up to our newsletter and get a free digital issue.
You can unsubscribe at anytime. View our privacy policy at www.mortons.co.uk/privacy
Latest Forum Posts
- hemingway ball turner
04/07/2025 14:40:26 - *Oct 2023: FORUM MIGRATION TIMELINE*
05/10/2023 07:57:11 - Making ER11 collet chuck
05/10/2023 07:56:24 - What did you do today? 2023
05/10/2023 07:25:01 - Orrery
05/10/2023 06:00:41 - Wera hand-tools
05/10/2023 05:47:07 - New member
05/10/2023 04:40:11 - Problems with external pot on at1 vfd
05/10/2023 00:06:32 - Drain plug
04/10/2023 23:36:17 - digi phase converter for 10 machines.....
04/10/2023 23:13:48 - More Latest Posts...
- View All Topics
Support Our Partners


Shopping Partners
Subscription Offer

Latest "For Sale" Ads
- Reeves** - Rebuilt Royal Scot by Martin Evans
by John Broughton
£300.00 - BRITANNIA 5" GAUGE James Perrier
by Jon Seabright 1
£2,500.00 - Drill Grinder - for restoration
by Nigel Graham 2
£0.00 - WARCO WM18 MILLING MACHINE
by Alex Chudley
£1,200.00 - MYFORD SUPER 7 LATHE
by Alex Chudley
£2,000.00 - More "For Sale" Ads...
Latest "Wanted" Ads
- D1-3 backplate
by Michael Horley
Price Not Specified - fixed steady for a Colchester bantam mark1 800
by George Jervis
Price Not Specified - lbsc pansy
by JACK SIDEBOTHAM
Price Not Specified - Pratt Burnerd multifit chuck key.
by Tim Riome
Price Not Specified - BANDSAW BLADE WELDER
by HUGH
Price Not Specified - More "Wanted" Ads...
Get In Touch!
Do you want to contact the Model Engineer and Model Engineers' Workshop team?
You can contact us by phone, mail or email about the magazines including becoming a contributor, submitting reader's letters or making queries about articles. You can also get in touch about this website, advertising or other general issues.
Click THIS LINK for full contact details.
For subscription issues please see THIS LINK.
Digital Back Issues


Donate

 Register
 Log-in
Model Engineer Magazine
- Percival Marshall
- M.E. History
- LittleLEC
- M.E. Clock

ME Workshop
- An Adcock
- & Shipley
- Horizontal
- Mill

Subscribe Now
- Great savings
- Delivered to your door

Pre-order your copy!
- Delivered to your doorstep!
- Free UK delivery!
All Forum Topics > I/C Engines > supercharged V12 2 stroke