Forum sponsored by:

Glr vertical boiler
Well it's time to light the blowtorch
| Dismaldunc | 22/12/2012 14:11:52 |
| 91 forum posts 8 photos | Hi chaps, I'm currently building my first boiler. The end plates are made and drilled (which was really good fun ) the tubes have a little ridge on them as per stans instructions and the bushes are made. now I have to commence silver soldering but to be honest I'm a bit scared of cocking it up. From the practising with off cuts you do have to get the work REALLY hot . I've bought a sievert 19mm cyclone burner which is rated at 3kw. So I suppose the question is will this be hot enough? Also any handy tips will be gratefully received . thanks in advance dunc |
| Terryd | 22/12/2012 15:12:10 |
 1946 forum posts 179 photos | Hi Dunc, Depends on the size of the boiler. Up to about 3" diameter I use a 19mm plumbers torch. The secret is not to let heat escape and use refractory materials to surround your work behind the work so as to retain and reflect the precious heat. There was another thread recently about this subject and I was able to visit and help the guy who was having difficulty. I tend to feed the joint with a long rod and let the liquid solder follow the heat around the joint. Make sure that the joint is well fluxed and the area on both sides of the joint is protected with Tippex which will prevent the wasteful spreading of expensive soolder where it doesn't need to be. Best regards Terry |
| Terryd | 22/12/2012 15:17:44 |
1946 forum posts 179 photos | The thread I was refferring to is here: There are many others on the subject. T
|
| Dismaldunc | 22/12/2012 15:47:08 |
| 91 forum posts 8 photos | Great stuff thanks Terry, I really should do a search before I jump in. That's a good helpful thread |
| Bill Dawes | 22/12/2012 19:25:26 |
| 605 forum posts | Hi Dunc, I too am building the GLR vertical boiler. for various reasons it has been a long standing project so have not progressed too far but the following may be of help.
I soldered on the firehole ring and the firebox endplate quite successfully (as far as I can see anyway, the truth will out when it's finished and tested of course) Finally got round to soldering in the tubes and disaster (see my thread 'silver solder disaster' Following advice from fellow modellers and Keith at Cup Alloys (it was Cup solder) I have bought a neck tube burner and some wool insulation blanket. I am conviced now my problem was too much direct heat on the solder, not enough heat in the job. Will take more care at next attempt with insulation around the firebox. Not got round yet to try again, hopefully early in new year, be interesting to hear how you get on. Regards Bill D |
| Bill Dawes | 22/12/2012 19:28:48 |
| 605 forum posts | PS. it was the 10.3kw burner I bought. Bill D. |
| Springbok | 22/12/2012 21:29:03 |
 879 forum posts 34 photos |
As Bill says have a word with Kieth I personally regard him as one of the countries leading experts when it comes to ME silver soldering. |
| Martin Cooper | 22/12/2012 22:01:09 |
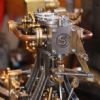
| 17 forum posts 2 photos | Hi Dunc I used a Sievert 2941, which is 7kW. Soldering this boiler was pretty scary. Don't make the same mistake I did, and do it inside (the garage, not the house). Apart from the smoke alarm going off, after a few minutes of 7kW burning away there isn't much oxygen left - even with the garage door open. You'll need welders gauntlets or something else substantial to protect your hands, and a bucket of water just in case. As to whether a 3kW burner would do it... well, I am no expert at all. But it did take what seemed like an age to get the boiler up to temperature. So it would take even longer with a 3kW burner. I would play safe and go for a bigger burner. Here's a photo of my arrangement. The whole job is surrounded by vermiculite bricks and I found an old barbeque to act as a hearth.
I put rings of solder around each tube, and I think I had a length of silver solder in my other hand to touch it up. I have some more photos if you would like more. Martin
|
| Dismaldunc | 23/12/2012 10:30:39 |
| 91 forum posts 8 photos | Hi chaps, thanks for the advice and yes Martin more pics would be great, I bit the bullet last night and had a crack at the boiler tubes. All seems to have gone well and on your advice a cocooned the assembly in some refractory material I bought from my heating spares company. It's 5mm thick white stuff that bounces all the heat back and is only £7 for a huge 1200x600 piece they call it ceramic paper. I will take some pics later. on another note I see GLR are closing down, which is a bit sad as I wanted to get the wood cladding and steam fittings kit from them..... |
| Bill Dawes | 23/12/2012 14:06:49 |
| 605 forum posts | Martin I see you soldered from the top as described by Stan Bray in the article that came with the boiler kit. This is what I did and also with a 2941 burner. As my attempt did not work I have to have another go but from inside the firebox as the first effort partly soldered most of the tubes in so not easy to take apart and start again. Doing inside the firebox meant I needed a necktube burner, the 3525, from memory which is 10.3kw. From my limited, (but educational) experience Dunc, 3kw seems very small to me. Sad to learn about GLR, I bought my 10.3kw burner and kaowool insulation from Cup alloys, excellent service, no connection with them of course. Bet of luck. Bill D. |
| Dismaldunc | 23/12/2012 15:03:18 |
| 91 forum posts 8 photos |
Well I reckon I'm gonna need a bigger burner, will hop onto the cup alloys site and get busy with my credit card |
| Martin Cooper | 23/12/2012 20:11:16 |
| 17 forum posts 2 photos | Dunc (and all) I have put some more photos here. I can't claim it's the best made vertical boiler, but it raises steam and building it was hugely educational. Good luck with your soldering! Martin |
| Mad muppet | 24/12/2012 06:54:34 |
| 9 forum posts 122 photos | Marin If my GLR vertical boiler turns out half as good looking I will be well happy. Nice phots as well George |
| Dismaldunc | 24/12/2012 09:19:02 |
| 91 forum posts 8 photos |
Thanks Martin the boiler looks great, love th idea of sticking the cladding to some card, I shall be using/stealing that idea |
| fizzy | 25/12/2012 11:20:56 |
 1860 forum posts 121 photos | Hi, ive built quite a few vertical boilers in the past, and soldering the tubes from above is the first big mistake I made! This is simply asking for failure, and its a nightmare to try to correct once its cooled! If at all possible heat it from the other side. From the single photo im struggling to understand the design - hope you used higher temp solder for that joint cos its going to get very hot! Very confusing! Best of luck, and since its christmas day I will offer my services and equipment to help with any leaks should you need them (cant beat oxy for repairs). |
| Doubletop | 26/12/2012 10:14:03 |
 439 forum posts 4 photos | I'm not claiming to be an expert on this subject apart from 'been there done that' with a couple of basic boilers and then one for the Northumbrian. What I haven't seen in the thread is any reference to the flux and if there is one thing I've learned is "get the flux right", ahead of 'how much heat". Once I found Tenacity #5, or at least an equivalent to it, my silver soldering experiences improved by an order of magnitude. Even to the extent that before I couldn’t get the solder to flow, then I couldn’t stop it. The other lesson was trying to manage the torch with one hand and feed the length solder rod with the other is doomed to failure. You never know whether you’ve got the heat and solder in the right place at the right time. Use “pallions”, short lengths of solder cut up and placed a round the job where you need the solder to flow. With plenty of the right flux you’ll soon know its working. One second lumps of half melted solder and then its gone, and flowed into the joint. Time to move the heat on to the next area. ………..Oh! and another thing while I’m rambling on. Keep the torch back from the job. Too close and you don’t have the work area in the hottest part of the flame. With the bigger burners that can be a foot or more. Pete
|
| Terryd | 26/12/2012 11:42:10 |
1946 forum posts 179 photos | Hi Pete, It is possible to feed solder. I also use paillons and start the soldering process, when the job (not solder) is hot enough teh solder will flow. on larger jobs the heat is then carried around the joint and th esolder will flow as it follows the heat. Stick solder is applied to the heated job in lag of the flame so that it is the job that melts the solder not the flame. By the way I use borax for all temperatures of solder from low temp up to enamelling grade and it works well. My experience? first soldering work in 1970 as a trainee silversmith using step soldering and have used the techniques learned since on many jobs including successful boilers. I was taught by a real expert of many years experience himself, and have improved my skills empirically ever since, Best regards and seasons greetings, Terry |
| Doubletop | 28/12/2012 10:11:21 |
439 forum posts 4 photos | Terry From a beginners point of view when trying this (or any other new process) there are so many variables and zero experience that it is hard to work out which particular variable is the cause of any problem. That's where I was two years ago when I made my first boiler and anything I tried didn't seem to resolve the issue. Suddenly the planets lined up and I now wonder why problems had existed. These days I just do it and it works, but in reality I do much the same thing each time and I now can spot the' sweet spot' when its time to feed solder For beginners my advice was based on that recent experience and getting the basic stuff organized to remove any doubt. The rest can then be a matter of just do it and learn. The other aspect is overcoming those negatives of either experience or advice. Some examples in my case :
Get the basics out of the way and get the solder to flow well the first time and there is only one way forward, better and better results each time Pete |
| Adam Gregory 1 | 30/12/2012 18:59:49 |
 20 forum posts 11 photos | Hi Dunc Like Martin I used a Sievert 2941 following the instructions supllied with kit and all worked fine. I too used short peices and rings of silver solder around tubes and joints with flux applied, but also did something i think is called "hot roding" where i heated the solder stick and then plunged it into flux powder to coat stick. This i used to fill any areas that the solder did not want to fill or flow into, using the heat in the job to melt the stick not the torch. The process took about 10 to 12 minutes to get up to the right temp, I watched for the flux to run clear before attempting to add any more solder/flux. I'm very pleased with my efforts and the boiler steams very quickly about seven or eight minutes from lighting coal to 60 psi and running engine.
Just got to finish the the model boat to give it a proper run. I also want to thank all the people that put stuff up on the internet and forums for us newbebies to learn from. Thanks Adam |
| Bill Dawes | 30/12/2012 19:34:20 |
| 605 forum posts | Had another go at rescuing my first semi successful attempt, this time resoldering from inside the firebox, I took more care with insulation this time, all cosily wrapped in kaowool backed up with insulating blocks, the firebox also filled with insuation block offcuts. Tried to keep flame from direct impingement on solder but found this to be not easy with a powerful flame in a relatively small area, flux seemed to be fizzing away far too soon. After what seemed to be an eternity I began to think it was not going to work again then suddenly the solder just flowed. Thus encouraged, the next day I proceeded to solder in the firebox and ring. All seemed to go well but on inspection afterwards, another disaster, two of the tubes became unsoldered and dropped out. Problem is they did not just fall out loose, the molten solder ran down the tubes and resoldered them to others, got to work out how to free them and resolder in. Should I have insulated them from the heat more when I was soldering in the firebox and ring? Reading through this sorry tale makes it all sound a bit amateurish, I guess I am learning the hard way. Bill D. |
 The solder just did not run properly. One of the replies to my thread said it is best to solder from inside the firebox, as you will see the instructions with the boiler clearly shows it being soldered with the tubes standing up.


Please login to post a reply.
Magazine Locator
Want the latest issue of Model Engineer or Model Engineers' Workshop? Use our magazine locator links to find your nearest stockist!
Sign up to our Newsletter
Sign up to our newsletter and get a free digital issue.
You can unsubscribe at anytime. View our privacy policy at www.mortons.co.uk/privacy
Latest Forum Posts
- *Oct 2023: FORUM MIGRATION TIMELINE*
05/10/2023 07:57:11 - Making ER11 collet chuck
05/10/2023 07:56:24 - What did you do today? 2023
05/10/2023 07:25:01 - Orrery
05/10/2023 06:00:41 - Wera hand-tools
05/10/2023 05:47:07 - New member
05/10/2023 04:40:11 - Problems with external pot on at1 vfd
05/10/2023 00:06:32 - Drain plug
04/10/2023 23:36:17 - digi phase converter for 10 machines.....
04/10/2023 23:13:48 - Winter Storage Of Locomotives
04/10/2023 21:02:11 - More Latest Posts...
- View All Topics
Support Our Partners


Shopping Partners
Subscription Offer

Latest "For Sale" Ads
- Reeves** - Rebuilt Royal Scot by Martin Evans
by John Broughton
£300.00 - BRITANNIA 5" GAUGE James Perrier
by Jon Seabright 1
£2,500.00 - Drill Grinder - for restoration
by Nigel Graham 2
£0.00 - WARCO WM18 MILLING MACHINE
by Alex Chudley
£1,200.00 - MYFORD SUPER 7 LATHE
by Alex Chudley
£2,000.00 - More "For Sale" Ads...
Latest "Wanted" Ads
- D1-3 backplate
by Michael Horley
Price Not Specified - fixed steady for a Colchester bantam mark1 800
by George Jervis
Price Not Specified - lbsc pansy
by JACK SIDEBOTHAM
Price Not Specified - Pratt Burnerd multifit chuck key.
by Tim Riome
Price Not Specified - BANDSAW BLADE WELDER
by HUGH
Price Not Specified - More "Wanted" Ads...
Get In Touch!
Do you want to contact the Model Engineer and Model Engineers' Workshop team?
You can contact us by phone, mail or email about the magazines including becoming a contributor, submitting reader's letters or making queries about articles. You can also get in touch about this website, advertising or other general issues.
Click THIS LINK for full contact details.
For subscription issues please see THIS LINK.
Digital Back Issues


Donate

 Register
 Log-in
Model Engineer Magazine
- Percival Marshall
- M.E. History
- LittleLEC
- M.E. Clock

ME Workshop
- An Adcock
- & Shipley
- Horizontal
- Mill

Subscribe Now
- Great savings
- Delivered to your door

Pre-order your copy!
- Delivered to your doorstep!
- Free UK delivery!
All Forum Topics > Beginners questions > Glr vertical boiler