Forum sponsored by:

Rivet snap dimensions
| geechr | 30/12/2011 15:31:29 |
| 4 forum posts | I recently bought, online, a 3/32" rivet snap. When I received it I was surprised how large the indentation in the snap to produce the rivet head was (3/16" diameter on the OD). The snap also allows you to "set up" the rivet and the hole OD in the snap to allow this operation is 9/64". When I tested out the snap I obtained poor results so I concluded that the snap must be incorrect so I sent it back and requested the correct item. I received the same rivet snap back.
Before I return it again I want to make sure that my suspicions are correct or perhaps I an not using the tool correctly.
My questions are: -
1. Are the dimensions quoted above correct for a 3/32" rivet snap?
2. What does setting up a rivet mean?
Regards
Chris Gee
|
| Terryd | 30/12/2011 17:02:26 |
 1946 forum posts 179 photos | Hi Chris, The head of a round head rivet is nominally twice the diameter of the shank, so a 3/16 dia rivet would have a head of 3/16. So your 'snap' appears to be correct. As I was taught, the 'setting' of a rivet is the process whereby the parts to be held by the rivet are closed together tightly before the rivet is finally formed. So the rivet would be inserted in the close fitting holes in the parts to be held, the head is supported somehow - usually in a second snap - and the loose setting hole placed over it and hammered down to close the parts together, hence the loose fit in the snap. You can make a set to do this latter with just a hole in a length of carbon steel and hardening and tempering to blue making sure that the business end is well finished so as not to mark the work. I may be teaching grandmother to suck eggs, but the snap cannot be used to form the head, only finish it. After the rivet is set (assuming it has been cut to the correct length), the head must be rough formed by 'peening ' with a hammer. This is done with the half round part of the ball peen hammer. The half round set is only then used to finally finish off the head to a good half round shape. The picture gives a better idea of how it is done. The two parts would have been set tightly together before peening. 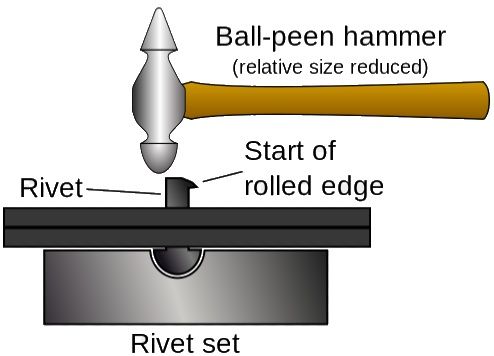 Best regards and good tidings, Terry |
| Brian Price | 30/12/2011 17:08:12 |
| 8 forum posts | Hi Chris
It is a long time since I have done this type of riveting but I have gleamed the following info from my machinery handbook.
For snap or round head BS small rivets
Shank diameter 3/32"
Head diameter 0.164"
Head height 0.070"
Unfortunately I don't have tables for the length of shank needed to form a good head for rivets below 1/2" diameter.
I tried to find a picture of a rive snap set but if my memory is correct there should be one tool to support the already formed rivet head whilst you hit the other end.
Another tool with a straight clearance hole that is used to make sure the two plates are set flat together,
Then the rivet is peened over with a ball pein hammer
Then there is a female mushroom on the punch to finally form the rivet head, usually combined with the setting punch.
I hope this helps
Brian
www.ebolt.co.uk
|
| JasonB | 30/12/2011 17:08:46 |
 25215 forum posts 3105 photos 1 articles | The head dia for a 3/32" rivit should be 1.75D so 0.164" with a height of 0.75D so 0.070"
http://www.sapphireproducts.co.uk/641t1.htm for size chart
How well does a rivit sit in the snap, if its a bit below the surface then maybe grind down the end of teh snap.
Setting a rivit is done with a hollow punch or a setup & snap like you have, it basically makes sure all teh layers to be rivited are pressed well together so the rivit won't expand into gaps between teh layers, I would expect the hole to be a littel over shank dia but yours does sound a bit large.
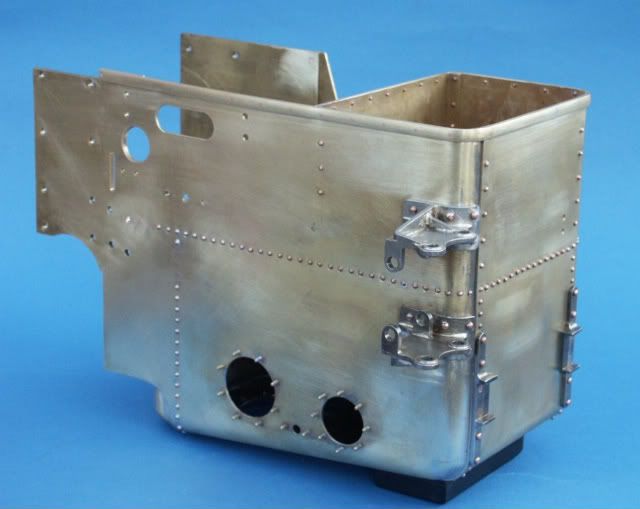
Have to disagree with Terry, the snap can be used to form the head, as this pic confirms along with the use of rivit squeezers and larger hydralic machines.
 J Edited By JasonB on 30/12/2011 17:15:17 |
| Stub Mandrel | 30/12/2011 20:38:45 |
 4318 forum posts 291 photos 1 articles | I made a serviceable snap for 1/16" rivets by drilling silver steel with the tip of a 1/8" drill, heating to red heat and then whacking a 1/8" ball in the hole with a big hammer, followed by harden and temper. I had to do a little grinding off the length to get the best results. Neil |
| geechr | 30/12/2011 23:01:52 |
| 4 forum posts | Thank you for the quick and useful information. I wonder whether my problem is the length of the rivets? Perhaps they are not long enough and that is why I am not obtaining well formed heads. How much of the rivet should protrude from the materials being joined?
Regards
Chris Gee
|
| mgj | 30/12/2011 23:59:40 |
| 1017 forum posts 14 photos | Perhaps a lot depends on how much force one has available, and how soft the rivet is. . Certainly you can form the head of a rivet just using a domed snap, but Terrys system is easier, and best is the use of a set up and then a conical snap and finally a domed finisher. The problem being, starting with a domed snap is that its quite easy to offset the head, and once its been knocked off line, its difficult to get all straight again. The bigger presses tend to use guided snaps/dollies, which makes a difference. I shall be doing a 4" TE shortly, with 3/16 and 1/4" rivets. A guided dolly is the way to go there, along with a 10 ton press! The other alternative, where visibility is less of a problem, is to knock the rivet into a countersunk hole, which gets away without forming a second head at all - if that suits the circumstances. There are various charts for head size etc, but snaps do differ, and its probably worth experimenting on a bit of scrap first. Once things are setting right, you know how much to allow. |
| Terryd | 31/12/2011 04:30:42 |
1946 forum posts 179 photos | Posted by geechr on 30/12/2011 23:01:52: Thank
you for the quick and useful information. I wonder whether my problem
is the length of the rivets? Perhaps they are not long enough and that
is why I am not obtaining well formed heads. How much of the rivet
should protrude from the materials being joined? Regards Chris Gee Hi Chris, The shank of the rivet should protrude by 1.6 diameter. The
diameter of the rivet head is a shown in this extract from a
manufacturers table. as you see the max allowable size for the rivet
head is 0.185" which is a few thou short of 3/16 (0.1875"). Regards Terry |
| JasonB | 31/12/2011 08:16:00 |
25215 forum posts 3105 photos 1 articles | Terry where do you get your 1.6D from? I usually cut just below 1.5D and thats backed up by the table I linked to in my post above at 1.43D
As mgj says it may need a bit of adjustment up or down to suit your specific snaps, aim for a formed head that looks like the manufactured head as much as possible.
Also when doing things like traction engine wheels you have no choice but to use punches/snaps as you cant get all round the rivit with a ball pein hammer
J |
| Terryd | 31/12/2011 09:24:26 |
1946 forum posts 179 photos | Hi Jason, That was what I was taught and have seen in various reference books over the years. I can't guarantee that it's correct. As you will be aware, mistakes are often repeated in books and the internet as many texts are partly plagiarised, or copied and information is often repeated ad verbatim without corroboration. In this case the difference would be about 9 thou and when set would make very little difference to the shape of the head when set, but I am more than willing to bow to your expertise. I set and formed many rivets over my career and never had much of a problem, but then I have always had full access to the head of a rivet and have been able to peen the head first as per formal practice. The shorter shank length would certainly help to prevent distortion of the shank if using the snap alone to form the heads. In full size practice of course I would expect that the rivets would be hot set with specialised equipment as in Locomotive practice. Best regards of the season, Terry Edited By Terryd on 31/12/2011 09:36:19 |
| mgj | 31/12/2011 09:38:40 |
| 1017 forum posts 14 photos | Next problem - if one is cutting rivets to a length - how to do it quickly? Is there an answer. I find if I use cutters and so don't get a nice square end the shank tends to tip leaving an "offset" or malformed head. So its down to hacksawing many rivets - long time slow. Hammering them - work of a second or so with an air hammer, but cutting to length? Any solutions? Or is this just one of the little joys of model engineering? |
| David Clark 1 | 31/12/2011 09:48:38 |
 3357 forum posts 112 photos 10 articles | Hi There
We did a rivet crop in a recent issue of Model Engineers' Workshop.
Don't think it was Model Engineer but could have been.
regards David |
| Brian Price | 31/12/2011 10:23:53 |
| 8 forum posts | Posted by mgj on 31/12/2011 09:38:40:
Next problem - if one is cutting rivets to a length - how to do it quickly? Is there an answer.
I find if I use cutters and so don't get a nice square end the shank tends to tip leaving an "offset" or malformed head. So its down to hacksawing many rivets - long time slow.
Hammering them - work of a second or so with an air hammer, but cutting to length?
Any solutions? Or is this just one of the little joys of model engineering?
Hi Chris If you have a number to do you could make up a piece of scrap plate to the required thickness put a suitable hole in it and then use it as a cutting filling jig.
Brian
|
| JasonB | 31/12/2011 12:28:51 |
25215 forum posts 3105 photos 1 articles | A shearing action works well. Either drill a hole in some plate the thickness of which is the length you require, poke rivit into hole and a sharp coal chisel will chop it to length or you can make a pivoted blade to do the same job.
All the copper rivits on my Fowler were done with side cutters, teh steel/iron ones sawn. On the larger ones for your next project you could make a jig to hold say 4 at a time and do them with a bandsaw, there is a pic somewhere on TT of it being done.
J |
| mgj | 31/12/2011 12:40:12 |
| 1017 forum posts 14 photos | I thought it would come to that. The only problem with the jig (sawing) is that one has to lock the rivets, or they will rotate (I guess) under the saw? Might come to something like sawing roughly and a burst with an angle grinder and sanding disc for length? Or some grub screws. Food for thought - thanks. |
| Terryd | 31/12/2011 13:05:06 |
1946 forum posts 179 photos | Hi MGJ, As Jason and Brian suggested, a piece of plate of suitable thickness with a reasonably accurate hole and a good sharp cold chisel is one of the best solutions. The chisel must be really sharp though. There was an article in the ME a few issues ago which showed the method. If you need longer rivets use the same hole and put a suitable washer under the head for packing or on top as a chisel guide. If you haven't plate of the correct thickness just get a thicker piece than is required and counterbore the bottom for the head of the rivet. You can get different lengths by using several rivet holes in the same plate and adjusting the depth of the counterbores. Regards Terry |
| JasonB | 31/12/2011 13:13:35 |
25215 forum posts 3105 photos 1 articles | 'tis what you need
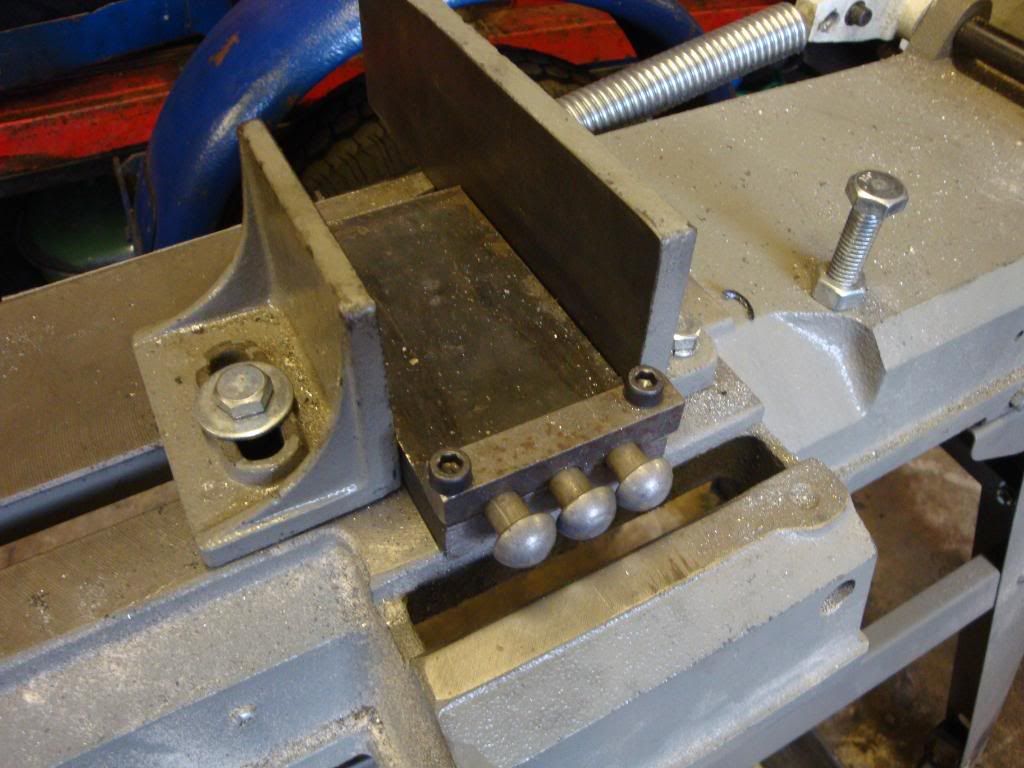 J |
| Terryd | 31/12/2011 13:38:35 |
1946 forum posts 179 photos | Hi MGJ, I just found the article I was referring to and having read the whole article it is well worth reading. It is in issue 4412 of ME by Geoff Holland P346 onwards ("Fairlie Complex"). The explanation of riveting (in both senses of the word) is on p 347 and also has a good explanation of how to make the rivet snap (dolly) and set ('drawing up punch' in 'Geoff speak'). By the way Jason, Geoff also mentions 1.6 times diameter as extra length needed for head, he must have read the same text book as myself, but I'll go with your suggestion. Edit: Hi Jason, I have just found my original source of the 1.6 x diameter formula. It is in K.N. Harris' book "Model Boilers & Boilermaking" published by MAP in1967 which was considered the model boilermakers bible when I bought it originally as an apprentice in '68. Regards Terry Edited By Terryd on 31/12/2011 13:56:33 |
| Brian Price | 31/12/2011 13:44:13 |
| 8 forum posts | Posted by mgj on 31/12/2011 12:40:12:
I thought it would come to that. The only problem with the jig (sawing) is that one has to lock the rivets, or they will rotate (I guess) under the saw?
Might come to something like sawing roughly and a burst with an angle grinder and sanding disc for length? Or some grub screws.
Food for thought - thanks.
Cut a long thin slot in line with the hole with a hacksaw and then when you clamp it in the vice it will grip the rivet. |
| mick H | 31/12/2011 15:01:11 |
| 795 forum posts 34 photos | A gentleman called A. Mellor described an easily made "Hand Rivet Squeezer" in ME 15th May 1987 and a smaller version for riveting the wheels (awkward) of the Minnie traction engine in ME 6th May 1988. I have made both of these tools and they make a very good and easy job of riveting and forming perfect heads on1/16" and 3/32" rivets. I have not tried them on larger sizes. If anyone is interested in this tool, I would be quite happy to forward the articles by e mail.
Mick
|
Please login to post a reply.
Magazine Locator
Want the latest issue of Model Engineer or Model Engineers' Workshop? Use our magazine locator links to find your nearest stockist!
Sign up to our Newsletter
Sign up to our newsletter and get a free digital issue.
You can unsubscribe at anytime. View our privacy policy at www.mortons.co.uk/privacy
Latest Forum Posts
- hemingway ball turner
04/07/2025 14:40:26 - *Oct 2023: FORUM MIGRATION TIMELINE*
05/10/2023 07:57:11 - Making ER11 collet chuck
05/10/2023 07:56:24 - What did you do today? 2023
05/10/2023 07:25:01 - Orrery
05/10/2023 06:00:41 - Wera hand-tools
05/10/2023 05:47:07 - New member
05/10/2023 04:40:11 - Problems with external pot on at1 vfd
05/10/2023 00:06:32 - Drain plug
04/10/2023 23:36:17 - digi phase converter for 10 machines.....
04/10/2023 23:13:48 - More Latest Posts...
- View All Topics
Support Our Partners


Shopping Partners
Subscription Offer

Latest "For Sale" Ads
- Reeves** - Rebuilt Royal Scot by Martin Evans
by John Broughton
£300.00 - BRITANNIA 5" GAUGE James Perrier
by Jon Seabright 1
£2,500.00 - Drill Grinder - for restoration
by Nigel Graham 2
£0.00 - WARCO WM18 MILLING MACHINE
by Alex Chudley
£1,200.00 - MYFORD SUPER 7 LATHE
by Alex Chudley
£2,000.00 - More "For Sale" Ads...
Latest "Wanted" Ads
- D1-3 backplate
by Michael Horley
Price Not Specified - fixed steady for a Colchester bantam mark1 800
by George Jervis
Price Not Specified - lbsc pansy
by JACK SIDEBOTHAM
Price Not Specified - Pratt Burnerd multifit chuck key.
by Tim Riome
Price Not Specified - BANDSAW BLADE WELDER
by HUGH
Price Not Specified - More "Wanted" Ads...
Get In Touch!
Do you want to contact the Model Engineer and Model Engineers' Workshop team?
You can contact us by phone, mail or email about the magazines including becoming a contributor, submitting reader's letters or making queries about articles. You can also get in touch about this website, advertising or other general issues.
Click THIS LINK for full contact details.
For subscription issues please see THIS LINK.
Digital Back Issues


Donate

 Register
 Log-in
Model Engineer Magazine
- Percival Marshall
- M.E. History
- LittleLEC
- M.E. Clock

ME Workshop
- An Adcock
- & Shipley
- Horizontal
- Mill

Subscribe Now
- Great savings
- Delivered to your door

Pre-order your copy!
- Delivered to your doorstep!
- Free UK delivery!
All Forum Topics > Beginners questions > Rivet snap dimensions