Forum sponsored by:

Cutting a Morse Taper
| Wolfie | 29/11/2011 21:28:54 |
 502 forum posts | I'd like to make a tailstock die holder, but I can't work out how to cut the MT2 rear part. My lathe does have a compound slide but looking at the data, I would need to set it to 1 degree and so many minutes which is beyond its capability I think. Anyone point me in the right direction? |
| Steve F | 29/11/2011 21:59:09 |
 101 forum posts 25 photos | Hi Wolfie I can tell you how i did it when i nneded to make a plug for my rotary table. I had 2 morse tapper centres. Chuck a piece material in the lathe and then centre drill. Place a centre in the tailstock and then suspend the other MT2 centre between the tailstock and the centre drilled hole. You can then use a clock gauge in the toolholder and set over the topslide to get the taper of the suspended centre. It takes a bit of time to get it right. It worked great for me. Hope this helps regards Steve PS i am only a beginner and i cant believe i can actulally help someone for a change  |
| ady | 30/11/2011 07:34:32 |
| 612 forum posts 50 photos | Anyone point me in the right direction? I tried a few different systems for my MT1 The best for me was to measure an MT1 which was fine, at the thick end and thin end over a set distance, about 2 inches, 16 turns of the leadscrew on my imperial lathe. This difference in taper diameter (in millimeters) was halved, call it the X-factor Then I fiddled about with a dial indicator and my compound slide until by moving the saddle 2 inches the dial indicator, set against the side of the compound, moved the dial indicator the X-factor distance Make sure everything is snug on the compound, no wobblyness for the cut. Did this a few times now and got a very decent first fit, only needed to polish the taper up with some fine grit paper after that. You'll get a few different suggestions, people have their own way of doing tapers and the best system is the one which works best for you. edit If you do use a profile/tracking system like in the first reply be very careful to track as exactly along the centreline as possible, if you mistakenly track away from the centreline along a cone then it will give you a bad taper. edit2 Because it's pretty fiddly to set up once I get a good one I try and do a batch of 2 or more morse as needed. Tapering out from the chuck towards the tail or the tail towards the chuck needs to be tested out along the full traverse of the cut, you can get fouling issues I haven't done this yet but it ocurred to me that if I needed an MT1 BORE then this would be a great time to drill and bore an MT1 hole. since my male tapers are spot on....by leaving everything set exactly as it is and simply replacing the cutting tool with a boring tool...in theory I'm laffing. Haven't tried that one yet though. Edited By ady on 30/11/2011 08:01:45 |
| _Paul_ | 30/11/2011 07:58:26 |
 543 forum posts 31 photos | Morse Tapers. I cut between centres using a device that sits in the tailstock and lets me "set over" without actually fiddling with the tailstock settings. Using measurements from a printed table I have at home set the correct amount of set over then I make my first taper, "blue" it with a felt marker then use a "jump sleeve" the correct size to check the fit. Normally requires a couple of small adjustments on the set over device and a subsequent skims to achieve an acceptable result. Regards Paul |
| Les Jones 1 | 30/11/2011 08:45:44 |
| 2292 forum posts 159 photos | Arc Euro (and probably other suppliers) sell blank end morse taper arbors. I have considered this option to make a tailstock die holder. I have also considered just making one to fit in a chuck. Les. |
| John Coates | 30/11/2011 09:17:44 |
 558 forum posts 28 photos | Posted by Les Jones 1 on 30/11/2011 08:45:44:
Arc Euro (and probably other suppliers) sell blank end morse taper arbors. I have considered this option to make a tailstock die holder. I have also considered just making one to fit in a chuck.
I thought of this Les and bought one but the machinable stub is too short for the slide rod for my design of die holder (double ended for different diameter dies and about 3" long) |
| Tel | 30/11/2011 09:20:44 |
 157 forum posts 28 photos | The set up looks like this - please note, however, that in this shot the centre is in the wrong way around for what you want to do - I was setting up to cut a 2MT socket at the time! 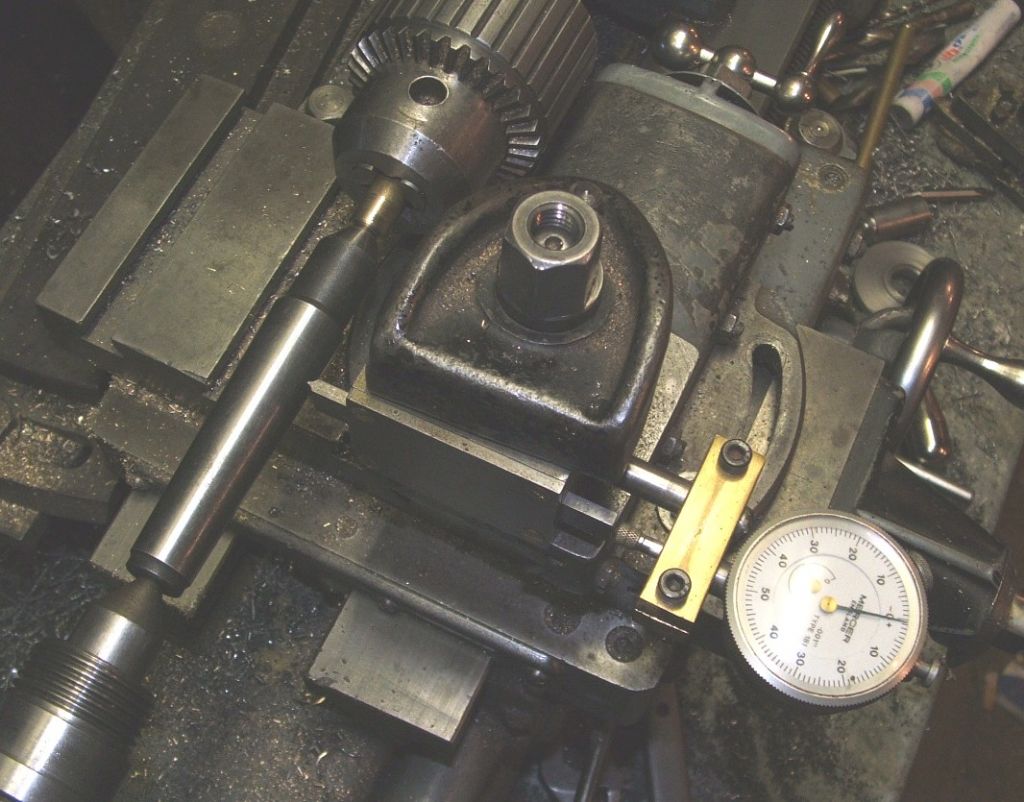 Edited By Tel on 30/11/2011 09:21:53 |
| NJH | 30/11/2011 10:38:26 |
 2314 forum posts 139 photos | Hi John You say:- I thought of this Les and bought one but the machinable stub is too short for the slide rod for my design of die holder (double ended for different diameter dies and about 3" long) I managed this successfully. The stub end is soft so I put the blank end arbor in the headstock morse taper socket and bored out, to the depth of the stub, a socket to take a piece of ground rod which I then secured with Loctite. The die holder is a close sliding fit on this rod - one end is made to hold 1" dia dies and the other 13/16" dies. It has worked well for many years! Learning to turn a taper is useful but, with the price of a blank less thas a fiver, probably not "cost effective"! The bought item also has a nicely ground finish unlikely to be achieved by turning. Regards Norman |
| David Clark 1 | 30/11/2011 12:14:56 |
 3357 forum posts 112 photos 10 articles | Hi There
Drill and ream the blank.
Fit a 10mm or 3/8 bar to it.
Worked for me.
regards David
|
| maurice bennie | 30/11/2011 15:49:32 |
| 164 forum posts 1 photos | Hi Wolfie. Try "model engineers handbook" by Tubal Cain .page 3.2 all the morse tapers from 1 to 7 and many others calculated for you.
Best wishes Maurice
|
| Tel | 30/11/2011 19:21:55 |
157 forum posts 28 photos | OK - a no2 Morse Taper needs an offset of 1° 25' 50" (half the included angle) now, knowing this, how do you go about setting it? With great difficulty for most of us, I suspect, so back to direct setting with known 'good' taper - done carefully this will give spot on results every time. The KISS principal is alive and well, and living in the wilds of Oz. |
| Wolfie | 30/11/2011 19:31:01 |
502 forum posts | Thanks all, useful stuff there. Now I have the ME Handbook and I've just looked at the page in question. OK I'm not sure on terminology but I'm assuming that the taper per inch is the change in radius over one inch from an axis running the length of the metal? A bit like a hill is 1 in 3, is then an MT2 taper 0.04995 in 1 (or 1 in approx 20!) If so then working out the angle via: tan A = opp/adj tan a = .04995/1 = .04995 so tan-1 .04995 = 3.177 degrees Contradicts directly with the figures given here http://en.wikipedia.org/wiki/Morse_taper#Morse which gives a figure of 1° 25' 50" Unless I am misunderstanding what each measurement is..... Edited By Wolfie on 30/11/2011 19:31:56 Edited By Wolfie on 30/11/2011 19:37:59 |
| Tel | 30/11/2011 19:41:28 |
157 forum posts 28 photos | Don't get lost in the numbers Wolfie - just get hold of a known, good, MT2 centre and work from that. |
| AndyB | 30/11/2011 20:40:44 |
 167 forum posts 7 photos | Hi Wolfie,
I do it similar to Steve, but use an adjustable boring head with a straight arbour centre set into it.
Set a centre-drilled (they always are) blank MT arbour in the mandrel and place a centre between it and in the boring head centre (point facing the headstock). You will need to use a drive plate and dog to turn your stock.
Adjust the boring head towards you until the side of the centre clocks true along its length.
The reason for winding it towards you is that you can cut towards the wide end using the leadscrew so giving you a finish point so you know that it is the correct length and width. You don't have to worry about setting over the topslide.
Don't forget, if you copy a centre then the length of the centre is the only true taper!
Then centre drill your stock and place it in a centre in the mandrel and the boring head and away you go.
I am slow at setting up and don't do it very often so it takes me about 10 minutes before I am ready to cut. I think that is pretty good, especially as my maths is crap!
Works for me every time; I have made 1MT tapers, one with a screwcut nose to fit a chuck to my rotary table and a 2JT taper for mounting a drill chuck on a tapping tool. Sits perfectly true.
Andy |
| Harold Hall 1 | 30/11/2011 22:00:14 |
| 418 forum posts 4 photos | The method suggested Wolfie, using a second taper between centres, is without doubt the easiest, that providing you have a second taper and you do need one for each Morse taper being cut. I do accept that a temporary taper could be turned on a piece of metal held in the lathe's three jaw. If you do not have a suitable second taper, or wish to machine some other precise value, then the method I use may be of help. A test piece is required enabling two diameters to be measured at a given distance apart ensuring the difference lines up with the taper required. Having made the test piece it can then be used every time you make that particular Morse, or other, taper so that it is easier second time round. The method is illustrated here I do like Tel your method of extending the reach of you dial indicator. Harold Edited By Harold Hall 1 on 30/11/2011 22:26:34 |
| Andrew Johnston | 30/11/2011 22:46:36 |
 7061 forum posts 719 photos | The maths goes like this: the taper quoted is actually the change in diameter over an inch. So for one half of the taper the decrease in radius is half the given value. Taper per inch (on diameter) = 0.04995 Taper per inch (on radius) = 0.024975 tan-1(0.024975) = 1.4306647° Which in real money is 1° 25' 50.39" Regards, Andrew |
| dcosta | 30/11/2011 23:47:11 |
| 496 forum posts 207 photos | Hello Wolfie. Please take a look at my tailstock die holder here: http://www.model-engineer.co.uk/albums/member_photo.asp?a=18517&p=305494 My starting point was a MT2 taper I bought from Chronos (?). Please note the rod glued (and pressed) into the MT2 is hollow allowing me to do longer work. Rehgards Dias Costa |
| Wolfie | 01/12/2011 00:32:17 |
502 forum posts | Thank you all again, loads to go on there. OK assuming I buy a couple of blank tapers, how do I hold them in the chuck to drill and ream them out? |
| Tel | 01/12/2011 00:34:57 |
157 forum posts 28 photos | Thanks Harold - that gadget has the added advantage, not really obvious in the pic, of the blade being about 3/8" wide, set vertically, so that, within reasonable limits, you are not concerned with setting it on centre height - one more little simplification to the process! AND I was working on one of your projects at the time!   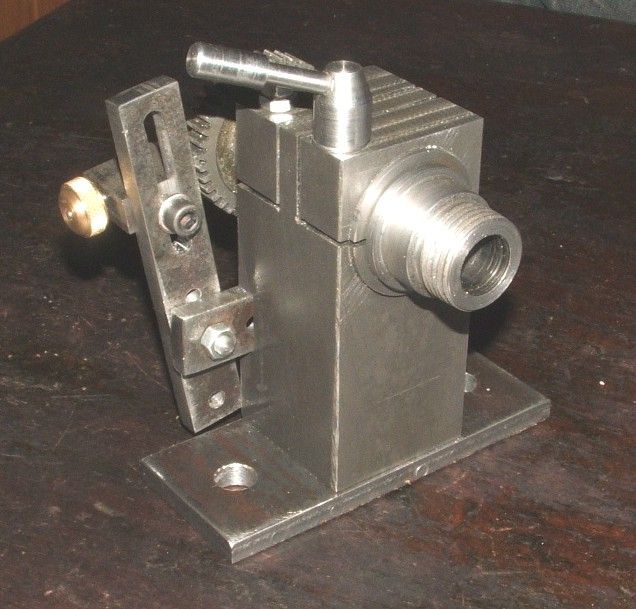 Edited By Tel on 01/12/2011 00:41:41 |
| David Littlewood | 01/12/2011 02:01:45 |
| 533 forum posts | Wolfie,
Surely the best method is to put the taper itself in the headstock. That is (a) the easiest way, and (b) the one that gives you the very best degree of concentricity. However, it would be better to buy a blank which has a threaded bore at the tail end so you can hold it in place with a drawbar, otherwise light cuts will be essential.
David |
Please login to post a reply.
Magazine Locator
Want the latest issue of Model Engineer or Model Engineers' Workshop? Use our magazine locator links to find your nearest stockist!
Sign up to our Newsletter
Sign up to our newsletter and get a free digital issue.
You can unsubscribe at anytime. View our privacy policy at www.mortons.co.uk/privacy
Latest Forum Posts
- hemingway ball turner
04/07/2025 14:40:26 - *Oct 2023: FORUM MIGRATION TIMELINE*
05/10/2023 07:57:11 - Making ER11 collet chuck
05/10/2023 07:56:24 - What did you do today? 2023
05/10/2023 07:25:01 - Orrery
05/10/2023 06:00:41 - Wera hand-tools
05/10/2023 05:47:07 - New member
05/10/2023 04:40:11 - Problems with external pot on at1 vfd
05/10/2023 00:06:32 - Drain plug
04/10/2023 23:36:17 - digi phase converter for 10 machines.....
04/10/2023 23:13:48 - More Latest Posts...
- View All Topics
Support Our Partners


Shopping Partners
Subscription Offer

Latest "For Sale" Ads
- Reeves** - Rebuilt Royal Scot by Martin Evans
by John Broughton
£300.00 - BRITANNIA 5" GAUGE James Perrier
by Jon Seabright 1
£2,500.00 - Drill Grinder - for restoration
by Nigel Graham 2
£0.00 - WARCO WM18 MILLING MACHINE
by Alex Chudley
£1,200.00 - MYFORD SUPER 7 LATHE
by Alex Chudley
£2,000.00 - More "For Sale" Ads...
Latest "Wanted" Ads
- D1-3 backplate
by Michael Horley
Price Not Specified - fixed steady for a Colchester bantam mark1 800
by George Jervis
Price Not Specified - lbsc pansy
by JACK SIDEBOTHAM
Price Not Specified - Pratt Burnerd multifit chuck key.
by Tim Riome
Price Not Specified - BANDSAW BLADE WELDER
by HUGH
Price Not Specified - More "Wanted" Ads...
Get In Touch!
Do you want to contact the Model Engineer and Model Engineers' Workshop team?
You can contact us by phone, mail or email about the magazines including becoming a contributor, submitting reader's letters or making queries about articles. You can also get in touch about this website, advertising or other general issues.
Click THIS LINK for full contact details.
For subscription issues please see THIS LINK.
Digital Back Issues


Donate

 Register
 Log-in
Model Engineer Magazine
- Percival Marshall
- M.E. History
- LittleLEC
- M.E. Clock

ME Workshop
- An Adcock
- & Shipley
- Horizontal
- Mill

Subscribe Now
- Great savings
- Delivered to your door

Pre-order your copy!
- Delivered to your doorstep!
- Free UK delivery!
All Forum Topics > Beginners questions > Cutting a Morse Taper