Forum sponsored by:

Michael Cox Tangential Tool Holder- MEW 179
| mick H | 22/08/2011 16:18:56 |
| 795 forum posts 34 photos | I made a tangential toolholder as described by Michael Cox in MEW 179, over the weekend. The toolholder performs well and eliminates most of the chatter that I get on my light lathe. It also gives 40 thou cuts with no problem, an excellent finish and is recommended.
However, a strange thing did happen that I hope someone can throw some light upon. I had taken the toolbit out of the holder to hone it but when I replaced it, I inadvertently put it in upside down - it was getting late and I should have gone to Specsavers long ago - which meant that the cutting edge exposed was just the slanting cut that one usually gets on HSS bits. It cut exceptionally well - probably as well as the properly ground toolbit. That is not the end of the tale however, because when I realised that the cutting edge looked the wrong shape I compounded the error by turning it through 90 degrees so that the cutter had a positive side rake and cut again. The result was an incredibly fine finish although the depth of cut was limited to about 10 thou.
Whatever the explanation I am inclined to make another holder so that I have one to hand for roughing and one for that finish
|
| mick | 22/08/2011 17:18:31 |
| 421 forum posts 49 photos | The ground angled face on HSS tool bits was always intended to be a front clearance angle to save you grinding one on, at least thats what I was told by my instructer, although I've always thought it to be too much, as 8 to 10 degrees is considered to be about right. The more top rake you apply to a finishing tool, the better the surface finish, so if your tool bit's rake angle is indeed the front angle, this might explain it, as all the cutting edges are in fact factory ground, which is a far smoother edge that most workshop regrinds can produce. |
| Michael Cox 1 | 22/08/2011 18:06:18 |
| 555 forum posts 27 photos | Glad you like the toolholder. Thanks for the interesting comments regarding the orientation of the toolbit. I will make some trials myself when I get time to understand what is going on.
Mike |
| chris stephens | 22/08/2011 18:35:45 |
| 1049 forum posts 1 photos | Hi Mick H,
Welcome to the wonderful world of tangential tooling, good aren't they.
You might find that honing a tangential tool bit to be a waste of time, as they seem to work better when used straight from the grindstone, provided that your stone is not too coarse, of course. I have tried using a diamond wheel on the Quorn in the hope of an even better cut and was disappointed, and I believe I am not alone in this conclusion.
I don't know which sharpening jig you are using but the 30 degree "V" block gives a better cutting tool than the commercial variety, it's all a question of which way the grinding striations run. The commercial jig is very good for sharpening thread cutting tools. The two items are at the bottom of the picture are the two styles of jig.
 You might find that by putting a radius of about 0.4mm on the toolbit gives a very good finish and can also be used for roughing, it also reduces sharp corners that can cause problems in some situations.
chriStephens
|
| ady | 22/08/2011 20:41:09 |
| 612 forum posts 50 photos | I used to do a lot of experimentation. The best cut I ever got was the toolbit pointing upwards 45 degrees from the back. The swarf dropped off while it lasted, it diverted the steel like it was wood shavings. Very difficult and fiddly to set up and replicate though, I gave up on it eventually. For boring I use "self sharpening tooling" If I cut upside down on the far side again, and cut slightly above centre height. The tool squeaks slightly and "lasts forever" as the cutting edge and the hss material below the cutting edge(above actually, because it's upside down) is ground away by the workpiece, very handy for roughing out a big bore. The books tend to give you the basics but there's a lot they don't bother getting into because production line techniques are only about established practices. The smaller the angle used to remove metal the less work required to do the task, less heat, less wear and tear etc, but harder to lose heat if it's too acute, and can't do bigger cuts fascinating stuff. Edited By ady on 22/08/2011 20:57:12 |
| mick H | 23/08/2011 07:52:38 |
| 795 forum posts 34 photos | Mike Cox, yes I am very pleased with the holder. I made it from half a G clamp which was past it's best, which I picked up from a car boot sale for about 20P. It saved me having to chomp through half inch mild steel...and I've still got the other half to make another one.
I do find it quite bizarre that I can put a tool in upside down and back to front so that there is positive side rake and still get a finish as good as any I have ever managed to achieve with conventional tooling! I suppose that is part of what Chris calls calls a wonderful world and Ady calls fascinating stuff!
Chris asks what sort of sharpening jig I am using, but the answer is, I haven't made one yet......I shall no doubt have to do so, but as I say above, initial results did not make it a priority.
|
| Martin W | 23/08/2011 10:47:07 |
| 940 forum posts 30 photos | Hi
I also made one of these just to see if there were any benefits from using a tangential tool system. My experience reflects that of others in so much that it was easy to obtain a good finish on all materials I tried. The only draw back with Michael C's design is that the tool securing screws can get in the way if taking a deep cut up to an edge. Other than that, the tools sharpening is simple especially as I already had a piece of steel with a 90 deg slot cut in it. Angle it approximately and slide the tool bit to the grind wheel and the jobs done.
I tried rounding the tool tip profile to see if I could get an even better finish but the results were variable and on steel seemed to generate much more heat even after honing the tip, cutting edge set true to turning centre. I have probably upset the geometry some where so will re-grind to a fine tip and try again when time permits.
Overall it is easy to make, simple to sharpen and cheap to run; what more could anyone ask for from a bit of kit.
Cheers
Martin |
| jomac | 23/08/2011 10:49:35 |
| 113 forum posts | Hi. same subject, different material. Iv'e got in my workshop a 2 meter long wood lathe, cause besides bowls,newel posts,etc etc, I also made and sold snooker cues, one of the flat HSS tools is 800mm long, it has a 30mm wide and 10mm thick blade, the straight edge of the tool is angled about 15 degrees and a wedge shaped cutting edge. If I place the tool tip on the work at about 35 degrees lower the tool so that the heel touches the work then slowly lift the handle up the tool starts to cut, Because the angle of the cutting edge is now about 15 degree to the vertical, I can cut very very thin shavings and dust. ( the finish is perfect and does not need sanding} now if I turn the tool tip so that the angle is 30 degrees I can take deeper cuts, that if you are not careful can result in a rippled affect. and some times a dig in. OK think about it,?????, When using my home made tangental tool, with 1/4" round I get a good finish, some times better than the square tool, if I turn the tool clockwise (as seen from the top) lift the tool slightly, so that the cutting edge is on the center line, its like my wood turning chisel. Ultra fine shavings/chips, and the angle of the cutting edge is near vertical. So play around with you settings, until you arrive at a good compromise. Its interesting and fun just experimenting. John Holloway. |
| ady | 23/08/2011 12:16:44 |
| 612 forum posts 50 photos | The best basic setting cutting tool I have, came attached to something I bought (can't remember now) It does a great job.  |
| jomac | 23/08/2011 13:31:19 |
| 113 forum posts | Chris Hi, nice looking toolholder, very proffesional gear. When I made my toolholder I offset the front by 15 degrees, as my mill was out of order I grooved and welded up the parts, next one I will machine on the mill, (when I get time) take photos and try to add to posts (not really conversant with that at the moment). Any way when testing out the tool, I was taking off 4mm in one pass, which is not bad for my Hercus, (South Bend style) then I upped the ante and found that the toolbit was dropping under the increased pressure, so I drilled and tapped the holder to take 2, 6mm, cap screws, since then Iv'e had no problems. As I said in previous post, rotating the round tool bit clockwise, and then raising it a bit so that the side of the bit is at center line, it acts like my woodworking chisel, ie the front of the tool is nearly rubbing on the work, thus NO dig in's, try it and let us know if you have any problems, I might have been just lucky. John Holloway |
| John McNamara | 23/08/2011 13:47:25 |
 1377 forum posts 133 photos | Hi All
HI Jomac from Jmac. And I notice you did something similar with wood.
A while back with my old lathe a Colchester plain bearings, flat belt drive and no gearbox just change gears model dating from the 40’s. I experimented with a shearing rather than a cutting tool. The old lathe was a bit past its prime and the maximum speed was rather low. I wanted a fine finish. I had read of shearing tools. Imagine grinding a flat chisel point right across the cutting edge of a HSS tool; to clarify at 90 degrees to the length of the tool, as if you were making a wide parting or grooving tool. The tool did have top rake and clearance for steel. Now the interesting part: Rotate the tool so that the cutting edge is at almost but not quite 90 degrees (Almost vertical). As the work rotates the cutting edge is lead into the work, the swarf was quite different to normal, coming off as thin slivers that formed a sort of thread. Like very fine steel wool, soft to the touch. If you think about the geometry of the setup; the actual cutting area was only in the centre of the tool where the radius of the work piece contacted the centre of the chisel edge. Using this method the long axis of the HSS tool bit itself is at 90 degrees to the work both horizontally and vertically and it is fed straight in. The rotation of the cutting edge to the work and its relief angles are the only variables.
A very fine finish resulted. I was only removing very small amounts of material maybe .001 to .003 at a time. Reading this thread reminded me of the experiments. At the time I used square inserts, this required grinding the very fine angle. It would be interesting to use a piece of round HSS and vary the cutting/shearing/scraping angle (I joined them together because there is a bit of everything in this setup.) Has anyone else in this place read of or experimented with similar tools?
Cheers John Edited By John McNamara on 23/08/2011 13:54:42 Edited By John McNamara on 23/08/2011 14:13:02 |
| John McNamara | 23/08/2011 14:23:20 |
1377 forum posts 133 photos | Hi All
I did a bit of googling using Others have been doing research too.
Cheers
John
|
| chris stephens | 23/08/2011 15:15:02 |
| 1049 forum posts 1 photos | Hi to the two Johns
If you raise the tool bit a touch above centre height, and cut backwards, you get a shearing cut which will give a very good finish. In fact if you make a cut in the normal way and then cut backwards, without withdrawing the tool, on the penultimate cut and measure then take the final cut again cutting backwards afterwards, you will get a more accurate cut. What happens is that on the back cuts you take any spring out of the tool in a consistent way. Readers who have Shaublin or Hardinge lathes can ignore this recommendation but for us mortals it is worth giving a go.
Back in the fifties there was a small article in ME about making a shearing cut tool. The tool was very much like a "D" bit, but instead of the flat being in line with the axis there were a few degrees of positive rack. The tool in use was turned in the tool post so the cutting edge was anywhere between the 1 & 2 o'clock position. The recommended depth of cut was given as about 1 thou and then it will give shavings like fine wire wool.
If any of you chaps reading this wonder why a good finish appears to be of so much interest, well you can't accurately measure a rough surface as you can only measure over the peaks, which will soon wear down in use.
chriStephens
|
| John McNamara | 23/08/2011 15:45:28 |
1377 forum posts 133 photos | Hi All
It looks like GMTA....
Link here:
Cheers
John |
| chris stephens | 23/08/2011 17:18:38 |
| 1049 forum posts 1 photos | Hi John,
The one I was describing is the same as at the bottom of the second link.
I would have posted a copy of the ME article but I did not want to upset the "keeper of the blue pencil" even more than I seem to have done already in recent times.
chriStephens
|
| chris stephens | 23/08/2011 18:05:52 |
| 1049 forum posts 1 photos |
Hi Martin,
To over come your problem, can you lower the tool holder and then raise the cutting tool, this will give you a touch more side clearance.
chriStephens
|
| mick H | 02/09/2011 08:28:37 |
| 795 forum posts 34 photos | I have delayed making the grinding jig for Mike Cox's toolholder because my freehand efforts have been pretty successful. I am now ready to do the job properly but having reread the article, I cannot find any reference to the angle of the channel in the grinding jig. From the photos it looks as if it is about 60 degrees. If that is the case, then it occurs to me that there are three ways that the toolbit could be held in the jig. ie one side of toolbit against the left side of the channel, one side of the toolbit against the right side of the channel or the 90 degree angle of the toolbit centred over the centre of the channel. If the angle of the channel is 90 degrees then of course there is only one option.
I wonder whether Mike or someone more in tune than I am can assist with this. I hope the verbage above is reasonably clear. I did draw a diagram but I can't seem to attach it.
|
| John McNamara | 02/09/2011 09:06:22 |
1377 forum posts 133 photos | Hi Mick H
There is another way to attach a photo, use a free file sharing site. I use a site called Mediafire. Once you have posted a file there, copy the link URL by pressing the copy button in Mediafire and then move to the MEW “Post a reply” window and click the image icon at the top (second from the right, like 2 blue hills with a sun above); a window will pop up asking for the URL…You already have it on the clipboard so just right click paste it in and close the window. Done…It will appear in a few seconds. There are many other free sites. I chose this one because at the time it looked OK, that was about 6 months ago…I still use it. It is also handy for making large files that you cannot email available to friends. Just upload and send them the link to download it. Files are not made public. The only access is via the link, you control who you give it to. (You can also share entire folders of files, great for family photos) The make their money from the advertising on the pages. Annoying but they have to eat. There is a paid account as well then there is no advertising and you get an even bigger file quota.... There are a lot of sites offering similar services, have a look around the web. Cheers John See screenshot below use the “direct link” selection. For those wondering how I grabbed the screenshot and put the red arrows on it? I used "Snagit"...easy to find on Google. I cannot recommend Snagit too highly. It has made copying , snipping and marking up a pleasure instead of a chore.
All you do is press The print screen button on your keyboard, drag a box arount the part you want and click, it will pop up in a window yo can edit with arrows etc, or comments then press save and it is ready as a JPG file. or press copy and you can paste it directly in an email.
 Edited By John McNamara on 02/09/2011 09:18:57 |
| mick H | 02/09/2011 09:23:16 |
| 795 forum posts 34 photos | Thanks for the tip John, I shall download it later.....the problem that I have though is that when I click on the "hills and sun" icon, the screen goes a sort of pale blue and freezes. I am not much good in the workshop.....even worse on computers. I think that I am in the wrong century. |
| Gary Wooding | 02/09/2011 09:33:22 |
| 1074 forum posts 290 photos | 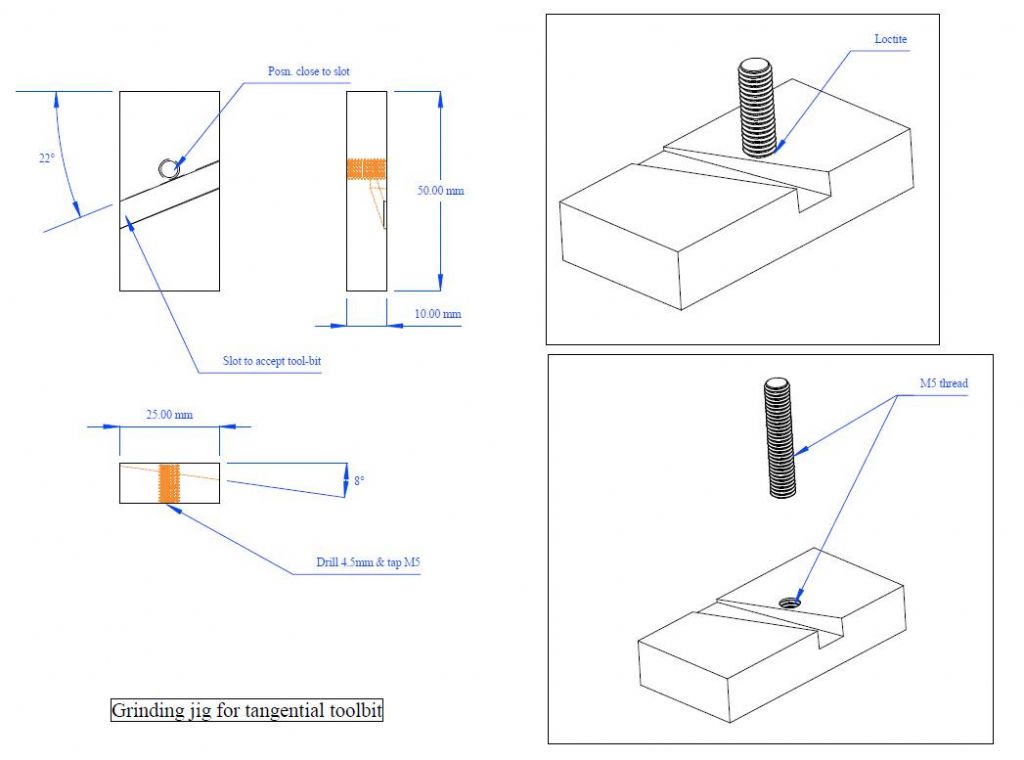 Is this what you wanted? |
Please login to post a reply.
Magazine Locator
Want the latest issue of Model Engineer or Model Engineers' Workshop? Use our magazine locator links to find your nearest stockist!
Sign up to our Newsletter
Sign up to our newsletter and get a free digital issue.
You can unsubscribe at anytime. View our privacy policy at www.mortons.co.uk/privacy
Latest Forum Posts
- *Oct 2023: FORUM MIGRATION TIMELINE*
05/10/2023 07:57:11 - Making ER11 collet chuck
05/10/2023 07:56:24 - What did you do today? 2023
05/10/2023 07:25:01 - Orrery
05/10/2023 06:00:41 - Wera hand-tools
05/10/2023 05:47:07 - New member
05/10/2023 04:40:11 - Problems with external pot on at1 vfd
05/10/2023 00:06:32 - Drain plug
04/10/2023 23:36:17 - digi phase converter for 10 machines.....
04/10/2023 23:13:48 - Winter Storage Of Locomotives
04/10/2023 21:02:11 - More Latest Posts...
- View All Topics
Support Our Partners


Shopping Partners
Subscription Offer

Latest "For Sale" Ads
- Reeves** - Rebuilt Royal Scot by Martin Evans
by John Broughton
£300.00 - BRITANNIA 5" GAUGE James Perrier
by Jon Seabright 1
£2,500.00 - Drill Grinder - for restoration
by Nigel Graham 2
£0.00 - WARCO WM18 MILLING MACHINE
by Alex Chudley
£1,200.00 - MYFORD SUPER 7 LATHE
by Alex Chudley
£2,000.00 - More "For Sale" Ads...
Latest "Wanted" Ads
- D1-3 backplate
by Michael Horley
Price Not Specified - fixed steady for a Colchester bantam mark1 800
by George Jervis
Price Not Specified - lbsc pansy
by JACK SIDEBOTHAM
Price Not Specified - Pratt Burnerd multifit chuck key.
by Tim Riome
Price Not Specified - BANDSAW BLADE WELDER
by HUGH
Price Not Specified - More "Wanted" Ads...
Get In Touch!
Do you want to contact the Model Engineer and Model Engineers' Workshop team?
You can contact us by phone, mail or email about the magazines including becoming a contributor, submitting reader's letters or making queries about articles. You can also get in touch about this website, advertising or other general issues.
Click THIS LINK for full contact details.
For subscription issues please see THIS LINK.
Digital Back Issues


Donate

 Register
 Log-in
Model Engineer Magazine
- Percival Marshall
- M.E. History
- LittleLEC
- M.E. Clock

ME Workshop
- An Adcock
- & Shipley
- Horizontal
- Mill

Subscribe Now
- Great savings
- Delivered to your door

Pre-order your copy!
- Delivered to your doorstep!
- Free UK delivery!
All Forum Topics > Workshop Tools and Tooling > Michael Cox Tangential Tool Holder- MEW 179